

Tamiya P-51D Bare metal jacket


This will be so exciting to build, as the detail and precision of the parts is spectacular.


The lower crank case assy I will be masking off with latex and spraying semi gloss black. Then I will pick out every bolt head with a chrome pen, as in the real engines built by Rolls.

Each sub assy will be totally devoid of any seam lines or excess glue 'push out'.

The final assy of the engine will depend on what I can paint and fit the 'BIG ED' material to.

The first of many many 'dry fit' situations.


You will notice the 'Brass 'oil' pieces, and as these are meant to be in an obvious position, I have decided to make my own oil pipes, as you will see.

These look more life like being 3D in effect. It took some time but will be a good grounding for all the other hydraulic lines and wiring I am yet to do.

There are some ejector pin marks that can be overcome, but thankfully, the glue I use is so much better than Tamiya and takes very little time to truly cure and set.


About 20 pieces go into the assy of this unit. !


Compared to the eduard flat brass, my scratch made piping is more real, almost the 3D look.


The eduard seat belts are just stunning. !


The facia black pannel is now in place after removing a whole lot of the kit detail, but so worthwhile.


Never, in a million hours of looking, could you retrieve this from the carpet monster. ! EVER.


This is yet to be sprayed matt black, after some careful masking off.

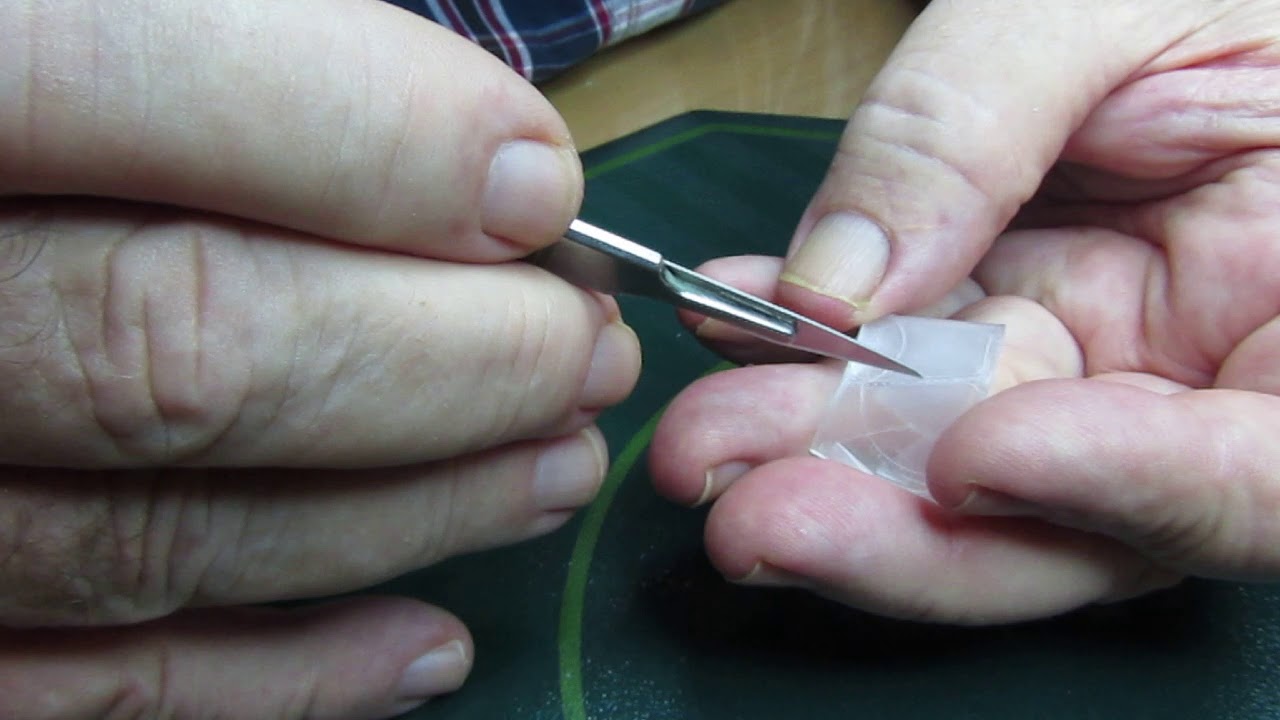
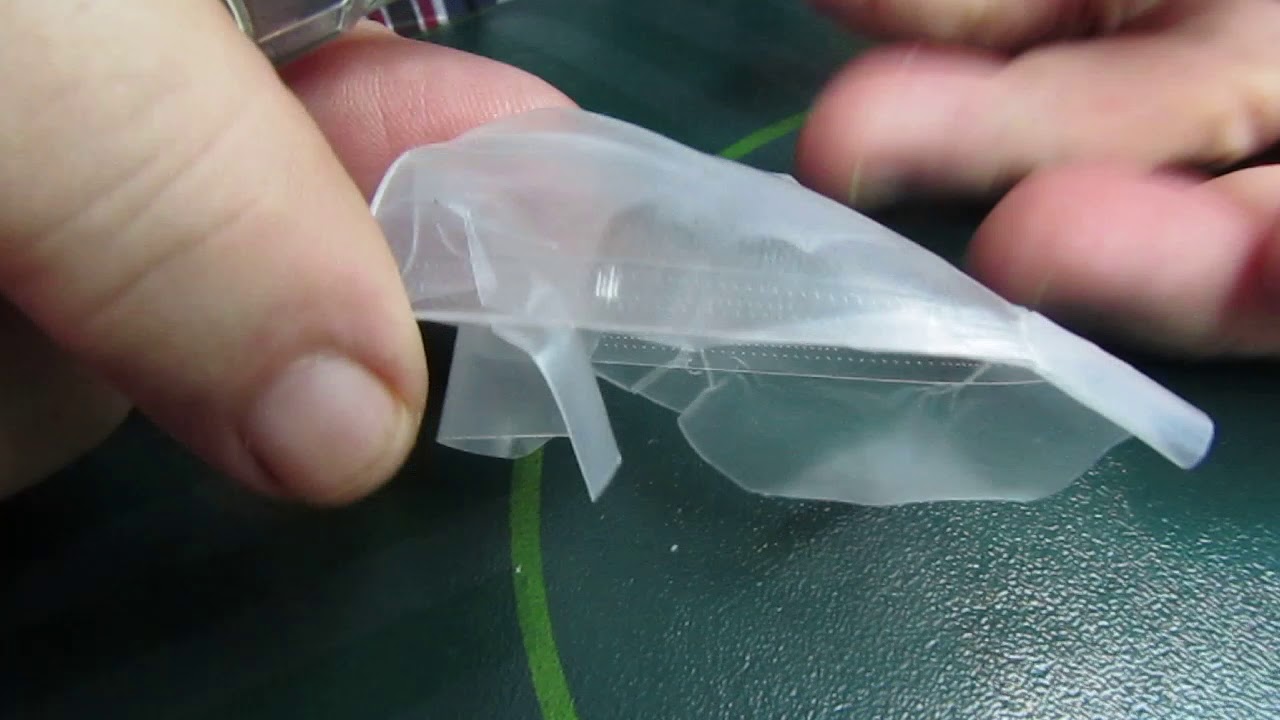
These covers are wafer thin to begin with, but to then shave away the areas that will take the brass is quite daunting

Thie first was a really interesting thing to do. It is exact,and there can't be any out of alignment

I cleaned away any excess CA glue.


I sanded the bras to smooth off any CA that found it's way onto the areas I needed clean.

Dry fit, and thankfully I shaved away just the right areas that had to be removed

These items are meant to be 'recessed', but just the right amount.


Semi gloss black, with every nut and bolt head picked out silver with AK interactive wax paint.


The next time you will see the supercharger, it will be all connected with oil and pressure lines.

The sump pan and the reduction gear casing were buffable metalizer.

These images are way too dark. Next lot in the sun. !


This is the remains of the TAKOM King Tigre etched metal parts, and part of that had 4 uniform insignia for the crew's uniforms, But I found a good use for it. Desperation make you do crazy things. LOL

RED indicates what has to be removed before applying the photo etched.

All cleaned away and ready for the brass bits.

Ready to GO. !


Before I assembled these doors, I worked out where the wiring in the wheel well was to be located and wether I had a clear area and missed the stainless steel plates that were in the assembly, and all was good.


These are 'temp'. Just to make sureI had the right location for the main electrical cable (The twisted one)and the rudder control pulley wires were in the right location, which will be removed and replaced when the doors with the drilled holes for cables.

All wires and cables are now in place. Next comes the springs on te doors and fluid lines.

Preparations for the painting of the zinc chromate.

Being pedantic.


Darker that what is called out in the instructions. But I am happy to say it's as close as I want.


All the cockpit interior is finished and ready for assembly.

There was a lot of parrafilm used in the masking off of the areas that had either aluminium or zinc chromate.


The red paint worn off the seat adjuster lever will be replaced.


The 'coms' switches for the pilots head set.


This is the damage caused before I could get all the parts out of my acetone spill. Sadly, some acetone actually got into a couple of bags that were not fully zipped closed.


This is the former 'gun bay'. As I had to remove the whole assy to retrieve the PE I could use on a kit I have coming.

I kid you NOT. Milliseconds of exposure did this.

This is the remains of the two gun bays, having had to drop them in acetone to get a 'melt' happening for the retrieval of the PE. NOT a pretty sight. 🙁

Thankfully, ALL of the PE was retrieved and cleaned in acetone......of all things. LOL

Before I realised that the acetone had actually got into some bags, this was the effect. Only discovered after I started looking at the places I needed to clear the acetone from. BUMMER. !

As of 10.27 AM Quensland time, I have a new kit from Toyworld @ Australia Fair for the rip off price of $180.00 Au.

And THEN. If things couldn't get any better. The 'Pacific Theatre' P-51 K arrives from Japan Plaza.

Hurredly, I got to cutting away the wrapping paper to find.................................................

The beast. hahahahahahahahahahaha

Isn't she lovely. ? I am a so heppy. !!!

All present and accounted for. 🙂

NOW, I have what I have always wanted....................My own hangar full of fine animals.


Spelling mistakes abound. ! Lines that was meant to be. 😉


Some fine work with a hairy stick will be required for the overall appearance to improve some what.


All the connectors will be loaded with gel glue and silver paint ready for the 'anodised' red, blue and gold connections.

A lot of what you see here will be 'adjusted' to make it look more like the real paths and bends the plumbing has. AWIP you might say.

Since I posted this image. The big pipe from the box has been re adjusted to follow what is in the images I am working from.

This was a hoot. ! Wound piping was used to reduce the fatigue of the braised joins on the knuckle fasteners.

In the last four images, you will see the difference in the position of these pipes, more to the outside and lower.

The ignition 'wiring' is not installed yet, but it will be. 🙂


These oil supply lines are scratched built, as the EDUARD lines were flat and featureless, but these give it all a 3D look.

This is a big change from the way It is supposed to be built according to the instructions, having placed each exhaust pipe right on the engine block rather than the shield supplied.

underneath and behind the exhaust stacks you will see that ignition 'wiring' installed.

Now the larger copper pipes are in their correct positions, closer to the frame and lower for easier access.
Comments
1 27 March 2019, 04:58
I ordered the Tamiya kit through a company in Hong Kong called "Lucky Models", and landed here in two weeks for Au $104.00, yet to buy it through any store in Australia, I was looking at Au$160.00. THEN, all the brass was $104.00....................go figure. 🙂 👍
27 March 2019, 05:04
Lucky Models is an awesome shop with really nice prices overall😉
Btw count me in for this project
27 March 2019, 06:46
Whooooo with all bells and whistles! I am in! Got the kit at home, too!
27 March 2019, 07:47
Thank you all my friends. 🙂 👍
This makes three builds on my bench.
The F-100D, The P-38 and soon, the 'tang'. 😉
It's nice to get back to the hangar if you get my drift. 🙂
Mostly, these will be for the 'Nationals' held in Melbourne next year.
To have blokes like David Dalton, the mariatime Aussie champ and Peter Hardy as my friends and motivators, it's not hard to keep grounded and focused on what makes the effort all worthwhile. 👍
27 March 2019, 08:54
We demand a group-photo from you and Peter!😉 With a beer. But keep your shirts on.😉
27 March 2019, 09:14
I'll take a seat 🙂 don't forget to breath while playing with the bigEd😉
27 March 2019, 18:58
Looks like this one is gonna be etch city! I've had excellent service from Lucky Model...
27 March 2019, 19:12
I should be charging 'admission' here. Jeez, I'd make a bloody fortune. ! hahahahaha 🙂 🙂 🙂
It has just hit me what I have let myself in for here. !
BMF and etch all in one giant leap. !!!!!!👍
But I do like an audience though. :-/
27 March 2019, 20:41
Well I figure by the time I get there you'll have partaken of the other half!
28 March 2019, 00:58
This is going to be a build like no other I have ever done. Details are all the go now, so that I can do.
7 April 2019, 07:50
Enjoying this Kez, kinda thrilling watching it all come together. Looks like a beautiful kit too.
7 April 2019, 07:55
Peter and Monkeyhoar thanks for the vote of confidence lads, but I promise you wont be dissapointed in what I have planned for the engine. 🙂 🙂🙂
This is the third of the Tamiya mustangs now, and this I will devote a lot of time and energy too. 👍
7 April 2019, 09:01
It is a plumbers liquid glue. It's clear and like Tamiya and like water. MEK. It's used by plumbers to 'prep' a pvc pipe before the blue bonding agent is used.
I prefer it because it dries really quickly.
'bonds' really hard.
It doesn't 'chew' into the plastic like Tamiya if you over administer, but is so much easier to use.
If you do get any 'over flow', the affected area can be cleaned up in a matter of seconds without a whole lot of softened plastic getting in the way.
This link is all about MEK.
railpage.com.au/f-p1345185.htm
Also Bryn. I decant a small amount into a empty Tamiya glue bottle for convenience.
Like any solvents, make sure you ventilate your work area too.
Just to be on the safe side.
8 April 2019, 17:21
I run a chain of plumbers merchants & we stock several brands of Methyl Ethyl Ketone, the American ones are the best. Come in 125ml & 250ml screw top cans.
8 April 2019, 17:44
In my humble opinion, it is the very best type of liquid glue one can use. I love it. 🙂 👍
8 April 2019, 20:04
I have a liter of that stuff with a pipette to go. Love it absolutely!
13 April 2019, 04:22
Holger. You have to admit that it is WAY better than any other liquid glue you have used. And dries and bonds so quickly too. ! 👍 😉
13 April 2019, 05:37
I admit everything... 😉 But MEK is absolute a super stuff!
But take care of your finger prints! They burn faster in the styrene than you want to. 😎
You say, you apply it from an old TTC bottle? Thats a good idea! I will try that, too! Actually i apply it with this:
scalemates.com/kits/..w-applicator--233203
13 April 2019, 07:10
Wow. I have never seen one of those. !
I 'discovered' MEK when I went to a railroad modellers exhibition in Brisbane about three years ago. !
Having asked a retailer if he had something else I wanted, and he said he had something else I may want to try. !
And from that moment on, I have used nothing else.
13 April 2019, 08:53
Kerry in respect of picture 55 - "Semi gloss black, with every nut and bolt head picked out silver with AK interactive wax paint". Was that using AK True Metal applied as a dry brush?
13 April 2019, 09:14
Richmond. I used the tip of a bamboo skewer to apply the AK tube wax paint and a black artists pen to correct any over paint.
13 April 2019, 11:07
The Touch -n-Flow applicator is awesome, it gives you greater control!
13 April 2019, 11:46
All care and dedication to a good end, and no brushes were involved, as it was a case of dip the sharp bamboo skewer in the silver AK Interactive tube paint, enough to leave some of it where placed without it running all over everything else. 😉
13 April 2019, 12:21
Good morning every one. 🙂
And to Michael Hickey especially, I do apologise for not saying my thank you to you for your kind words on my build progress. Thanks mate. 😉 👍
And to Lode, Richmond, Clifford and Nathan, I say thank you too gentlemen. 🙂 👍
Now, back to the subject of preferred glues and the benefits there of. ! 🙂
Besides MEK being a wonderful glue in the way it performs as an adhesive. 👍
The other advantage is that IF you make the mistake of touching any surface and the glue manages to make it under your finger and leaves behind any mark/mess.
That damage is immediately repairable and you will find virtually no visible damage remains.
Unlike the tamiya glue that really eats into the plastic. The MEK evaporates instantaneously.
MEK will also let you hold parts together for just a few seconds, to achieve a bond that will hold, where as, the Tamiya join will take ages to 'go off' or cure, forcing you to clamp a lot of joins and wait ages before you can get back to working on your build.
MEK still allows you that opportunity once you have applied the glue, to 'work' parts into a better alignment too, with the joins not being as rigid or un-forgiving as 'super glue' while drying.
All the usual rules of using a liquid glue still apply when using MEK, just be sure you use just enough to create a bond that will hold.
Or in other words, don't over apply to cause overfill of a joint.
In fact, you will find yourselves using way less MEK than you currently use with Tamiya glues, as the effect is more pronounced and quick.
A better result all round is what I am trying to say. 🙂 👍
Cheers. 👍
13 April 2019, 23:21
Agree with Michael mate, no worries. Thank you for the wisdom of the MEK. A can of it sure will last a lot longer than a small bottle of Tamiya extra thin. So that will save money in the long run, as I pay 6.00 a bottle for the Tamiya.
14 April 2019, 20:25
Clifford and Ingo. The MEK is so worth the money. Au$10.00 500Ml, and Au$10.00 for Tamiya. Jeez. !
Ingo, as for the PE, well. ! I have just started on the gun bay set up and my Lord. ! What a challenge that will be. WOW. 👍
I have just finished folding the belts of ammo, and the base of the shells are created to look 3D, like the real shell casings.👍
The access doors will be a thrill.......NOT. hahahahahaha🙂
Images yet to come. 👍
14 April 2019, 22:08
Ingo, what the PE is replacing is quite a bit of the instruments and black boxes, and all the internals of the wheel wells and gun bays. 🙂
I have done the kit is what I call "Sub assembly" mode.
Building everything ready for painting and adding all the pe before adding the kit components and all out of sequence.
I will post some images of all my bags I have named with the parts inside.
The engine will be the most critical as I am fully adding all the oil and hydraulic lines with copper wire and electrical wiring like the real bird.
It should turn out ok. 😉
15 April 2019, 02:00
No one will know it's there except me.🙂
But ain't that the way it is with most of the stuff we do. ? hahahahaha 🙂 🙂 🙂
15 April 2019, 19:13
Hi Lode. 👍 🙂
I thought that the PE on the Arizona was difficult. !
Jeez. This P-51 has it on everything.
Even the main landing gear has 5 pieces, and the gun mounts has15. !
Thoroughly worth the expense of buying the update kit, as it replicates everything exactly, even down to the small pivot mounts for the support struts that helps keep the access doors on the ammo bay open. !
I will take images of that bit and post it.
Just amazing fun really. 🙂 🙂 🙂 👍
15 April 2019, 21:58
Clifford. That is such a nice thing to say mate. Thank you. 👍 🙂
But following the eduard 'instructions' is like trying to understand Egyptian hieroglyphics. ! 🙁
Vague to say the least. 🙁
But patience is the key to it. As with any new way of doing things. It just takes a little getting used to. 👍
All of these bits, though fully assembled, will all be bagged for painting, then the final assembly will follow. 👍
16 April 2019, 01:34
Lode and James, thank you for your support and encouraging words. 😉
I am mainly posting these images for those who have it or are thinking about getting one. 👍
As so far, there have been no real 'heads up' situations to be aware of, but what there is have been avoided by not 'building' it until all sub assemblies have been prepared with masking latex or parrafilm.
BTW. Today I will be making a video on how to use parrafilm for the best results and possibly some BMF work too, as it is our club meeting day today and there will be a whole lot of keen cameramen ready to assist with all the close up work I need you to see. 🙂 🙂 🙂
16 April 2019, 22:18
Oh cool, Kezza! I´m looking Forward your advice for BMF and Parafilm.
17 April 2019, 06:26
Holger. As unprofessional as I am. 🙂
My friend and mentor, David Dalton helped me put together two videos, but mostly, I liked the one about parrafilm. 🙂 👍
I will post them tonight and give you the link once it's uploaded (a long time. !)
The BMF one was a bit of a flop, but fun in the attempt. hahahahaha 🙂 🙂👍
Youtube Video
Youtube Video
17 April 2019, 09:38
Inspiring!
I bought this kit from Plaza Japan, but it went AWOL in the post. Plaza were very good about refunding, and I ended up getting a Zoukei-Mura instead. Will still build it up bare metal, so I'm looking to this project for overall pointers! 🙂
(Is it just me, or is there a problem with the videos?)
17 April 2019, 12:36
No problem with the videos. As what you DON'T do is click on the black screen with the arrow.
But rather hit the links above the black fields and it will open up for you.
17 April 2019, 15:25
Great info on the Parafilm Kerry. I seem to remember someone at a local show talking about using this, so seeing it in action was very useful. I'll have to try it out soon!
17 April 2019, 15:47
It is so versatile Nathan. 👍
It can be used in so many different was. It's limited by your imagination. 😉
17 April 2019, 15:53
Pwieuw... talking about PE-madness.... but you are doing a great job...
17 April 2019, 17:01
Aha, I was clicking the black screens with the arrow! Doh!
Where do you get Parafilm from? It's been a long time since I worked in a lab!😉
17 April 2019, 17:04
Richmond, I ordered it online from here. google.com.au/aclk?s..YQ2CkIuwI&adurl=
18 April 2019, 03:35
James. Cheers mate, and I am having heaps of fun. So much in fact, I have ordered the P-51K, (Pacific Theatre) kit. 🙂 👍 From Plaza Japan for $116 Au. !
Everywhere else it's close to the $200.00 mark.
20 April 2019, 20:10
I'm thinking that Parafilm might make a useful alternative to tape for low-tack masking. Just need to be careful of 'oil staining', but worth a try!?
21 April 2019, 19:37
James and Nigel. Thank you both for the feed back on the videos. 👍
James, as for 'trust', that all comes down to using a powerful magnification goggles and keenly watching the angle the tip of the blade is going to take.
Don't think that the ridge your following will 'guide' you, as it won't, because that is only a line to follow. AND, the weight of the blade is enough to make the 'cut' .
The stretching of the film in effect reduces the thickness of the film and soft enough for the blade to get through, and if you apply enough pressure when 'setting' the film in place, that will be all you need for the cut to happen without marking the clear part with the blade.
The thing to avoid is actually letting the blade mark the surface, and if that happens, it is usually so miniscule, you would be hard up finding any damage.
Gently is the key, as it's not like your cutting through masking tape, but a membrane that is finer that is softer than baby skin.
Nigel M, As for any remnants or marks left from the film it's self, that does NOT happen, and can remain on the parts covered for months with no difficulty when removing it at a later time.
It was a big thrill doing the vids, as I had David holding the camera and following all I was doing, rather than have it tripod mounted and remembering to stay 'In shot'. hahahahaha
The thing with parrafilm, is that once you have a first time success, it is so much easier every time after that.
Cheers and thank you both.
Kezz. 👍 🙂 😉
21 April 2019, 22:07
Great videos Kezz, very informative. Now the thing is, can you get it in the U.S. have never seen it before.
21 April 2019, 22:11
Cliff, it is made in the USA, originally by the "American can company". And all you do is ask Google for "Parrafilm 'M'. " and where do you get it in the USA.
And here is the link for the USA outlet. 🙂 bemis.com/na/product..oratape/parafilm-lab
21 April 2019, 22:15
Thank you very much sir. I am most surely going to give it a go.
21 April 2019, 22:17
It is used extensively in the horticultural industry for wrapping stems when splicing cuttings to other plants, also, in all medical labs and especially in pathology..................... as well as scale modelling. hahahahaha 😉 👍
21 April 2019, 22:18
My hands are as soft as baby skin, mostly because I gave up working for a living. 🙂 🙂 🙂 👍 hehehehehe
21 April 2019, 23:26
My hands are unusually soft.
So much so that one day when meeting a farmer (I live in Coleraine) I shook his hand and he remarked "well you don't work" and when I said that I am a grave digger and dig them with a crow bar and shovel he was stunned
21 April 2019, 23:33
Stephan. Thanks mate. 🙂 It is progressing as well as I was hoping it would. 🙂
As with all complex builds, the preparation time is the biggest user of time.
But I wouldn't have it any other way. 👍 LOL. :-0
22 April 2019, 09:27
James. Thank you my friend. 👍
I was never impressed with that 'day glow' yellow a lot of modellers have used for the ZC, and what appeared in the Tamiya publication that came with the kit was more to my liking. 🙂
I have wired the radio and battery packs, plus, I am about to sort out the hydraulic system on the engine. But all is as the images dictate, but wether it will all fit 'under the hood' is an other question. hehehehehehe
24 April 2019, 19:16
Beautiful... Thought the difference netwerk zinc chromate green and yellow was defined by built in Britain or the US
24 April 2019, 19:44
That had never occured to me Bart. 👍
But now you mention it, I can understand the many variations. 👍
Cheers. 😉
24 April 2019, 19:47
Sweet! This in 1/32! I loved my 1/48 but this will be awesome! Bart that is cool that you shared that! I had no idea on that. Thank you!
24 April 2019, 20:18
Lode. Your silver tongue will get you into trouble one day, but right now, your kind praise means so much and always has. 👍
Thank you to all my buddies for your looking in and your helpful and supportive words. 🙂
I have been sourcing as much material from other builders on other forums who have done wonderful things with the builds they have done, and I am hoping that copying a lot of what they have pioneered, I can be assured that what I do will match theirs. 👍
Building kits used to be pretty straightforward and simple business, but with all these extras and 'after market' products, the hobby has, in a lot of ways, become quite stressful, as helpful and needed as these items are.
So I can say with some surety, the next two Mustangs will be quite a challenge, as I will give the PE and other bits a rest and get back to basics. 👍
🙂
Cheers, and, "Lest We Forget". (ANZAC Day here in Australia and New Zealand. Remembrance Day.)
24 April 2019, 21:43
It took a bit of finding after I deleted the album, but at the suggestion of my good friends, I have decided to leave the P-51 build on site for those who may find some of my work worthwhile reference material. 👍 🙂
1 May 2019, 00:12
I am so sorry to hear what happened! For what its worth...Shhhh...But I've done the same thing...and it hurts I know!
1 May 2019, 01:46
Thanks for leaving it up Kez. I love to cruise through some of your older builds from time to time. Appreciate you won't have wonderful memories attached to the project now but ...
1 May 2019, 02:50
Thanks lads. 🙁
It was one of the worst things that has ever happened while modelling.
All the time that little voice kept saying. 'Put the fuckin' lid on it drongo.' ! 🙁
1 May 2019, 02:55
Thanks for reposting it, Kerry. I was planning to use it for pointers in my own build. 👍
1 May 2019, 08:15
Bart, I screwed up mate. 🙁
Nigel, I do appreciate your comment and that there was some use for it with your looking in on what I had done up to the mishap. Thanks guys. 👍
Now I don't feel so bad. 👍 🙂
1 May 2019, 09:54
Thou shall not feel pitty! Thou shallt pull the pin of the holy handgrenade of antiochia and count to three, and then throw it in the bin with the blasphemous Tamiya kit, wich brought you shaking hands and a miserable mishap with Aceton! ROFL! 😄😄😄
Burn it! Burn it!
1 May 2019, 11:53
Holger. 👍 Not until I have dissolved as much of the plastic away from all the PE I can save. !
Then it is burned to a crisp. hahahahahahaha
1 May 2019, 14:37
My old computer took a dump, and I just got my new one. What did I miss? What happenend to the P-51?
1 May 2019, 21:30
Unfortunately, There was a mishap with, as I recall acetone being spilt and plastic was melted.
1 May 2019, 22:00
Clifford, I knocked over my FULL bottle of Acetone, and 1/4 of it was out of the bottle, all over my ready to assemble bits, but all is good now, having used the enemy to help rescue all the PE ready for the other P-51 I have coming from Japan. 🙂 👍
The most damaged parts were the main wing and uppers, of which, most of the PE was attached to.
Most of the parts were in plastic bags, sealed, thankfully saving a huge damage bill, but also, with a couple of bags opened for quick access, those being the main landing struts and wheels copping a bit of overflow.
I have made it sound more dramatic than what actually got destroyed, and for that I do apologise.
But it has served as a warning to me not to be so cavalier about what happens on a work bench. 👍
I have some images of parts damaged, but it will be a while before I have the courage post them.
1 May 2019, 22:26
I returned to the hobby recently after almost 20 years and managed to spill almost everything in at least semi-liquid form in the short time after... Also checked the achievement of gluing both my hands simultaneously to a plastic/PE assembly, four fingers total... 🙂 Some of your affected parts look rather grisly but do not lack a certain style (143-144 in particular) - maybe an idea for an "Aliens vs Mustangs" action diorama with some acid blood spilling damage?😉
2 May 2019, 09:13
Slavo. Thank you for the reassuring words of the misfortunes on your work bench. 🙂 I do feel a whole lot better for it mate. 👍
I have figured out how to keep most parts alive, but will be ordering the spru's of the damaged parts, and thankfully, I will need only two. 🙂
As I am not a sci-fi creative type, The aliens will just have to wait.
(Welcome back to the frustrations of scale modelling mate. hehehehehe)
2 May 2019, 10:09
the horror... the sheer horror...
Nothing was really lost... just a bit of putty/mr surfacer on the top surface of the wings sanding them smooth and there you have it, all rivet detail filled as per real filled, aluminium painted and polished wing to reduce drag... I know, boring sight, but it seems only lines visible were inspection covers and ammunition covers... but that doesn't look like much on a model...
2 May 2019, 11:58
No wonder I survived this calamity. !
As without a 'sounding board', I would have easily walked away and quit doing this unforgiving hobby. 😉
Thanks for your support and suggestions and sharing. I needed it. 👍
Cheers a thousand times over.
Kez 👍
2 May 2019, 15:17
Hi Kerry, sadly I stepped over this WIP reading the bad News of the mishap. But luckily you can save most of it an can go on with the excellent work you did so far. Shit happens everywhere and everytime, but what I have learned, breath deeply and than go on again. So keep up the good work!!!
Cheers, Christian
2 May 2019, 18:48
To all my fellow modellers who have seen and heard what I did in my lapse of sensibility, thank you all for your understanding, support and encouragement to keep my chin up. 🙂
It just couldn't have come at a worse time. Just as the final assembly was about to happen after all that 'prep' work was now completed, the most time consuming and tedious aspect of modelling was finally at an end. But I am still trying to figure out what the hell I was doing with a full opened 1ltr bottle of acetone on my work bench, having finished all the sub assemblies and prep work needed for the end result. 🙁
I am paranoid of all the liquids I have to deal with, especially the glue bottle. ! 🙁
Extreme caution is now the staple of all my activities at the bench.
I feel that it is also a case of the utter inconvenience of my idiocy that really sticks in my craw. Knowing I am smarter than that.
Put it down to old age I keep telling myself.
In finishing.
Thank you all for being so cool about what a goon I was. 🙂 🙂 👍
2 May 2019, 22:05
'Old age'!
Q. "What do we 'senior' people want?"
A. "Respect!"
Q. "When do we want it?"
A. "Want what.....?"
👍 🙂
2 May 2019, 22:28
Kez, I know you are frustrated and, knowing you as well as I do, probably a little embarrassed as well. You made a mistake, a stuff up everybody here does as well. Don't put yourself to the sword over it please! It just makes you as human as the rest of us!!!!!!! I remember a little while ago I ejected the entire contents of a bottle of liquid mask over myself, my project, my hobby desk and everything on it. My shorts still have it in the very fabric weave. Although a few people here believe I cannot make a mistake (lol) I did. Very humbling but, my personal mask of mystery became very transparent!! You have to end up having a laugh about it!! As you are well aware I am very quick to laugh at myself and on that particular day, all my friends laughed as well!!!
2 May 2019, 23:10
Thank you one and all. 👍 🙂
You can't see it, but there is a smile a mile wide on my dial at the moment. 🙂
Cheers.
Kezza. 👍
3 May 2019, 00:33
Kerry, that is why we are called HUMAN! We make mistakes and we help each other out.
3 May 2019, 00:36
Holy hell!. That was a mess. I am glad to see you have been comforted by some new plastic. That should get you back in the groove Kerry. Shit happens and should be looked at as the past and move then move forward. I have done the same but with Micro-Sol on a sheet of decals. So I feel you pain.
3 May 2019, 17:00
A big 'Good Morning' Bryn and Clifford. 🙂
LOL, 🙂 As a matter of fact, I was just looking at some reference images as to where all the lines and wiring goes in the wheel well section, figuring out where I need to drill all the holes and where to place the pulleys for the rudder cables to track. 👍
The hydraulic lines look to be the most challenging part of the whole build. 🙂
It seems like last month all this trouble happened I did to myself, but here I am less than a week into the regroupe and I am feeling great. hahahahahaha
I am.............................crazy. but happy. 🙂 🙂 🙂 👍
Thanks for your help and support. 👍
It is most valued. 🙂
3 May 2019, 23:10
James. Thank you so very much mate, 🙂
I have tried to replicate as much as I could of the predominant plumbing, to the point of wanting to leave it all open for viewing, so, in doing it that way, I decided to put the exhaust pipes on the block without the 'shield/cover' system on offer.
Wanting to display the whole aircraft in a fully exposed situation. 😉
Most of the plumbing I had to pre shape to what I thought would look like a natural position and also to incorporate the bends that would help overcome the stiffness of what copper pipes look like in the images I am using to achieve a reasonable result.
The next step is the bare metal foil. !!!
So...............Tally HO. !
11 May 2019, 00:33
Wow. ! Don't you guys know how to make a fella feel good. ! 🙂 🙂 👍
Thanks so much for all your compliments. 👍 🙂
And to think, that not long ago, a fair bit of this build ended up in the dumpster. !
11 May 2019, 05:45
Bart, Slavo and Stephan. 🙂 This really has been a labor of love.
Pushing myself like I have never done before, and now I am seeing how well it is turning out, I can't really see the other two to be as big a deal as this one has.
But boy oh boy !, kidding it hasn't been the best fun I have had in a long time. 😉 👍
Thanks to all my good mates for helping me make it through the gloom and doom to where it is now. 👍
Greatly appreciated. 🙂 🙂 🙂 👍
11 May 2019, 08:12
ya, where just like family but without the craziness on holidays! LOl! 🙂 The craziness is always here every day.
11 May 2019, 13:44
The best collection of derelicts if ever there was, and all of them are my mates. 👍 👍 😉
11 May 2019, 18:28

Album info
My second 1/32 Tamiya P-51D using the 'ultra chrome' foil this time, along with the Eduard 'BigEd' brass super detailing set.