

Title: Grumman F11F-1 Tiger, Bu.-Nr. 138614, NATC Patuxent River


Comments
3 2 January 2018, 18:01
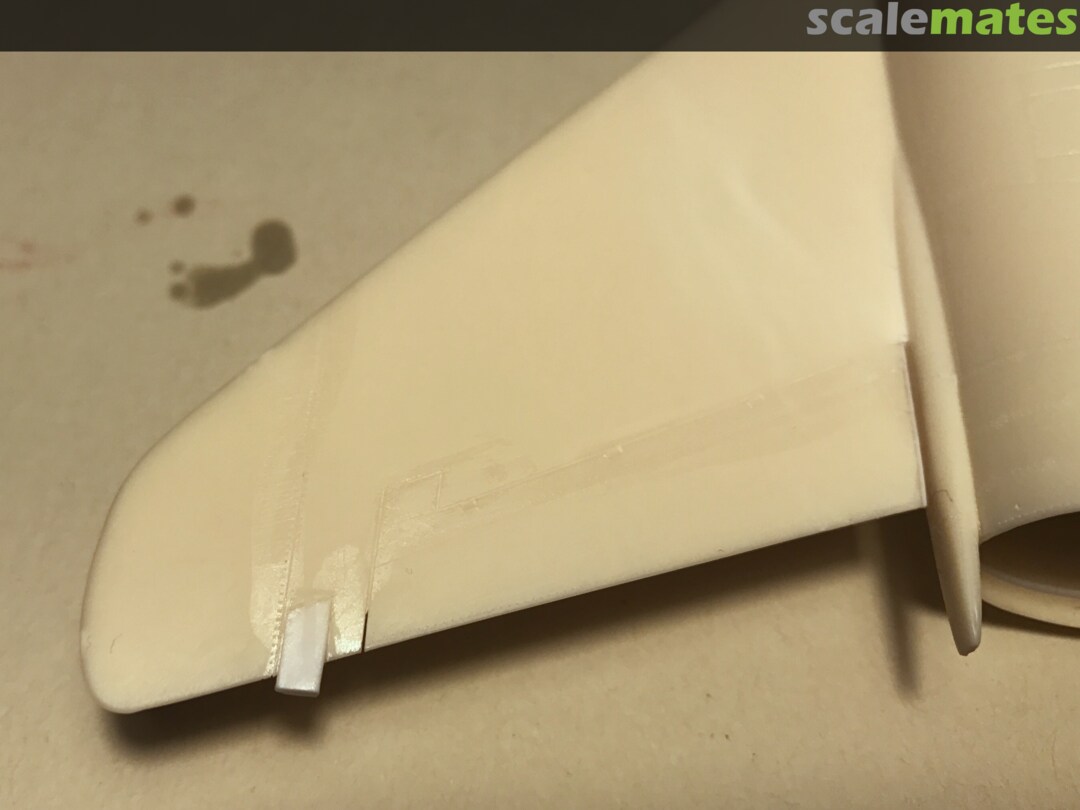
The kit is a true multimedia kit: injected plastic parts unfortunately in "short run" quality, a lot of resin parts, landing gear made of white metal and a vacuum formed canopy. All trailing edges are molded with heavy mistakes. In the case of the ailerons the mistakes where so grave so that reshaping (filling and sanding) where impossible because of the bulged hinges. So all I cut do was take off the "bulges", rep are the surface and refix the bulges. On the occasion I enhanced the quality of the panel lines and added rivets.
By the way: the colour of plastic and the plastic itself are AWFUL!
2 January 2018, 18:04
Following. Looks like a really awful kit, but i am quite sure, that you will build an amazing model out of it!
2 January 2018, 18:13
All these issues are just the usual features of FM kits 😄 Watching with interest, sure you will turn it into a jewel. Best regards, Hubert
2 January 2018, 18:47
That promises to be a lot of work....... Looking forward to see it unfold ! 🙂
2 January 2018, 19:00
Is that all that's wrong? Should be an easy/medium challenge for you 👍
2 January 2018, 19:24
Hubert: pożyjemy a zobaczymy. 🙂
Hanno: weiss noch nicht ob das gut oder schlecht ist...🙂
Martin: I don't know but I hope that's not all what it's wrong🙂🙂🙂
2 January 2018, 19:38
That's why I do not buy FM kits unless there is absolutely no other way to get the subject in any scale!
4 January 2018, 21:43
A lot of scratchbuilding again 👍 Don't You miss easy tamigawa-like kits?😉
8 January 2018, 10:18
This should be another beauty! I don't know why the F11F has been a (mostly) neglected subject all these years, but I know Bernhard will do it justice. You know, Bernhard, if you really want a challenge you could build the short nose Lindberg 1:48 kit!
8 January 2018, 13:42
Edutainment... Thank you for the compliment. I will try my best but it should not be too complicated (Lindberg: many years ago I foundered on Lindbergs Duck🙁 ).
Tamigawas kits are too fast to build and my showcase is very small🙂
8 January 2018, 16:35
you're making a jewel of this ugly duckling... FM, not for the faint-hearted, but in the end they have nice, rare subjects...
15 January 2018, 11:10
The fit of the fuselage halves = grande miseria!! A lot of plastic and a lot of CA was needed to fill all the gaps.
18 January 2018, 06:54
challenging build Bernhard..... the more it is, the more satisfied you will be when done, and more amazed of your skills we will be 🙂
18 January 2018, 07:16
Tail cone and exhaust tube. Some days ago I wanted to finish this task quickly quickly and glued the rectangular piece flush with the fuselage. I spotted the mistake and after fixing it with a lot of work I noticed today that I forgot the exhaust tube. Now it does not fit anymore.... All I did yesterday was sanding, filling the wrong panellines and more sanding..... 🙁🙁🙁🙁 at the moment I'm fed up with this entire project. So so I will put "on hold". Grumble! 🙁
19 January 2018, 18:32
No! You must continue and defeat this beast. Unless, of course, you have something more interesting that you want to do. 🙂
19 January 2018, 20:56
Hope you manage to bite through the sour apple... You did some beautiful work on a demanding kit, after a few days it will be vetter. Keep the good spirit up
20 January 2018, 06:35
This sounds like Fonderie Mini Mach 2! Bill is right! After cooling down, you will make a wonderful Tiger then!!🙂
20 January 2018, 08:30
Harking back to my original post, I certainly understand your frustration, but your work so far has been fantastic! (Absolutely AMAZING cockpit and well handled nose conversion.) All of your travails so far have been typical for most short run kits. Rejoice in the fact that nothing is warped and the parts that require gluing 2 mirror image parts together (ie, fuselage, wings) are molded the same length and (approx.?) shape. Keep at it! The beast will eventually submit!
20 January 2018, 20:37
I have understood: my application for abandoning/scrapping the project was rejected🙂 Obviously now I have to continue this build.
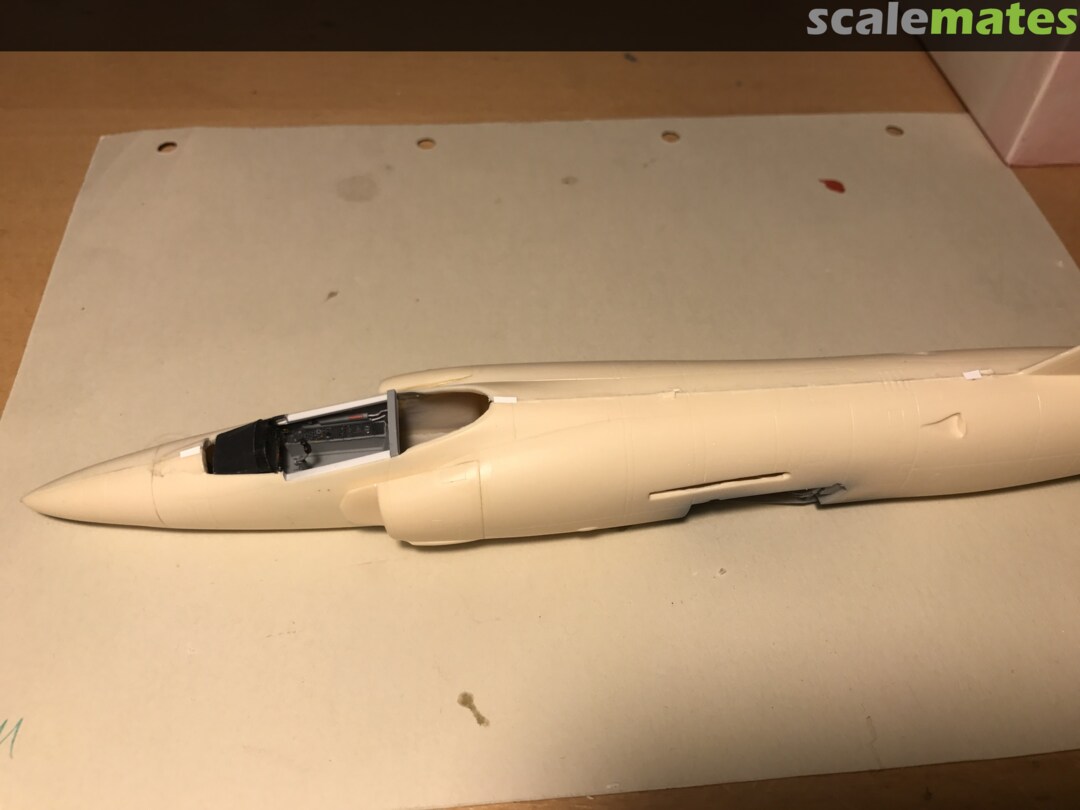
Yesterday I have inserted at least with a trick the nozzle into the fuselage. First I have thinned the edges/walls of the fuselage. Then I have sawed off the bulkhead, inserted the tube first and inserted the bulkhead diagonally. Then I have pull the pipe in place with a 0.4-mm-wire as a "guidance".
21 January 2018, 07:07
Yesterday I finally got around to fixing the wings on the fuselage. I had to attain a dihedral of 2,5 degrees. I did not want to use guesswork so I added two brass rods. As expected there were very large gaps on the upper side. Obviously FM did not factor in the dihedral when designing the kit. On one side I had to add plastic stripes. On the other side I figured that CA glue would do the trick. After aligning the 2,5 degrees I closed all the gaps using a lot of CA. On both ends you can see additional plastic pieces to help keeping CA in place (normally CA would not fill this kind of gap).
Result: today I needed only one hour to clean, sand and restore the lost panel lines and rivets. No second round of CA was needed🙂🙂
25 January 2018, 19:11
This kit contains the worst vacuum formed clear parts I ever saw and built. There are myriads of "inclosed" dust particles and clearly noticeable sanding "traces". In addition very poorly designed contours of the framing. I had to bathe the windscreen in Future three times to achieve a tolerable result. Unfortunately it was impossible to avoid "runners" ("Laufnasen" ) 🙁🙁🙁 I was to lazy to carve a new master and so I must live with it.
27 January 2018, 13:48
So, no masterpiece then? Just a regular 'perfect'?
You're letting us down Bernhard 😉
27 January 2018, 15:34
After seeing this „project in progress" live an' direct today, I can assure you Martin, this WILL be another masterpiece for sure.😉😉 An enormous amount of work has been invested here.
28 January 2018, 20:20
Yeah I figured as such. In my opinion, anything that Berhard touches is a masterpiece, even if he thinks it is tolerable. I would love to produce a build that's tolerable by Bernhard's standard.
29 January 2018, 14:58
i fully agree with Martin. I guess we need to increase or level of patience, research, and perfectionism a few notches.....😉
29 January 2018, 18:14
Very beautiful Bernhard, amazing job so far. Respect for your work
6 February 2018, 11:42
Exquisite work with the airbrush Bernhard! I really like how this is coming together.
6 February 2018, 15:57
Thank you for nice comments. I'm glad that you like this dayglo scheme. By the way: today I managed to print the black lettering with a laser printer in my office. 4 different decal papers: 1 very good result almost without defects and 2 good results. Resume: enough usable elements.
6 February 2018, 21:04
Spanjaard: I have not forgotten you🙂. I wanted to see first how the decals can be applied. It was a normal laser printer of HP. Setting: glossy photo paper. 2 of 3 prints are usable but not perfect. I had to use at least the second best result (about only 95% the area was printet black, the rest remains translucent🙁 ) because the best result was reached on relative thick carrier film (I used only "NATC" for right side of them).
11 February 2018, 10:17
thanks a lot Bernhard. i will have to give a try to printing decals at home 🙂 yours look fantatic!
11 February 2018, 14:52
Excellent work, Bernhard. Which decal film gave you the best results? I found the Bare Metal decal film that I used for my F-111B was too thick for me. Also, you mention some translucency in the black - was this printed simply 100% black? I found that using "four colour black" produced a better, deeper, more opaque black. I believe I used 70% cyan, 35% magenta, 40% yellow, and 100% black. This is an old offset printing trick, since 100% black in a CMYK process is never black enough by itself. I used an inkjet printer, does the laser printer in your office print colour?
12 February 2018, 13:41
Very impressive, you have just turned a piece of soap into a decent model. Hats off! Best regards, Hubert
13 February 2018, 08:49
I was looking again into those decals... maybe the decal film liquid can be applied with airbrush instead of brush to avoid the smearing?
16 February 2018, 15:24
Spanjaard: THX for your comment. No idea if this works. But I think this is not necessarily necessary. First time I have made a mistake and have too often painted one and the same place. With the next sheet I have painted only once and there were no streaks.
16 February 2018, 17:20
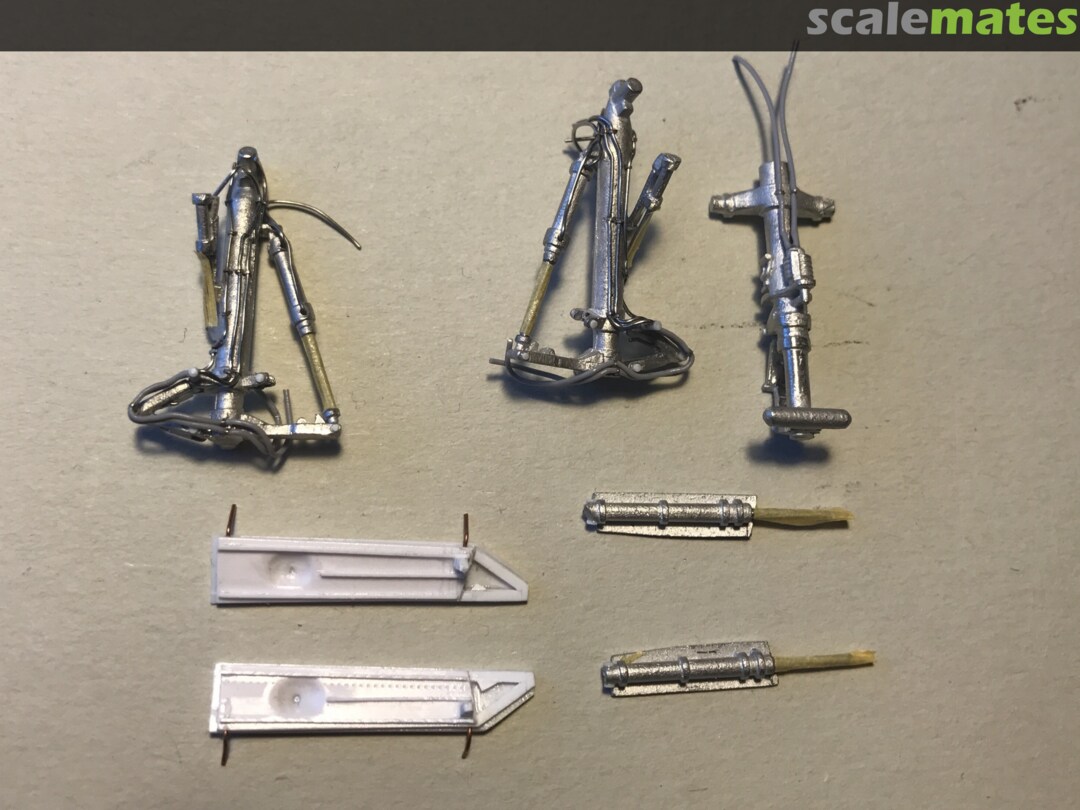
Yummy legs ! Polished ? Hast Du die Litze doch „ draufgenäht" ? Superbohrer ?
17 February 2018, 09:34
Hanno: Danke. Weißmetall, recht brauchbar. Oleo -Teile gegen Kanülen ausgetauscht wegen rund und stabil. Maskiert vor dem Lackieren mit weiß um Metall nicht danach metallisch zu lackieren. Nähen ging nicht da bohren in WM so tief nicht geht. Technik 2: so tief es geht (1-1,5 mm) mit 0,27 mm gebohrt und flachgequetschen 0,2 Draht als Schelle eingeklebt. Hat gut funktioniert. 🙂
17 February 2018, 09:43
Tiger almost completed: minus leading edges of stabilizers, arresting hook, seat and hood.
18 February 2018, 15:44
Thank you Mates.
The last task: completing of the sliding hood (frame of plastic and vacuum-formed main part). By the way: I never saw a vacuum formed hood in a worse quality. The entire surface is full of imperfections (dust particles and sanding strokes on the vacuum master). I needed two rounds to finish the hood: after sanding both sides with 2400/4000 micro mesh I submerged the canopy two times into Future. Unfortunately I had not enough patience and began the next step too early. Result: fingerprints (grrrr). So I had to remove the entire Future coat (micro mesh and Mr color thinner) and start the second submerge task.
What you see in pictures 77-79 is the dry fit of the frame on the fuselage. Eight 0.32 mm holes and 4 pieces of wire (0.3 mm) help to achieve a clean correct fit of the canopy on the fuselage. Needed and achieved 🙂🙂 precision: 0.2 mm.
20 February 2018, 18:45
Been following this for a while. An eye catcher. Well done Bernhard!
20 February 2018, 19:18
I'm sure you'll get it done right! The plane looks too good for you not to!
20 February 2018, 23:21
Nice one Bernhard, I like it. I did not know anyone made a kit of that aircraft in 1/48 scale.
21 February 2018, 00:14
No I believe to know why the models of the Tiger (built of the FM-kits) are so rare... The vacuum formed hood is aprox. 3 mm wider on the base than the frame and nearly impossible to glued on. I spent one hour and had to use every single trick I could think of and I barely managed. The waiting was worth it: no fingerprints🙂🙂
21 February 2018, 20:54
Good news: I managed already yesterday evening to finish the Tiger without trouble🙂🙂. Pictures coming today evening.
23 February 2018, 04:38
As announced pictures of the completed Tiger. Yesterday It was a little bit late so I noticed only during photographing that I forgot all 4 cannons 🙂 and forgot to mend the underside of the sliding hood in black🙂
23 February 2018, 19:19
I definitely need to practice more to be even half of half as good as you.
Man this is another masterpiece. Do you have something that isn't? 😉
23 February 2018, 19:47
The next masterpiece from your bench - hope too see it in Lingen 👍 👍 👍 top notch
23 February 2018, 19:49
Grandios ! Phantastic detailing, especially on the gearstruts !
23 February 2018, 20:36
That is just fantastic. Beautiful is and understatement. Bravo, BRAVO!
24 February 2018, 02:04
Hallo Bernhard, echt schön! Ich habe momentan kaum Zeit. Jetzt habe ich auch kapiert warum wir aneinander vorbei geredet haben. Dem Rumpf von FM fehlt Tiefe. Ich würde das Fahrwerk noch so wie beim Original nach vorne winkeln, dann sitzt sie hinten auch tiefer. Deine gerade frisch gezeigte Skyray haut mich immer noch um!🙂
25 February 2018, 18:07

