Hobby Boss Su-30MKM Flanker-H - WIP


Comments
3 21 November 2018, 03:11
And here we are with my next project, and it is a DOOZY! This will be my first major conversion, as there are no 1/48 kits for this aircraft made yet, or any of the canard twin seat Flankers, for that matter. I absolutely love the twin seat canard Flankers, so this will be a bit more of a labor of love than most of my builds. So wish me luck!!!
21 November 2018, 03:21
CooL, so this one will take more than a week or two.;) I'm in.👍🙂
21 November 2018, 06:31
Hell Yeah thats looking interesting!!
Take a seat too...
More than two weeks.... unbeliveable 😉!
21 November 2018, 06:35
Welcome Erik, Michael, Konrad, Spanjaard, and Maciej!
So I have started preparing for the "plastic surgery" by marking off where I will need to cut to install the new shoulders for the canards. I sure hope this goes well! LOL
I also am thinking about using the canards from a bad sprue (short shot) from my Kinetic Su-33, which was kindly replaced by Kinetic. It looks to be the same size and very similar riveting, although the shape is very slightly different.
23 November 2018, 03:50
She'll be right Michael, it's only plastic, not somebody's arm.;)👍
23 November 2018, 04:56
Well, got the cutting done and sanded strategically to fit the shoulders. The left side is done and the fit is going to be quite good, should only need a little bit of filler up top and a bit more on the underside. Still working on the gun side, the shape is a bit more complicated on that side so I still have more sanding to do to get a consistently good fit top and bottom, but I will get there.
This has gone quite well, not the monster I was fearing LOL. Actually, this has been kinda fun to do, almost like a puzzle that I need to make fit.
25 November 2018, 17:18
Looking good. I hate having to hack stuff up for mods. I always seem to make a mess that is twice as hard as it should be. LOL
25 November 2018, 19:01
Thanks Konrad and Donald! Donald, I know how you feel! I am hoping I don't do the same...
Well, took a break from the cutting, sanding, and fitting and worked on the cockpit. It is mostly done, but have a few little areas to touch up. A couple things of note about the cockpit:
1. The IPs are not correct for the MKM. There should be more MFDs both front and back and in different positions. I did try my hand at scratchbuilding some, which is not something I have done much of and unfortunately was not at all happy with what I came up with. And since there is no aftermarket MKM cockpit set, I decided to just go with the kit supplied MKK cockpit IPs.
2. You might wonder why the pit is dark gray. Well, from looking at pics it appears that the Malaysian version has this color as opposed to the normal Sukhoi blue-gray. I just used Gunze Aqueous Dark Seagray, which looked close.
I used the kit supplied decals for the cockpit, but painted the MFD screens black because I am building a powered down aircraft. The decals show displays on.
Still not sure what I will do about the Thales HUD, as it is different from what is in the kit, and I cannot seem to find any good pics of it. All the close up pics I have found have a red cover over the HUD.
28 November 2018, 04:48
Nice pit, why don't you try your hand at making a cover for the HUD.👍
28 November 2018, 06:51
Thanks Michael!
I had considered doing that, and since you mentioned it as well I think I might just go that route. I am not sure I have ever seen anyone do that before. I am thinking maybe trying to fashion it out of blue tac... THoughts? Any other ideas?
28 November 2018, 14:39
Yeah I'd probably use Milliput but I guess Blu-Tac will work as well.
28 November 2018, 22:57
I have no idea what the cover looks like, but could you use lead sheet?
28 November 2018, 23:53
Thanks Clifford!
Yeah, it would be a good idea to post a pic of it before I asked... LOL Here it is:
[img1]

Since I do not have any milliput, that is why I considered blu tac.
29 November 2018, 01:37
I also finally found a decent pic of part of the HUD. Might be able to come up with something from this pic:
[img1]

29 November 2018, 01:45
That doesn't look a lot different than a lot of other HUDs. And yeah, could fashion that cover from lead foil easily.
29 November 2018, 04:29
Yeah, just nothing like the kit (usual Flanker) HUD. But wouldn't be to hard to find a similar looking donor from another kit. As far as the cover, I would not actually cover plastic, I would fashion a shape and paint it. I have a bit of time to decide which way I will go, don't have to decide until it's time to put the windscreen on.
29 November 2018, 04:39
Made some more progress tonight. Got the fuselage halves together and pit in. I had previously cut the exhaust area to fit the AMUR Reaver thrust vectoring exhaust, and cut a little more. The exhausts will stick out a little further than the real aircraft, but I prefer that to having the nacelles not match the diameter of the exhaust. It won't really be noticeable IMHO.
Next step will be to attach the shoulders, which will be a bit dicey since I have to use CA, and can't fit THEN apply the glue (cement) like plastic to plastic. I will concentrate on getting the tops perfect as that is most visible, and leave the extra work on the underside as far as any sanding, puttying and leveling.
29 November 2018, 04:54
This looks promising ... I will definitely follow this one, I'm curious about the end result! I have not yet made jets from the east, but they are absolutely on my wish list ... Good luck Michael with your project!
29 November 2018, 11:12
Thanks Jos and Spanjaard! Eastern Jets are super cool, I love building them, especially Flankers. The only aircraft I love more is the Tomcat. You should get one, would love to see what you make of it!
Anyway, got the shoulders attached now and primed the areas to more easily see where in need more work, and there are definitely a few, despite the fact the intial grafting fits pretty well for a conversion. I'm going to try to use Perfect Plastic putty as much as possible to fill gaps to avoid sanding off detail and rescribing, but there are some areas where the resin to plastic has a step (and a gap) so this will be unavoidable in some places.
5 December 2018, 05:31
Flankers and Tomcats, THE most beautiful air superiority fighters! I´ll take a seat here, Michael.
Where do you store all this big models? 😮
7 December 2018, 08:21
Does anyone know a good video from a comparison dogfight between a Turkey and a Flanker?
7 December 2018, 08:22
I couldn't agree more Holger! As far as where I keep my models, I have 10 in my office, 4 around my work area, 18 on display in my living room, and 1 under repair. The older ones that are not as good as my current output are the ones I keep near my work area. I just bought two large IKEA shelves for my office, so I will be transferring about a dozen more there over time.
I will post up an album of my living room models when I get a chance. Nothing special, really, as far as display cases.
7 December 2018, 21:22
Looking very nice Michael. I have models everywhere, in the basement in my den and in my workroom. Running out of room for them. Guess I will soon have to resort to hanging them up.
9 December 2018, 18:33
I have to get two more shelves for one of my cabinets. That will hold me over for some 1/48 kits. But the big 48s and 72s, gotta start hanging as well.
9 December 2018, 22:36
Thanks Maciej and Clifford! Yeah Maciej, the fit is very good. It would have been even better if I spent more time fitting and sanding before gluing the shoulders in. Instead I had to do it after. LOL
Holger, I am currently in between wives, so I have artistic license currently of where I put my models. That may change in the future, but my future wife seems to like my hobby so I may be able to continue to display in the living room. 🙂
I took some pics of my living room models, I will make an album for them soon. I will also take a pic of my work area, once I finish this project. My work area is usually a disaster mid-build, but this one (because of the plastic surgery for the conversion) is a whole new level of mess. LOL
10 December 2018, 03:33
So I got some more work done. The shoulders are pretty much done, but I have since managed to lose the gun barrel. Ugh. I will come up with something.
The nose cone and wingtip pods have been added, so it's starting to look like a Flanker! I put a TON of weight in the nose, I figured I would need it because of the resin vertical tails AND resin exhaust nozzles. I hope I have enough in there and not too much to stress the nose gear too much. We shall see!
10 December 2018, 03:35
Check Spruebrothers for the gun barrel, I think they have them, or brass tubing could work also, I think.
10 December 2018, 21:05
Looking great so far. Watching to the end. Love the Russian Jets.
10 December 2018, 21:08
Thanks Bryn! I love Russian jets too, I have tons I still want to do!
Clifford, I looked, and I do not see any aftermarket gun barrels for the Flanker, and I don't have any brass tubing unfortunately. I will likely look for a similar sized round unused part from one of the finished kits I have. I am sure I will find something that will work.
12 December 2018, 05:13
So update time! I have finished the intakes, the fit there is quite good. I pre-finished the insides and outsides around the opening since that would be much harder to do after assembly. Also added the resin LWS310 pods on the sides of the intakes. I had to sand down that area first as it had detail for the MKK pods that go there from the kit. I also added the doohicky that goes right in front of the IRST in front of the windscreen. Not sure what it does but it seems to be unique to the MKM.
Also, while I was looking for the clear part for the rear coaming, I noticed a clear part that is unused in this kit, and interestingly it looks almost exactly like the Thales HUD! The HUD glass square fits perfectly in the frame, so it must be for that reason, maybe for a future kit? That would be cool! I did have to sand angles at the top of the square piece to make it look like the Thales piece. But I am pretty stoked with this development!
Anyway, I have a few little pieces to add, mask the windscreen and canopy, and attach the windscreen, then it will be time to prime! Starting to get excited for the next steps!!!
12 December 2018, 05:21
You are creating a whole new monster, Dr. Frankenstein ... 🙂
Lookin' good!
17 December 2018, 15:14
Thanks Dem! It is indeed quite a monster, and while quite a lot of work, it is very satisfying to see it start to look like what it's supposed to. LOL Especially since this is an AC I really love. Reality is the Naza conversion is quite nice, and am very pleased with it. Now that I have done this conversion, I am sure some manufacturer will release a canard twin seat Flanker kit soon. LOL (not that I would complain, I would still like to do an SM or MKI as well).
17 December 2018, 15:22
So lot's of progress over the Scalemates-less weekend! LOL
Added the Saab MAWs and LWS pods, and scratched the Thales IFF "bird slicers" on the nose. That was not a fun task, as those are quite small and thin. Gluing them properly aligned and in place was very tricky.
Also got the windscreen masked and on, puttied, sanded, and got the whole bird primed. Next up is pre-shading marblecoat. This is were cool stuff starts to happen!
17 December 2018, 15:27
The flanker is a brutal-looking plane ... what brand would you recommend to build one?
17 December 2018, 17:42
It sure is! Brutal yet elegant, curves in all the right places. You can really see the influences of the Tomcat on the design of this AC. I guess that's why the Tomcat and Flanker are my favorites!
Anyway, the kit of choice would depend on what variant you want to build. Here is my synopsis of the various variants and kits in 1/48 scale:
Su-27 Flanker-B, Su-27UB Flanker-C (2-seater) and Chinese J-11B - Right now the best kit for these is Hobby Boss. This is a really nice, well detailed kit that is actually a rather simple build, and the fitment is quite good. There are some minor inaccuracies, but nothing too major to note. The other option is Academy, and that kit is rather basic in comparison and has some dimensional issues. But it is a simple build, but lots of putty required. Kitty Hawk just announced an Su-27 to come, and their Flankers to date have been pretty decent, so it may unseat the HB. Most likely will be quite correct in dimensions and shape, have fantastic detail, and be a bit of a pain in the arse to assemble. That is the Kitty Hawk way.
Su-30 (any variant) and Chinese J-16 - Also Hobby Boss. Their Boxing is of the MKK (Flanker-G), which is the Russian built Chinese version. The Academy version still has dimensional issues and merely acceptable detail, and requires some kit supplied plastic surgery to make correct. There are currently not kits available of the variant I am building (MKM Flanker-H)), which are the twin seat Flankers with canards, hence the need for the NAZA conversion set. This also goes for the MKI, MKA, and SM.
Su-33 Sea Flanker-D and Chinese J-15 Flying Shark - Only kit in town right now is Kinetic, which is pretty much a perfect kit. Detail is fantastic, and it is extremely accurate. It is a complicated build though, and the instructions are terrible. The difference between the Russian Su-33 and Chinese J-15 are missiles, pylons, and engines, and Kinetic has released kits for both versions. Hobby Boss will release their versions some day, but they will not come close to the standard of the Kinetic kit.
Su-35 Flanker-E - There are two kits of this aircraft available, Kitty Hawk and Great Wall. It appears the GWH kit is nearly perfect, but the Kitty Hawk kit is really nice as well and can be had for a lot less. There are some things to watch for with these kits though. If you want to model an early prototype (splinter scheme) or an early eggplant painted AC, the KH has the correct tail with the chaff dispensers on the top of the stinger tail. Also, the normal boxing of this kit does NOT include the drooped at rest thrust vectoring nozzles, so you would have to go aftermarket there or model in-flight or powered up to be correct. The GWH represents a later version, such as the blue camo version currently in Syria. If money is no object, get the GWH.
Su-34 Fullback - This is based on the Flanker, so I will include it in this list. There are two kits of the AC, Kitty Hawk and Hobby Boss. Kitty Hawk: Better detail, more correct shape, doesn't need aftermarket to fix glaring errors, a more complicated build with instruction errors. HB: Fit is nearly perfect. Nose is terribly misshapen, and absolutely must be replaced via aftermarket. The stinger tail has some issues as well. The cost of this kit is outrageous, going for well over $100. The clear winner here is Kitty Hawk.
Well, that ended up being more than I planned to write. LOL I hope this helps!
17 December 2018, 18:39
Looking nice Michael, and very informative info, thanks for sharing.
17 December 2018, 20:55
Thanks Michael, for your extensive reviews of the different kits and for sharing them. This information is certainly valuable in my research to buy a Flanker ..! Thanks mate 👍
17 December 2018, 21:04
Thanks Clifford and you are both welcome! Anytime I can help, I do my best!
So, got the pre-shading marble coat tonight. Got it all done in a little over an hour, moving as quickly as I can do ensure randomness. My airbrush hand always gets sore doing this, as sometimes I am stop and go stop and go over and over for many minutes in a row. LOL
Anyway, this is the part of the build where things really start to come together. Hopefully tomorrow I will be able to lay down the base coat. Nice thing about this is the Malaysian Flanker is all one color, and I will be using Gunze H335. Considered using H337, but decided H335 is best.
19 December 2018, 05:41
Ahh another beauty from Michael 🙂 Count me in!
Btw lucky you, that you have time to build so many kits... 🙂
19 December 2018, 05:55
Thanks Sören! Yes. I am lucky as I do get consistent bench time and I am not easily thrown off task or shelve a build. I also build quickly, so that all adds up to high volume production, although 2018 has been my lowest output since I started building in 2015.
Demigod, my workhorse brush is an Iwata Eclipse HP-CS. I also have a GSI Creos Mr. Airbrush Procon Boy PS-270 for finer work, and this is a fantastic airbrush.... and a wonderful value. It can be had for less than $100 right now.
19 December 2018, 21:20
Got the base coat down tonight, all good there. I am happy with the color, looks pretty right to me. Added a little bit of white to the remaining paint in the cup and painted the radome as well. In pics some radomes are considerably lighter than the rest of the jet, but in others the difference is quite subtle. I decided to go the subtle route and am happy with the look. I will need to go back in and paint a square patch of the base color around the IFF bird slicers as seen in pictures.
20 December 2018, 06:01
Looks really nice Michael.
Regarding the Procon Gun.
Do you had the chance to compare it against a Infinity from H&S or a 0,15 gun from H&S?
20 December 2018, 09:26
Thanks Demi and Sören!
I have only used three airbrushes, a Paasche Talon (my first AB), the Iwata Eclipse, and the Procon Boy. One of these days I will try one of those high end ABs you mentioned, but for now the others work for me. I know a lot of people swear by the H&S brand, but they sure are expensive!
So small update today, painted the anti-glare black in front of the windscreen and the canopy. I also painted the square patch of the fuselage color around the IFF bird slicers. Soon it will be time for the future gloss coat then decal time!
21 December 2018, 06:43
They are really great and I have the luck that the company is right in front my doorstep (10km's away).
The prices are indeed a little bit higher, but I paid 215€ for a customized CRplus, which is ok in my opinion 😉
build-an-airbrush.de..tor?___from_store=de
But I must also say that Ive read a lot of good reviews for the Procon Gun and I will have a look at her.
21 December 2018, 07:12
That is pretty cool how you can build your own AB there Sören! If I only knew exactly what I wanted LOL. Too many options! LOL
23 December 2018, 03:18
Well, metalwork is underway, so far so good! Made a couple of errors, but have since corrected them. I should have a little more time tonight to get some more done.
23 December 2018, 03:19
It sure is looking nice. I started my Chinese J-11B, which is of course the Chinese copy of the Flanker B. I hope it turns out even half ass nice as yours is looking.
23 December 2018, 03:23
Was supposed to be as nice not A**. Computer does goofy stuff sometimes LOL.
23 December 2018, 03:25
Cool to follow your building process...everyone has their own good techniques, that's fun to see!
23 December 2018, 08:07
Very nice Michael. You've done a great job with the conversion. 👍
23 December 2018, 08:57
Michael, I always like doing the exhaust areas on planes. You can have fun with paints and colors you would not be using otherwise. Looking good. 🙂
Clifford. Uh huh. Blame the computer. 😉
23 December 2018, 14:27
Clifford your "computer" mistake is much more indicative of how we feel when Michael is building his model and how we would like to build ours.
23 December 2018, 16:09
Keeping such a smooth and detailed surface after all that plastic surgery is absolutely stunning. Great job on the paintjob too. This will be an eyecatcher!
23 December 2018, 16:16
Thanks Clifford, Jos, Erik, Michael, Donald, Maciej, and ice! You guys humble me with your kind words!
Clifford, that made me LOL! It actually makes sense using A** in that sentence too haha. I will have to check out your J-11B build!
Donald, I totally agree. I love doing heat stressing, especially on Flankers because there is so much room to be artistic.
ice, I appreciate that! Being this is my first conversion of such magnitude, I am very pleased with how it turned out. The conversion set helped a lot, as it fit very well, so I can't take all the credit.
24 December 2018, 06:45
So the metalwork is coming along, got the fuselage part of the metalwork mostly done, just need to tone down the bright metal panels on top a little bit. They stand out a bit too much. Also gotta do the nozzles as well, but may do that after decals. The nozzles are quite a bit more complicated to paint, so may want to do something easier first.
24 December 2018, 06:47
Thanks James!
Got most of the deals on now, still have a few stencils to figure out. The Fishbone decals don't come with instructions and only have a couple stencils, so I have been looking at pictures of the real AC and using random Flanker decals from the kit and my Eduard boxing for these.
Starting to look like an MKM!
26 December 2018, 03:48
Just awesome Michael 👍! Following from the beginning and to see how it turns out is just inspiring!!
26 December 2018, 08:10
Welcome Florent and Tim, it is an honor to have you both here!
Thanks Konrad and Christian, I really appreciate the kind words and am glad I have been able to inspire someone, it is truly the biggest compliment one can receive.
26 December 2018, 16:23
Coming along great here. I especially love how the exhaust looks so far.
26 December 2018, 18:23
Thanks Nathan and Maciej! Hoping to get a lot done over the long weekend coming up. 🙂
27 December 2018, 18:43
I'll admit I'm going to try to duplicate your exhaust on my HobbyBoss Su-30 MKK.
27 December 2018, 19:40
Go for it! I used: Gunze GX-2 Gloss black as a base (stuff is SUPER glossy and dries very quickly). I used to use Alclad black gloss primer, but while that stuff works quite well for a glossy black, it can take more than a day to dry. Also used Alclad Airframe Aluminum, Pale Burnt Metal, Brunt Iron, and Tamiya Clear Blue. Looking forward to seeing your attempt! If you have any questions just let me know!
27 December 2018, 20:03
Looks awesome Michael. I also will try your method on my J-11's exhaust.
28 December 2018, 01:20
OK, you just need to stop with these projects. I already have 4 on the bench. I dont need you doing stuff and making me go to my stash thinking Oooooo, I have a Flanker. I could...STOP! 😉
28 December 2018, 18:40
Very nice build so far, Michael! I'm still at work with my bad shaped Trumpy SU-27 (Nose, canopy, intakes etc. etc.)
29 December 2018, 11:14
Thanks Clifford, Donald, Augie, and Dieter!
Clifford, I am watching your J-11 build. Not an easy kit to build!
Haha Donald, inspiration always hits ya when you least expect it. But, that being said, I look forward to when you build your Flanker!
Dieter, which scale Flanker are you building?
30 December 2018, 03:40
Made a little more progress this weekend. Applied the wash and added some more details. This one is coming along slowly, but surely! Will do some more weathering, but will not do too much.
30 December 2018, 03:42
She is really coming along nicely, the grey looks stunning on her as the russian blue-camo is seen so often 😉
30 December 2018, 07:55
Thanks Michael, Christian, Florent, Dieter, Ronny, Sören, and Clifford! You are all too kind!
Small update: Got the final flat coat on after some minor additional weathering. I wanted to keep it a little bit low key on the weathering, so I am happy with where it is at. I also added a few more painted details. Lots of little details on this thing, and new things to do seem to keep popping up! LOL
Anyway, getting there! It's always fun to rip of the windscreen and canopy masking to see how that went. It is also one of the first real signs of getting close to the finish line!
31 December 2018, 03:07
Got 'er on her feet tonight, still have to attach the bay doors though. Making progress, started painting the weapons as well.
2 January 2019, 04:26
She's coming along nicely! Can't wait to see her finished. Do you apply the decals over a flat cote? Or did my eyes fool me and it's glossy anyway?
2 January 2019, 17:19
Thanks Michael, Demigod, and Spanjaard!
Demigod, I applied the decals over a glossy surface. The gunze paint itself is semi-glossy, and I brushed on a coat of future as well. Then I sprayed my home-made flat coat mixture of Tamiya Flat Base X-21 mixed with future. Ratio is: 6 parts future, 1 part X-21, and 1 part Mr Color Leveling Thinner.
2 January 2019, 21:20
Two questions Michael...your home-made flat coat is that pure flat our semi-flat...so let we say satin varnish...? ... and why do you prefer your own home-made flat coat over the standard flat coats of the famous brands, such as AMMO of Mig Jimenez (Lucky Varnish) or TAMIYA?
I ask you this because I am about to give my Rafale M the final layer, I like to experiment a bit.
3 January 2019, 12:03
Jos, It is more flat than satin, but it is not quite dead flat. The cool thing about making my own is I can control exactly how flat, satin, or anywhere in between I want it to go. Plus, it is cheap as Future comes in huge bottles that last forever, also helps that I love the finish I get using it.
3 January 2019, 21:26
Thanks Michael for this explanation ... I am certainly going to experiment with this too, but could I also use other thinners than just Mr. Color Leveling Thinner, I have the thinner of Vallejo and Ammo of Mig Jimenez ...?
3 January 2019, 22:07
Man that is looking fantastic. I finally got all the puttying done on my J-11 and shot some black primer on the putty joints to check them. All looked good, so I can start thinking about getting some paint on the beast. I ordered some more PE details for it they are mainly canopy and canopy deck details, so I should be able to start priming tomorrow.
4 January 2019, 01:00
Thanks Clifford and Adam!
I have never used anything other than MCLT to thin it, so I am not sure how it would work with the others. But if you are doing experimentation, I would be interested to see what your experience is.
Also, when spraying this blend, it is best to spray it on with very thin coats, and look at a glancing light source as you spray it on. You will see it flatten right before your eyes, which is kinda neat. It is also really cool to watch decal carrier film completely disappear as well. I usually only do two light coats. I spray this at a bit higher PSI, around 20-25 as it seems to work better that way for me.
4 January 2019, 17:50
Thx mate, appreciate your comment...gonna use your tips and tricks...👍
4 January 2019, 19:48
You're welcome Jos, good luck!
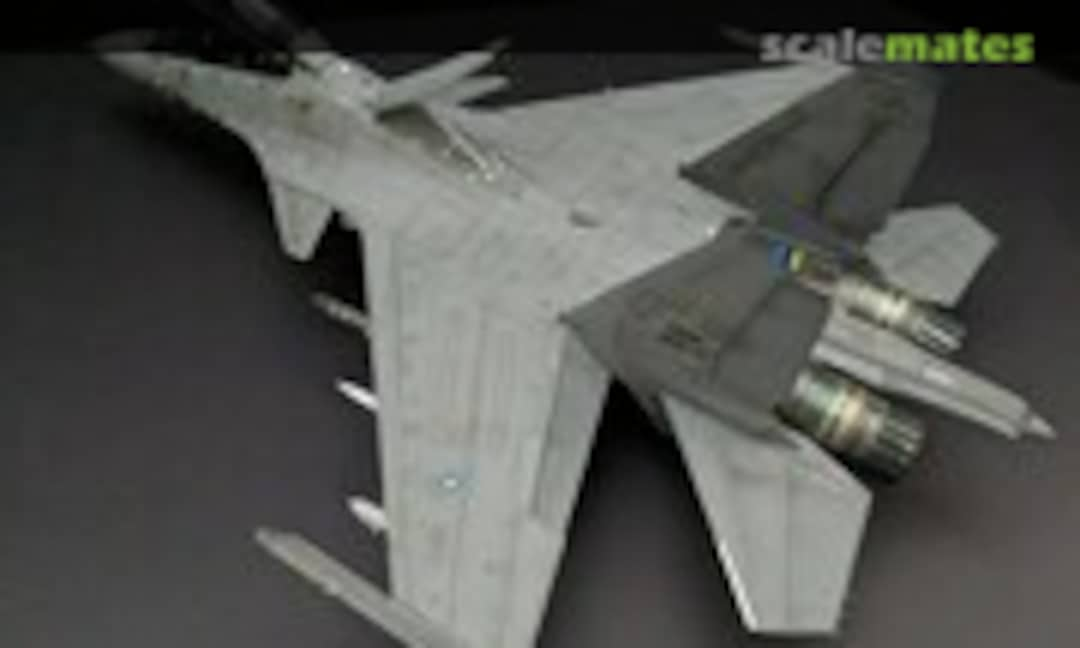
Got the weapons done, that took quite some time, even without many decals (kit does not come with many, and I didn't want to use the training markings. 2x Kh-31s, 2x Kh-29Ts, 2x RVV-AE (R-77 export version), 2x R-73s, and one Thales Damocles pod w/NAHAR pylon. I am very happy with how these turned out, especially the Kh-31s.
Getting close, the finish line is near!!!
6 January 2019, 01:47
As I know squat about Russian stuff, the weapons list reads, to me, neat looking thingies that fly off the plane and go BOOM! LOL They look good sir. I am thinking they will round this beautiful build off perfectly.
6 January 2019, 02:29
Thanks Donald, Clifford, and daemion! Worked on the nozzles some last night, but it is not finished yet and no new pics. Seems like these final steps are really taking forever! LOL
7 January 2019, 14:57
Thanks Augie and Clifford!
So I got a lot accomplished tonight, got the burner cans done (although I will hit them with a flat coat to tone them down a little) and the vertical and horizontal stabilizers, as well as the canards on. Also attached the deployed air brake and IRST clear part.
This will be the last update on the WIP, next up will be the final reveal in a couple days. Still have to finish the seats and canopy.
This thing REALLY looks awesome in person, and it is my favorite model that I have built so far. I am really excited to get this one done!
8 January 2019, 04:16
Yes yes , this is a verry nice looking plane , .. 😉 Fantastic Job ...
8 January 2019, 06:32
I look forward to the rolling out ... so far a fantastic timeline, cool to follow ... thx mate!
8 January 2019, 08:12
Thanks James, Ronny, Hans, Eelco, Harry, Ingo, and Jos!
I hope you all enjoyed the ride! This has been a rewarding one for me as it got me a bit outside of my comfort zone by doing a conversion. Turns out it is not so bad. I think I can see myself doing others in the future, unlike full model re-scribes LOL.
8 January 2019, 14:00
Amazing work mate! And now I need such a kit too 😉! Love to scroll through the pics! 👍
8 January 2019, 15:00
Thanks Donald, Maciej, Gerald, Clifford, and Michael, I am humbled by your compliments.
LOL Donald, Maciej, and Clifford... you guys crack me up! 🙂
9 January 2019, 13:25
Thanks Martien and bughunter!
Clifford, I used Gunze Aqueous H335 Medium Seagray for the overall coat. I had read H337 was a good match as well, but I decided to go with the slightly darker and "less blueish" H335. For comparison, the H337 is the dark gray color from my previous build, the Heater-Ferris F-4S.
Unlike almost all other Flankers, the Malaysian scheme is entirely one color top and bottom, which is kinda cool.
9 January 2019, 21:40
Thanks Michael, Erik, and Spanjaard! This one is ALMOST done, just gotta finish the canopy detail and add a couple probes and doodads and that's it. I might finish tonight, as least that's the plan. 🙂
Once again, thanks to everyone that followed along, as well as commenting and contributing!
10 January 2019, 18:15
Thanks for the color. I got my J-11 painted today. It is Tamiya IJN grey on the undersides, and Blue grey on top. MM Dark Ghost Grey with a few drops of dark blue added.
11 January 2019, 23:32