

WIP Revell Supermarine Stranraer


Comments
24 April 2017, 21:47
Thanks for the inbox, but it would be more available uploaded to the kit's subpage (using "what's in the box" feature)
25 April 2017, 13:49
Okay, thank you for learning me something new 👍
Shall post the pics there when I'm home
25 April 2017, 15:26
Nice going so far Martin. The tail fin does look much better, and just a bit of time to scribe it, makes a big difference! I have this kit also, so I'll be looking for some pointers as you build. It's a cool airplane !!!
26 May 2017, 18:49
I'll give you everything I have as I go along.
If you want some lessons from the master, check out Bernhard Schrock's: Supermarine "Super-Stranraer", Queen Charlotte Airlines, CF-BYM (completed: picture 158) | Album by Yellowwing (1:72)
27 May 2017, 10:08
This build looks doomed (exaggeration). Making error after error. At least I got some paint on her now.
29 May 2017, 11:09
Painted the crew. Added the decal for the instrument panel. I think I would have been better of with drybrushing the panel.....
4 June 2017, 12:55
The fuselage halves had some difficulties lining up. Some encouragement in the form of rubber bands & tape was needed. There was still a small step between the halves. Hopefully I can hide this with some putty and some sanding.
Dry fit of the lower wings showed some promise of a good fit. The three part upper wing will require some planning I think.
I'm entertaining the idea of rigging like this: Youtube Video

4 June 2017, 19:39
Very interested how the rigging method works for you. I don't think I can do it in 1:72 😄 and the 56 anchoring points... 🙂 🙂 🙂
6 June 2017, 11:36
I usually try something that's supposed to end perfect. Usually it doesn't end perfect. 🙂
I've tried simple glueing in other models and I wasn't satisfied with the result. The number of points make it a straightforward mass production job 😉
The scale presents some issues. The tool I made for making the eyes is too large I think. Now I'm pondering whether to continue, for consistencies sake, or to make a new tool. I'm leaning to the former.
Time will tell how it will turn out.
6 June 2017, 21:38
Ha ha, I know what you mean regarding intentions and outcomes 🙂 The eyelets look good, keep going 👍
7 June 2017, 12:20
Just watched the rigging video. whoa. It's a neat technique but I don't believe that I have the requisite hand-steadiness or eyesight anymore to pull it off. In truth, I probably never did have it...🙂
7 June 2017, 14:51
Looking at the video, rigging seems as easy as open hart surgery? 😉. I wish you a lot of succes 👍
7 June 2017, 15:42
All holes have been drilled. Tried some rivetting, don't think it will be a succes.
Thank you all for your encouragement!!!
7 June 2017, 20:30
Martin,
I see these on ebay for 1/72nd, but you'd need 3 packs of them, about $21:
Ebay.com Item - Yahu Model 1 72 Turnbuckles for Aircraft Model Kits Rigging YMS7220
I bet they are teeny little things!!! I think making them from wire is probably a better idea.
GasPatch Models also makes 1/48 & 1/32, but not 1/72.
I see lots of other ones too but not in 1/72 scale.
I've seen someone do riveting on this kit and it makes it look SO much better, but takes a lot of time I bet. And wouldn't be easy !!
7 June 2017, 22:01
Our very own Bernhard Schrock did a wonderful job: Supermarine "Super-Stranraer", Queen Charlotte Airlines, CF-BYM (completed: picture 158) | Album by Yellowwing (1:72)
A guy named Toichiro Yokoyama made another masterpiece: seawings.co.uk/ModArtStranraerTOY.htm
I can't decide which I like better 🙂
For the rigging part, this is my very first attempt this. It's not that hard, just a bit repetitive. Thanks for the tip anyway. The rivetting will be hidden under the camo paint I guess. And no, I will not make it NMF, I've got enough of those already and more in the stash 😉
What keeps eluding me is sanding skills. Just can't find the patience for it. And I do know how important it is. I've got files, sanding sticks, sanding paper in different grits, polish, polishing cloths, the whole lot. Anybody got some tips to make it less of a chore?
8 June 2017, 06:52
no tips about that, but whenever it's a thing you have to do that you don't like, my father teached me one important lesson:
if you don't like the work you are doing, do it right the first time, then it's permanently out of the way. Otherwise, it will come back and back, and people might think that you love that kind of work because they see you doing it a lot 😉.
He teached me this when I was very young and the garden needed to be weeded (1400m²...) so you learned to get over some disgust.
Personally, sanding is more like a zen moment for me... the better you do it, the more your model wil benefit...
8 June 2017, 07:18
Bart, you're right. Doesn't make it more enjoyable for me though 😉
Some lessons are hard to learn, maybe one day......
Tried a dry fit of the wings and struts. Total failure. Can't line them up properly. Need to think of something.
8 June 2017, 20:35
Martin,
I make my own sanding sticks from 150 grit to 3000. I just can't afford to buy $12 set of sticks every 4-6 kits! For $12 worth of sandpaper I can make dozens of sticks! When the store sticks are worn out I strip off the paper & foam and re-use the plastic part. Get even more use out of them !!
I make "Hard" sticks from 1/8" birch plywood and use double stick Scotch tape or super glue to adhere the paper. Soak the edges of the wood first with thin CA, helps make it waterproof, although I don't wet sand much because it's hard to see where your at, and too easy to go too far. If you have high spots, rough edges that need taking down you need a hard stick, soft padded sticks just don't do it right. Also get one of those large gum eraser things to keep the sticks clean, makes them last much longer!
I also make some softer sticks using double stick carpet tape on the wood ones, or use strips of craft board. It's close to the softer store bought sticks and good for light/general cleanup.
I also get the Tamiya sanding sponges from 400 to 3000 and put those on a wood stick or even a strip of craft board, good for light work, but don't last long wet, they fall apart. I use the Tamiya pads a lot. You can wet sand with them, but eventually they come apart too.
Rarely will I start with anything rougher than 400 to take down high spots and clean up rough edges, sprue points, joints, etc, even 400 scratches are hard to remove from the plastic. Then go with a hard 600 or even 800 depending on what the finish will be. Then give it a good once over with the 600/1000 Tamiya pad. 600 scratches will show under a glossy finish, but not so under flat.
I also buy these: Legacy Super Fine Mesh Sanding Pads (Amazon). They are 3"x4" double sided foam pads, 1500, 1800, 2400, 3200, 3600, 4000, 6000, 8000, 12000 grits. These work great for wet sanding between coats on car bodies. Just cut them into small strips the width needed. I'll start with the 1500/1800 on the primer coat, then go higher as I put on coats of color & clear, 4000 is more than good for that last coat of Pledge. The higher grits would work well for polishing the plastic I suppose. About $17 for a set, but work great and last a long time.
Sanding is a big part of building,,, there's always something that needs it,,, and does take a good amount of time. If nothing else I'll always scuff the whole thing with the 1000-3000 Tamiya pad just to take the "shine" off the plastic, helps the paint stick better. Not my favorite part either as it does add a lot of time to the build, but something we just cant avoid !!
Bart,
My dad always said the same thing too. Do it right the first time and you won't have to do it again. Kind of a no brainer !! lol
8 June 2017, 21:06
Thank you for the tips Robert. I've got the stuff, sandingpaper in several grit from the DIY store, dry & wet. I've got polish in different grades. I've got the alclad micromesh polishing cloths in grits up to 12000. It's just a chore I despise, and I guess I Always will.
Paul Budzik made a nice video about making your own sanding blocks: Youtube Video
I highly recommend his site with all kind of tips: paulbudzik.com/tools-techniques/index.html

8 June 2017, 21:49
Yupper !!
I like the guys videos, watched many of them.
Yes it is a "chore", but consider it more of an artistic thing! Done properly will make the build look so much better. Just keep at it mate!
9 June 2017, 00:59
After a couple of days trying to get the struts in place and getting nowhere, frustration took over. I controlled myself and gently placed the Stranraer in a corner and decided to have some fun: Tamiya Bell X-1 | Album by Mahoo76 (1:72)
13 June 2017, 18:35
I know what you mean regarding struts etc. I still have not figured out the best way to do it. Taking a break is the best policy 👍
14 June 2017, 01:01
there are some stands available to aid you with this: for example: umm-usa.com/onlinest..?manufacturers_id=92
Then you line out the wings, fix them and place the struts
14 June 2017, 07:15
After finally finishing the Hind, I pulled another old hag from the shelf. The problem was to get the struts to fit. After all this time, I found the source of my frustration. Both wings should be horizontal. My lower wing is tilted upwards and my upper wing slants down a bit. Which leaves too little room for the outer struts. Instead of ripping apart the wings, I'm shortening the struts. Not very rivet counter friendly, but it is a solution.
14 April 2019, 14:27
Cuajete, they are way overscale, but at least all are the same size 🙂
Thank you Stephan
16 April 2019, 19:50
I need that spirit, as painting a three tone paintjob with the upper wing glued on, could present a challenge 🙁
Welcome aboard!
16 April 2019, 21:06
Oh, I'm following this one. I have this kit, but I have... different plans for it.😉
17 April 2019, 14:30
Praying didn't help too much Alec. The Ammo Grey primer spit and spat all the time. It is now begging for mercy from the bin.
Greg, of course you do
Anyhow, primer is on and if it's an indication of the level of difficulty for the camo, I'm in for a lot of trouble…..
17 April 2019, 15:47
I feel like my reputation is becoming well known... 🙂
Anyway, stay the course Martin. This will turn out great!
17 April 2019, 15:51
Took an hour and a half to get the green in the spots I wanted it to go.
18 April 2019, 19:33
Love the Saro london and Stranraer ! Good progress and result Martin👍
Still got this on my to do list 👍
Sorry for the issues with the colors but you will manage it iam sure👍
18 April 2019, 22:45
Greg and Daniel, please make sure your lower wing is straight and level, that's the root of my frustration with the struts. And painting the wings before glueing them together can be helpful too 😉
Getting past the major speedbump has upped my own expectations of this build. I just ordered the right paint colours (due tomorrow?) and am even contemplating a base. But why did I think I should rig this thing......
19 April 2019, 06:41
Absolutely not the easiest way to apply a camo, but you've done a great job...
19 April 2019, 09:08
Looks good - quite a challenge to go for painting after glueing the upper wing!
19 April 2019, 09:37
Well, the paint arrived today and I just had to paint this girl.
Definitely not the easiest method. But I made this bed, so I must sleep in it.
20 April 2019, 16:41
We are getting somewhere! Started decalling today. There aren't that many, or overly large ones. But they shrivel like raisins with the slightest drop of softener. And I'm using Revells own stuff...
2 May 2019, 15:41
Thanks you gents. Just finished the rest and added two more pictures. The larger decals conformed very well into the recesses. Quite happy 😄
2 May 2019, 18:10
Thank you all. I just spent over 2 hours in an attempt to rig her. I abandoned the idea of looping a wire through a bit of pipe. I can't get 0.1 mm wire through a 0.3 tube through an eyelet and through the tube again. Madness!
So plan B called for a loop through an eyelet, a simple knot and a bit of ca.
The thread is so thin, it's barely noticeable.
6 May 2019, 19:47
Just finished the rigging between the wings. Bright light is necessary as the wire is soooo thin.
James, the eyes are only sharp when the distance is less than 30cm. Anything further and I need my glasses. 🙁
Last things are the guns and crew, the floats and their rigging, some gloss paint to represent wet spots and finishing of the base.
7 May 2019, 18:45
Damn, I have exactly opposite problem, can't see too close😉
Fingers crossed for the rigging, it can be frustrating sometimes 🙂
7 May 2019, 19:31
The rigging looks like a great job, but is it too thin for this scale? I'm asking for a friend...😉
Of course, it could be that I always seem to upscale my rigging, so my reference point needs to be calibrated. I'm obviously no expert though, so I stand and await imminent correction.
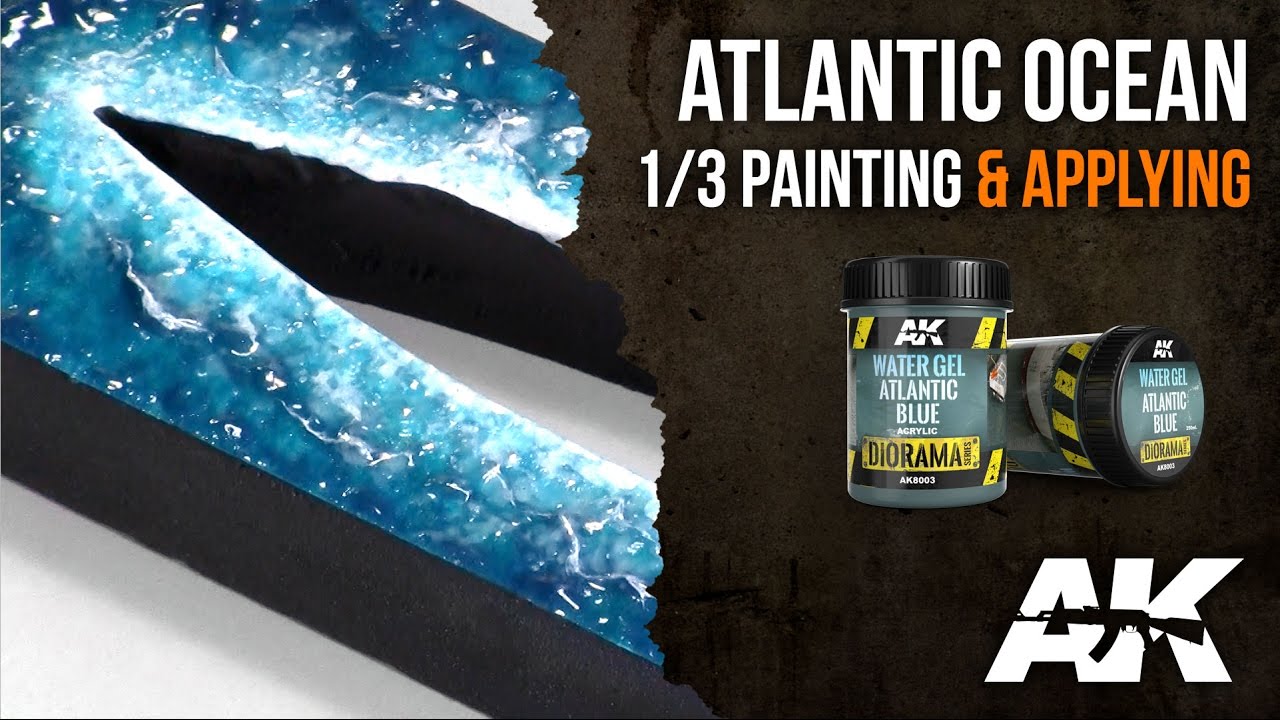
7 May 2019, 22:41
You can tell your friend I use this [img1]
The box says it is ideal for 1:72 and 1:48 scale.

And: Youtube Video

8 May 2019, 06:07
Mig rigging: 2mtr. for €4.50 Uschi von Den Rosten: 45mtr. for €10.50 ! And it's the same brand. Pick you're choice
8 May 2019, 08:32
Martin, I would have used a few metres of wire clothes line from the back yard! Looks awesome from my couch!
8 May 2019, 08:41
Lode, I have another pack unopened. Use these first, then look for something else.
Lex, you are right. The packing clearly states it is Uschi's stuff. Unfortunately some of my stuff was bought before I joined this venerable fountain of knowledge 😉
Peter, take a look at the newest picture. I managed to rig one of the floats. Still needs positioning and glue.
8 May 2019, 15:57
Thanks Clifford.
Rigged everything and glued the floats in place.
Guns, crew and joining with the base are chores left.
9 May 2019, 19:06
The more I look at it, the more I begin to think the rigging size is more appropriate than I first thought. It sometimes takes a while to adjust my frame of reference I think. After dealing in 1/144 for so long a big bird like this seems strangely huge.
13 May 2019, 23:19
Thanks guys. Because of some RL frustration, I got too hasty and glued the plane to the base too early. So now I'm making waves with a plane in the way. Oh well, what's new?
18 May 2019, 10:24
... and she is finally afloat! What a heck of a work, Martin! But you tackled this ´ol kit masterly! Well done!
18 May 2019, 10:48
Wow, the water looks really great 👍. Can you share materials etc? Very realistic 👍
18 May 2019, 12:01
Alec, I used the base from a display case. Painted it with white primer. The added some colour variation to the white, in my case greys and greens as I wanted a darker shade of water. De water itself is AK Atlantic water gel and AK Pacific water gel. The white foam is Vallejo transparent water gel tinted with white paint. For the base check here: WIP Supermarine Stranraer base | Album by Mahoo76 (1:72)
For the water, this is part 1 of a tutorial: Youtube Video
18 May 2019, 12:46
You should have more RL frustration if this is the result, my friend... when it happens to me I just end up glueing my fingers together and flinging a $50 kit off the shelf after tripping over some wires...
18 May 2019, 14:36
Awesome water! I have to try it myself one day. Just one remark though,I find the burnt iron paint you used for engines way too bright, looks more like brass or wood, not very realistic IMO.
18 May 2019, 20:48
So I took pictures of the completed thing yesterday and this morning I read Łukasz' comment. Damn you Łukasz! You are right 🙁 Thank you for this, the steel paint is drying now.
Greg, James, Tom and Lode, thank you gentlemen.
19 May 2019, 08:28
The album for the completed build (with steel exhausts) can be found here Completed Supermarine Stranraer | Album by Mahoo76 (1:72)
Thanks again Łukasz, your comment made me improve the build.
19 May 2019, 08:49
Thank you gentlemen. Waterpraise from the master shipbuilder #1 himself? I must be doing something right then 😄
19 May 2019, 19:35
Martin, can I ask you to at least wipe the dust off before you take a photo please? Your photography skills are sadly lacking. Sorry, but it had to be said.
I also have issue with the lack of a megladon under the water. Every illustration of a water scene I have viewed this year has a meg, where is yours?🙂
19 May 2019, 21:11
I NEED A DUSTBOX! That waterstuff is soooo sticky when wet. The dust particles are embedded in the water now, call it pollution??
The pollution scared the Meg away, it's of to cleaner Australian waters 😉
19 May 2019, 21:19
Lovely Martin! Seeing this great build is just pushing me a little closer to doing a float-plane.
19 May 2019, 22:14
Some of the best compliments ever: 'I may have to do a float plane as well'
20 May 2019, 17:47
I knew I was missing some great builds lately.... amazing job Martin. I really like the water and the rigging
25 May 2019, 10:17

