

Part 2 - Soviet Heavy Metal - Tu-128 Diorama Base

That's the plan.

This is what we got: A fancy bamboo cutting board as our diorama basis, the (awesome) PAG-14 airfield plates from ICM, an Ural 4320 truck also from ICM, an APA-5D airfield service vehicle conversion set from Armory, boarding ladders, wheel chocks. Did I miss something?

Ural 4320, an all-terrain, all-purpose 6x6 backbone of the eastern block (with its predecessor Ural 375)

The cabin, not much bigger than my thumb. Some flash and quite good detail for 1:72

The conversion kit for the APA-5D service vehicle which provided all kinds of AC/DC to the airplanes on the ground. Nice white resin casting, no bubbles. Photoetch and Decal.

Not really much to the chassis, but enough detail.

Wheel profile is not great, not terrible. A solid 3.6/10. There is aftermarket replacement for them, but the kit ones do not bother me too much. Will be covered in snow anyway!

There are three kinds of PE parts: fragile...

...small...

...and tiny.

I probably would have been perfectly fine without having to bend each 1:72 cable holding hook individually, but hey...here we are.

Soldering...

...and cleaning.

Attachment points for the cable holding swinging arms

Swinging arm attached

Implemented a metal axis into the construction so it is movable like on the real thing

Cabin already painted before installing the interior and windows. Kit windows were fairly thick and uneven, sanded them flat and a little thinner.

The conversion kit guys even included a miniature control panel for all the airplane service equipment


Made some additional little handles and struts, reworked the fenders a little

Painting time!

Here is the real deal btw

Electrical unit painted

Russian green, a wash, highlights, drybrushing. Nothing fancy.

Dry fit

Started working on the diorama plate.

ICM's PAG-14 concrete plates attached with superglue

I considered to ditch the plates and "painting" them since almost the whole area will be covered in snow anyway. But then realized I had to get rid of the wood grain of the board first. So the "real" plates was the simplest and more time saving solution after all

The gaps were sealed with superglue and superglue filler

Excess was cut off...

...and reused to fill the smaller sections at the edges

A totale of the whole artwork

View from behind

Cutting off the last remains

Applying them parallel to the board would have been less troublesome, but tilted like this it just looks better imo

The edges are then smoothed out

Additionally I layed down a layer of polyester putty to fill the last gaps

Painting process. After a coat of grey primer I did this kind of "preshading"

On pictures of these plates you see subtle but noticeable color differences between them coming presumably from different production batches where different "filler" materials were used in the concrete. The distribution should be more or less random.

Now we lay down several coats with well diluted grey paint

Until we get the desired effect. The coverage should be not too opaque and not too thin

In the next step we sprinkle random droplets with very diluted paint

Also in a random fashion and different colors to simulate all kinds of spills and holes in the concrete

After sealing everything with Future I lay down a heavy black wash

Let it set for good 10-15 minutes and wipe it off (with a dry cloth) focusing more on the centre of the plates

Last step was drybrushing with white which brings out all the edges and the fine structure of the plates a bit more

You see on pictures that often there is a "line" of bitumen sealing between the plates.


I tried to recreate it, figured a black paint marker was the right choice but noticed it did not look really good after half was done

The wavy and uneven application was deliberate but the contrast was just too strong, so i applied a thin layer of grey on top of the black sealing

Anyway, this is the result. I am not entirely happy with that, nex time I will do it differently and more subtly but since most of this will be covered in snow i'll give it a pass 👍

Let's dedicate ourselves to the main contender of the base: the snow. In order not to ruin the main base plate entirely I decided to do some test runs with different methods of snow application. Cue test subject Nr. 1. Just painted a small plate grey and drew some lines to simulate the concrete plates.

I want to recreate the snow accumulations around and beyond the airplane like it is seen on the picture.

For the bulk of the snow I am using a simple air curing modelling clay. This is applied in irregular piles. For this test piece I orient myself on the method described by this gentleman in his video: Youtube Video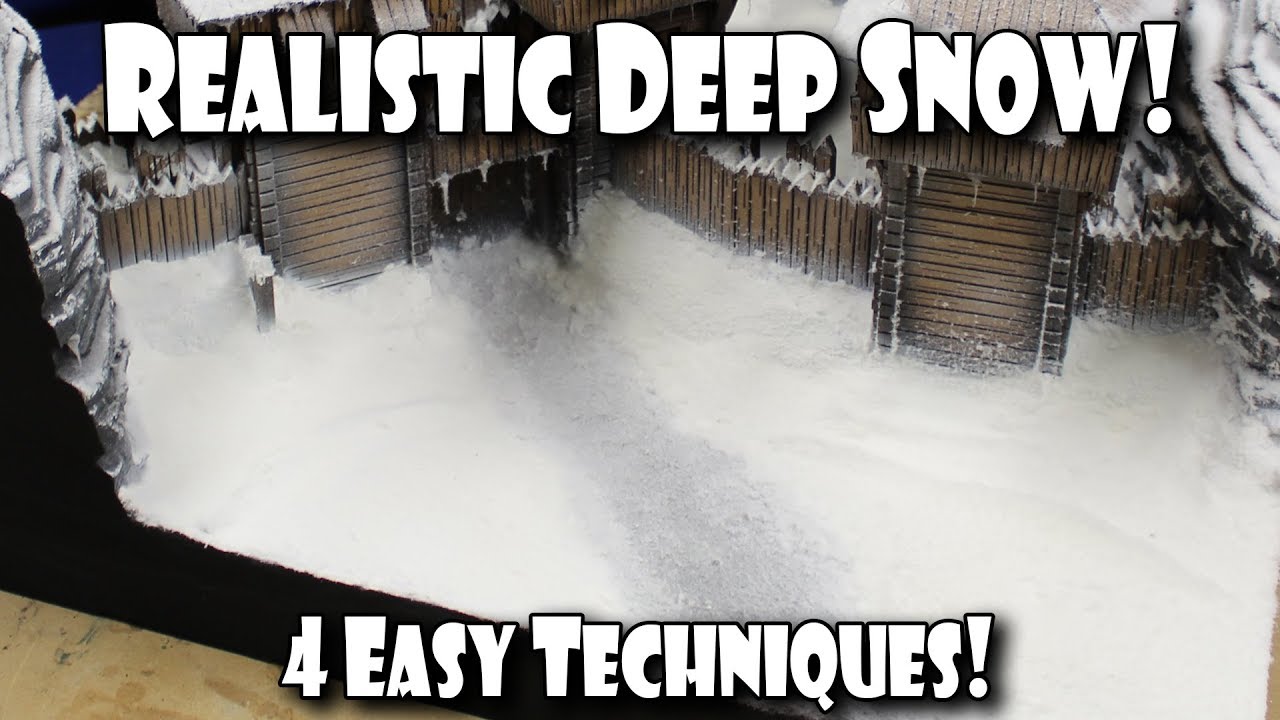

White "frosting" sprayed aroud the edges

When the clay is dry we apply a mixture of acrylic sealant from the hardware store, white paint and water.

Followed by a layer of this good stuff. This particular products is not a powder, but fine viscose flocks, similar to very fine static grass.

Using our snow applicator 5000

Which is actually a flour sieve but works perfectly for our cause


Let it snow!

And this is the result

I must say, this is pretty convincing snow

Especially from particular angles, light conditions and a distance

BUT. What we have to consider is the scale effect. If you look closely it looks fuzzy. Because in essence this product is the same as static grass, just in white.

Under direct sunlight conditions it is even more evident.

Ok, that was test subject Nr. 1! It looks pretty good, it might work in 1:35 but for 1:72 it seems a little "out of scale"

Test subject numero dos, same procedure

This is the clay I use BTW. It is already "wet", no mixing with water required. Very convenient. Dries overnight.

The contenders for this experiment.

Left to right: "Terrains Snow" a white, fluffy goop. Like molten marshmallow. Used to depict deep and fresh fallen snow. "Snow sprinkles", much more dense and more clear in appearance. Used for molten and frozen snow. "Snow Microballoons", a very fine Powder, ingredients not specified besides "Acryl". May be mixed or sprinkled on top with the other two to get a variety of effects.

Similar order of actions as the first test subject. The fluffy goop is diluted with water a bit and applied on top.

Followed by sprinkling on the microballoons. First impression: very, very convincing!


Detail work, to make flat, trampled down snow I apply the stuff, even more diluted, in irregular blotches on the surface and sprinkle the Microballoons on it.

This is the end result. At the very left corner I used a mixture of "Snow Sprinkles" and "Microballoons" which gives the appearance of very hard and icy snow that melted and froze again. The rest is the "Terrains Snow" with Microballoons sprinkled on top, which gives the impression of somewhat fresher snow.

It is even possible to make impressions of all kinds, like truck tires for example.

I think the winner has been determined!

But the first contender is getting a little consolation prize👍 Was having some fun while I was in "Winter Mode" and made a little diorama for my winter camo Panzer 3 I built a few years ago.

Now let's tackle the big one!

Let's finish the vehicle first. My "cables" came in with the mail, finally. These are elastic bands used for DIY necklaces.

Speaking of which, the cables are a trademark of this vehicle

My research has shown there are three types of connectors

Which provide three different types of current: DC, three phase AC and one phase AC

Which can be combined and plugged in countless ways fitting the purposes of the airfield in is used on. The configuration and placement of wires is also different for each vehicle. Which gave me a little "artistic freedom"

I made the connectors from various styrene strips

In total 5 sets of cables were made. Three plugged in in the panel and one will be feeding our airplane

The cables are also different in size and appearance, this one is a bundle of 4 small ones held together with clamps, which I recreated using flattened lead wire

The little hose clamps on top of the arm were also made from scratch. The ones from the conversion kit were unusable.


Found the right wheel chocks for our project

Was quite the pain in the a** soldering them but the practice with the flimsy vehicle arms paid off

Made them chipped and well used

Sneak preview

Finally tamed this little beast, all pics in an separate album, if you like!
Part 3 - Soviet Heavy Metal - Ural 4320 APA-5D Airfield Service Vehicle | Album by Alex G. (1:72)
Part 3 - Soviet Heavy Metal - Ural 4320 APA-5D Airfield Service Vehicle | Album by Alex G. (1:72)

This next addition I deliberated over a long time should I do it or not

The culprit is this particular stepladder

Which I encountered many many times in my reference material

Everywhere. It seems to have been designed specifically for this airplane to give the two man crew and the servicemen the best possible access to both cockpits

The aftermarket is really scarce in this case. I found a couple of etched ladders but frankly they would have been a poor compromise...

I deliberated really long whether to burden myself with it or not. The main problem was I did not find any reference material for this ladder. No sizes, no drawings, nothing. All I had are there B/W photos mostly with some bloke standing conveniently in the way.

But feeling judged by this comrade for my attempt to chicken out I started working.

Material of choice were Nickel Silver rods by Albion Alloys

The platform was taken from one of the PE sets, in my estimation it was the perfect size.

The rest was bending and soldering

I drew the framework of the ladder on paper, estimating the size as well as possible from the pictures

This was used as a template for the main structure


All kinds of contraptions were used to align the pieces

And this was the result of one day of work


This is how the working place looked like at the beginning...

...and towards the end

The steps were taken from the PE sets and modified by adding reinforcement struts

Two whole days and "meters" of soldering wire later this was the result

The wheels were made from spare parts


I had to make one little compromise...

The floor on the original is perforated and my disregard for this fact is met by this comrade with disgust

But I am not a perfect human being either so I am ok with that little inaccuracy, let's not forget the scale effect!

That was a new one for me and I am really happy with the result. A huge contrubiting factor was the encouragement of you guys, thanks for your positive comments and the likes 👍

to be continued...

Time to make it snow, first the approximate placement of the contenders

..and application of the snow heaps around them

I used the same clay as on the test dioramas

This seems pretty good

Followed by a treatment with the other Vallejo snow products as described in the thread

What is absolutely necessary when it is snowing? Snow shovels! These were made using various materials like brass sheet, styrene profiles and a lead strip.

Dioramas and especially figurines have always been outside my comfort zone but for this project I decided to take this step so please don't judge me too harshly on what follows!
Our main player is the pilot, a really nice and clean depiction by Aerobonus. He has to be modified a little in order not to look anachronistic.
Our main player is the pilot, a really nice and clean depiction by Aerobonus. He has to be modified a little in order not to look anachronistic.

The helmet is wrong and needs a little reworking and I want to get rid of the life jacket to make a "normal" pilot jacket. Plus he does not need his sidearm.

The helmet needs a visor, I cut it out from 0,2mm tin foil

This is sufficient

The other figures, pilots, mechanics, other personnell came from different sets, two from CMK

Since the setting takes place in a cold climate and I did not want the guys to catch a cold and neglect their duties they all received appropriate headgear.

The Soviet style ushanka hats were stolen from a Pegasus Hobbies WW2 Russian Infantry set and makes even the french mechanic Jean on the right look like an Ivan! He was abducted with his compatriot from a CMK kit.

This fine gentleman was taken from an "Alex Miniatures" set. Not sure what he is supposed to represent, maybe some Ministry of the Interior staff or even KGB. I included him because of his swagger

High brass and little helper expaining us something are from "Alex Miniatures" as well

The gang is complete!

Base painting was done using Vallejo Model Color acrylics and a wet palette. The mechanics received blue/blue grey overalls. Some had jackets.

I tried to vary the colors to prevent a homogenous monotony, used several shades of grey and blue, also take notice of the purple beanie on the helper!

The KGB guy received a fancy leather jacket...

...the low rank mechanic a dirty grey overall and an old ushanka

The air force high brass received a uniform in according colors. I am no expert in this field but according to my research this looks the part. The light blue collar badges and the hat ribbon were air force colors.

Base painting done, now to the finishing touches.

Used some washes to accentuate the shadows and increase the depths


Dry brushing was used for high lighting, various details painted with fine brushes

Like I said, figure painting is far outside my comfort zone but I am content with the result!

There are various Youtube tutorials which were helpful


Comments
160 15 March 2021, 22:35
Palo, for all the soldering questions please contact Mr. Bughunter: bughunter
😄
This guy is a magician. Practice and patience in my case, that is all there is.
17 March 2021, 14:05
Alexander, black marker ink can bleed through paint layers in time, take care that this black won't resurface in some months of time. The pigment particles are smaller than paint pigment and they tend to migrate through them.
26 March 2021, 11:42
Thanks for the heads up Steven, i will give it a couple of layers of Future to hopefully seal it 👍
26 March 2021, 12:12
Thanks Mate. Nice of you to share by photos your snow study. I see, using that kind of snow product it is prone to simulate a paste that, dosen't attract bugs😉, but instead creates a furry kind of snow 😄 😄 😄 (you have to agree that the pun / quibble is funny?) In the package the "stuff/ed" material is recomended for HO scale? Plan B?
27 March 2021, 11:29
Right now I am just weighting my options, this was just the first test. Yeah, the snow is for HO scale and should be suitable for 1:72. Don't get me wront it does look really really good but if you zoom in you see the individual fibers. I am considering this one plan B. Next test will be some snow products from AK, pictures following the next days 👍
BTW that pun was awful 😄 😄
27 March 2021, 12:24
AK interactive has some nice snow products for dios. I used them for my Dakota crash and Gladiator dios
27 March 2021, 12:27
You mean fur, not fibers, right? Sorry Mate, I didn't know that your sense of humor was going so low 😄 😄😄
So you are getting the professional materials on bord? Looking forward for the next tutorial 👍
27 March 2021, 12:29
Erik I read that first as "AK interactive has some nice products for idiots" 😄😄 They sure do, they really are fool proof and there are even instruction videos on Youtube.
27 March 2021, 16:18
Looks really good so far, looking forward to your next snow experiments. 👍
27 March 2021, 18:33
Your test subject looks better than my hangar apron 😄 😄 😄
Loving the snow applicator Mk.5000 👍
Btw. remember you're making a Siberian dio, the snow in such temperatures gets stiff and hard like a stone (checked this out one day in Finland), so it may look a little bit different than a fresh&soft one we get in Mid-Europe.
27 March 2021, 21:42
Yeah had that in mind too with the snow. Second test subject looks promising! Pics tomorrow.
27 March 2021, 23:06
Oh the microballoons..., in my search for snow, I read about them in a model magazine, I think it was n.20 "Art du Modelisme" (no, not this one but has a nice article about snow). They are perfect for this purpose.
The Deluxe materials brand also produces them but they are expensive (so not for me). In that publication they advise to use mask during its application because they are so small that they can be inhaled and are harmful to health.
You can also read about them in this link (beautiful internet):
christinedemerchant...-micro-balloons.html
Perfect. keep it comming mate 👍
28 March 2021, 11:19
I told you it is good stuff. And you can mix it with acrylic paint of other AK products to get dirty snow.
28 March 2021, 11:28
Thought also about breathing this stuff in. Particles that small are never a good thing for the lungs I guess. But thanks to the virus there is an abundance of masks anyway in each household👍
28 March 2021, 12:33
100% following. Gosh. This is amazing work... Love admiring all that PE work and those who build these dioramas. ?
29 March 2021, 19:08
The round elastic is a very clever and useful thing for the representation of cables and (fuel) hoses . I guess it can be found in local shops .
29 March 2021, 19:30
Thx guys.
I liked the cable material too, very "organic" and bendable. Found mine on eBay.
29 March 2021, 19:36
Running out of superlatives to support your posts - so will just say this is a terrific addition to show off the Fiddler.
29 March 2021, 21:02
The truck is finished, all the pics in an separate album: APA-5D Airfield Service Vehicle | Album by Alex G. (1:72)
30 March 2021, 19:04
Great construction, very beautiful model, great technical mastery. I like it ! , Congratulations !😉
1 April 2021, 12:39
Awesome scratch detail work on the ladder - looks very realistic and adds greatly to both the size of the model as well as the overall appearance in a diorama! 👍 👍 👍
1 April 2021, 13:49
Disappointed though, that you didn't feature the semi naked Soviet technician from the photos! Splendid finale however!
1 April 2021, 20:30
Don't tempt me Andy, the ladder wasn't planned either from the beginning 😄😄
1 April 2021, 20:44
Ladder is excellent, as comrades above have already mentioned, lack of perforation and semi nakedness notwithstanding 👍
1 April 2021, 23:04
Hello Mates, Sorry for the lack of updates lately, but I am desperately waiting for some diorama figures to arrive in the mail. The post of Mother Russia is awfully slow these days. At the latest next winter the diorama will be finished, I promise😄
6 May 2021, 18:46
That is a truely breathtaking piece of work. NMF at its best, fantastic attention to detail
in every respect 👍
6 May 2021, 19:09
Love you work and dedication to the project. Nice ideas and it'll be a sight when it's done. I'm late to the show but now I'm here following the home stretch!
6 May 2021, 19:20
Thx mates. Urban, you are far from late to the show. The project is still in progress! Still waiting for a parcel from Mother Russia with figures for the dio.
31 May 2021, 10:54
I can not believe two years have passed but I finally made the last pictures and can show the completion of this project!
21 March 2023, 09:22
I have no words for the superlatives of your skills and the diorama. Hats off! 👌👌👌
22 March 2023, 10:52
Are unique! Thanks for the good description of the snow. The selection of figures is very cool. I also suffer from a lack of the right people, that's why I regularly don't even think about whether I'm putting dagi at all.
22 March 2023, 11:55
thx mates!
@Bernd: I wouldn't go that far calling my skills "superlative", but I am flattered, very kind of you 😄
@DerMattes: the ladder was quite a bit of work but it was worth it in the end and I also like the result, thanks!
@Живко: it was surprisingly hard to find proper figures, like I said they were from many different sets and had to be modified to fit the dio and my ideas
22 March 2023, 19:07
Very impressive build. The scratchbuild detail looks great as do the snow effects.
23 March 2023, 10:58
Thx Vincent! I broadened my horizon with this project and am too quite happy with the result. Final pictures following
23 March 2023, 19:58
Final reveal guys, tell me what you think. All kinds of criticism please, positive or negative 👍
25 March 2023, 11:44
Very nicely done!
Again makes me want to build this NMF giant, too!
25 March 2023, 12:01
Well I remember our discussions a few years ago whilst you were building/correcting your Trumpeter kit and I was doing mine. It's great to see the enhancements made by the diorama and support vehicles.
Outstanding!!
25 March 2023, 12:03
Outstanding work Alex. The tarmac looks a bit too new, that's the only thing that jumped out at me. The models are done to perfection, I love the figure work as well 👍
25 March 2023, 12:34
Speechless, I don't know where to start - from an unusual plane topic and the superb construction of what seems to be a difficult and inaccurate kit, to the detailed and lively looking diorama with great snow effects!
👍👍👍
If you want some 'negative' criticism too, then I could think of only two things:
1) perhaps the snow could be more colorful in some areas. Maybe something like oil/fuel staining, or anything to make it a bit more interesing. Perhaps also some areas where the snow melted, only to freeze again to form a mixture of snow and ice
2) maybe also some snow or ice on the plane itself, at least in areas where its hard to remove it
But those are very nitpicky and minor things that might also be subjective. In any case, this is definitely an eye catcher!
25 March 2023, 13:51
So. I said a bit above that I admire the choice of figures. The plane is very good. I can't make one. The staircase is unique. The concrete looks very clean. There are no signs of wear, and in the north the conditions are harsh and destroy it a lot. I would do it in patches. The snow is very white. If we assume that the moment is shortly after snowfall, it happens. But there is one but. Then there should be no old snow in front of the plane. If I have old snow somewhere, it should be at least a little dirty. The truck is very clean. Russian military equipment, even new, is not that clean. The one that stays in the garages and is taken out once a year too. In addition, during the winter, military equipment is not cleaned as often. Yes, it is not muddy, but there is a lot of sand on it from the roads. You wanted criticism, that's from me and my experience with snow and military trucks.
However, this does not mean that the work is bad. I admire her.
25 March 2023, 21:18
Thx guys for the replies, was interesting to hear different opinions! Truck is definitely too clean!
30 March 2023, 13:09
Thx a lot mates, that was a challenging but fun project. Went definitely beyond my comfort zone. Many new techniques were learned and applied
4 May 2023, 09:41
Awesome diorama! All the parts are just excellent and the stepladder is cherry on the top 🙂 Enjoyed your comments below the pictures too 😄
22 July 2023, 18:15
On picture 7: "Wheel profile is not great, not terrible. A solid 3.6/10". Ahaha I see what you did there!
13 September 2023, 07:40
Good eye Davide 😉 Glad someone got the reference or is at least reading my scribbling 😄
13 September 2023, 10:56
Brilliant. The truck is my favorite part. Or the platform. Or the snow. Well, the plane isn´t bad either...
13 September 2023, 21:35
Album info
The finished Tu-128 will be a part of a little snowy diorama with an airfield service vehicle.
WIP of the plane:
Part 1 - Soviet Heavy Metal - Tupolev Tu-128M Heavy Interceptor WIP | Album by Alex G. (1:72)


