

Char 2C


Comments
Having completed the Char B1, I decided to make a start on this one next as it too is also French and still remains the largest armored vehicle to ever go into production.
The bloody thing is HUGE!
Being my first Meng kit, I was really impressed with the molding quality and fit and the included P/E was very nice and thin.
I just need to assemble the track runs which I'm a little dubious and concerned about to be honest, then give everything a coat of black primer. I've left the spotlight and machineguns off so as not to break them while handleing etc.
Thanks Villiers, Rewop and Robin 🙂
I got the tracks assembled yesterday which went together very easily despite my concerns about them.
I then gave everything a coat of Stynylrez black surface primer in readiness to begin applying some colour later today.
Pics to follow...
OK looks like somebody's got the ww1 bug. Looking forward for the result. 👍
Hehe, perhaps post WW1 and pre WW2... but in saying that, my brother has suggested I do the Takom 1/35 St Chamond next. I'm still thinking about it 😉
I got the green base colour done earlier today.
Will leave it now and look at spraying the sand yellow tomorrow.
A bit of a milestone made today with the addition of some dirt and grime applied to the upper surfaces of the sponsons before mounting the tracks finally which were a colossal pain in the arse! Also started weathering the rest of the main hull and turrets with Mig oil brushers.
Thanks Robin & Villiers 🙂
Just a little more weathering to do before finishing up with the installation of the machine guns and spot light.
Thanks S M 🙂
I finished it off yesterday and just waiting for the sun to come out to get some pics of the completed build.
Background:
The Char 2C (also known as the FCM 2C) was a French "Super-Heavy" tank.
It remains (by dimensions) the largest operational tank to enter service by any nationality, and was only matched in weight by the German King Tiger's and Jagdtiger's of WW2.
It was designed in 1917 during the closing stages of WW1 with a proposed production run of 300 examples.
However, with the end of the war in November 1918, this order was temporarily suspended and nearly cancelled, before being revised to just 10 units being produced in 1921.
It measured 10.27 m (33 ft 8 in) long, 3 m (9 ft 10 in) wide, with a heigh of 4.09 m (13 ft 5 in) weighing in at 69 tonnes and had a crew of 12 men.
Living up to it's description of "land battleship" It did not have an engine bay, but an entire dedicated engine room, which was accessible from both the forward and rear fighting compartments inside of the hull.
It was initially powered by 2x Mercedes aero engines (captured during the war) producing 200 hp each, but these were found to wear out too quickly, and were later replaced with more powerful 250 hp Maybach engines that the Germans were using to power their large Zepplin airships at the time. It's maximum speed was (considering its overall size and weight) a respectable 15 km/h (9.3 mph) with an operational range of 150 km (93 miles)
It's main armament consisted of a single 75mm field gun mounted in the forward turret, with 124 rounds.
Secondary armament consisted of 4x 8mm Hotchkiss machine guns mounted via gimballed ball mounts in the front of the hull and forward section of both sponsons as well as in the rear turret.
A little known and unique design feature of the turrets was the addition of "stroboscopic" cupolas.
These basically consisted of rotating rings with vertical slits cut into them for the occupant to peer through.
When rotated at speed, the vertical slits merged together offering the crewman inside an unobstructed 360 degree field of view around him (similar to looking through a rotating aircraft propellor) and yet offered protection against incoming enemy small arms fire!
Unfortunately for the Char 2C, the passage of time rendered it too late to take part in WW1 and by the mid 1930's with WW2 on the horizon it was obsolete due to the advent of modern artillery and smaller, more maneuverable tank designs.
It would however be kept in service as a morale booster for the local civilian population.
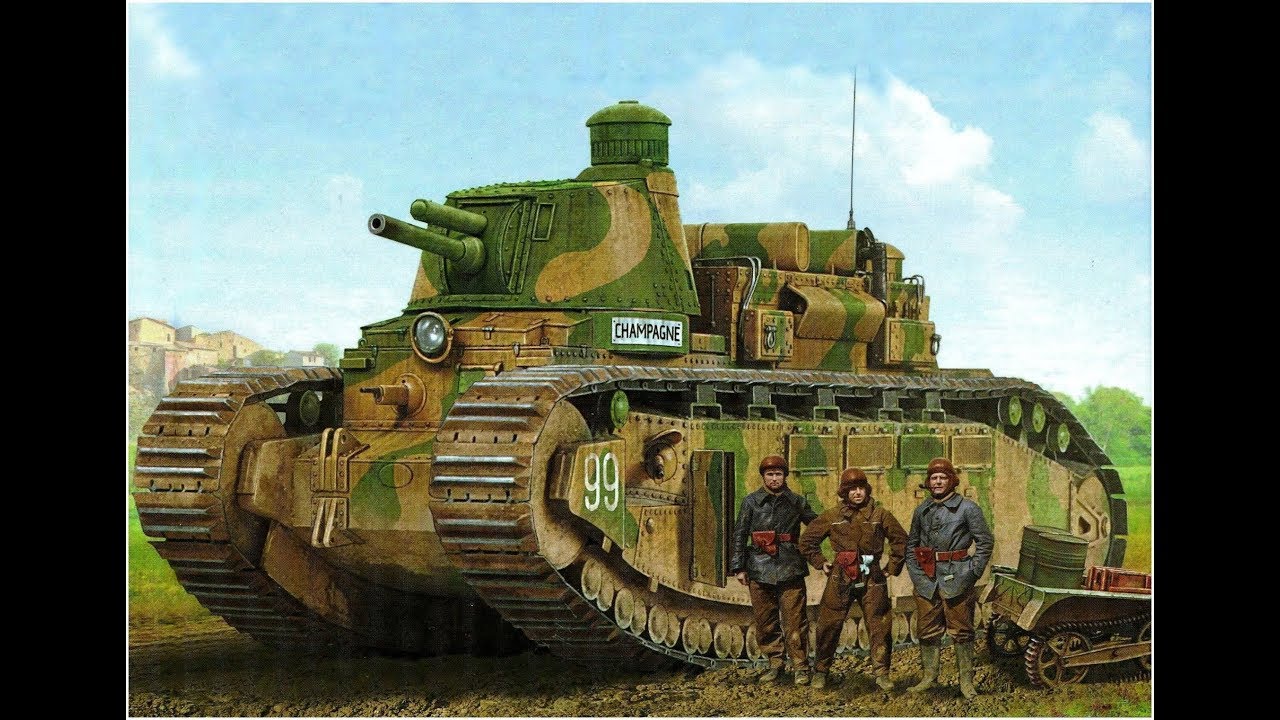
During the French mobilization of 1939, all ten Char 2C's were activated and placed into their own unit, the "51st Bataillon de Chars de Combat". For propaganda, each tank was named after one of the ancient regions of France, numbers 90-99 being named "Poitou", "Provence", "Picardie", "Alsace", "Bretagne", "Touraine", "Anjou", "Normandie", "Berry", and "Champagne" respectively.
In 1939, the "Normandie" was renamed "Lorraine".
The kit:
This was my first Meng kit and I was really impressed with the quality of molding and fit of the parts.
The assembly instructions were clear and easy to follow with no numbering discrepancies encountered.
Love them or hate them (more on this later) Meng include workable plastic track links which are already loose and ready to assemble. Despite it's large size, each run only consists of 67 links due to the individual links themselves being quite large.
The kit also includes photo etch grills for the top of the engine room, sides of the sponsons and a baseplate for the name plaque beneath the main turret.
While you could go to the expense of obtaining a metal barrel for the main gun, I found that the two piece kit barrel assembled and cleaned up easily with minimum effort. The kit offers 3x marking options to choose from with 2x being in overall dark green ("Poitou" and "Normandie") and 1x camouflage scheme for Alsace. I obviously chose the more challenging Alsace scheme purely for aesthetic reasons.
Unfortunately, other than the 2x unit numbers on either side, Meng only provide decals for the unit insignia and name plate for the left side meaning that the right side looks a little bare in comparison. If I were to build it again in one of the overall green schemes, I'd seriously consider using the "Poitou" decals on one side and "Normandie" on the other; effectively representing two units in one. (would need to scratch together a second name plate out of 0.25mm plastic card though)
Build notes:
In my first picture you can see 6x large slots on the bottom of the hull where the inner skirts attach to.
Only version C (Normandie) is supposed to use the skirts, but is easy to overlook (as I did)
It's not a big deal and I suspect that all 10 tanks had the skirts installed at some point when first manufactured, but is something to be wary of if you want to be anal about it. Obviously if you leave them off, your left with some sizable holes to fill.
In the end it worked out quite well for me installing them on the inside but leaving them off of the outside etc.
Pay attention to the placement of the small wheel assemblies noting that they alternate between ridged and flat and just do them one block at a time per the instructions. To prevent getting the parts mixed up I removed and installed the locking rails that lay over the top just one at time. It's also advisable to glue the wheel axles in place to prevent them from rotating to make painting easier... alternatively you could just paint them beforehand prior to mounting etc. Also, when removing the road wheels from the sprues, take care when handling so as not to accidently snap the delicate hinges that attach to the sponsons later on.
(It may be a good idea to set these parts aside for safe keeping right at the start)
When your ready to attach the frontal armor plate to the upper hull; dry fit it in position to the lower hull using some tape to secure it until the glue cures. This will ensure a proper fit and alignment which is critical later on.
Completely assemble each of the mounting blocks for the upper rollers one at a time (per the instructions) to prevent mixing up the parts, then label them on the base as depicted in pic 5 so you know which completed assembly goes where.
Note that they are installed with the taller side facing outwards from the slope on the sponsons.
The individual track links are ready to assemble straight out of the bag, and I only came across 12 or so that needed a couple passes with a sanding stick to clean up. They just click together, then need a gentle wiggle to ensure that the connecting pins are seated properly. Assemble them in blocks of 5 - 10 links maximum to avoid having them separate from each other as the run increases in length.
If you take your time, they assemble very quickly with each run only taking approx. 25 mins total.
Just avoid putting any tension on them whatsoever! I didn't loose any links during assembly and had just over 20 spares left.
I did not test fit them prior to painting and installing so as to minimize the risk of having them fall apart.
The instructions indicate to use 67 links per side, but I found that this ended up being approx. 4mm too short to join each loop together. Trying to put tension on them to make them fit ended up in several breakages much to my annoyance.
Fortunately, I had anticipated having this problem and painted several spares to use to increase the overall length to 68 links.
When joining the second side together (with 68 links instead) I had no issues other than a slight droop where gravity pulled them away from the road wheels at the upward sloping front and rear. This was overcome by gluing the top of the tracks directly to the bottom of the road wheels and sitting the hull upside down while the glue cured. Once secured, the slack created by using the extra link was evenly distributed across the top with a little bit of fiddling, before they were anchored in place with glue as well.
Leaving the rear drive and front idler wheels to rotate freely, rather than gluing them also helped a lot with the final track positioning.
Leave the machineguns and headlight off until the very end to avoid breakages, as the mounting bracket for the spotlight in particular is extremely fragile. Also note that the outer ring of the clear lens needs to be painted the same base colour as the hull but wasn't immediately obvious until I went to install it; and after getting them positioned, I glued the ball mounts for the machineguns to prevent them from moving around while painting. Just be sure to angle them the way you want them beforehand.
Lastly, prior to painting I recommend using a black or alternative dark shade of primer to cover all of the bare plastic, and pay careful attention to apply it inside all of the many recesses on and around the hull; particularly around all the road wheels and inside of the cavity in front of the rear drive wheels.
Summary:
This is a huge kit, but not complicated if you take your time and follow the assembly instructions closely.
Even the tracks, despite their fragility assembled very easily, with the hardest part being mounting them finally at the end without breaking them. For this reason I'd not recommend the kit for beginners.
At the time of completing the build, there was nothing available in the way of metal replacements which was a shame as the kit is crying out for some and would benefit greatly with more durable and weighty tracks.
But despite this, all up it's a very nice kit of an interesting and rare subject.
Very highly recommended & cheers for following 🙂👍
Youtube Video
Crikey this thing looks like Homer Simpson had a hand in the design process...
Turned out fantastic. Tracks may have been a pain but they turned out great. Can you give a brief detail on how you painted them? That slightly rusty effect is amazing.
Awesome! And your description is fantastic and very instructive.
Thanks for looking in and commenting guys, very much appreciated 🙂
@ John - Re painting the tracks, there's nothing to it really.
After a primer coat of black, I spray the tracks in Tamiya XF-56 "Metallic Grey".
Once dried, I brush on Mig enamel "Tracks Wash" (A.MIG-1002) with a disposable paint brush using a stippling motion to get down into all the recesses.
I then blot away any excess from the raised detailing with a paper towel and leave it to pool in all the recesses, then set them aside for 24 hrs to dry.
(note that the wash will lighten a bit as it dries)
Once dried I seal them with a coat of flat clear (Tamiya XF-86)
To add a little colour variation I then apply (vary sparingly) assorted pigments to represent dried mud/dirt with another disposable brush. I normally use a combination of light sienna and burnt umber depending on the theater.
lastly, I then go over all the raised cleat details with "light gun metal" from Tamiya weathering master set F or alternatively you can dry brush them instead.
I suspect that the weathering process hindered their movement enough to prevent me from joining the track runs together per the instructions with 67 links, so something to be mindful of as well. That may leave no option other than to mount them prior to painting and secure them with glue link and length style etc. 😉👍
migjimenez.com/en/we..mmo-tracks-wash.html
James, thanks for the details on the weathering. Sounds quite straightforward. I need to get some of the MIG washes to make things easier as I've been using oils and white spirits.
There's an urban legend who say that one( Number 97) is still somewhere in Russia.
In June 40, german backed it in Germany for test and evaluation, and in May 45, Russians backed it to homeland for test of French technology.
And after, 97 fade away...
It's somewhere in a military base in Far East. That's all I know.
I have worked on 1/72 Master of 2C in 1993, in cooperation with Schneider Factory.
@Marc: I was thinking of this myth when I first saw this build! However, as with many of those urban legends there are variants of it floating around: The version I heard was a vehicle (the "Champagne") being of course taken as a trophy by the Germans after failed scuttling attempts in 1940 and shipped to Berlin. The twist with this variant however lies in the vehicles fate. There are some claims of eyewitnesses reporting the vehicle present in postwar Berlin and East Germany for a while before disappearing suggesting it being either scrapped or taken by the Russians as you suggested 👍
The tank-nerd in me still however wants to believe the thing being stored away somewhere... and ideally finding it´s way to Saumur to be properly displayed.
Until then, we at least have great build of this vehicle as seen here 😉
Thanks Marc and Tom 🙂
I had heard of the rumors as well and is mentioned in the short youtube link I posted above.
It would be amazing if it did turn up finally some day, but I suspect if it were true that either it has long since been scrapped or is now beyond salvage. Considering they were built in 1921, It would be just over 100 years old now.
It'still possible to doing one real again. Schneider still have plans and files on it.
It was an Urban legend in 1993, when I worked on 1/72 Master, and Saumur Panzer Museeum was on search and negociations with russians too (I was in contact regulary with The Boss), at this period.
But 30 yrs later, it's realy possible to find it in nowhereland in Russsia...
Or to reproduce one...
@ Ben, that would be cool. Hopefully Meng or Takom etc will do one in 1/35 some day 👍
@ Marc - If the plans still exist even a wooden mock-up of the real tank as was built during the design conception in 1917 would be awesome to see. Wood be cheaper to build as well I should think. 😉
@ James C
The plans and drawings still exist. I've seen them in 1993, and worked with, when I've sculpted 1/72 Master of 2C for ITA Models.
Thanks Pietro and Robin 🙂
@ Robin - It sure is and was a tight fit to squeeze it into the display cabinet!
I've really enjoyed building these French tanks for a change from the usual WW2 subjects, and am about ready to throw some paint at a third. 😉
It would, but don't currently have one in my stash... but I do have the crazy looking St Chamond from WW1 😉
Should also make a nice contrast. 👍 I always wondered how the designers figured the St Chamond would navigate trenches without getting stuck (spoiler: they got stuck).
Hehe, yeah I was looking at the assembly instructions, and it looks like it had wine barrels mounted to an axle installed into the undersides of the main hull where it overhangs the tracks at the front and rear which would rotate if it made contact with the ground. I guess the idea was to help prevent it from ploughing into the dirt and getting stuck! But, I cant see how it would have been able to navigate across open trenches.
Beautifully executed one James, lots of things going on every corner of that model. 👍
Thanks Murad 🙂
Unfortunately I've been having trouble of late with the camera as it's becoming increasingly difficult to get it to focus properly and is getting worse. Being 10 years old now, it's well overdue for a proper servicing to give the mirrors and lens a good clean in a sterile environment but too expensive to justify the cost at present.
My IPhone takes sharper images indoors, but gets too much glare on the screen when used outside to be of any use. 🤔
Wow another beauty James! You're going to inspire me to build a tank at some point 😁
For information, these tanks weren't buit in a tanks factory but in a Shipyard, at La Seyne sur Mer, near Toulon, in South of France. The shipyard's name was, Forges et Chantiers de la Méditerranée (FCM).
Thanks Hugh. It was mentioned in the brief YouTube clip I posted above along with period footage of one of the actual Char 2C's ploughing through a house.
Well worth a look for more historical info on what happened to them, and other assorted period footage...
Youtube Video
Album info
Background:
The Char 2C (also known as the FCM 2C) was a French "Super-Heavy" tank.
It remains (by dimensions) the largest operational tank to enter service by any nationality, and was only matched in weight by the German King Tiger's and Jagdtiger's of WW2.
It was designed in 1917 during the closing stages of WW1 with a proposed production run of 300 examples.
However, with the end of the war in November 1918, this order was temporarily suspended and nearly cancelled, before being revised to just 10 units being produced in 1921.
It measured 10.27 m (33 ft 8 in) long, 3 m (9 ft 10 in) wide, with a heigh of 4.09 m (13 ft 5 in) weighing in at 69 Tonnes and had a crew of 12 men.
Living up to it's description of "land battleship" It did not have an engine bay, but an entire dedicated engine room, which was accessible from both the forward and rear fighting compartments inside of the hull.
It was initially powered by 2x Mercedes aero engines (captured during the war) producing 200 hp each, but these were found to wear out too quickly, and were later replaced with more powerful 250 hp Maybach engines purchased from Germany which were being used to power their large Zeppelin airships at the time.
It's maximum speed was a respectable 15 km/h (9.3 mph) (considering its overall size and weight) with an operational range of 150 km (93 miles)
It's main armament consisted of a single 75mm field gun mounted in the forward turret, with 124 rounds.
Secondary armament consisted of 4x 8mm Hotchkiss machine guns mounted via gimballed ball mounts in the front of the hull and forward section of both sponsons as well as in the rear turret.
A little known and unique design feature of the turrets was the addition of "stroboscopic" cupolas.
These basically consisted of rotating rings with vertical slits cut into them for the occupant to peer through.
When rotated at speed, the vertical slits merged together offering the crewman inside an unobstructed 360 degree field of view around him (similar to looking through a rotating aircraft propellor) and yet offered protection against incoming enemy small arms fire!
Unfortunately for the Char 2C, it arrived too late to take part in WW1 and by the mid 1930's with WW2 on the horizon it was rendered obsolete due to the advent of modern artillery and smaller, more maneuverable tank designs.
It would however be kept in service as a morale booster for the local civilian population.
During the French mobilization of 1939, all ten Char 2C's were activated and placed into their own unit, the "51st Bataillon de Chars de Combat".
Each tank was named after one of the ancient regions of France, numbers 90-99 being named "Poitou", "Provence", "Picardie", "Alsace", "Bretagne", "Touraine", "Anjou", "Normandie", "Berry", and "Champagne" respectively.
In 1939, the "Normandie" was renamed "Lorraine".
The kit:
This was my first Meng kit and I was really impressed with the quality of molding and fit of the parts.
The assembly instructions were clear and easy to follow with no numbering discrepancies encountered.
Love them or hate them (more on this later) Meng include workable plastic track links which are already loose and ready to assemble. Despite it's large size, each run only consists of 67 links due to the individual links themselves being quite large.
The kit also includes photo etch grills for the top of the engine room, sides of the sponsons and a baseplate for the name plaque beneath the main turret.
While you could go to the expense of obtaining a metal barrel for the main gun, I found that the two piece kit barrel assembled and cleaned up easily with minimum effort. The kit offers 3x marking options to choose from with 2x being in overall dark green ("Poitou" and "Normandie") and 1x camouflage scheme for Alsace. I obviously chose the more challenging Alsace scheme purely for aesthetic reasons.
Unfortunately, other than the 2x unit numbers on either side, Meng only provide decals for the unit insignia and name plate for the left side meaning that the right side looks a little bare in comparison. If I were to build it again in one of the overall green schemes, I'd seriously consider using the "Poitou" decals on one side and "Normandie" on the other; effectively representing two units in one. (would need to scratch together a second name plate out of 0.25mm plastic card though)
Build notes:
In my first picture you can see 6x large slots on the bottom of the hull where the inner skirts attach to.
Only version C (Normandie) is supposed to use the skirts, but is easy to overlook (as I did)
It's not a big deal and I suspect that all 10 tanks had the skirts installed at some point when first manufactured, but is something to be wary of if you want to be anal about it. Obviously if you leave them off, your left with some sizable holes to fill.
In the end it worked out quite well for me installing them on the inside but leaving them off of the outside etc.
Pay attention to the placement of the small wheel assemblies noting that they alternate between ridged and flat and just do them one block at a time per the instructions. To prevent getting the parts mixed up I removed and installed the locking rails that lay over the top just one at time. It's also advisable to glue the wheel axles in place to prevent them from rotating to make painting easier... alternatively you could just paint them beforehand prior to mounting etc. Also, when removing the road wheels from the sprues, take care when handling so as not to accidently snap the delicate hinges that attach to the sponsons later on.
(It may be a good idea to set these parts aside for safe keeping right at the start)
When your ready to attach the frontal armor plate to the upper hull; dry fit it in position to the lower hull using some tape to secure it until the glue cures. This will ensure a proper fit and alignment which is critical later on.
Completely assemble each of the mounting blocks for the upper rollers one at a time (per the instructions) to prevent mixing up the parts, then label them on the base as depicted in pic 5 so you know which completed assembly goes where.
Note that they are installed with the taller side facing outwards from the slope on the sponsons.
The individual track links are ready to assemble straight out of the bag, and I only came across 12 or so that needed a couple passes with a sanding stick to clean up. They just click together, then need a gentle wiggle to ensure that the connecting pins are seated properly. Assemble them in blocks of 5 - 10 links maximum to avoid having them separate from each other as the run increases in length.
If you take your time, they assemble very easily with each run only taking approx. 25 mins total.
Just avoid putting any tension on them whatsoever! I didn't loose any links during assembly and had just over 20 spares left.
I did not test fit them prior to painting and installing so as to minimize the risk of having them fall apart.
The instructions indicate to use 67 links per side, but I found that this ended up being approx. 4mm too short to join each loop together. Trying to put tension on them to make them fit ended up in several breakages much to my annoyance.
Fortunately, I had anticipated having this problem and painted several spares to use to increase the overall length to 68 links.
When joining the second side together (with 68 links instead) I had no issues other than a slight droop where gravity pulled them away from the road wheels at the upward sloping front and rear. This was overcome by gluing the top of the tracks directly to the bottom of the road wheels and sitting the hull upside down while the glue cured. Once secured, the slack created by using the extra link was evenly distributed across the top with a little bit of fiddling, before they were anchored in place with glue as well.
Leaving the rear drive and front idler wheels to rotate freely, rather than gluing them also helped a lot with the final track positioning.
Leave the machineguns and headlight off until the very end to avoid breakages, as the mounting bracket for the headlight in particular is extremely fragile. Also note that the outer ring of the clear lens needs to be painted the same base colour as the hull but wasn't immediately obvious until I went to install it; and after getting them positioned, I glued the ball mounts for the machineguns to prevent them from moving around while painting. Just be sure to angle them the way you want them beforehand.
Lastly, prior to painting I recommend using a black or alternative dark shade of primer to cover all of the bare plastic, and pay careful attention to apply it inside all of the many recesses on and around the hull; particularly around all the road wheels and inside of the cavity in front of the rear drive wheels.
Summary:
This is a huge kit, but not complicated if you take your time and follow the assembly instructions closely.
Even the tracks, despite their fragility assembled very easily, with the hardest part being mounting them finally at the end without breaking them.
For this reason I'd not recommend the kit for beginners.
At the time of completing the build, there was nothing available in the way of metal replacements which was a shame as the kit is crying out for some and would benefit greatly with more durable and weighty tracks.
But despite this, all up it's a very nice kit of an interesting and rare subject.
Completed February 16th 2023

