

AREA 88: "The Upside Down Bomb" (DC-10-30)


Comments
2 29 July 2018, 14:17
My first time trying to build an airliner... and already the tail engine has me a bit stumped. How do I glue, putty sand and paint the interior (very visible) seam? Hmmm...
31 July 2018, 23:56
I have every faith in the "Mysterious Eastern Guru" in solving any dilemma!
1 August 2018, 00:21
Ask KC, he's got an answer that'll work. He Always has. (Building up expectations and pressure on KC 😄)
My 2 cents: can't you cut of the nacelle from the wing, glue it, putty it, paint it and then slide the engine in? Then put it in the right place? Or "just" replace it with some sanded to shape plastic tubing?
1 August 2018, 13:33
Hmmm... that's not bad. I already started modifying the engines a bit, so I think what I'll do is place the rear items in place before it gets glued shut. I'll also create a tape mask for the painted fan and shove that down the front so that once the putty, sanding and painting down the tube is done, I'll just be able to pull out the tape with some tweezers.
Then I'll get frustrated that it didn't work... crack it open and do it your way.😉
1 August 2018, 14:53
Paint the fan, cover the front with liquid mask. Might even be easier to do.
1 August 2018, 15:18
I've never used a liquid mask, but this might be the time to take the plunge. The engines moved up the priority list, so I got rid of the early-style fins, trimmed back and thinned the exhaust cowling and then rummaged through the spares box for something to use as a cone. Luckily I had a couple of bombs off a 1/72 Yak-38 that did the trick. I only had two bombs, but need three cones. Conveniently the bombs are tapered on both ends, so I just needed to trim the fins off one of them.
2 August 2018, 00:18
The engines are now finished and after a bit of fiddling, the fuselage is buttoned up. Probably the biggest plane I've ever worked on. I was surprised at how long it took to glue even the main parts together.
3 August 2018, 23:19
After lots of putty, sanding and repeating, there's more to repeat. There's not much of a gap, but I still have a bit of a ghost ridge along the seams. I hope it will go away if I sand it enough.
5 August 2018, 15:37
Well, there are two bombs really... one each attached to the fuselage right where the wings meet. They're probably the very last thing I'll do on this build. Just pop them on with a spot of CA glue.
6 August 2018, 01:54
This project stalled out while I was waiting for some very small SMD LED lights for the wing tips... then it got bumped out of the rotation by everything else. Luckily it's managed to claw its way back into contention. I had to reopen part of the fuselage and the wings to retro fit the lights. I made a bit of a mash of one of the wingtips by trying to squeeze overly large bulbs into it, but with the tiny LEDs in place I think I was able to scratch in a passable replacement. I won't say which tip...'cause if you can't tell, I win.😉
17 April 2019, 14:39
Just bought some tiny SMD LEDs - I hadn't realized just how tiny they are. Had experimented with lighting a cockpit with fibre optics but this should work better.
17 April 2019, 21:17
we need like a Greg Baker projects page. A list of current running projects with links. Updated at least daily.😉
17 April 2019, 21:24
Matthew, the SMD LEDs are VERY tiny. They opened up a whole new world of possibilities for me, including adding wing lights to 1/144 scale models (like my Area 88 C-47 project). I'm also considering using them for headlights on a couple of 1/72 scale cars.
17 April 2019, 22:39
Heh, Don... I've come to realize that 3 projects on the go is my magic number. There are usually 1-2 that are waiting in the wings (not counting those relegated to the shelf of doom). At the moment I'm working on three 1/144 scale projects, this DC-10 (with two Kfirs to come), my F-100D, and my T-62 vs. Jeep. The Nausicaa Ohm project keeps staring at me with all 14 eyes waiting for me to paint a bunch of plastic plants and finish it off, and my Tintin Arabian Dhow is waiting for me to work up the courage to try something with a sail...
17 April 2019, 22:44
While I'm at it... the shelf of doom has two 1/72 F-8Es that are starting to twitch and might get revived, a 1/72F74 Tigercat that seems to comfort me in it's half-built state, and a Macross 1/72 Battloid that has unimpressed me repeatedly.
17 April 2019, 22:47
Well, it's not pretty, but the guts wired up and the blinking lights blink and the four wingtip lights come on... I'll call that a win.
18 April 2019, 17:11
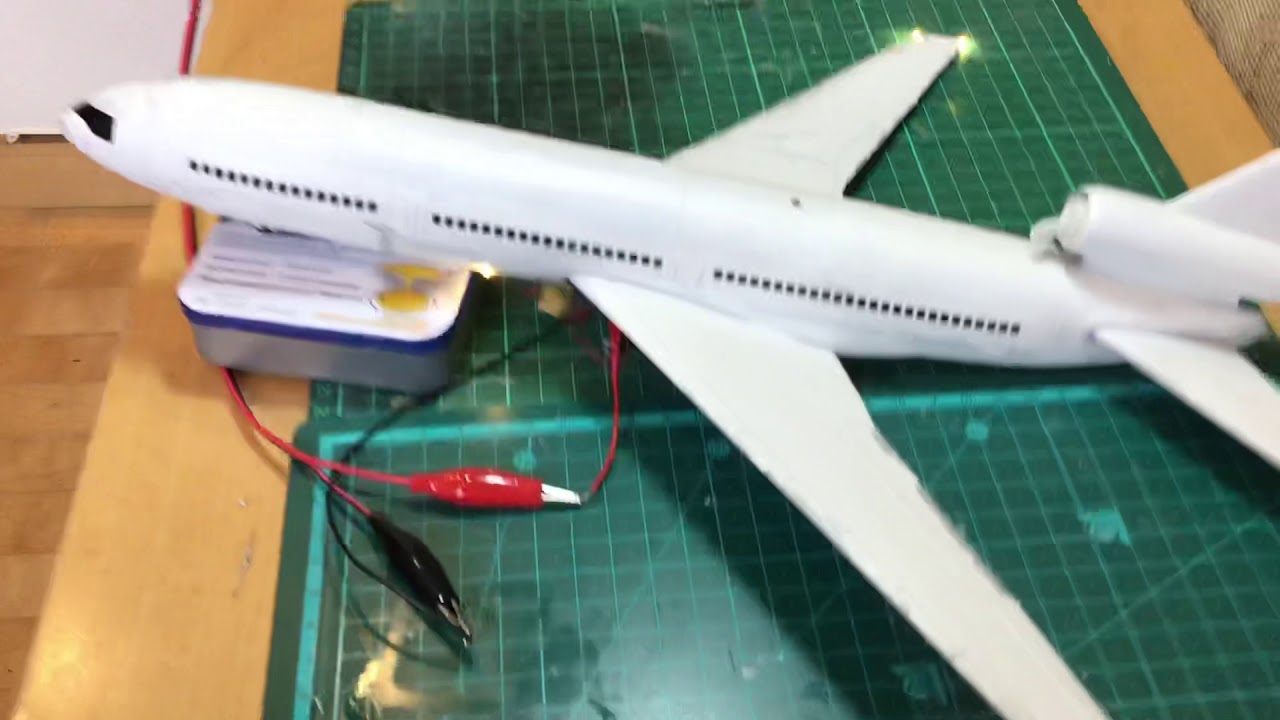
Thanks guys. No pic update, because the last session was basically trying to glue the spaghetti dinner of wires into strategic locations inside the fuselage so that they're not visible. I didn't want people peeking in the window and thinking this was depicting a scene from that film classic Snakes on a Plane!😉
Anyway, it's all glued back together. Now for the putty and sanding!
19 April 2019, 23:42
I missed this so far. Greg, the Blinking leds are they alsof smd or An other type?
20 April 2019, 11:24
No worries Erik, I just revived this project anyway. The blinking red LEDs are just regular 3mm reds. I could've/should've also used SMD LEDs because they're actually a bit oversized, but I ran out. I only had 10, and this project already used 6. I killed two before I figured out how much resistance was needed, and I already used two on my C-47 project. Oh, well. It's not that noticeable... good enough for a comic book project, right?😉
20 April 2019, 11:43
I protect my SMD with 100 Ohm on a 5V supply and so far it works.
@Alec : Nikoloas Kouzinis wrote the LED tutorial in the comments of his Sunderland diorama album:
scalemates.com/profi..bums&album=40823
He is an expert, his An-12 project is remarkable too.
20 April 2019, 16:12
Final wing/tail panel lines scribed and the first blast of putty/sanding complete, so I glued the engines, underwing fins and cockpit windows in place. More putty and sanding to come.
21 April 2019, 14:05
DISASTER! Ever get too clever for your own good? I'd been planning to add some clear red/green plastic to the wingtip lighting and I was happy to have a bit of leftover clear red sprue from my son's Hyundai kit. But the green was a challenge until I found a pen cap with just the right shade. Anyway, long story short, while glueing the blank in place, I somehow managed to get one of the LED leads glued to my tweezers unbeknownst to me... and I killed one of the wing lights. There's no wire to work with to replace it either, unless I rip the entire wing apart again.
I tried to soldier on but I ended up killing the red one somehow as well. I was filing down a bit of excess and something must have gotten pulled, 'cause it went dead as well. Strangely, once the second one went down, the comfort of symmetry washed over me and I accepted defeat graciously. I'll still put in the clear plastic, but it won't be lit up as I imagined. Before the red one died, I got the impression that it was a bit of a moot point as there wasn't enough plastic going to be left to make the colour come through anyway.
26 April 2019, 15:53
Oh well, live and learn. I still have 6 lights on this baby (eight if you count the two in the Kfirs), I suppose it's not worth getting greedy. I still have a B-747, B-767, L-1011, A300B and probably a DC-8-71 to try out plans B through F... although I did say a lot of F tonight... I will admit.😉
26 April 2019, 15:56
Greg, did you use red and green smds? The wires are very delicate , I had the same problem on one of my projects and reopened the wing to fix it. I now use transparant uv hardening glue to protect them.
26 April 2019, 18:36
Never been too clever Greg, just half smart! Pity though, woulda bin awesome!
26 April 2019, 22:47
Erik... no, I didn't use coloured SMDs, but I should have. That's one of the main reasons I decided to let it go. Even if I did tear open the wing once more, I'm not sure I could fix the problem. If I do get coloured SMDs, and attempt such a feat, I run the risk of killing the other tail lights... hmmm... I'll think on this a bit more. I'd hate to disappoint Peter.😉
26 April 2019, 23:19
let it GO?! LET IT GO!?! NEVER!!!! BWahahahahahah! (rushes to order green/red/white SMD LEDs off eBay...)
I may suffer defeat in the darkness, but there's nothing like the morning sunshine to sober a man up and get him to resume bashing his head against a brick wall... stay tuned.
27 April 2019, 00:30
You never learn do you?
A concrete wall lasts longer than a brick wall. More bang for your buck!
We know you're one of very few who can fix this 👍
27 April 2019, 07:52
Heh, thanks guys! When I looked at it again with fresh eyes in the morning, I realized that cutting out a couple of slots on the wing tips would let me retrieve the wires with very little non-repairable damage. All the complicated wiring is far away, hidden in the fuselage, but all I really need is two small wires and a bit of elbow room. Of course, on the first one I fished out one red and two black wires. It was like a real bomb difffusing scene... which one to cut? Of course I picked the wrong one and ended up having to repair one of the rear-facing lights... but it was proof of concept on the repair job... so... good.
27 April 2019, 23:35
Then I taped the wires to the wings so I didn't lose them and then took a pic with the two Kfirs behind, so we can all remember what we're here for...😉
27 April 2019, 23:45
Thanks Lode. In a nutshell, the story is about two inverted Kfirs shooting bombs off the underside of a DC-10. Should look good when it's done... let's hope!
28 April 2019, 22:05
The whole concept is original, creative and just plane (sic) awesome. This is why Greg has so many followers.
15 May 2019, 21:03
Ok gents... my tiny little LEDs finally arrived... and we are back in business! I repaired the damage I caused, so this build can now move forward. Now I'm debating if I should try to remove the large blinking lights from the top/bottom of the fuselage or just leave them be. They kind of bother me because they're much too large for the scale. But to fix it, I have to cut some holes fish out the old lights wire in the new ones and try to patch it up. Any opinions? Anyone want to try and talk me off the ledge? Or give me a shove.😉
22 May 2019, 14:44
Keep the large lights and paint them partially (ring wise) so that they look smaller ?
22 May 2019, 15:11
or sand em in shape, as nog as you don't touch the electronic contacts inside
22 May 2019, 15:22
Are they so out of scale that it is shockingly obvious? If not, leave them.be.
22 May 2019, 16:45
Real fuselage lights appear bigger because they are omni-directional (okay, so I am talking cr*p here!). Don't tempt fate! 🙂
22 May 2019, 16:56
Apparently I already had one foot off the ledge when Matthew showed up...😉
A bit of drilling, cutting, fishing, soldering, glueing, puttying and sanding... and the fuselage lights are on par with the wing tips. It''ll look better in the end, and I've already had to repair so many things on this build, what's one more?
23 May 2019, 16:19
OK, not going to ask about Greg and Peter's inter personal relationship.
Good going with the lights! *whistling, looking towards the corner*
23 May 2019, 22:19
looks like these LED's are even smaller then SMD-LED's, what type are these?
24 May 2019, 07:32
Well, SMD is surface-mounted diode, which basically just means they flat (and small) LEDs, so SMDs also come in four different sizes (L x W x H):
- 1206 (3.2mm x 1.5 mm x 1.1 mm)
- 0805 (2.0 mm x 1.25 mm x 0.8 mm)
- 0603 (1.6 mm x 0.8 mm x 0.6 mm)
- 0402 (1.0 mm x 0.5 mm x 0.45 mm)
These particular ones are 0402 LEDs. The first ones I bought were the 0603 ones. Luckily they were all pre-soldered to wires, 'cause there's no way I'd be able to do it.
24 May 2019, 09:20
Yep. Quite delicate. The wires holding them together are basically like a strand of hair.
24 May 2019, 16:05
Ok. so the wing tip lights are more or less finished. I sanded everything flush and then I gave them a few coats of metalic grey paint to keep the light from shining through the plastic. Hopefully once I give the whole thing a white primer coat it will all blend together perfectly.
28 May 2019, 15:00
Masked and painted the underside grey... but then afterwards it occurred to me that, perhaps I should've painted the whole thing white with paint, not just primer, first. I think I just got excited to be able to do something other than fixing broken wires and sanding... and painting it all white. Oh, well... I think I'll do the wings next.
3 June 2019, 23:59
That thought had occurred to me. It's Tamiya extra fine primer, so it doesn't even require sanding...
4 June 2019, 01:04
Maybe with some 8000 and 12000 just to smooth it out really nicely.
4 June 2019, 01:32
Got some aluminum paint on the wings. I'll rub it down with some high grit sandpaper as well to make the shine a bit more uniform.
5 June 2019, 15:08
Great performance Greg yet again... 👍 Fantastic idea and implementation with this old Revell kit..
But where do you put this big beast when finished? 🙂
9 June 2019, 22:17
This one is starting to become a bit of a slide downhill. First I repainted the underside from grey to aluminum, then the front, left side panel of windows fell in and is now rattling around inside the fuselage... then I somehow managed to get a couple of black paint smudges on the white part of the fuselage after I painted the nose... which I also seemed to have managed to make a masking error.
I dunno... I guess I'll try a couple of spot touch ups with some white paint and then go over the whole thing with a coat of future before attempting the red M logo/cheat line. This one is my focus project at the moment, but it feels like the battle is starting to get the best of me.
14 June 2019, 15:06
Don't forget even Tintin put the propeller of the wrong way round the first time [img1]

16 June 2019, 21:56
Thanks for the encouragement guys. I stepped away from it for a bit and printed off some paper masks for the "M" logo. After seeing it in daylight (but not under direct sunlight!) it's not as bad as I thought. I was able to get rid of the black smudges (and a bit of the white paint) with a bit of thinner on a cotton swab, but with the white primer and a coat of future, it's not terribly noticeable. The windows are still rattling about, but once I was able to win the battle to get it impaled on a clear tube (glue fingerprints and all!) I was happy enough.
16 June 2019, 23:35
Let's see if my sunshine mood survives the "RED M MASK" portion of the build. That and a couple of decals are all that are standing between me and final victory.
16 June 2019, 23:36


Thanks guys! I got half of the masking on relatively easily... now for the other side.
17 June 2019, 22:37
Ok... red "M" logo (for MacGregor Airlines) and cheat line painted on... I'm calling that a win. Just a a few decals to attempt and maybe a very light grey panel wash and this baby will finally be done!
18 June 2019, 14:51
I would call it a Mighty win, never masking-taped a 1:144 but I imagine it being a little bit fidgety... 🙂
18 June 2019, 15:36
That's one hell of a long masking line...Looks straight and even.... MAJOR congrats to you!
18 June 2019, 17:49
To be honest, I never doubted you Greg. Another one for display! Well done " Oh Perseverent One"!
18 June 2019, 20:56
Thank you mates. I have to admit, the masking worked better than expected - one of the few such incidents in this build. I just a bit of wide (12mm) Tamiya tape and then carefully cut out the "M" logo from a printout. Then I used some 3mm tape to mark the positive image of the line and then used more Tamiya tape to mask the negative space and then removed the 3mm tape. Spray red paint, pray and peel.😉
Having the masking line straight and clean makes up for the slight black smudges and a bit of silver overspray in a couple of spots. So really, having the windows fall out on me was the major disappointment. But I probably deserved it for trying to glue them in after the fuselage was already in one piece.
19 June 2019, 00:26
Alright guys... I'm spreading my fingers and backing away slowly from this one...
After the masking/painting I was feeling pretty good... for a time.😉
Then, right in the home stretch this build decided to kick me one more time, just for fun. After I got the grey panel line wash on I decided against adding any decals so I glued the clear stand rod into the base and started to finish the last little bit of wiring. But, while I was soldering I must've clipped the wing and the whole model started to go for a tumble. So I reached out to steady it and luckily caught it gently before it went overboard. But, not quite gently enough... because I managed to a) break off the stand rod from the underside of the fuselage and thus break the wires right at the surface of the airframe, and b) clip the edge of the wing of one of the Kfirs with the tip of the soldering iron in the moment of confusion...
19 June 2019, 16:23
So, after I sat down on the floor and had a little cry, I felt better. I managed to drill a small hole in the fuselage, pop the glued wires back inside, then open up the hole large enough to fish them out and reset the clear stand rod. Then I had to made a couple of very nervy solder connections of some very small wires, with very little give, very close to the plastic fuselage, but I got it done... as for the Kfir wing? Well... there's nothing to be done, so we just agreed not to look each other in the eye.
19 June 2019, 16:24
Anyway, she's done. I'm happy... and, just because it's hard to get the full lighting experience from the still images, here she is in video - happily blinking away:
Youtube Video
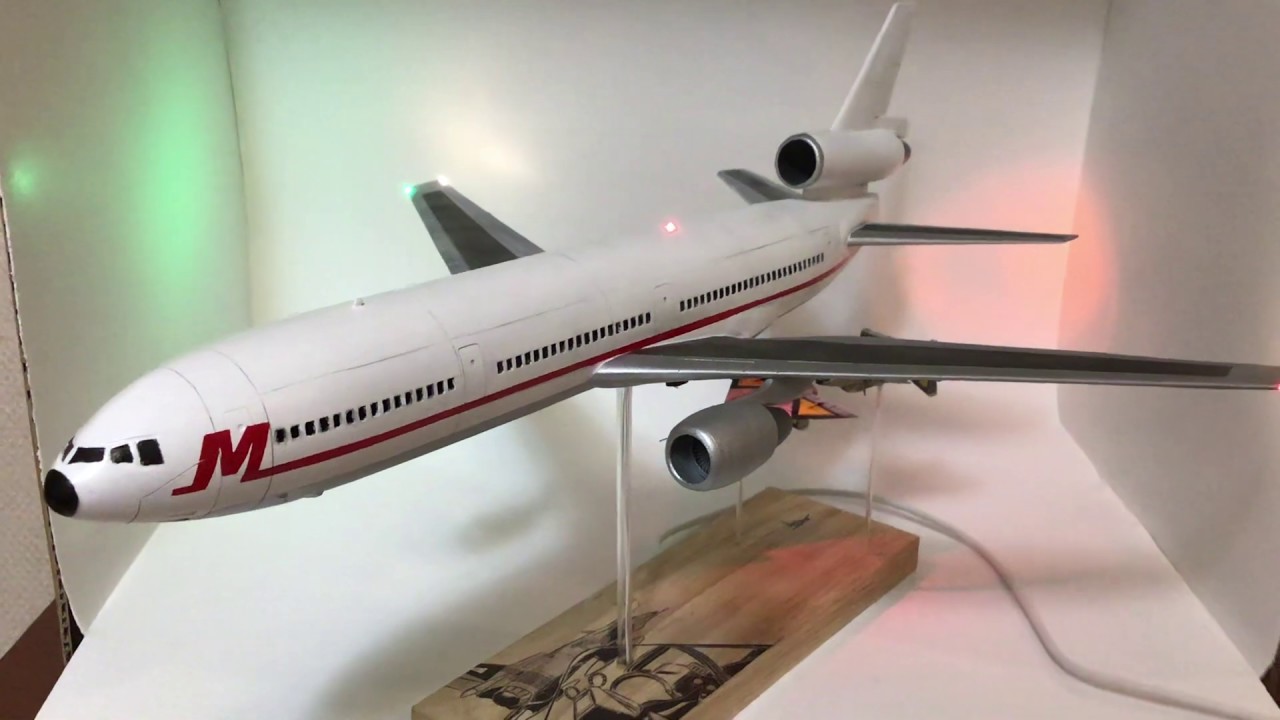
19 June 2019, 16:25
After all that, it still came out great Greg. An eye catching display for sure! 🙂
19 June 2019, 17:00
Prices are given at the finish, and you reserve an extra one for perseverance.... Splendidly done, and very dynamic scene.
19 June 2019, 18:36
Great perseverance, great job. And that second hand Kfir is just in need of some maintenance when it gets back to base!
19 June 2019, 20:33
Again an absolute amazing and skillful implementation of a cool story 👍
Fantastic greg
19 June 2019, 20:33
Wow. Thanks for the great feedback and encouragement gentlemen. For a first airliner, I'm pretty happy with the result. There were setbacks, but I'm happy that I didn't lose the plot, despite a few twists and turns. 😄
20 June 2019, 01:11
Nice jet glow! Not too familiar with the source material so... What is going on in this scene?
20 June 2019, 07:23
Thanks playtime 222 - you can check out the whole backstory on my blog - strobez.ca/wp/index...e-down-bomb-area-88/
20 June 2019, 08:27
Turned out very well Greg. This hobby sure is a great opportunity for practice in patience and perseverance😉 👍
20 June 2019, 15:48
Greg, was not able recently to follow the huge amount of nice projects here, so now I discovered your upside down work. Great, with all the lights, paint and detail work! But it was a very bad idea by Revell to call a DC-10 a Airbus! Airbus is now 50 years old, so older then this kit.
20 June 2019, 17:05
I love this hobby, I love scalemates, i love this display too! Awesome Greg!😉
20 June 2019, 17:57
It looks superb, I like all your Area 88 style builds a lot, including the cool bases. This one is just great, including the "personal touch" on the Kfir😉
20 June 2019, 19:00
it fought you during the building progress, but you won.
it absolutly looks great, and the lighting really ads extra flair to it 👍.
20 June 2019, 19:25
Thanks mates. I'm a little overwhelmed by the positive reaction to this build, but it really adds to the feeling of victory. There's more to come though, so stay tuned~
21 June 2019, 01:43
Album info
When assassins target Asran Crown Prince Saki Vashtar, they don't care who gets in there way - including a plane full of innocent people. With bombs placed strategically under each wing, and set to detonate in 2 hours or if the plane drops in altitude, Saki isn't left with much choice. He calls on his two ace pilots, Shin and Micky to attempt to shoot the bombs off. The only problem is that the Kfirs' tails are getting in the way. The solution? Shoot them off while flying inverted. This build will try to replicate this dramatic action scene from the Area 88 manga.


