WIP Junkers D.I


Comments
56 21 June 2020, 20:35
Before I remove the internal structure I want to be sure, that it fits! Otherwise I have to search for the short fuselage kit. Please see pic 15.
Thanks for your help!
21 June 2020, 20:42
OH MANN, so kurz vorm schlafengeh'n bringst Du meinen Puls nochmal auf Hochtouren.😉
21 June 2020, 22:15
Oh, entschuldige bitte! War vorher nicht fertig mit dem Bilder bearbeiten ...
22 June 2020, 19:12
For me, there really is a special aura to your builds... like "I don't really want to do this, but it's extremely pleasing and calming to watch..."😉
23 June 2020, 19:41
Thank you Slavo, that means a lot for me! Nice that you found the next parallel build. I hope that I'm not getting confused and put corrugated metal on the Sopwith Triplane😉
23 June 2020, 20:11
I was just thinking: where the hell does this guy find the TIME??! I mean, does he BUY IT? No, he must MAKE IT... 😄 😄 😄
All lame jokes aside, this is awesome. That corrugated look is super. Looking at pic 19, I wonder if 5 min epoxy may have been a good gap-filling choice? Did the white glue work good?
27 June 2020, 15:21
Thank you Alec! I try to spend every day some time on the bench, this allows constant progress.
Since I own two IKEA KVISSLE I have to much running projects, I should finish some.
27 June 2020, 16:49
All needed foils are glued to fuselage, and I experimented with real wood foodbridges on the wings.
28 June 2020, 17:57
Yes, but if it failed with wood glue it is easier to remove😉 And it worked surprisingly well. And this is only inside.
29 June 2020, 14:01
The last action on this project was done 2020 (the frames of the fuselage was soldered already 2016). It ends up as shelf queen 🙁
After the end of the F.K.8 project I decided to give it another try. Not sure it I finish it this time in one go, but at least the Mercedes D.IIIa engine is now finished - Hooray!
I'm happy with the outcome. Fill it with fuel and oil and it runs! The Roden engines gives a good base and are not that much undersized as others in this scale (often done for fit into the fuselage).
10 March 2023, 22:14
Welcome to the show Michael! It will not on the level of the previous F.K.8 project but I hope to finish it this time.
13 March 2023, 18:07
Hey, this is still on? Wow - I do not feel so old anymore! 😉 Will be more than happy to continue watching where this journey goes! (we kinda know where... to a model which aircraft-builders & restorators could take as a reference for a 1:1 replica...) I am pretty sure the cockpit dials are working and will show different values in some of the following pictures... 😉
14 March 2023, 18:06
I'm joining the audience. It would be a shame to miss your next masterful "concert" . I will watch it with great interest and pleasure.
14 March 2023, 20:41
Oh Slavo, I have missed your wonderful comments! It looks like the project was paused as long as you were away 🙂 But I have worked on many other projects in between.
There was some trouble and I could not decide for a marking. In the meantime, I switched to another kit when I caught Roden's other kit variant with the short fuselage. Now I can rely on the WNW research and can build a black or brown aircraft. This way I can avoid the Roden decal in corrugated metal. The work done already is not lost.
Welcome Ludvík! This time it looks promising to come to an end!
14 March 2023, 20:57
Sorry teacher. Looks like I'm late for the lesson….again. 😉
I'll take a seat at the back.
Oh, started 2020! Looks like I'm very late for this lesson. 😄
15 March 2023, 13:08
If there was a modelling class of wizards- you'd be a 6th Dan….superb superb superb!
15 March 2023, 15:25
Thank you mates!
@gorby The date inserted in the pics of the soldered framework goes back to 2016! 7 years in shelf is enough!
@Andy Wow, now I need a red face smiley!!! Yes, it has some nice parts it will be definitely not my best model! For example I don't like the seams on the fuselage of the corrugated sheet metal, but there is nothing what you can do about. Any try to use something like putty or sand it will make it more worse. .... give me the strength to accept things I cannot change with serenity....
15 March 2023, 22:34
My friend has another saying in these cases, "don't worry about perfection, you won't achieve it anyway" 🙂
15 March 2023, 22:46
My prescription is -7.5 for contact lenses, makes me pretty short sighted, but a gift for 72nd scale models….however I could not get to those levels of intricacy. Could you share your secret?!
15 March 2023, 23:35
seriously man, where did you get that dinner plate sized 1 cent coin?
16 March 2023, 00:15
Thanks for you feedback mates!
@Andy I'm also short sighted, but not that much (-2,5 I think) and work without glasses. The Quarter scale is a good compromise for me: the parts are bigger as in 1:72, but the finished models not as big as the WNW birds in 1:32. I try to work without paint (wood and metal) and as I hate CA sometime I try to create form-fit connections, which need not much glue.
@Alexander Especially for you I made new pictures with that coin, as you requested.
16 March 2023, 17:58
Once again: great "movie" 🙂.
Pic53: Womit hast du Wellblech maskiert für weiß und rot? Sieht makellos aus!
16 March 2023, 18:48
Thanks - That is the nice side 😉
I used slim Tamiya tape and put it with a toothpick carefully into the grooves, groove by groove. On top I added other tape to cover the rest. Need to do this again for the crosses, later also on the wings and rudder. My normal Oramask foil used to cut masks do not work here.
16 March 2023, 19:24
wow - progress! 🙂 Looks as stunning as ever and I see even the European Central Bank has noticed and supplies fresh & immaculate 1-Cent coins for the background/comparison... 😄
It´s always fascinating here - I´ve seen builders (me navigating these waters as well) who create/increase detail and scale impression by smart painting, smoke-&-mirrors effect and weathering... You do that through "actual details" and it truly works (without even the need of the above mentioned techniques) - truly fascinating... 👍
16 March 2023, 22:09
Thank you mates, but this project the devil has seen! Murphy is in top form! What can go wrong also goes wrong.
There's a reason this has dragged on since 2016, and it's about to end up in the corner again 🙁
I have just removed all paint from the wings ...
22 March 2023, 10:08
I know it very well. Some kits are said to be cursed and can only be built at certain times. That's exactly how I built Bucker 131 a while back. I carelessly knocked it off the table the first time right after finishing the rigging. After a week, I returned to the Bucker and gradually removed the effects of the accident. And when I was tensioning the last rigging line, one wrong move and I tore off the whole upper wing with struts and rigging. The bucker ended up in a box in the closet and I didn't get back to finishing it until a year later. And surprisingly, even with this attempt, the work to repair and finish the model went smoothly and without any problems.
The way I see it, the time for your Junkers has not yet come. But believe me, that time will surely come. And maybe sooner than you expect. 😉
22 March 2023, 18:21
Thank you Ludvík for your great help! But I'm not bowing to Murphy that quickly yet.
I wanted the paint more bright, so I tried to mask for the green, mask the opposite to paint the Mauve also more light on the white primer. But that do not work as I was not able to mask exactly the opposite. So I end up with white lines and more worse dark stripes where the paint was on top of the green.
So I removed the paint and painted the whole surface in a light green. The masked again and painted the Drooling Bulldog Mauve. So no masking problems but the Mauve comes out darker.
I have also another violet shade from Drooling Bulldog called "German Purpur". This looks more like the paint on the Roden box. But according to Wingnut Wing Mauve is correct and this looks like the WNW profiles.
22 March 2023, 19:06
Jumping on board late as usual. I hope to see you conquer this devil to your satisfaction.
23 March 2023, 04:45
Thank you mates!
Since I expected that I would not be able to press the stubborn decals into the corrugated metal, I looked around for alternatives.
My self cut ORAMASK will not conform to this surface too. Other decals in my spare album ( I use a stamp album) were too small.
So I decided to go the hard way and mask the crosses by hand with Tamiya masking tape, the same way used for the fuselage band.
That was a lot of work but I'm happy with the result as nearly no color was going below the masks 👍 It is may be not perfectly as using decals, but as this was hand painted in brings in some little variation here and there.
Looks so unspectacular now, after handling hundreds of little pieces of tape ...
Kyle, the devil looked only once around the corner, but I noticed early enough to fix it. See pic description.
23 March 2023, 21:39
Wonderful work on the markings. Also I always enjoy flipping through your albums to see your excellent descriptions of the work as it goes along. Most enjoyable.
23 March 2023, 22:38
As you can see from the photos, the pitfalls of corrugated iron have been overcome.👍
24 March 2023, 06:11
Beautiful crosses. I think masking and painting is more realistic than decals. I doubt planes painted on the field were as "perfect"as decals are 😉
24 March 2023, 10:40
Thank you very much mates!
@Kyle Please tell me my mistakes as English is not my native language and often I do not know the exact technical term.
@David Welcome! I haven't seen you in a long time.
@Spanjaard Not only in field, also during production. The famous 8cm wide brushes of Fokker painting 😉
That work on the details brings up the kit errors, e.g. the direction of the corrugations on the ailerons is wrong. I can't fix it so I will let such errors as they are.
Now the crosses on the fuselage, which are only four white angles due to the black fuselage.
24 March 2023, 13:53
Thank you Alec!
With the masking and painting of the fuselage crosses the risky parts of the paint job are done! Now I can continue to bring all prepared parts together. Next step will be mounting of engine and adding the front.
24 March 2023, 21:01
In principle it would (I own a Silhouette cutter), but ...
- usually I use ORAMASK 810, but this is to thick to work on the corrugations
- it do not work to apply the Tamiya tape and press it then into the corrugations => it gets to short and moves back into straight
That's why I use slim tape and apply it step by step by pressing with a tooth pick into the corrugations. Even after removing the tape it has still the funny shape. So the marking is in one direction longer as in the other.
24 March 2023, 22:33
... and more painful! From masking to cleaning of seams and much more.
That will not be a contest model but at least at looks like an aircraft now 😉
25 March 2023, 17:57
Incredible details in your build. Watching to see what you will accept as a finished look.
29 March 2023, 22:40
Thank you very much mates for such nice feedback!
Yes Ethan, if I want to take part in contests in the Master class (as I have done last year) with a chance of winning it I have to build in this level. But much more important this detail work is pure fun for me 😉
30 March 2023, 17:58
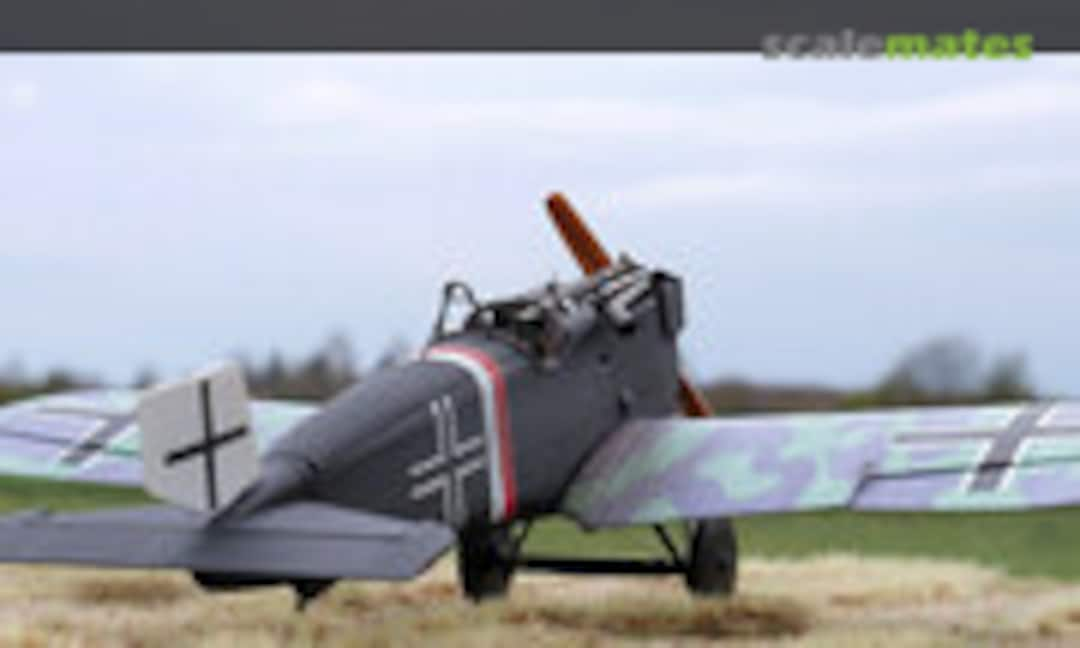
I think all parts are in place now and this Junkers D.I is finished!
Roden and PART provides clear windshields, but the original photos I have seen do not show one. The WNW manual of this serial 5185 in November 1918 also not, so I will not mount one.
I will do a light weathering and wait for better weather for some outdoor pictures.
That is really a great feeling to finish this beast after so many tries since 2016!
30 March 2023, 19:35
Beautifully done! Congrats on finishing this shelf queen, she deserved it. I love the camo on this bird, something you would expect to find in a graphic novel but not on real aircraft 👍
31 March 2023, 11:30
Thank you Alec, yes I'm happy too!
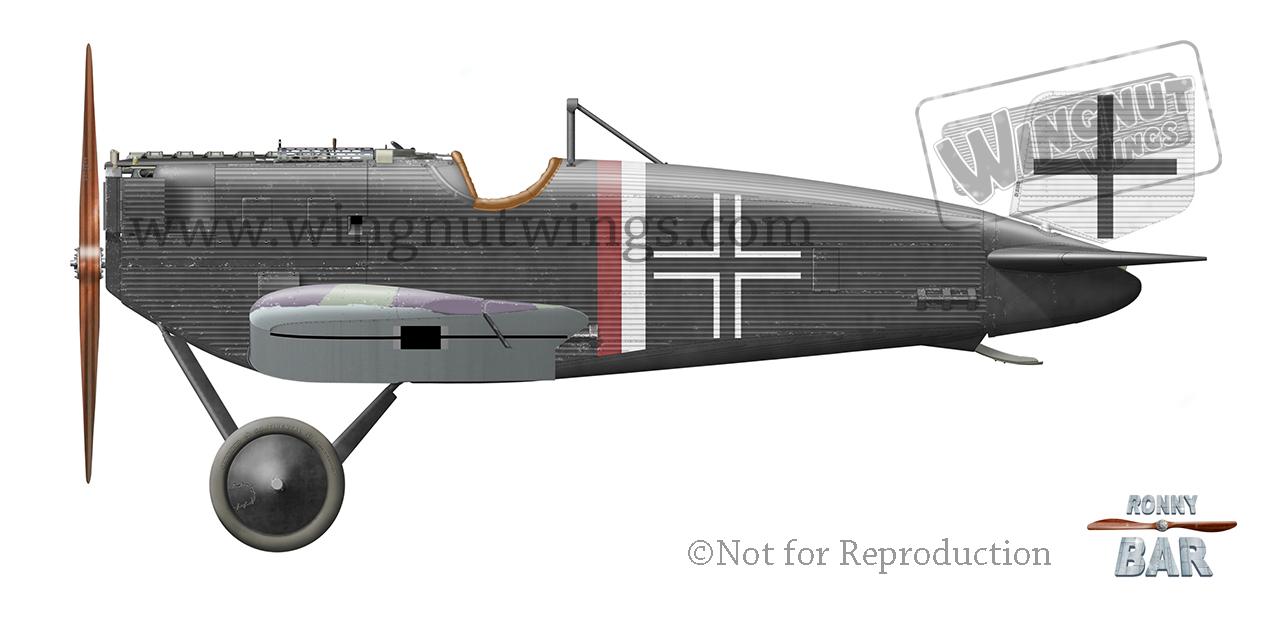
The mauve/green was ordered after brown and green caused mistaken identity with enemy aircraft. I think violet was ordered, so beside mauve also a darker violet was used, e.g. on Albatros. That is called "German Purpur" in the Drooling Bulldog range.
Here ar my WNW templates, fuselage:
[img1]
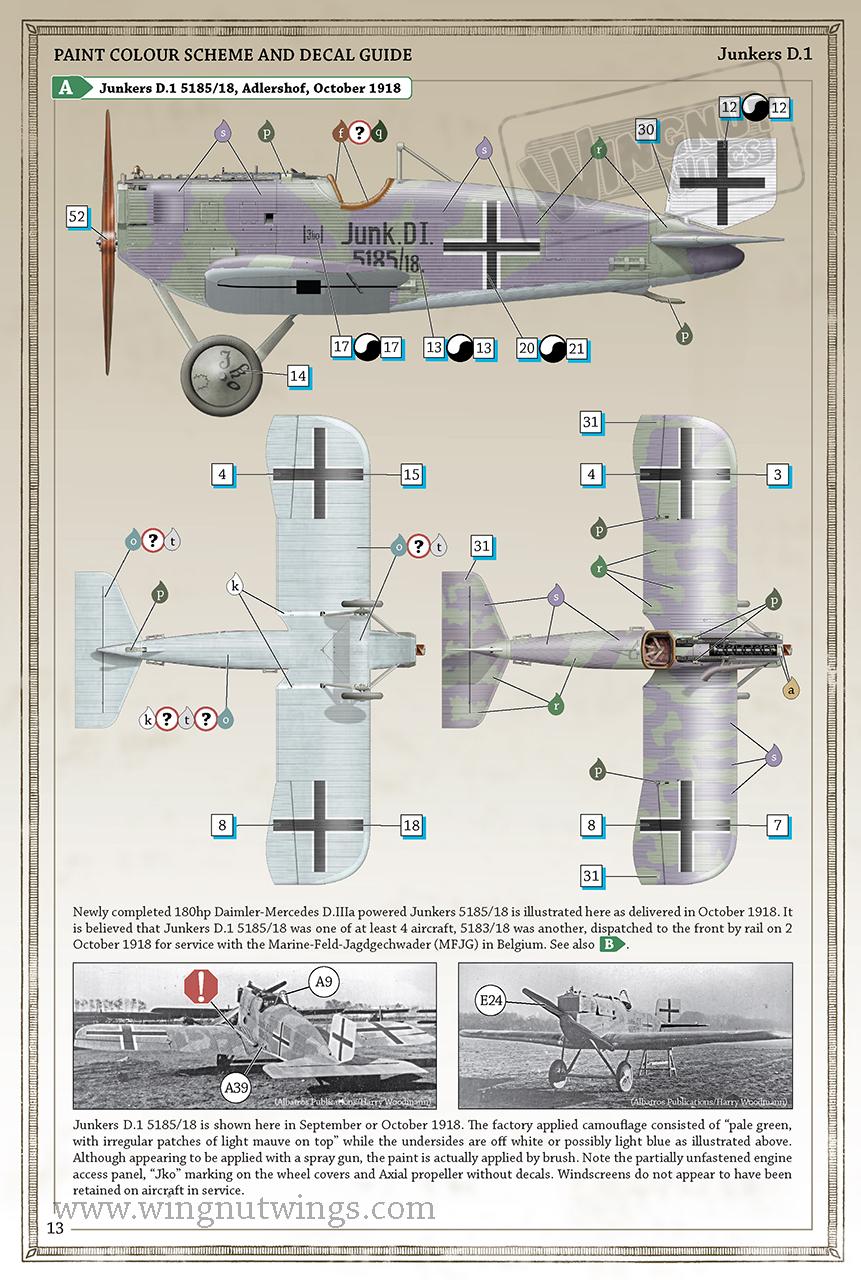
Wings as on this one:
[img2]
31 March 2023, 12:01
I have done a light weathering mainly with oil paints (some white on the mauve was very successful) and smoke for exhausts stains.
In between the cloudbursts there was some nice weather, so that I could take the final outdoor pictures 😉
SCM Newsfeed
31 March 2023, 15:56
I am particularly impressed be the clean borders you achieved with masking the corrugated parts. Maybe I missed it, but can you specify which masking material you use for that purpose?
1 April 2023, 00:34
Thank you mates!
@Alexander As the colors looks still a bit dark I modified it with white oil paint and like it more now. I hope the difference is noticeable in the final album, see link above.
@Michael That used the lovely and famous Tamiya tape, see pic57 and following. Because of the corrugations I don't use masks cut by my plotter for the markings (only used them for the mauve on wings).
1 April 2023, 12:14
You actually built a whole plane around that cockpit-engine combination that would make a jaw-dropping standalone model on their own... 😉
I am not sure if I should praise the completed model or mourn the loss of (now) invisible details inside... But I am sure it was a lot of fun and satisfaction completing this one, so I can only congratulate on the result... 👍 Just take care & keep it clean so the machine guns will not jam 😉
5 April 2023, 13:26
Thank you Slavo for your kind words! It is always a pleasure to find a comment form you below my builds 👍
This corrugated aluminium is tricky to handle, it is hard or impossible to fix or change some things, hard to clean up seems, hard to mask .... but it makes me happy to see the outdoor pictures of the final result! May be I merge the remaining parts with the long fuselage into a NMF bird one day in the far future 🙂
14 April 2023, 19:55
Amazing build, as usual! I had earmarked it a while back when it was stalled and pick it up now, glad to see it gloriously completed.
It's a pleasure to watch, and now I know I won't be building this corrugated monoplane beast any time soon: too much fussing with toothpicks needed (tempting as the challenge may be). Perhaps I'll finish the decals on my son's civilian Ju 52 first. At any rate, I feel like I've built this model just by looking at your build. Thanks for sharing your ever-reconfirmed expertise!
15 April 2023, 10:01
Thank you Boris! Such nice comments encourage further reporting 😉 Don't miss the final album!
15 April 2023, 11:34
Album info
This kit was a prize of a Memorial Group Build some time ago.
Added some additional parts and references, as usual 🙂