

Dornier Do 335 | Practice Kit


I got impatient waiting for my model masking tape to arrive so I substituted my drafting tape. It works but bleeds a little more.


Comments
I see that the infamous Mad Trenchdigger had some sidejob across the pond, not only at Matchbox.
Very nice vintage build 👍 I like it.
As I mentioned on the project post that this album is attached to... I have not built a model in a very long time...
Lindberg | Dornier Do 335 | Practice Kit | Project by GrenadeBait (1:72)
I did a few things well and many things not so well. I'm learning the hobby again and having a really good time.
Welcome back Rui, I returned to the Hobby 4 years ago after a 17 year break myself. I am currently in the process of finishing a kit that was started 21 Years ago, having finished 11 kits since I re-started. All of these 11 were started since I returned. I have 6 potentially easily completable kits that I started over 20 years ago, and quite a few to restore.
Thanks Chaz. Technically I haven't built a kit in nearly 40 years, but about 25 years ago I did supervise AFV builds in the Army to help recruits become more familiar with allied and Warsaw Pact equipment. About 4 years ago I started collecting as part of my retirement plans in a few years.
Great result from a kit that's so old. I've seen builds of the Tamiya 335 that don't look as good. And that of course is 1/48.
Haha, Rui, you and I are pretty much on the same path, I'm 17 years away from official retirement, but I think I will be able to do it in 10. I have almost every kit I drooled over when I was in my teens now, and my current built rate of 3-4 a year needs to speed up if I'm ever going to build them all.
Thanks Neil. I have Tamiya as well as Revell 1/48. Both look like great kits in the box. Don't want to ruin them, yet LOL. Building the Lindberg because I got it in a lot of kits of eBay and the box had 2 full kits plus a partial in the box. I'm building the partial kit because all it is missing is landing gear, so in the air it goes. Hope to build the Tamiya and/or Revell in future but I need a lot more practice. Heck, I only learned yesterday what salting is. LOL
Hey Chaz. Sounds like we're are on the same path. I have only 5 years to go before I retire. Hope to enjoy quiet afternoons in the country building all the kits I have now that I only dreamed of in my youth. Back then I didn't really care much about accuracy and just made up my own techniques which sometimes worked and sometimes not. Now I see, through the internet, all these possibilities and great techniques; no more guessing on how! Cheers!
I know what you mean Rui. I have a Tamiya kit plus all the Aires resin sets for it. And I think all the Dragon 1/72 iterations of the 335. Plus more references than are helpful. For me this creates a mental barrier formed by the fear of my workmanship not doing them all justice. And just like you, I'm busy with several average to poor kits which I hope to turn into something better than the raw material would suggest is possible. And you're showing just how it can be done. More power to your elbow! 🙂
If you are concerned about your skill level, and want to get practice before tackling a certain kit, the best thing to do is to get a modern release kit that is on current availability, and not too costly. The Tamiya 1/72 range are excellent kits. Also Eduard or the airfix new tool kits. Use the Scalemates database to work out if a current line kit is a re-release on the old tool, or has had a new tool in the last 10 years.
Thanks, Neil. I have the 1/48 Tamiya and the Revell. In the box, they look like really nice kits. But I'm not going to touch them until I'm ready. I will probably do another more junky kit to practice paint and sanding, and then one more to practice the weathering techniques that I have been learning about.
Also, I went through my stash and pulled out all my duplicates. I was surprised at how many I had. My plan now is to follow Chaz Gordon's advice after I'm ready and build a few of the more recent releases that I have duplicates of.
Too bad I can't post a picture because right now I staring at my to-do shelf which has about twenty of those duplicates ranging across air, land and sea from 1/700 to 1/48 and a wide range of big-name quality makers, but I think I may stick to something a little more manageable so there's nice Airfix 1/72 Typhoon that's a new tool and looks great in the box.
Thanks guys for the great advice and boost 🙂
Great advice from Chaz indeed. The Typhoon looks really great when I look at it and you surely will enjoy building it 👍
nice looking bird 🙂
maybe I can give a couple of suggestions. Before doing decals and washes, give it a coat of bright clear coat. decals will adhere much better when placed over the bright coat and over a matt coat. for washes, they will give a much "dirty" look over matt than over bright coats. over a bright coat you can also wipe out the excess, and it will also flow better in the panel lines (where you want it to go).
you can actually paint in matt, give coat of clear bright, decal, coat of bright clear again, then do washes (so they will also flow in the panel lines covered by decals) and then clear coat of matt, semimat, or whatever your preference is. over the complete model (not the transparent parts, i did that once and is not a good idea 😛). of course, make sure that things are totally dry before applying each step
i am remembering now my X-wing. i did paint it in matt color and then did the washes... it looks far too much dirty because of that. if i would have gave it a coat of Future for example, before doing the washes, it would have looked much beter.
about washes, there is lots of choices, oils can be really good but be careful to apply oil paint with white spirit. once i did that over a model where i did not use primer, and the white spirit attacked the plastic.... was not fun to see a beautiful model literally crumbling in from of my eyes.... i am now using flory models, that is just clay dissolved on water. totally harmless, it can be removed if you do not like result. I plan to create my own washes with water and colored clay, there is some videos in youtube about it. would give a lot of choices and will the cheapest you could find.
almost forgot. if you have decals that are looking yellowish, i have read (never done it myself) that you can place them in the window for some days, and the sun will make that yellow go aways. of course, depends on how bad the decals look like, how old, how much sun you can have etc. i would suggest to try with one that you do not need, just in case.
Always love an Arrow. The horror of vintage kits 😄 Pretty good representation though and nice fixups.
Nice looking bird. I think you are doing it just fine 👍
@ Spanjaard, great "toturial". Thx for sharing 👍
Hi Rui, the Airfix 1/72 Typhoon is on my bench right now and about halfway done. It's one of their better new tools IMHO. They are cheap and plentiful, so I didn't fear messing it up. I invested more than the cost of the kit in aftermarket, and still needed to resort to old fashioned scratch building for many details. In case you'd like to see it, I've posted pics of the progress on Scalemates here: MrPlastic
Just my to cent. You can also use Zipppo lighter gasoline to work with oils. Less greasy.😉
@Spanjaard, thanks for the detailed information. I'm going to have to go through it carefully and try out some of the process techniques to understand the sequence and how different substances interact. And yes, the sunlight technique does work on some decals. I recently did it with several old kit decals and many lost the yellowing. It working on the decals for this project but they still has other problems like thickness and poor alignment. Thanks.
@Neil Patrick, I checked out MrPlastic...ver6 impressed. Will be following it when I build the AirFix Typhoon, but out of the box only as I need to take baby steps 🙂
@OttovonLindberg I suspect the varnish is the problem. I couldn't get the lid off a new jar of Tamiya XF-86 Flat Clear, even using hand tools. Frustrated, I resorted to Pebeo Artist Acrylic Matt Varnish that I use for architectural models. I diluted with a little distilled water for better flow because my largest airbrush is 0.3 mm. I applied a couple of coats and let it dry. It look amazing; the paint matted down nicely, made the camo lines crips and the decals looked sprayed on. However, as mentioned, about two days later the blotching started to appear🙁 On investigation I discovered that Pebeo instructions recommended applying it to a relatively thick finish that has cured for a week or two! Who has time for that LOL 🙂
Hot tap water (not boiling) will help with the tamiya jar issue. just leave the jar under a running hot tap, until the jar heats up, and it should be easier to open. Also Trumpeter make a grip tool for these jars. When you get the jar open, clean the threads of the glass jar with some damp scouring pad, and clean the inside of the lid out under the hot tap. I've got a couple hundred jars of tamiya acryllic that are 26 years old (the paint as well as the jars), and have managed to resurect and re-use jars this way.
I definitely agree that it's the varnish, I think you are very lucky because it is an interesting effect! Imagine if it was white splotches instead!
Thank you for the kind words. Things have slowed a bit on the Tiffie because I decided foolishly to scatchbuild the rockets and rails, so 8 parts from the box have become 64 tiny pieces! But I'm nearly there and will post pics soon. But even OOB, it can built to a very nice model and there are plenty of very nice OOB builds of it here on SCM.
The effect isn't as bad at all. Some try to achieve this with oil paints for years. ?
Don't be too concerned about that blotchy paint, by the time they were rolling these off the production line, pretty, sprayed paint jobs were not their priority. This reference clearly shows a blotchy paint finish in the real deal.
[img1]
do you mean there are 3 models in the box and you used the third for practise
can i have the spare on
oh wow, I saw this build in the newsfeed and realized I'd built that same kit as a kid, I'd forgotten til I saw it. You did it justice! Like Chaz said, don't sweat the mottling.
I think the blotchy paint makes it look more weathered. Very nice modelling! 👍
Thanks, everyone. I had kind of given up on it but a little while back I put a few finishing touches on it and the Pfeil is now sitting on the display shelf along side the other four projects I have done so far.
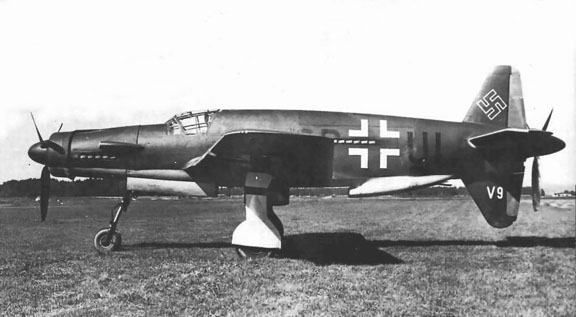
The Dornier was the first project I have done in about 30 years so I think it was a relatively decent job on an old kit. The other kits I did afterward got progressively better. In fact, the Fw.190 and the P-47 turned out pretty good for the scale.
Album info
This was my first ever kit on returning to the hobby after a hiatus of more than 30 years; career building is time consuming 🙂
I picked this kit because it was disposable, so I did not mind messing it up. I have a nice 1:48 scale Do.335 in my stash but I wanted to practice at 1:72 scale on something I have duplicates of. I had won this Lindberg kit in an online auction along with a bunch of other nicer kits. When I received it I was pleasantly surprised to discover three kits crammed into the original Lindberg box! On inspection I discovered I had two full kits and. a third that was missing only the landing gear and doors, so why not build it in flight.
Assembly was very easy because the Lindberg kit is not well derailed and only had a few parts. However, some of it did not fit very well. The really focus of the project was sanding and finishing anyway, so I got some good practice in that regard. I also, decide to brush paint because I wasn't ready to try my new airbrushing equipment and still hand to research things like pressure and paint mixes, and I was anxious to start something.
Finishing went well and looked not too bad considering many pictures I had of the Do.335 showed poor finishing anyway. Things went. well and the kit looked great after sealing everything and it was ready for display. However, disaster struck when a few days later the matt varnish I used reacted with the camouflage and made it very blotchy. I was disappoint.
However, once I posted the final pictures, including the blotchy finish, I received very encouraging support for stalemates members, and one of them reminded me that near the end of the war many aircraft like the Do.335 did not have very good paint jobs. SO, I have to say that my fellow scale mates are pretty awesome!

