

Horten Go 229 - Revell - - Finished


Comments
11 March 2015, 18:20
Only glued the wings so far.
More important is that I know have a much better light for my airbrush - like you see on the pic.
11 March 2015, 18:21
Thx looking really forward of building it. I heard good things about that kit till now , so we will see 🙂
11 March 2015, 19:58
Hi Soeren - it is a very good kit indeed (ein richtiger Schüttelbausatz!!!)
11 March 2015, 20:13
Hi Soeren i got one of those I will looking forward for your build
11 March 2015, 20:32
Thank you both 🙂 Yeah Im also looking forward for that build, but first my Wildcat needs here color on the weekend 🙂
12 March 2015, 05:56
I agree with Mike! I built this kit one year ago, I haven't had problems...except for the decals...in contact with water they are crumbled!!! And, if you want, make a hole in the cones of the air vents, as the original one.
12 March 2015, 06:32
@ Mike, na dann will ich ja nicht hoffen das es Ihn schüttelt, wenn er Ihn baut!😉
Soeren, i´m looking forward your build, i love the 229 and i have that kit in my stash waiting... 😄
12 March 2015, 12:37
Nein der wird nicht geschüttelt Holger 😛 Wäre aber mal ein Versuch wert was dabei rauskommt, wenn man eine offene Packung Tamiya Kleber mit reinlegt 😛
Ja 1x habe ich das Modell dann auch noch 🙂 Mal sehen was mir beim 2ten Kit so einfällt (großer Vorteil von What If Sachen) 🙂
12 March 2015, 12:48
Maybe somebody can help me right away with a question regarding the color.
I wanted to paint the cockpit interior but Revell is suggesting a mixed color there.
So my question now is: Which Gunze color should I use for the interior?
25 April 2015, 16:42
Super danke an Euch 🙂
RLM66 hatte ich auch schon gedacht, aber wusste nicht genau wie es bei "What if" Modellen sein muss.
25 April 2015, 18:23
Bie What If "muss" garnichts sein. Da kannst Du machen, was Du willst. 😄
25 April 2015, 18:48
O, Ho.229? Go on man! You have enough of good references here! I hope it would be superb model!
Mine will wait some time...
25 April 2015, 19:07
Thx Kerber 🙂
Yeah I hope it will look okay in the end - I expect not much so far.
But first I will finish my F6F 🙂
25 April 2015, 19:10
geil, da will ich auch mal dabei sein. Ich find die auch schon immer interessant. Cool aber das jemand der zusammen mit mir in meiner Liga spielt die mal auch baut. Toll.
25 April 2015, 20:47
Thx guys 🙂 I will do my best to entertain you with this build😢
@ Mike Good to know!
@ Sebastian
Naja eine Liga ist leicht übertrieben, wenn ich mir da deine 88er oder 109er angucke😉
Ich werde aber mein Bestes geben und hoffentlich kommt dabei dann ein "anschaubares" Ergebnis bei raus!
Erstmal ist die Hellcat jetzt dran.
25 April 2015, 21:35
Painted some parts and made the cockpit (I will add some little details later)
27 April 2015, 04:29
Ich hoffe das deine decals besser sind dann die ich hatte. Viele sind bei mir gebrochen ins wasser.
Und ich hatte das silvering problem.
27 April 2015, 07:16
Hast Du eine Schicht Klarlack vor dem Anbringen der Decals aufgetragen Martien? So vermeide ich silvering an meinen Modellen recht erfoglreich.
27 April 2015, 07:45
Ich mache das immer Marc. 1 schicht Mr. Color hochglanz lack . dann die decals und wieder ein schicht lack und dann fänge ich an mit die weathering . Was ich mit die uberige decals gemacht habe. Habe die geklebt auf nasse revell klarlack.
27 April 2015, 08:08
Ich berichte dann wegen der Decals, aber der Bau wird bis dahin wird es ja eh noch paar Tage dauern😉
27 April 2015, 08:20
Na, dann bin ich auch mal auf meine Decals in dem Bausatz gespannt. Aber bis ich überhaupt anfange wirds dauern. Jetzt kommen bei dem guten Wetter erst die RC Modelle dran.😉
27 April 2015, 08:22
Made some progress today. Already looks like a plane 🙂 (The wings are not glued yet, but I will probably still need some filler 🙁 )
2 May 2015, 13:14
Thx André 🙂 I must admit that I did make it right to apply Mr Metal (no primer, no clear coat), but the result is still good in my opinion - ok you dont really see these parts now after the assembly....
I will do the "correct" method when I make the heat protection panels on the body at the end.
2 May 2015, 14:01
The polishing colors you do not prime and seal my knowledge. That's one of the advantages at Gunze. The Supermetalics also require no priming.
2 May 2015, 14:29
Ok because Ive read this now on some sites and was wondering, because it already worked fine for me without it after using Mr Metal for the engines.
2 May 2015, 14:51
Ready to put some primer on the kit.
The kit will be the Red 13 with RLM 74+75 on the upside and RLM 76 on the downside.
31 May 2015, 16:39
Can somebody help me and give me a hint how to pain the engine intakes at the front?
I ask because the belly at the front will be yellow and I really dont know which would be the best choice....
20 June 2015, 13:16
I've painted silver, but I don't know if are correct. From the picture I look around the air intake a "light zone" that I've interpretated as silver.
20 June 2015, 13:32
Soeren, I am really amazed at just how much detail is in the 1/72 version here, and you have done extremely well to get it all looking as great as you have, 🙂 and now I say this.:-/
If anyone knows exactly what the paint work on the Ho-229 ever really looked like, they would be time travellers, as every person who has ever built one has had to create their own version of what they "Think" it looked like.
I am not being 'flippant' when I say this, but paint it any way you like, as you cant be 'corrected' by anyone for getting it 'right' or 'wrong'.
Artistic licence is yours mate, and you paint it as you think it would have looked. Yes? 🙂
20 June 2015, 13:33
Agree Kerry. It's your kit Soeren and you do whatever you want. Even if the colours were known exactly who says you have to do it that way? I understand that some like to do exacting representations of certain planes etc but it's not a rule. Use this kit to feel free to do your own interpretation.
20 June 2015, 13:59
Hey mates,
thanks a lot and I really appreciate your comments (espiecally yours Kerry - to kind to me as always 🙂 )
I think I will go for half of the belly color and half of the top color. Think this fits in the best way.
20 June 2015, 14:03
Soeren, You will probably end up presenting one of the best looking Ho-229's ever seen, and I for one am really looking forward to seeing some of your creative juices at work. Have fun mate. 🙂 👍.
20 June 2015, 14:14
Thanks Kerry 😛, but I think that this won't happen.
Im happy when it turns out nearly as good as the F4F and F6F 🙂
20 June 2015, 14:25
Pre-Shading on the bottom is ready. Next step now is to paint it in RLM 76.
23 June 2015, 19:39
Always live in hope Soeren, as it pays dividends mate. It'll look great. 🙂 👍.
23 June 2015, 20:42
And Sören, Whats going on... is the 76 on it? Did you do it jesterday? I think you will get a very good result.
kind regards
24 June 2015, 07:19
Sadly hadnt the time yesterday.
I think I will make this today and after that comes the yellow for the front.
24 June 2015, 08:32
The pre-shading didnt work out as good as I hoped but I think you can still see it a little bit.
After all Im happy with the restul so far and I think this is what matters 🙂
26 June 2015, 18:35
Sieht Super aus Sören - freue mich schon auf das fertige Ergebnis!
27 June 2015, 14:27
You did it. !!!!! And how cool does that look mate.🙂
I am really impressed with your interpretation Soeren. !! 🙂 👍 👍👍
27 June 2015, 19:54
Thx a lot Ekki and Kerry 🙂
And yeah I did but this was not even half of the work 🙂 Now the upper side and then also the engine entrances.
So still a lot to do 🙂
27 June 2015, 20:00
If the belly is any indication of what's to come.............well...........what's the worry. ??? 👍 👍 🙂
27 June 2015, 20:35
Good photo angle 😛 There are some flaws in the paint job.
Maybe you will see them as soon it is ready😉
27 June 2015, 20:36
Thx Clifford.
@ Donald
The V2 used the Jumi 004 jet engine. The final version would have probably used the same.
This engine was also used in the He162, Me262 and Ar234. (little historical fact: Even the Yak-15 used a replica of that engine)
28 June 2015, 20:41
The Jumbo's had a high failure rate, due to the lack of knowledge of metallurgy and the blades couldn't take the heat. !
29 June 2015, 00:05
That's really nice to know. The reason I asked about the rockets is, didn't the Germans use alot of rocket power too in some of creations?
29 June 2015, 01:42
They experimented with jet engines, rocket engines and ramjet engines. The only rocket fighter to ever see battle was the Me163. The Bachem Natter is another rocket powered fighter/interceptor but it wasn't really a success. The Germans also combined a use of ramjets and jet engines on certain craft, the ramjet used more or less like a booster engine.
29 June 2015, 02:30
With those "Wunderwaffen" (miracle weapons) the Nazis tried to turn the tides in the last days of the war. I am indeed an big fan of those technical interesting, partly bizarre machines they tried to throw into battle. A good read online on this can be found here: militaryfactory.com/..of-the-luftwaffe.asp
That´s also why I am working on my project "The cast of Secret Weapons of the Luftwaffe.", based on a PC Game from the ninetees where the player was able to fly some of those planes into battle.
29 June 2015, 08:46
Hi Soeren and mates 🙂 - a little hint: The first design of the V2 was planned for the BMW 003 (should be the serial engine). Because these engines are not available on time they must take the Jumo 004 engines. In this case many conversions resulted with the V2. It was nearly a new plane.
First testflight: 02.02.1945 in Oranienburg -- second testflight: 03.02.1945 -- third testflight after repairing the landing gear: 18.02.1945 with a crash in which the pilot Erwin Ziller died.
Note: The front undercarriage was the tailwheel from a HE 177 and the the main landing gear was mostly from a Me 109.
29 June 2015, 19:19
Thanks Gentlemen for the history lesson, I was always in awe of German engineering but I have trouble with the time tables. How in the world could they build in such a short amount of time.🙂
30 June 2015, 00:54
Post WW1 Germany were barred from forming armed forces of any substantial size and developing weapons of the day as per the Versailles Treaty. They weren't however barred from experimenting and developing rockets, gliders and possibly jet engines (I'm not 100% on jet engines) mainly due to the lack of foresight in the possible future of weaponry. So the Germans put a lot of time and money into the things they could do as compared to the current "accepted" weaponry technology that they weren't allowed to develop. You can easily search these on You Yube and get some interesting info on it. Basically it allowed Germany to get a pretty good head start on these technologies via people like Lippisch and Horten etc who studied flight efficiencies via gliders.
So it's not so much as developing them in such quick time but quickly over a longer period.
This is my very rough understanding and I'm happy to be corrected.
It is a truly interesting period of flight.
30 June 2015, 03:34
Thx mates and always nice to see that this is not always only about the model but also about some discussions with same thinking people 🙂
30 June 2015, 04:56
Soeren, I hope you are not thinking of 'weathering' the Ho-229 as it was not around long enough or made in sufficient numbers to get that 'used' look.
Leave it crisp and clean, like it's the first one out of the factory.🙂
(Just a suggestion). :-/
30 June 2015, 06:26
That was also my idea Kerry.
Maybe but only maybe I will make a little PLW, but not so sure about.
30 June 2015, 06:48
You do what ever you feel it needs Soeren, and I am sure it will be a great result, no matter what. 🙂👍.
30 June 2015, 06:59
Thanks Kerry, again 🙂
But we will see. Im still kind of afraid to make the masking on the top side.
I really hope it will work at all.
30 June 2015, 07:01
Your skills have developed beautifully Soeren, and all I can say is, be patient and thorough in your preparation and the rest will just 'happen'.
You will be ok mate. 🙂 👍.
30 June 2015, 07:36
Thank you😉 And I must admit that I do my best to get better!
I dont know how good it worked so far, but there is still a LOT!!! to learn 🙂
30 June 2015, 07:44
Soeren, I am learning every day mate, as I still make fundamental mistakes and I should know better, but smart people make plans and prepare way ahead of time, having thought of every little thing that can go wrong, and THEN !!! Mr Murphy drops by to say g'day and F*(&^S it all up.
You can talk yourself into problems and mistakes too mate. :/
I can only try and ease your anxiety a little by saying all I have said, but your the one who has the airbrush in hand. 🙂
You will be awesome. 🙂 👍 👍
30 June 2015, 10:19
So true Kerry 🙂 Its always fun to write with you here about all these stuff 😛 😛 😛
Next update for the 229 comes sadly not before next weekend 🙁
30 June 2015, 10:34
Hey guys, I was just saying to Gareth how much I enjoy the exchanges between all of us here, and it's all on scale modelling, and the best forum on the net......bar none. 🙂 👍
30 June 2015, 12:04
That is my plan 🙂 I only fixed the canopy with Blue Tac on the kit and filled it with styropor to cover the inside.
You can see that on pic 11 🙂
30 June 2015, 12:45
What EXACTLY have you done ?
If you have painted it, get some brake fluid and soak it in it, the fluid will remove the paint and not damage the canopy.
Settle down mate, it's not the end of the world ok 🙂
Shit happens for a reason.
you just learned why. 👍 🙂
30 June 2015, 13:31
Forget it 😛 Ive now seen both.
Some kits have the middle of the canopy painted and some not... So everything is fine 😛
And I looked in the instructions and Im correct 😛 Its definitely to hot here in Germany right now to think clearly 😛
30 June 2015, 13:32
Advantage working in IT Department. Usually situated in the "deeper caverns", it´s cooler here. Outside 29°C, Inside 20°, without A/C. 😄
30 June 2015, 14:26
We have had nothing but rain and high humidity here (Mid west U.S.) and much flooding, making painting impossible.
30 June 2015, 16:26
Soeren, I for one am pleased to say that I am glad all is OK with your canopy mate. 🙂.
I am so lucky living here where it is temperate all year round.
Ido my modelling in the cool of the evenings after a hot day.
Cheers mate. 🙂
30 June 2015, 17:44
Good job so far, I know this kit, it looks nice in the sprues but it is tricky to put together, the canopy is particulary tricky to find a position, I lived mine open and brushpainted the smaller frame so I avoided the complicated masking process, the problem was later one when i atempted to glue in in place, I hadn´t test-fited previously, so after the paint, decals, wheathering and clear coat, I found myself having to fill gaps with putty and going trough all the process again in the nose... :-/
30 June 2015, 18:42
THX Cesar and I know exactly what you mean.
I will also leave mine open.
30 June 2015, 19:47
Pre-Shading down.
Sadly its to hot right now for the complete camo... So Ive to wait and do that maybe later today
12 July 2015, 16:09
Green she is!
Not 100% satisfied - like always 😛, but the color looks still great on this kit!
12 July 2015, 19:20
You did well on the paint Soeren, as I can see all the surface detail has survived well. Good start to the finish mate. 👍 👍 🙂
12 July 2015, 21:32
Thx Kerry.
Sadly not all survived and some little ones are gone.
Also there are some sandling spots under the paint.
But after all its okay for the 4th kit😉
12 July 2015, 21:42
From Apprentice to master modeller in four kits is most commendable mate. 🙂 🙂 👍
12 July 2015, 22:02
Haha you re to kind but Im nowhere near master yet😉
I would still call me beginner😉
12 July 2015, 22:07
You could have fooled me mate, as I love your work and your determination to make it look the best you can. 🙂 👍
12 July 2015, 22:12
What do you mean by "The Beginning". ?
Do you know something we don't know. lol :-/
It was painted by the Americans when they "Captured" it and it never had any RLM designation at all from what history says. 🙂
13 July 2015, 10:19
Just the beginning of top-camo....nothing more. Unfortunately, I do not know the "real" color, the pictures from the Museum are somehow too greyish for me....I suppose the color is RLM83, but....I feel I am wrong...I didn't know about "American" paint on it...Also, The variant that You Kerry have done, in "wood" is also very nice and totally different. One of my favorite for all times... Huh, mine exemplar will be in some green livery, some what-if scheme....
13 July 2015, 19:31
Soeren, This is where the expression, "Artistic Licence" comes into play, as it will be totally your idea of how you 'think' the aircraft would have looked had it gone into service with an RLM designated colour scheme, and that is why you see so many brilliant variations of the Ho-229, because no one knows exactly what it would have looked like thanks to the American doing what they did, including the application of the white swastika.!!
The World War II German standards for aircraft colours came from the State Ministry of Aviation (Reichsluftfahrt Ministerium) and it was this bureau that set the colour standards. (Apparently), but correct me if I have got it wrong. :-/
13 July 2015, 19:58
The box art is more like RLM75/RLM83, but RLM81/RLM82 looks better, anyway. Great job!😎
14 July 2015, 17:54
Thx Burkhard.
I know, but RLM81 and RLM82 are more "historical" correct for this year - in my eyes 🙂
Btw it is RLM74 and RLM75 😉
14 July 2015, 17:56
Finally I understand what you guys are talking about when discussing RLM colors 🙂
14 July 2015, 20:05
Looking awesome! Great job! Got to remember your work when my 1:48 Ho 229 arrives. 😄
14 July 2015, 20:32
Thx a lot mates 🙂 Im reallyvflattered 🙂
Btw Ive still one kit left in my stash Burkhard. 😛
14 July 2015, 22:53
Thx Jens 🙂
@ Kerry
Naaaah. Next kit is the Airfix Zero and what comes after that - we will see 🙂
But there are still some little things to do at this kit - Aluminium look at the exhaust plates, one panel line wash etc.
The hardest part during building this kit was definitely to adjust the rear landing gear...... Luckily my Go 229 stands now straight and isnt lower to one site like some other kits I saw.
15 July 2015, 05:22
This camouflage scheme looks better than mine scheme with RLM 74,75.
Nice paint job, Soeren 👍
15 July 2015, 13:47
On the last two pics can you see what I meant with not that kind of good paint job 🙁
15 July 2015, 17:54
Soeren, I am struggling to see anything wrong with your paint job. What are you referring too. ?
15 July 2015, 18:44
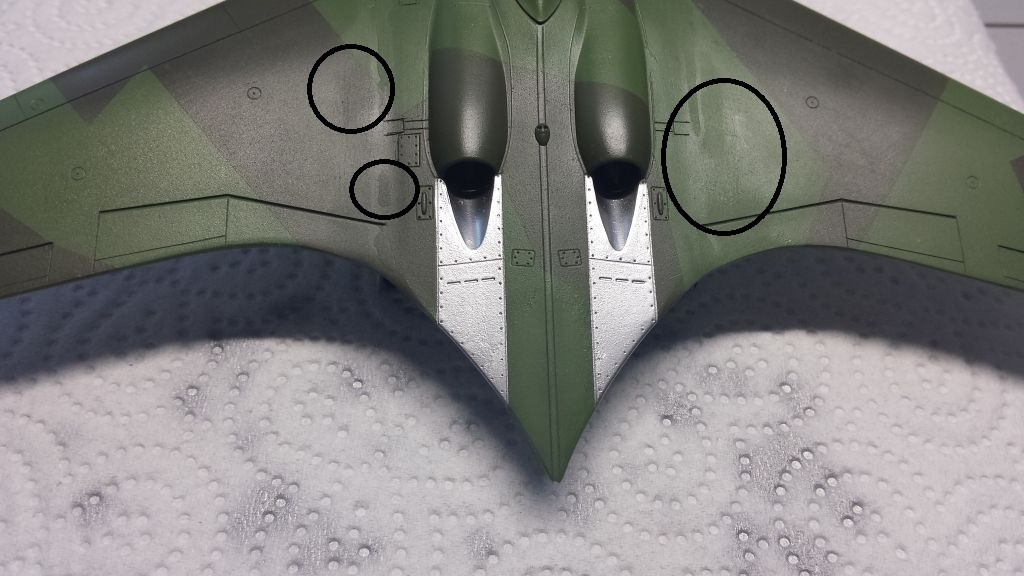
I was not aware of them Soeren, but as your the one who handles it and it's right under your nose, they might be obvious, but from where I am, I can see nothing.
I reckon it looks just fine. Mr Perfect. 🙂 🙂 🙂 👍
15 July 2015, 18:58
Thx Kerry, but isnt it always that way that the builder itself isnt quite happy with the result and finds everywhere some flaws and everybody else didnt even see them at all? 🙂
15 July 2015, 18:59
It is always like that Soeren, and I really think you have looked "Too hard" at your work. I am admiring your "splinter" cammo, and it is not easy to do.
I did the 1/32 Ju-87 Kanonevogle (Gun Bird)in the splinter pattern, and wow, didn't I have fun........NOT. :-/
I really like what you have done, and I am repeating myself again. 🙂 👍 👍 👍.
15 July 2015, 19:07
And am very pleased about that 🙂
Btw. I kind of liked to make the splinter camo even it took a while for the first time doing it 🙂
My biggest fear was to spray to much color so I had some bad passages between both colors.
15 July 2015, 19:10
The edges of any paint job are always the weak point of any spray job, as it's usually too much or not enough, and if you watch the paint 'build up' as the spray goes on, you will find that the surface (wet) as you 'see' it, will take on a sheen that gets easy to judge after a while.
You have that 'eye' Soeren, and you have seen it happen as you have sprayed too. So, watching for that 'sheen' is the best and only way to tell, just how much you are 'putting down' on the surface and it is also critical, just how far the paint has to travel before it 'reaches' the model too, AND, air pressure is a critical factor.
Your skills are developing nicely my friend and you are getting better results every time, and I think you will remember all your effort with the Spitfire you did so long ago mate 🙂 🙂
15 July 2015, 19:34
I really do! It was a lot of effort and also a LOT of questions 🙂 (which I still have on some matters 🙂 )
But true that the basics are working now a lot better and to every build
comes something new! Like on this kit the splinter camo and the metallic paint.
Still there is a lot to learn and to work on the techniques like airbrushing, which doesnt work always for me.
15 July 2015, 19:38
Soeren, I have been at this hobby for the best part of 50 years and I still encounter problems with the things I do.
My paint work still leaves a lot to be desired, and so do a lot of other things, like how to apply superglue properly, Grrrrrrrrrrrrrr:-/
I do have skills, but I am in no way a 'wizzard' at this hobby, but I can pass on a lot of advice on how to avoid some issues.🙂
Your approach and attitude to modelling will see you become a very gifted modeller, but you have got to stop beating yourself up over every little thing. We all love your work and effort Soeren. So should you mate. 🙂................Cruise. 👍. 🙂
15 July 2015, 19:52
Soeren, "Google" this. "Patience Grasshopper". 🙂
Opps, too late, I did it for you. 🙂
google.com.au/url?sa...97949915,bs.1,d.dGY
15 July 2015, 19:54
Looks good to me Soeren, I think you did a good job on the paint job.
16 July 2015, 16:06
Thx Ekki 🙂
and yes Kerry maybe you are right 🙂, but still some things to adjust for the next kit!
Btw. Clear coat is now on and today or tomorrow (if its not toooo hot) I will apply the decals of the red 13.
17 July 2015, 04:36
I am so excited for you Soeren, and your work is just wonderful to see and follow mate.🙂
With the clear coat, there will not be any 'silvering', and won't this look so fantastic mate. 🙂 👍 👍 👍.
17 July 2015, 05:42
Thanks Kerry 🙂 Lets see how the decals will apply and how the finished result will look then😉
17 July 2015, 05:48
This is a really well done painting, I would say. But also amazing how clean your airbrush cabin looks like! Is it new?😉
17 July 2015, 08:15
Thanks Thorsten.
Kind of new, it only saw 4-5 kits till now, but I must admit that I clean it usually after very kit.
17 July 2015, 08:57
I have an old newspaper placed in the cabin, to shield the bottom, but the sideparts are coloured after spraying 1:10 RC car bodies. 🙂
17 July 2015, 09:05
So sadly I fuc**d up and destroy one decal during the applying process.... Now I ve to see where I get a second decal sheet 🙁 and put this on hold till then 🙁
Decals really dont like me and the other way around too.....
17 July 2015, 20:26
Soeren, I am disappointed for you mate, after all, It does happen, all to often.🙁
I should have said to you, let the model sit for a couple of days before you tackle any decal application.
You see, both items are made of paint, being, the surface you just sprayed and the decals too, so, if the paint is still a little 'green', it has a effect on how well the decal behaves when it is laid onto the model.
A learning curve mate. Shit happens. :-/
17 July 2015, 20:58
It really does.... I painted the clear coat yesterday but sadly the bigges decals didnt want as I wanted 😛
So lets hope Department X has another for me.
This part broke during the appliny process: [img1]
I should cut such big decals the next time in half.

17 July 2015, 21:05
Thats how it looks right now. You can see the crushed decal 🙁
But I still can say Im a beginner and such mistakes happens even to the best of us (I hope 😛 )
17 July 2015, 22:19
😢 Luckily its not that "big" mistake so I can repair this with a spare of decals, which I will get in a few weeks, but till than this one is on hold 🙁
17 July 2015, 23:06
Thx Ray😉
The good news for me is that I got the damaged decal from a made so I can finish the kit next weekend😉
18 July 2015, 19:01
Btw. has somebody a good hint how to make the exhaust stains on the aluminium?
18 July 2015, 19:05
Hi Sören- you can do this with oil-colors. But not pure black. Mix black with a little bit brown.
18 July 2015, 19:37
Thx Mike.
Ive also ordered Jet Exhaust from AK Interactive and I will give both a try😉
18 July 2015, 19:39
Kein schlechte Wahl, aber Ölfarben kann ich immer über einen längeren Zeitraum bearbeiten.
Die AKs muß ich erst noch ausprobieren...
18 July 2015, 19:42
Ich habe das Alu von den neuen Metal Extreme Farben für dieses Kit genutzt und bin sehr angetan von der Farbe.
Mal sehen wie Jet Exhaust dann aussieht.
18 July 2015, 19:45
Soeren, you have made a fantastic job of your Ho-229 mate. 🙂
From every angle, it is superb.
Congratulations my friend. 👍 👍
18 July 2015, 20:10
Thx a lot Kerry 🙂
But now the Ho has to stay put for a few days till I get the decal!
So lets see what I do know😉
18 July 2015, 20:15
Thank you Burkhard and yes its kit number four 🙂
Number 5 is right now on my desk.
18 July 2015, 20:18
The A6M2 from Airfix (has also a album here)
A6M2b | Album by Floppar (1:72)
18 July 2015, 21:17
Well done so far Soeren ! Staining looks authentic to me . Are you going to get some decal replacement from Revell ?
I asked for that once for my PT boat build, and it was absolutely no problem, they sent it to me instantly without charging anything.
19 July 2015, 19:38
Thanks Hanno.
Yeah I wrote Abt. X but I will also get this decal from a mate. 🙂
So it will be definitely "repaired" 🙂
19 July 2015, 20:03
hi! very nice job so far, specialy the painting, I would just recommend flatten the tires, specialy the big one in the midle because it was overloaded with the weight of 2 turbines and the air pressure was not realy high as it was very big, so it woud had looked very weighted
19 July 2015, 21:09
Your an other one of the "Freaks" coming out of the woodwork. 🙂
Your pretty good for a "Beginner" LOL
A natural talent if ever there was one. 🙂 👍.
21 July 2015, 01:17
Thx Clifford and Kerry 🙂
Haha Kerry 🙂 Lets see how the He 219 will work, but that will be a really hard project for me.
21 July 2015, 04:49
Have you had a look at Google Images for any 1/72 219's ?
You will see some there and you will see it is not a hard thing to do. 🙂
google.com.au/url?sa..ust=1437543907792502
21 July 2015, 05:44
The build itself wouldnt be the problem at all I think.
The "hard thing" for me will be the painting.
I never did that kind of camo.
21 July 2015, 05:47
z15.invisionfree.com..x.php?showtopic=3624
This camo looks awesome for example, but I dont really want to think about doing that 😛=
21 July 2015, 05:53
Soeren, all I/we can suggest is that you practice using your airbrush and overcome this thinking that you cant do it.
This is just like using a pencil, and I mean that seriously, but remember what you have been encouraged to do like.
Mix your paints to the consistency of milk, use a low air pressure setting on your air regulator and set the needle on your brush to deliver just the amount of paint you need at each touch of the trigger.
We are all here to help each other in the groupbuild, and that's why it is called a groupbuild as we all make sure we 'get it right'.
'You have nothing to fear, except fear it's self' (A famous quote from President Roosevelt)
We are just over your left shoulder mate. OK. ???????
And if it makes you feel any better, I have never done this type of cammo before either. :-/, so we are both in the same boat my friend. 🙂 🙂 👍
21 July 2015, 05:58
I know Kerry and I really appreciate the help I got till now 🙂
Youre right I really need to practice this method, but first I ordered from Eduard the mask and PE interior and True Details resin wheels for the He 219 😉
21 July 2015, 06:03
Soeren, You are way ahead of me mate.
All my stuff is still at least a month away. 🙁
21 July 2015, 08:18
I dont know how long my stuff will take.
The Eduard stuff comes from the UK, the True Details wheels from a supplier a few min away from me and the OWL Decals from the USA.
So I think it will also take 2-3 weeks for me.
I think we can say that Im all into this groupbuild😉
21 July 2015, 08:27
Soeren, this will be the best experience in modelling you will ever have mate.🙂
You see, I have to wait until the President of ZM is back in Japan from the IPMS convention in the USA before any orders are sent out from ZM.
Why it is so, I don't know, but that is what the ZM crew have told me. :-/
21 July 2015, 08:45
Probably he want to hand you the kit in person after your great 229 build 😛
21 July 2015, 08:57
LOL, That will be the day LOL
I has something to do with new orders placed at the convention. :-/
21 July 2015, 09:03
As long as you will get it in the next few months, its okay 🙂 Im really looking forward for you build then😉
21 July 2015, 09:15
Soeren, In the meantime, practice at developing your airbrushing skills mate>
And you might even have time to do an other model 🙂
21 July 2015, 09:34
Yeah I will try the mottle camo soon. I also have a pe mask from Airwaves to do them. I really hope this will work, because my skills are not that good yet.
And the next 2 models are already on the desk!😉
21 July 2015, 09:38
A BIG thx to a mate from another board, who helped me out with a new decal 🙂
So the decals are now down and the next step is another clear coat plus a panel line wash.
22 July 2015, 16:25
Btw next clear coat is now on and I hope that I have the time to apply the clear coat today 🙂 And during that I will also put a clear coat on the cockpit of my I-16 🙂
23 July 2015, 06:01
Thx😉, but not done yet!
One panel line wash is missing and one clear coat 🙂
24 July 2015, 05:26
FINISHED. ???????
How cool for you mate and applause, applause, applause. 🙂 👍 or, clap, clap clap. 🙂
25 July 2015, 09:57
Thank you Ekki 🙂
Im really happy that its finished now and I can go one with my I-16 🙂
And also the result is looking okay after all (even with some little flaws) !
25 July 2015, 10:49
Thanks 🙂 The kit still has 2-3 flaws, but luckily they are not that obvious 😛
25 July 2015, 17:11
Actually, the result looks more than okay! 🙂
And don't worry, ultimately there'll always be flaws. Perfection doesn't exist, but one can come close.
25 July 2015, 18:33
You re right Ekki😉 and thats good that way.
But Im more than happy people are liking this one and even more important for me is that ive learned some stuff again😉
25 July 2015, 18:47
Great job! I also like that display runway. Still searching for something similar. How did you make this one Soeren?
25 July 2015, 20:32
Thx Marc.
I must admit that I got that one from a mate, so I cant really tell you that.
But I know that Uschi von der Rosten is selling that kind of stuff.
uschivdr.com/shoppin..hop-display-diorama/
25 July 2015, 20:35
Soeren, you have made a huge impression on all those who have checked your posts, and you have excelled in every way.
I never saw a negative comment on it from them, only yours. :-/
Salute. 👍 🙂
25 July 2015, 21:39
Oh, oh Soeren! Giving that link to me was "not that good".😉 Had to place a big order at Uschi von der Rosten. 😄
27 July 2015, 20:44
Thank you Arne😉
I must admit that Im kind of happy, that so many of you like my build after all😉
4 August 2015, 07:46
