

Lockheed P2V-7 Neptune WIP


Comments
Exceptional work so far Alec.
You're going to show us all up again aren't you? 😉
(Come to think of it that should have been a statement rather than a question. 😄 )
Thanks Gorby! Not my intention, just sharing my modeling joy in my characteristic pedantic manner 😄
One of my favorite prop classics! Please a seat in the first row! Excellent start. I'm curious for more scratchbuilding especially flaps & co. 🙂
For such exulted following, I better up my game. Welcome to the show mates, I'll try not to disappoint.
excellent and useful build tips....didn't know about acrylic glue....thanks for sharing the build!!
Nice to see another project form you, Alec. Great start. Looks like the Neptune need a lot of extra detailing.
Very nice work in the cockpit, Alec 👍 I'm looking forward to see next steps. Also, i'm surprised how big this bird is 😮
Thanks gents! Erik, you are right, the additional details will make it a nicer build but it's noteworthy how good this kit is after so many years. And yes Jakube, it's a BIG bird 🙂
Alec: they were several colors schemes used on dash 7. Which scheme intend you to build?
Hello Bernhard - I really like the later schemes of Light Gull Gray with white fuselage decking. I came across several renditions of BuNo 147967's scheme (see my project's banner) and as long I figure out the markings (specifically, what kind of decals I will need to make myself), this will probably be the one.
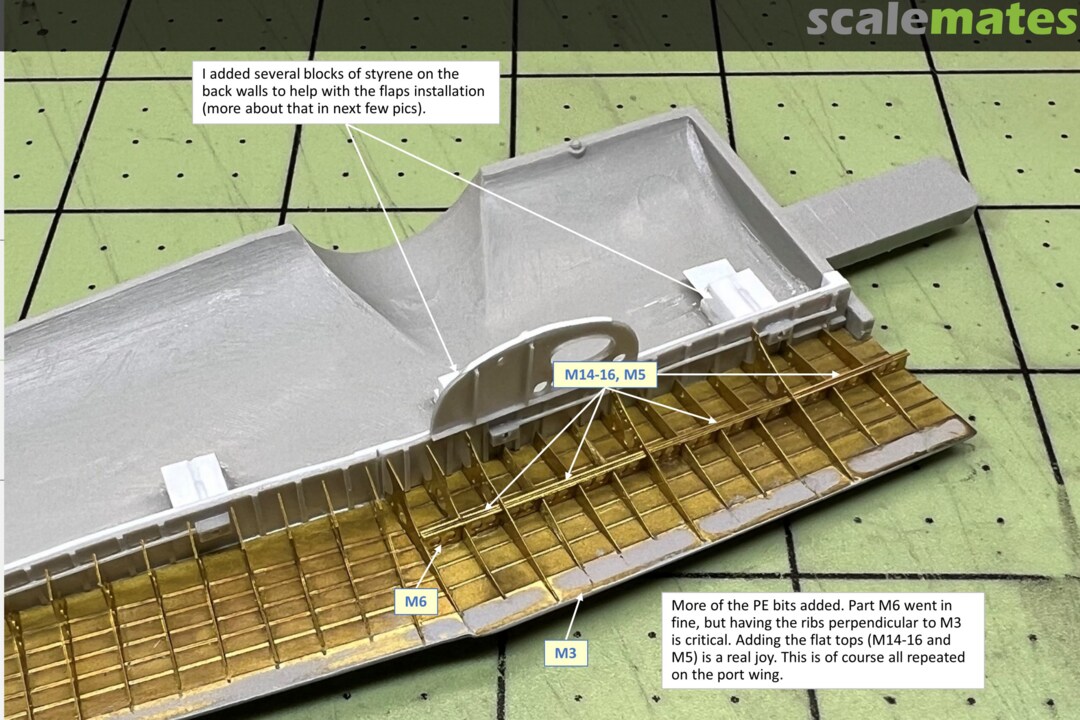
Welcome Oliver! I have added info about my fun time with Plus Model's flaps 👍
Really interesting project. I believe that in your rendition it will be another exceptional model. I will definitely follow this build 👀
A lot of work ahead, but it seem that you have it worked out before hand. Nice
Excellent start on the wings. Watching for next steps. 🙂
P.S. is #PJ 12 in gullgray & white you choice?
Alec, your modifications to this kit are great. 👍 I just don't understand one thing. Is there any reason why you didn't simply weaken parts 62-65, 66 and 67 from the inside and then glue the Eduard parts to them?
Welcome Jakube 👍
Ludvíku: A fair question regarding a choice I myself questioned. I though the Eduard parts were too thin (the formed reinforcing metal structure on the interior of the doors seems quite deep to my eye). Also, the front wheel bay door structure looks different than the Eduard interpretation. All that said, I think thinning the kits' parts and adding styrene strips would have been easier. Cheers 👍
Thank you for your reply. I don't mean to disparage your work in any way. I knew you had a reason. I just didn't know what it was.
The result looks very good. 👍 Especially considering the actual size of the parts in 1:72 scale. It's obvious you take great care with all the details. I wish you a steady hand and a good eye throughout the build of the model and look forward to seeing the progress. 🙂
Most impressive Alec.. That Metalwork is awesome!
Love the outcome so far👍
Thank you mates! Frank: I imagine you and others will relate 🙂. Recently I was going through my "keep for just in case" items and failed to get rid of much. Most of such items do not occupy a lot of space, it's much harder to justify keeping junk that does 😉
That it also a fact: if you don't used a thing for years and drop it in the bin one week later you will need it! That is caused by Murphy's law.
Greetings mates! Contrary to what you may be thinking, I have NOT been screwing off and AM actively working on this, just veeery slowly. Here is an update on my labors.
I'm watching this with great interest. I am always amazed at what can be done on this scale. 👍
Thanks much guys. This gives me strength to keep plugging away at this beast 😄
Impressed by your build, great scratching and use of "household" materials.
Cheers friends. Just so you don't think I gave up on this beast, here are some progress pics. This project has been a MONSTER but it's progressing, despite my every effort to screw it up.
Thanks gents for stopping by and for your kind comments. It's always a pleasure to read those 👍
I love your journaling, so much to learn from you, following 👀. Your work is amazing.
Great that you continued to work on this bird and uploaded new pics....
But, have you deleted all old pics and uploaded new ones? Normally I check the date to see, where the news are, but here _all_ pics are of the actual date 🙁 But some were definitely not new for me.
Thank you friends for your comments and support, very appreciated.
Jennifer: I am glad you like my ramblings. I realize I get into the weeds, but I always enjoyed others sharing their progress in detail and it has helped me great deal with my own modeling journey, so I am trying to do the same.
Frank, you are correct. There was a discussion some time ago about the preferred sizing of images for albums and I realized mine were pretty small, so I decided to re-upload the old pics in higher resolution. The teaser in the album marks where new work images begin. I hope it's not a big faux pas to do this as I plan to upgrade some of my older albums this way.
Thank you Alex - the new bigger picture size is for sure a _good_ reason to replace them 👍
There was also a discussion in feature request that replacing pictures by better ones do not trigger a notify. So this can be done behind the scenes without bother anyone..
Hello Alec. I'm glad to see you back here after some short break 🙂
That new vacu canopy looks great 👍
Finally painted something on this bird that will be visible on the outside. Cheers!
A pleasure to follow you on this journey. Sprue goo bubbles are a problem I am familiar with too and is doesn't have to do with stirring. Unfortunately I cannot provide an alternative theory why this happens. Maybe someone out there can enlighten us.
Alec, good progress! 👍 I admire the precision with which you create the details of the model. My admiration is all the greater because your model is in 1/72 scale.
The bubbles could have been caused by a chemical reaction between the sprue material and the solvent, or between the plastic of the model and the "plastic slurry" during drying (similar to adding yeast to dough), but that's just my guess.
Alec, what a no-compromise project! Very inspiring! And fingers crossed that the wind doesn't get out of your sails. 👍🍀
Hmm, interesting observations regarding the sprue goo bubbling, thanks for commenting on that Michael and Ludvik. Ludvíku, I think there is probably something to your theory. I just bought some dissolved putty from GSI and have high hopes for it.
Gordy: "good grief" about sums it up…
Zbynku, thanks for the encouraging post 🙂
Alec: I am very happy to see that this great project continues. You solved the canopy problem very well. I suspect that your self-made part is clearer than the one from the kit….🙂.
Great details on the wheel bays & landing gear, which is also movable! I am looking forward to further progress.🙂
Great and careful work again!
May be your sprue putty layer was too thick? The extra thin glue need a way to go out. So it is may be better to work in thin layers and give the glue the chance to left the plastic.
I'm also not a fan of normal putty, but I used some days ago the Tamiya Light curing putty (I wrote about in my Swallow project). I like it! But also there it is recommended in the manual to use only thin layers up to 2mm. If you put light on a thicker layer it will get too hot inside and create bubbles. But as this hardens quickly with UV-light it is no problem to apply additional layers.
Thank you mates. I think the canopy was the correct decision, the thickness alone makes it so much better. Silver linings…
Bugs, I think you are right about the goo. I did glob it on pretty thick, forgetting all my school chemistry 😄. Thanks for the advice as well, I'll have to look up that Tamiya light curing putty.
Alec, such a gorgeous aircraft which I also want to build. I got dissapointed to find out that the Hasegawa kit has raised lines and I wasn't yet willing to do the effort you are doing now.
Outstanding work, I admire the dedication you're pouring in this project. Thank you for recommending some scribing tools, mine got old and blunt and needed new ones.
One question: why use the saw for scribing? What is the advantage?
I missed this thread completely - outstanding work! Landing Gear, Cockpit, Flaps and much more just makes me feel like a beginner.
Thanks you guys. Thomas, your work looks rather advanced to me 🙂 👍
Marius, this is my first scribing/riveting project on the entire model and I really enjoyed the process. Regarding my use of thin saw blade: on curved surfaces like the sides of a fuselage, I find it difficult to use the UMM scribers. It's hard to describe, you just have to experience it. To get a nice even panel line with the scriber, I apply several passes at low pressure. This is hard to do when you are following a curve because the scriber's "angle of attack" relative to the surface is important and must be continually maintained as you move the tool. Saw works much better and produces a comparable result. Cheers!
I can only second Alecs arguments. Particularly if you have a panelline which was interrupted- by sanding for example - the saw can use the still existing grove as a guide much better than a scriber can.
Wow. What an odyssey of a build log. So detailed and painstakingly explained. Thank you. All aboard for the remainder of this journey.
Dat rivets look great, watching with envy. 👍
Thx for the Dymo tape hint, I have to test it, all these fancy modelling scotch tapes seem too thin for my taste.
Thanks Gary, welcome to the odyssey. We should hit port soon 🙂
Łukasz, Dymo tape is pretty good and readily available, but couple words of caution: its adhesive is very aggressive and tends to leave residue on smooth surfaces, and it's not very "bendy". It sticks to Surfacer fine and comes off the same, but I had it peel off paint on smoother paint finish. The Carving Guide Tape (HIQPARTS CGT-6MM, No) is a better option IMHO but not sure how easily available.
")
Thx for the additional info. The transparent ones don't work for me at all - my eyesight is too poor 😉
But I think Dymo could be good for the basic rescribing, even before surfacer.
For the later corrections I have these green semi-transparent one, but its edges are not thick enough for me to do the long straight lines:
mojehobby.pl/product..-Edged-Tape-3mm.html
Very nice rescribing, Alec 👍 . As for dymo tape, I have the same experience as you.
Its nice to see, you are using Hauler products. This company is located about 500 meters from my home 🙂
Thanks Clement and Nathan!
Łukasz - for sure, give it a try. For straight scribing, I like a firmer wide tape to keep the "straightness" and Dymo tape works great for that. It's also nice and thick for guiding the scribed. My only complaint, again, is that the adhesive sometimes stay put.
Jakube - thanks for encouragement. Do you mean PlusModel? Or does Hauler makes their PE? Either way, I am jealous 🙂 👍
Alec, i mean Hauler ( scribing template on your pic#110). They really make their PE. I saw it with my own eyes 🙂
Oh yeah, sorry! Got it. I have many Hauler PE sets (as well as their kits) in my stash 🙂
Alec, the longer I follow your work on the model, the more I like it. The care you take with all the details is admirable. 👍
In the time I have been building my models, I have come to the same experience as you. For restoring panel lines on curved surfaces of the model (like the fuselage), a razor saw is best. It's exactly as Michael Kohl writes a bit above.
To transcribe the lines on the model I use (among other things) rulers, which I made from an ordinary rolling ruler metal tape measure. I cut strips of different lengths from it. These strips are flexible and adapt easily to a curved surface. For even more flexibility, the strip can be cut lengthwise into two narrower strips.
This has turned in a very helpful thread with all the discussiond about scribing. I would like to share my own method for irregular surfaces. I'm using tape for electrical cable insulations together with a pointy tool. The tool is normally aimed at scribing access panels or doors, but I use it for larger panel lines too. Check photos #36 and #38 from this album:
MiG-23BN - Iraq - 1982 | Album by Redicus (1:72)
Managed some progress, engines are on the wings. Getting close to assembling this beast and finally painting.
Wow...I can't believe what a huge improvement you are making to this tool. Looks great!
Thanks Cuajete. The beast finally has wings and received a coat of paint. The saga continues...
Album info
I was struggling a bit to select my next build, spending time on gathering references for several project and abandoning each in turn. I had the Neptune kit in my stash for a while and as I have never built anything big, I finally reached for the Neptune kit. "It's going to be a nice relaxing OOB build" I said. Right. As in many times past, this idyllic plan did not survive the first contact with determined internet search.
I started with the two books listed in the project's reference section, thinking they would be more than adequate for an OOB build. Turns out they lack any detailed information or photos, precipitating an online hunt for detailed images. This initially also failed to produce much in terms of detailed photos and info, but as I was pumped to get started I did so without having enough material gathered. As I was progressing with the build I discovered several resources that uncovered many shortcomings of the kit. Needless to say, I learned few things I wished I was aware of earlier.
Below are links to the Tailhook Topics blog entries I referenced heavily during my build as well as some inspiring build logs by other modelers (I have included more reference links under the Project description):
Tailhook Topics- Hasagawa P2V Neptune Kit: tailhooktopics.blogs..p2v-neptune-kit.html
Tailhook Topics- Lockheed P2V-5 vs -7: tailspintopics.blogs..-5-vs-7-neptune.html
Build logs:
Keiun on 72nd Aircraft (in progress, and although of P2V-5, still and excellent and recent resource)- tapatalk.com/groups/..3Dlogin?deduce=login
Moggy on Britmodeller (older and not completed to date, but still a great resource)- britmodeller.com/for..tine-naval-aviation/
Paul Budzik's 1:48 scratch-built effort, as yet incomplete (and with his refocusing on ships, likely to remain so)- paulbudzik.com/curre..ne_Model_Budzik.html
Marcello Rosa (also on SCM)- marcellorosa.com/1-72p2v-7neptune
NABE3 (AP-2H gunship)- nabe3saviation.web.f..explanatione-fr.html


