One upper wing only!

This is my first build of the newer production batch from Small Stuff. The package and manual are different. The resin looks greenish now. So this is also a test how I can handle the new ones.

It works as before! The resin is as soft as before and can be cut with a razor blade.
Cylinders mounted to the case.
Cylinders mounted to the case.

And painted - five Alclad shades are used, plus copper on the intake pipes.

Here in a closer look.

All the remaining little parts are mounted to the engine. Also a light wash was applied using oil paint.

From the back side (that will not be very visible on the model later) you can see the push rods and ignition wires.

The engine is finished and can be stored safely for later mount.

Luckily I have prepared more seats in the last build so I now simply add this to this new project.
So you know also that it will be a British plane 😉
So you know also that it will be a British plane 😉

I decided to go with the old Eduard Camel kit.
The SPIN conversion kit offers a new cockpit cover, but I do not like it. Bad shape and too many errors, like the hole for fuel cap in wrong position. As the seat was moved backwards I removed parts of the back of the halves. Note the SPIN cover is also too short.
The SPIN conversion kit offers a new cockpit cover, but I do not like it. Bad shape and too many errors, like the hole for fuel cap in wrong position. As the seat was moved backwards I removed parts of the back of the halves. Note the SPIN cover is also too short.

In my spares box are many remaining optional parts from my 3 Camel builds of the new kit series. I modified the back part of a cover to fit here.
One fuel opening is cut away, one was closed and a new one drilled. Filled with a turned/milled brass cap for dry fit.
One fuel opening is cut away, one was closed and a new one drilled. Filled with a turned/milled brass cap for dry fit.

A ref pic shows a round grip on the stick, so I created a new stick (but it is not yet finished). I used a Eduard stick as size reference.

I decided to build up the cockpit internals based on remaining frames of the new Camel Comic (A toast to the common spues, so I have enough spares 😉 )

Some modifications and a lot of masking and painting there is now linen, wood and alu.

A view from a different angle shows some more details, e.g. the seat belts.

The next step was adding the internal rigging and some copper wires as fuel lines etc. The final step was an oil wash.
Please note, that the front plugin is not yet finished.
Please note, that the front plugin is not yet finished.

So the fuselage halves could be clued together. The back part of the cockpit decking and metal struts are also glued in place.
The front/lower part is only temporarily plugged in.
The front/lower part is only temporarily plugged in.

After a failed try to scratch a cockpit front cover from styrene I started again using thin brass sheet. That was one of the reasons to add the struts already.

The original Swallow used a really complicated shape which I tried to imitate here. With filing, cutting and a lot of dry fitting.

On the right the cover form the SPIN conversion kit: a total fail. To short, wrong openings for fuel and oil filler caps, and more.
In the middle my first try, but styrene do not hold the shape.
On the left my actual try with brass sheet.
In the middle my first try, but styrene do not hold the shape.
On the left my actual try with brass sheet.

Two Vickers MG from Gaspatch Models fits now.

It only lies loosely on top. With glue it will fit even better.
Now I can live with the outcome!
Now I can live with the outcome!

After a lot of work on the resin wing I applied thinned NATO Black as shading on white primer. Later I applied tapes cut with plotter between the ribs. Below the wing you can see the masking sheet.

So I can spray some layers of white primer to get enhanced bright rib tapes. The masks are removed.
Here the upper surface will be painted dark so not light is going through => the rib tapes needs to be bright.
Here the upper surface will be painted dark so not light is going through => the rib tapes needs to be bright.

On lower surface I sprayed MRP 257 Clear Doped Linen variant 1

On the upper surface I applied MRP-253 PC10 Late. But what the hell was this? I do not like the shade!
I found an older used bottle with the same number but much greener shade. So I added a thin layer of that paint on top. Be warned!
On the upper side you can also see my added tread strips made from real wood.
I found an older used bottle with the same number but much greener shade. So I added a thin layer of that paint on top. Be warned!
On the upper side you can also see my added tread strips made from real wood.

Due to the second PC10 layer a bit more paint is applied, but the ribs are still in a different shade.

The wing is plugged to the struts.

After seeing the previous pictures, I sanded the strips further.

For the window frame I bent a brass fret stripe in a PE holder. My "window glass" is 0.1mm so I feet in a Eduard STEEL fret, which is also 0.1mm thick. Then I filed in the window cutout. The brass is not yet cut to have a longer handle.

After the cut out is big enough I removed the handle. Used the steel fret to bring the brass in shape again. On the Cent the clear foil.

The foil slides in. Later I will use a fresh foil.

The frame was soldered from below to the cockpit cover.

That will be the look later.

The plastic tail skid of the Camel kit looks soo fragile, that I made a replacement made from real wood with metal fittings: 10 parts!
It is rotatable (can be articulated via rudder horns) and can be swivelled.
It is rotatable (can be articulated via rudder horns) and can be swivelled.

Axle fits into the fuselage. There is a metal sliding sho on the ground contact.

I soldered again landing gear legs from brass and nickel silver. 26 single parts.

Dry fitting is okay and it can hold the fuselage easily.

And because I was already soldering parts, I also soldered the over wing pylon cable support.

Later it will hold the rigging. It fits to the wing. Later it will hold the rigging.

The new parts are prepared to get some layers of paint later.

For the half axles I used 1mm, but the hole in the wheels was bigger. For easier and correct mounting later I drilled 1.2mm holes and added brass bushes.
I drilled into the wood and the axles in the rotation point, see the looong wires. Some plates to hold the suspension later are visible on the right axle but not yet soldered on.
I drilled into the wood and the axles in the rotation point, see the looong wires. Some plates to hold the suspension later are visible on the right axle but not yet soldered on.

Half axles finished. More parts prepared and/or modified.

I thought until now the cap in the middle between the guns is a fuel cap - wrong. There is a small oil tank below. A bigger fuel tank is below the oil tank between the frames and the filler cap in on the front left. I turned and milled the caps and scratched the faked tanks.

The cockpit cover is modified accordingly.

Here the removed lower Camel wing is visible. So the plywood cover of the Swallow has a different shape.
I filled the area with Tamiya's light-curing putty. I used this for the first time - great stuff!
I filled the area with Tamiya's light-curing putty. I used this for the first time - great stuff!

After sanding I primed the fuselage once in grey and sanded it. Another layer is needed.

The metal parts are painted gray. Used a blueish gray H337 this time.

Finally primed. Shadows and a PE stitching applied.

The lower surfaces are linen now, the same paint as on wing.

The Eduard resin wheels are primed and painted linen inside.

After a day drying time is masked again and painted PC10. Not too much this time as the struts are still visible, depending on light.

The tail plane.

And plugged together. Note: the front of the fuselage is only primed.

That is the wing after applied cockades 🙁
After a mishap I had to remove all the paint layers. As the rib tapes were made with paint those are also gone.
After a mishap I had to remove all the paint layers. As the rib tapes were made with paint those are also gone.

Days and a lot of work later the actual state of the wing. The paints are RAF-Blue/Red (Drooling Bulldog) and White/Insignia White (Mr.Paint).

This time also with pitot pipes. There was no strut to mount them and they need to be outside of the air flow of the airscrew so mounted to the wing.

In the middle of the wing the wooden stripes, a pulley covered with inspection window and the rigging pylon. All scratched!

On the undersurface cockades without white outer circle. The first version of rib tapes was better.

The engine is mounted on the painted fuselage. The cowling got aluminium and a oil wash inside.

The cowling is finally on - please note the mounting stripe (recycled and modified PE part) 😉
The undercarriage in mounted to, but with plugged on wheels the deflection is much too high without the bungee suspension!
The undercarriage in mounted to, but with plugged on wheels the deflection is much too high without the bungee suspension!

Bungee rubbers were wound up, so the axles have now a more realistic deflection.
The yellow thingy is a resin airscrew provided in the SPIN conversion set. But I will made of course again a wooden one, here in very early state.
The yellow thingy is a resin airscrew provided in the SPIN conversion set. But I will made of course again a wooden one, here in very early state.

The wing is only plugged to its struts for a teaser.

Much later the airscrew looks better. I believe it should have a length of 2,74m.
It is only primed and not yet finalized.
It is only primed and not yet finalized.

With a modified center cone, it now fits on the shaft of the rotary engine.

I made a box for the Vickers bullets. Plated with real aluminium so I don't need to paint it.

Decals applied.

Now it is really a Swallow also on the other side.

The instrument panel is made from real wood.
Sorry, the picture is bad. A lot of bad effects from the macro ring light in the instrument glasses 🙁
Sorry, the picture is bad. A lot of bad effects from the macro ring light in the instrument glasses 🙁

The instrument panel is mounted. From this angle it looks better.
Note: On the left white instrument the Kristal Klear glass is not yet dry completely.
Note: On the left white instrument the Kristal Klear glass is not yet dry completely.

The last pic of this build is the closed cockpit cover with Vickers MGs. I have no pics from the mounting and rigging process.
Comments
79 31 August 2023, 12:35
With finished Ship's Camel and end of summer holiday I need something new on my bench! So I build a Small Stuff rotary - my first of the newer production batch. Even if the resin looks different, the product itself is great as before.
This is the first build log with the new requested picture width of 2160 pixels. That are merciless macros now!
I happy so far, it is only very hard to get the valve rockers mounted in the right angle (and I lost some). It will be hidden by the cowling later.
By the way, wild guesses about the type are welcome!
31 August 2023, 12:55
Yes: one engine, one seat, but two Vickers.
The rest of the plane will follow soon.
31 August 2023, 15:46
This was a new info in Feature requests, see here: SCM Newsfeed
But here I have still a gray border (with 4:3 pics). In the final Ship's Camel album not (with 3:2 pics). That is not yet completely clear to me. One day (after all has settled) it should be added to the FAQ. There is a Beta feature called "UI for large screens", but this seems to be not finished yet.
31 August 2023, 17:23
Oh, Marcel you are highly welcomed here - as you played an important role in preparations for this project 👍 Thanks for that!
31 August 2023, 20:05
The Pup is already done: Sopwith Pup, N6181, April 1917 | Project by bughunter (1:48)
But very close hit: the company is correct 👍
31 August 2023, 20:45
Thank you mates!
And another hint: single engine, single seat, single wing!
31 August 2023, 21:15
Nope 😉 This will come later.
As David guessed above the Pup, I said the company is right. So we have: Sopwith, single engine Le Rhone 9J, single seat, single wing, two Vickers.
31 August 2023, 21:23
For the Sopwith Swallow there is now a kit in 1:72, but in 1:32 and my 1:48 scale there are only rare resin conversions for Camel kits available.
That project will require a lot of real modeling and not glue-together-parts. In principle the Swallow uses a Camel fuselage, but with a lot of modifications. The seat is moved backwards as on the Comic. Many things in and around the cockpit are different, but there is no drawing for inner details. So I have to modify things according to a few bad ref pics.
I know a build report of a 1:32 model, but I will do things different, e.g. I decided to move the main tank to the front. With the seat moved to back it would be too far from the center of gravity. A ref pic shows a big fuel cap in the middle between the guns. This was also done on the Comic. Only the small header tank is still in the back here. The fuel cap is not shown in the ref drawing, but the photos shows it on the left side. So I added a opening and fuel cap there.
1 September 2023, 17:10
Another Talent Show by Bughunter? Grabbing a seat, of course!
1 September 2023, 17:49
After some work on the cockpit parts the fuselage halves are closed now. Due to missing information a lot of details are pure guesses, based on information about the Camel.
5 September 2023, 17:22
I spent a lot of time (mostly for dry fitting 🤔 ) to create a cover for the front fuselage. After a failed try using styrene a brass sheet works better.
7 September 2023, 17:22
The spin conversion looks shocking.Hope you did'nt pay over the odds for it.
8 September 2023, 17:53
I don't know anymore what I paid long ago. The conversion kit is only a little letter with the cockpit cover and a new wing (both resin) and a drawing. I think I will use the wing. It has some bubbles and surface problems, but usable I hope.
8 September 2023, 19:43
I spent a few days on vacation, and in the meantime Frank started working on another great work in his "miracle factory". By the way, sheet metal is a great material, I like to use it too.
I wish you a successful and relaxing build. And I will follow its progress with great pleasure.
9 September 2023, 21:31
The beginning of "Piano Man" by Billy Joel matches: "The regular crowd shuffles in " 👍 Welcome!
10 September 2023, 12:21
For different reasons there was no progress for a while.
But now I can show the wing. It comes with the conversion set from SPIN Models and it needed a lot of filling holes and imperfections. Many priming/sanding cycles. It is ok now but far from perfect. On top side I applied wooden strips.
28 September 2023, 16:48
After the Piper Cub is finished I'm back on this one.
I uploaded some pictures of some scratch work: a fine frame for the wind shield.
18 November 2023, 21:59
Thank you Bruce!
The huge amount of scratch work and the modifications of used kit parts needs a lot of time. I have to think a lot about solutions and make frequent dry fittings once I have started making parts.
22 November 2023, 19:35
The next batch of macro photos with some scratched metal parts has been uploaded.
22 November 2023, 20:29
Ok, nothing has happened here for a few months. Thanks to Ethan, I can now get back to work. I have to change a few things, but the model will be a bit closer to the original.
Let's see if I can finish it this time without being distracted by other projects.
21 February, 09:38
Thank you and welcome!
I must admit that such heavy rework is not easy. I restarted this project 3 or 4 times since 2019 and put it aside after I run into trouble. But every time it goes some steps towards the end.
Later today I will upload some new pictures.
21 February, 18:26
I uploaded a new set of pictures.
!!! Miracle cure alert !!!
I used Tamiya's light-curing putty for the first time - great stuff! It hardens quickly under UV light and adheres very well to the plastic surface. It can be sanded, but is relatively hard. It is therefore better to work in several thin layers and not to apply too much.
21 February, 20:13
Here to watch again Frank!! Sorry I've missed the start of this as work and real life have been keeping offline. Trying to get caught up on things.
23 February, 14:30
I'll take a seat at the back as I'm late to the party as usual.
Interesting project, I've not heard of the Sopwith Swallow before.
23 February, 15:37
Thank you very much and welcome mates!
@Kyle There is no need to say sorry. I found out due to a date a photo was taken that I have glued wooden strips to the wing 2019! That was a shelf queen for five years?! 😮
@gorby It is not unusual not to know this type of aircraft! It was only a single piece, and during testing 1918 the war was over. But the history is extremely interesting:
The Sopwith test pilot Harry Hawker had an aeroplane built for aerobatics and travelling. A Camel fuselage was used, but with a new wing as a high-wing monoplane. This was the Sopwith Scooter. Imagine that today: The chief test pilot gets his own modified Eurofighter or F-35 .... 😎
In any case, his flights with it impressed the military, and so Sopwith was commissioned to design the Swallow. The wing was mounted higher than on the Scooter so that two Vickers MGs could be installed and further modifications were necessary like a bigger wing. It was powered by a 110 hp Le Rhône engine (Scooter used a Clerget).
23 February, 19:48
To make progress, the fuselage has been finally primed, shaded and the linen colour and PC10 have been painted.
23 February, 20:23
2019. Well it'll be good to get that off the shelf of doom and onto the finished shelf!! The fuselage looks wonderful already. Love that linen color
24 February, 01:08
I agree with Kyle. The hull looks very good already. 👍
I wish you to make it to the shelf with finished models this time.
24 February, 09:25
Thank you mates!
After a mishap all the work on the wing (pic 22-26) is lost 🙁 I had to remove the paint completely - again shortly before flying to the wall, into the bin or shelf of shame. The devil is involved in this project!
But I don't give up, let the plotter cut a new set of masks and did the work again.
Some more things are done too, but this is far from ready. Decals, Vickers mount, ... and even the instrument panel are still missing, not to mention the rigging ...
29 February, 20:44
Sorry to hear about your mishap!! Glad you did not soar it into the wall. Everything is still looking wonderful. The prop looks lovely sitting in its spot. And the teaser with the lower wing is very tasty indeed.
1 March, 14:01
I don't believe any kit could defeat Bughunter. 😄
Some models are sent to try our patience. My current project is really pushing me to the limit....but I'm still enjoying it.
1 March, 17:01
Thanks you Kyle and gorby! Made some small steps - this time in the right direction. Some new pics uploaded.
gorby, there are some special kits ... like the Curtiss Jenny from Lindberg. After looking into the box I quickly closed the lid and preordered the LukGraph kit 😉
1 March, 22:30
Thank you for your continued support, Kyle!
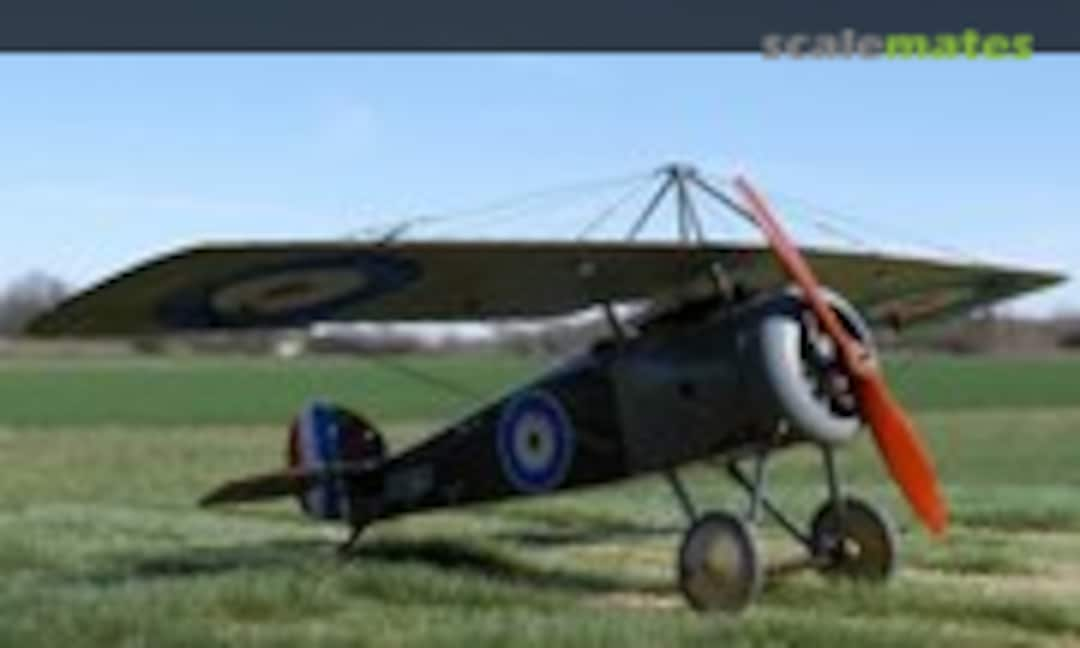
In case you want to see the finished model:
Sopwith Swallow | Album by bughunter (1:48)
20 March, 20:12
Indeed Frank, a beautiful result. I am sorry I didn't see it sooner. Gorgeous photos as always too!
20 March, 23:39
Album info
That big in the title names my first build log with the new requested picture size of 2160 pixels. Now that are really macros!