

Mazda RX-7 Efini

Revell quite old box... instructions and decals are all yelow, after some research I belive this should be rebox from Aoshima, (the male fitment in the wheels indicate that it should be Tamiya although the kit have no engine or open hood)

That is the test of the color I intend to use in this project: Tamiya X-14 and clear coat also from Tamiya, X-22, nothing fancy, thinned down with Mr. Color Leveling lacquer, I hope it goes down as well as in my test spoon.

First Steps: Body Preparation, marking mold lines for sanding down and removing sink marks and ejector pins.

Primer down: Mr. Surfacer 500 thinned down with some Mr. Leveling Lacquer Thinner, sanding some defects, Checking the Wheels.

This wheels from Aoshima feature stretched look and some angle to be fitted with some agressive camber, but I think I will camber them just a little.

The car is sitting on the wheels, I have to figure out how high I want the car to be and how should I modify the suspention...

Wheel setup, maybe I will go for the super low look... Hummm, the car looks like floating without one flat spot on the tire...

Front wheel, the rear ones are a bit deeper, but the tires are all the same, just the offset changes. Being one Aircraft modeler I feel the need to put somehow one flat spot on the tire... I think car modelers don't do that, is that too much of Heresy?

Second round of primmer I will be using my 0,5 needle Procon boy PS-290 that have the head for the flat spray pattern, more suitable for the kind of finish that I´m looking for.

Using Mr. Surfacer 500 diluted with Leveling Thinner.

Added a coat of Tamiya surface primer to have something white under the blue, turn out the layer although very smooth was too heavy, I hope it shrinks back a little, some of the pannel lines are now too shallow, I should have to reinscribe them deeper.

I sprayed that can I thought myself: "Humm, that's heavy handed, I have just ruined it..." but something inside was telling me to trust Tamiya, and so after a little drying time it shrinked down a lot revealing back the pannel lines, I´ll let it set more

First layer of paint, tamiya X-14 sky blue.

I used Mr. Color leveling thinner again.

Far from perfect, lots of dust and contamination on the paint, I'll have to let it set for couple of days before sand them out.

OK. It went down glossy but with a lot of contamination, so I sanded all with fine sanding sponges and tested on the rear wing one strategy that acctualy worked, so I sprayed all with tamyia X-14 thinned with normal X-20A 50/50.

I sprayed very light misty coat from some distance, the goal is to do exatly the oposite that I have been trying so far: I want that base color to lay down flat but smoth, letting the gloss to came with the clear coat later, just like the real car's paint

I paid a lot of attention to the dust particles, anytime I see one, I stop spraying the paint there and move to another clean area, alowing that spot to dry a bit, than with a soft brush I wipe it out as the base coat gets dry. End result is this satin.

Now the clear coat, I do have automotive clear coat and 2K clear coat but I decided to experiment what full Tamiya acrylics can do, I´m great beliver that dedication counts more than the materials you´re using, and I enjoy going trough all possibilities

X-22 clear 50/50 mix with Mr. Leveling Thinner, first very light/misty coat, second heavy one, than overcoated with Mr. Leveling, that softens the X-22 allowing it to level more. It is very wet looking, I still have some orange peel to deal with though.

There are still dust here and there, and of course the orange peel, but all of that will be sanded and polished later, I just have to wait until all is dry, it´s gonna take several days, time to shift to other parts of the project like the detail work.

That´s the airbrush I used for Clear coat, it cover the entire model literaly in seconds, it can be precise and modulated as you would expect from an airbrush but it covers like one spray can if you pull the triger real hard! great tool Mr. Hobby!

Today I managed to get the wheels done, first masked the borders and the interiour of the wheels, isolating the center area that is one separate piece, maskol was used on the hub caps; Boy, I hate masking! I really do!

Decals on and clearcoat on, same colors of the car, I clearcoated with the masks on so I don´t contaminate the border, I got the brakes painted, some silver, clear red to replicate candy/anodyzed calipers, and bunt exhaust for disk brake center's part.

tires on and brakes glued in place, a light wash with Tamiya panel line enamel to bring it to life and job here is done. I love wheels, it is the expression of any car! if you don´t get them right the project is ruined, simple as that!

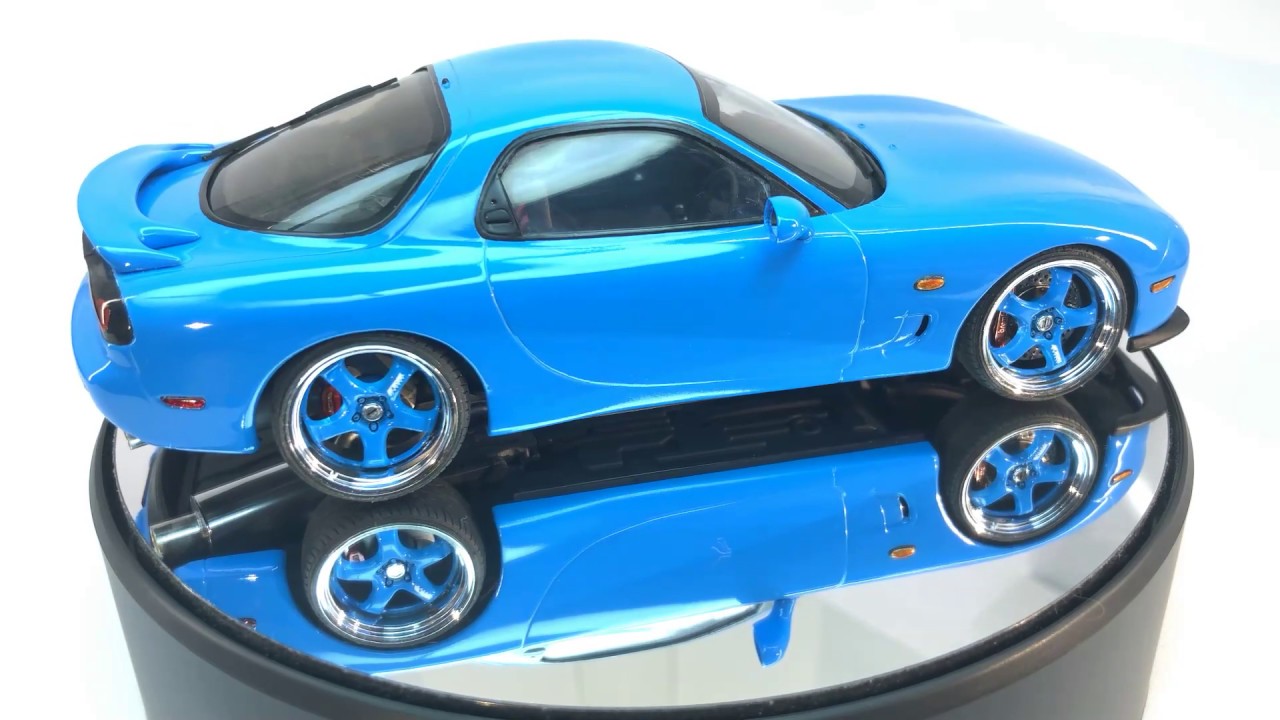
Checking if the parts still fit in the correct position, angle and attitude, all right! that´s the stance I´m looking for! Because the wheels are so big, even with no gap on the wheel well, the car looks high from the ground... humm... what can I do?

I think I could try to scratch build some side skirts to fill the gap with the floor a bit more, not sure; Still have to be polished, I´m waiting a little longer so the paint get harder, chassis/wheels/body are matching in the way I want, thanks godness!

Front Brembo brakes comes from one Fujimi BBS wheel set, than I used the kit´s front brakes on the rear, since they are a bit biger than the propper rear ones, and they have a nice "MAZDA" embossed on it.

After some brake, I will take the chance to work on my model during the extended holiday, so I chopped off the kit´s exhaust pipe and going to change for this piece of metal that I belive came from Bicycle cable.

I drilled the hole.

Fits in perfectly.

Searching for pictures of RX-7 on the internet very offen we see them equiped with this type of one-monster-sised-exhaust_pipe so I decided to go for it.

Hummm, I think it has to come out a little...

so, I sprayed gloss black from Mr. Color, GX 2, and after, Alclad II polished aluminium, my best metalic result ever, I wish my sabre had turned out that shiny!

since the modified tip of the exhaust is already in natural chromy metal, I masked it off and did the shiniest metal that I could to make them match.

little weathering with tamiya pigments

Chassis is ready, some coloring on the exhaust.

I´m very proud of this muffler, I hope I can replicate that finish in some NMF airplane, I need to buy more Alclad polished aluminium.

Chassis all done drybrushed and washed with enamel tamiya pannel accent black.

Priming the interior parts in Stynylrez black.

Right hand driver side is the only option so, no american licence plates for this one.

It´s my first time Flocking so I decided to experiment in some hiden place first.

On the right side I used Humbrol enamel as a "glue" in the left side of the chassis I used Humbrol Matt Cote enamel, and they both seems to work the same.

And that´s my flocked interior, looks like carpet to me.

Inserts on dash, doors and colsole was painted in gloss black, decals went on with a bit of dramma since they are old and ripped of, some puzzle work later they got together pritty nicely.

I brush painted the center portion of the seats but it is not looking good to me...

I have brush painted the center part with the color that manual said, I’m not impressed by the result...

So I decided to cover it once again with stynylrez.

And do some flocking to it, do not look very realistic, looks like carpet on the seat but it is better than before IMO, it will do.

So, time to assemble the seatbelts from Scale Production...

Fiddly work in progress, to pass the belt into the grooves was a challenge to my patience..

Some superglue later and job is done, this decals do not stick to the belt I did my best positioning that and I hope they stay in their places.

My brushpaint of the internal details was not briliant but thay don´t stand out too much thankfully, the seat belt call all the attention, tha's good.

Closer vies of the Dash with Cluster, some silver were also brushpainted in couple of areas.

The anchor point of the seatbelt was drilled closet to something back there that looks like some tortion baar to me, passenger seat belt is just normal black.

some black wash in the seatbelt locking system, the interior is complete!

My attempt to brush paint the black contours of the glass based on the fogged area of the piece.

The boundary of the black area is not as sharp as I would like it to be, I should had masked that...

So I gave up brush painting and started the masking process.

The transparent part is not briliant in this kit, there is a crack in the rear window, I hope that I can make it less visible, now I know why this kit was so cheap on Ebay...

All painted. look from outside.

I hate masking but I have to admit that I am very good at this.

Not perfect but will do.

I tinted the rear window with Tamiya Smoke, unfortunatly it went down with a lot of dust, I knew that was a stupid idea to do the flocking inside my spray booth... I will live like that anyway, it will not be so visible in the end product I hope.

Cutting the circle masks for the tail lamp, I bought this device in Hobbylink Japan.

As you can see, I cutted the smallest circle possible with the device and it is 1.5 mm and perfectly round!

But that's the size I'm going to use, 3 mm diameter.

This size fits nicely in the tail lamp.

All masked and ready for paint.

Long awaited time, after 3 weeks drying is time for wet sanding... going to remove all those dust and dirt things in the clear coat, used 2000 lightly to remove the problem and made my way to 8000 with sand paper and micromesh.

After A LOT of wet sanding and Polishing I can't believe in the result, is not perfect but way better than I expected for simple Tamiya acrylic clear coat.

It was used Meguiars Scratch X2.0 as compound and Ultimate Polish as finishing polisher. I used special cotton paper from automotive store to polissh, for tight areas I used qtip cotton swab, buffed of with superfine microfiber towel.

Making mistakes again: brush painting the trims, I should have learned and masked it over for airbrush, why I insist in hand brush painting?

I learned a little trick: with a bit of Scratch X compound in the tip of toothpick I can polish the edge removing the excess and sharpen up the border a bit more.

Liquid Chrome from Molotow for the reflective area of tail lamp, the tail lamp had a fit issue: it tend to stick out on the edges, what means, to superglue that you will have internal tentions and it may force the glue to brake out, as I learned later...

Time for the marriage of chassi and body. the glass went to the body with a lot of trouble, the clear parts certainly is the week point of the build. part for the bad fit and part for my lack of experience with cars.

why the black serigraphy of the window is so big? did they researched well before do the foggy mark model? specialy close to A pillar, nothing I can do about it now...

Tail lamp have snapped off and reglued, the problem here is: they do not want to fit, I should have cutted them in the small gaps close to the base of the light to release the tension , I would reccomend to anyone assembling this kit to cut in 3 parts.

Absolutly in love with this Chrome metal stikers!

Finally done! I sticked the wipers looking the pictures in the manual as I have removed the parts prior to paint and don´t remember the numbers, bad Idea: the manual show the wrong parts going in the front and back, I had to rip them off and reglue...

here is possible to see the result of the regluing process of the right side from tailamp, lesson learned for next time...

On the bright side, this side is perfect, wheels even turn, the paint turned out way better than I expected and I learned that Tamiya clear coat works as long you give it a loooong time to cure...

3 weeks to cure and it is workable, but I was still finding myself having to repolish the areas were I was holding the model with gloves, the latex lives its texture inprinted in the paint if you hold it for too long...

Next model I will use automotive clear coat, If I have to do gloss work with Tamiya acrylic again I will allow myself 2 months full to get it dry! That´s what my little spoon sample reveal to me.

I should had putted off this side turning light, I don´t understand why they made the small botton ones in clear plastic and the central molded on to the boddy...

Next model I will use automotive clear coat, If I have to do gloss work with Tamiya acrylic again I will allow myself 2 months full to get it dry! That´s what my little spoon sample reveal to me.

I did a small vídeo on Youtube about this build from 2 years ago, check that out! youtube.com/channel/..w?view_as=subscriber

I did a small vídeo on Youtube about this build from 2 years ago, check that out! youtube.com/channel/..w?view_as=subscriber

I did a small vídeo on Youtube about this build from 2 years ago, check that out! youtube.com/channel/..w?view_as=subscriber

I did a small vídeo on Youtube about this build from 2 years ago, check that out! youtube.com/channel/..w?view_as=subscriber
Comments
8 25 August 2017, 20:41
Hm, never thought of flattening car wheels on my models. If you want to add some camber, i guess there is no way around it....that blue is awesome btw!
26 August 2017, 06:38
Thanks for the coments, Alexander, this set from Aoshima is meant to be with camber already, for that the tire comming with the kit is in a kind of cone shape that actualy looks weird if you try to mount it straight, but when we do airplanes the tires are very often flattened to look weightened, something that all cars in real live have in some degree, I will train with the tires that came with the kit to put a flat spot by heating up one screw driver and touch the ruber to see if it give us a good effect.
I was just wondering that should be one reason for car makers to not do this that I can't see yet until is too late :-/
26 August 2017, 17:39
What is this leveling thinner? Where is the difference to "normal thinner"? I am wondering because you diluted the acrylic Tamiya color with as well as the solvent based mr. Surfacer...
1 September 2017, 07:17
Alexander, the funny thing with Tamiya "acrylic" is that it is syntetic, it is alchol base, thinning with isopropyl or X-20A but also can be thinned with soft lacquer thinner (not the one from hardwerstore), Thinners like the Tamiya Lacquer Tinner with the yelow top, Mr. Hobby Lacquer Tinner or Mr. Hobby Leveling thinner, all of them works, with lacquers you have one result smoother then the acrylic thinner, less tip dry, the gloss is deeper and the flat paints from the XF- range turns down to be more satin than dead flat, you can overspray the paint with plain thinner to soft the result even further alowing more time for it to level, the Mr. leveling thinner have more retardants to give it even more time, the down side is that it also alows the paint to catch more dust, ask me how I know that... 🙁
2 September 2017, 01:16
Wow, the more you know...i will definitely try Tamiya acrylics+lacquer thinners, having tried countless methods of painting my car models i still haven't found the "holy grail". Every paint job is a new challenge with sometimes not so pleasant surprises 😛
Considering dust, every car modeler feels your pain....hell you could paint in a grade 1 dust free biolaboratory clean room, there will be always one single dust particle finding its way at the midle of the car hood. Always! This is a law of nature!😉
cheers, Alex
2 September 2017, 09:36
Fantastic result, Cesar! Thanks for the detailed WIP, it was very interesting. Very nice paint and finishing job!
6 October 2017, 08:21
lovely build, it's also great that all pix have captions so i can read what is going on - i am a complete illiterate when it comes to civvy auto modeling, one day i'll build tho!
9 October 2017, 11:34
Lovely work mate! I'm not a car modeller myself (will try some in the future) but I couldn't tell that you isn't a car modeller from what I see. I hold car modelling as a tougher level of modelling than AFV's and warbirds that I'm used to.
13 October 2020, 20:53
This is your first car model? Impressive build. Sorry for all the questions. Which set of wheels are those? The polished chrome/lip is spot on. Were the wheels hard to mask? Did you sand before polishing the body? Any modifications to lower the car? I see you said the kit already provided the camber. Wheel camber and tucked wheels are perfect. What ratio did you thin and PSI did you use? Was the muffler/exhaust tip aftermarket? What paint did you use on the exhaust system? What is your technique to paint the black trim around the turn signals? I'm preparing to build a Celica GT XX and planning. thanks
Thanks
14 October 2020, 00:54
Jimmy, thanks a lot and sorry for taking too long to answer, I used this little tutorial to lower the car, check it out: rextremescale.blogsp..ring-techniques.html . Also I sanded the model with fine sand paper prior to polish but Tamiya's clear coat are not very thick or durable so you can't send it too much so be careful, today I use 2k urethane for clear coat, the wheels were very tricky to mask because the masking tape refused to adhere to the smooth chrome from Aoshima wheels, but I got that in the end, it is not a necessary step though, it all depends on the style you want, the pipe from exhaust muffler was quite simply a metallic cover from bicycle cable cover, it was laying here around, paint was alclad polished aluminium and trim around turn signals was achieved masking the circles and spraying the surroundings all from behind, there is a video showing some explanations in a slide show form and have one turn table zooming the results, I hope this can help you, cheers! Youtube Video
9 November 2020, 22:38
Thanks Cesar, I love your video. I meant to ask about the orange side markers. Do you have a technique to color the gasket edge black? So far I've been masking then masking again for the color which is tedious. I tried the sharpie but can't get the edge consistent and dark enough. Thanks
11 November 2020, 21:43
Hi Jimmy, I painted with a brush, number 2/0, first I paint the whole thing black using Stynylrez or UMP primer(you can neat up the contour using a toothpick lightly damped in IPA after the primer is dry), 2 or 3 coats, than I painted the inner part silver with Vallejo Metal color aluminium. than once dry I gave it a coat of Tamiya clear orange, x-26
13 November 2020, 20:45
Album info
My first car, going to use Tamiya Acrilic Paints and Aftermarket wheels, as well as some 3d chromed logos


