

Wellington GR Mk XIV


Comments
12 18 August 2016, 14:48
The Trumpeter kit of the "Wimpy" impresses with a great amount of interior detail and a plenty of equipment to be built into the fuselage.....
...and it impresses with a slightly exaggerated texture on wings and tailplane.
I will sand this structures down a little bit. Besides that, it should build up straight from the box- I decided not to use all too much from Eduards etched parts set.
The spare box will benefit from that! 🙂
18 August 2016, 15:04
The geodetic structure looks way overdone. Other than that, a nice looking kit. I like this colour scheme too!
19 August 2016, 01:29
Thank you all for encouraging comments, mates!
I will try to sand the the overdone structures down to a more realistic impression- I hope that will work!
19 August 2016, 05:23
Feel all welcome, mates!
That is definitely not going to be a "fast build" in any respects: the fuselage interior is a little Venuses´s flytrap- and I could not prevent to turn in. 🙂
Trumpeters 1:72 scale models are often referred to to be a smaller version of an quarter scale model, in this case, it could be correct. The interior is of quite tempting detail- and nothing will be seen after joining the fuselage half.....
I spent some time for the totally useless and absurd task to paint the interior- and, what a surprise-all of my meager attempts have been swallowed by irrevocable darkness as soon as I put the fuselage together 🙂
What Trumpeter did -totally- mess up is the highly visible interior of bow section. According to the few pictures and information I found, I did my best to recreate a acceptable solutions for this with spare etched- and plastic parts.
The next time consuming task will be sanding the fabric representing structures on wings and tailplane to a more reasonable dimension.
21 August 2016, 14:14
All the sanding work has been done- quite an effort, in return there was no need for any filling- so far.
Trumpeter conceived an easy and effective way to get the wings attached in stable manner by the way....
Next comes the interesting work of masking!
23 August 2016, 19:49
Your cracking into this at a great pace and she's looking great, as does the interior.👍
23 August 2016, 21:50
Thank you mates!
The "wood effect" was achieved by spraying Gunze H72 "Dark Earth" as a base followed by several shades of various brown with the dry-brush. I used for this step Gunze Acrylics and, going to finish, artists water-colors. I tried to imitate wood grain, dirt on the floor by leaving the brushwork visible.
24 August 2016, 06:12
Mmhhh, for sure the fabric structure seems to be a bit overdone, but according to your photos you sand it nearly down to zero level. From my point of view some layers of base coat in the fabric areas should work as well, especially to avoid any dust!
Looking forward curious to the first coat of paint to see how it will work.
By the way, excellent work with the interior 👍
Cheers, Christian
24 August 2016, 10:19
Thank you both very much, mates!
Christian, I see your point of view- and maybe, I have gone all too far! 🙂 As you have said, we will see with the first layers of paint on it- that makes modelling such a daily adventure!
But, on the other side, I am quite hopeful about the outcome: my pictures are rather leveling the structures, I think, they can´t cope with with original glossy and the new sanded dull surfaces....
The few new pictures show the outcome of today's masking session- the clear part on the bow is not glued yet because some reworking is necessary- I will install a gun with its carriage as mostly seen on Mk XIV.
24 August 2016, 19:38
Last steps before applying "Gunze H331" on the upper surfaces: I have sprayed a layer of Alclad on a primer of black gloss to get a base for simulating "chipped off" paint.
26 August 2016, 09:33
That´s the raw version of the upper surface camo with "Dark Green"/ Dark Sea-grey, H330/ H331.
I am happy that some paint is on those parts which will be painted with H 316; that will effect a kind of pre-preshading under that delicate colour. Shading will be further executed with thinned black, brown and red brown to get that certain used look of the white paint.
27 August 2016, 18:06
Looks good! Really excited to see how it will turn out with the white! 🙂
28 August 2016, 17:16
Thank you David!
Everything is masked by now- after three days on vacation I will start putting "50 shades of white" on the surface.....
29 August 2016, 05:24
The paint shop has been finished -and first attempts of "wear and tear" in form of artists watercolor has been tried out.
This will be followed by more serious signs of usage and stains......
3 September 2016, 20:08
Thank you very much, Christian!
The Wellington is completed; maybe some further finishing touches will deal with the wear and tear of the surfaces. I was pleased by the rear turrets appearance after assembling and painting the 9 parts it comprises.
Next I am hopeful to show you this de-masked and readily assembled Wellington Mk XIV!
8 September 2016, 09:36
Nice work, great weathering (wish I could do it so well), but I miss the decal number 5 on the pics 😭
8 September 2016, 20:25
Nice work, Roland - I really do like that colour scheme. I have Trumpy's 1:72 Wellington Mk.IC in the stash, and every time I look at the overdone geodesic effect, I put the lid back on. You're a brave man to tackle it! I think that I may combine both primer and sanding in trying to reduce it on my model when I get around to building it. But it still scares me. The effect that Matchbox achieved on their old Wellesley is much better.
The interior work you've done is stunning, it really looks the goods. Even though you can't see it anymore, you know it's in there and you can still be proud of your achievement! 👍 👍 👍
8 September 2016, 20:55
Thank you all mates for these very kind words- You make me happy!
Lukasz, sorry......but I will be working soon on a PZL 11 🙂
Bill, I appreciate your words very much- and I approve your thoughts about sanding the overdone structures- and have them treated with putty before! To be honest, I should have done so, because the sanding procedure reduces the "hills" but won´t stop the "valleys" to be there. There are some areas on the wings, where this fact produces rather unwanted effects....
By the way, as you mentioned the Wellesly- that is another Vickers/ Barnes Wallis construction I have to build once!
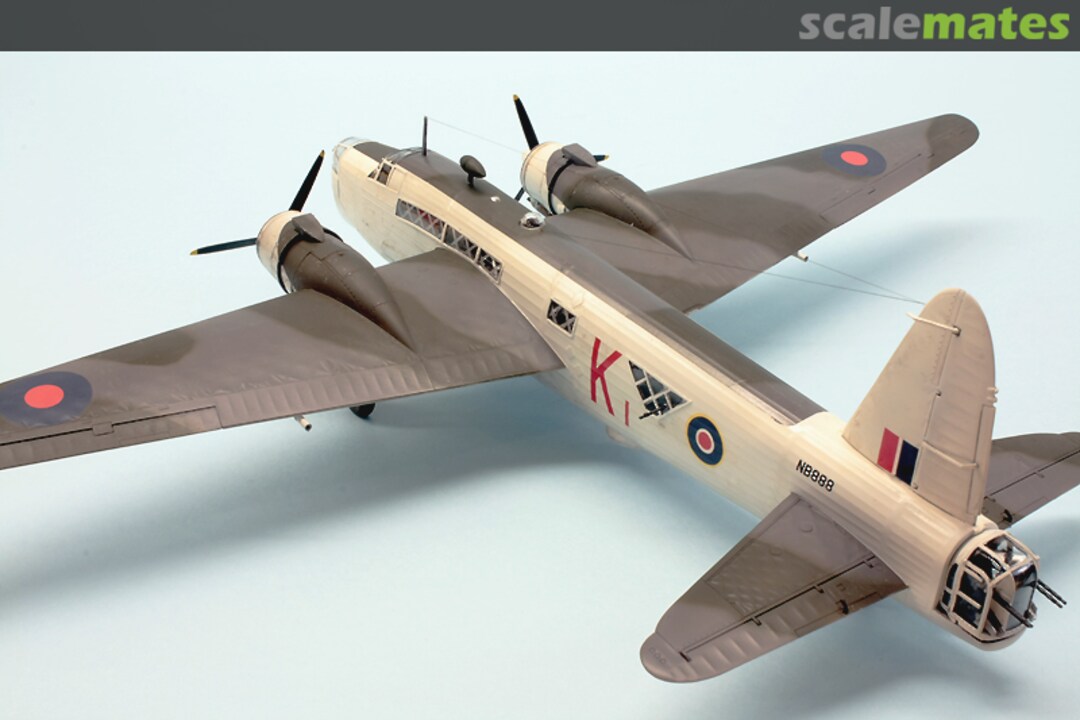
Thank you all for your kind interest on this build- I would like to show you with a few pictures of my finished Coastal Command Wimpy project!
10 September 2016, 18:41
Great work and finish as usual Roland. Always impressive how fast and clean you build each of your models 👍
Cheers, Christian
11 September 2016, 17:24
What a gorgeous looking model, once again you've built another wonderful kit, well done.👍
11 September 2016, 20:37
That´s motivating mates! Thank you allot, I really appreciate your words
12 September 2016, 17:16
That's a fabulous build Roland. I'm just reentering the world of modelling after a brief interval of about 50 years, and this is the first kit I've bought since my return. My father served in this version of the 'Wimpy' in the Mediterranean, so this build will be a tribute to him. My build won't approach your standard, but I will take my time. I have a painting of my father's aircraft, that he had commissioned many years ago, so that will serve as a guide and inspiration, as will your build.
30 December 2021, 19:01
I concur with everyone - i can't think of any superlatives that have not already been expressed!
30 December 2021, 20:25
Alan and Mark, I find your interest quite motivating, thank you for your comments!
Alan, I am touched by your words - the true value of modelling is always found within oneself anyway, it doesn't matter about supposed perfection.
31 December 2021, 15:57

