5F+12


Comments
1 23 March 2013, 11:13
Looking great so far, Christian! I hope you will make your target, it would be very meaningful to have the model there on that day! 🙂
23 March 2013, 17:15
Thanks mates.
@ Bill: Target to finish it is until may. At the moment the progress is slow ( preparing all parts for painting ( spinner, prop blades, airlions flaps, etc). I also have to go on a business trip on monday. Hope to do the base paint tomorrow. So the paint will have time to dry.
@ Stefan: Will you be in Helchteren this year?
23 March 2013, 17:52
This is a very interesting G-10 with very patchy camo - hope to see it finished soon! Nice going so far Christian!
23 March 2013, 19:37
In deed Aghis. This is a reco plane and the best is that there exist some color photos of both fuselage sides. As written- soon will hopefully be the beginning of may.
23 March 2013, 19:45
Some small improvements today (see pics7+8). Small parts received primer today
24 March 2013, 20:11
Some little progress. Large progress will occur the week end. It is intended to do the complete painting by using model air colors for the first time instead of x-tra colors: There are some different interpretations of the color of this plane. Some sources state 74/75/76 others 75/83/76 and Fujimi in the instruction states 75/82/76. After studiing the available color photos I believe that 75/83/76 matches best because one color seems to be green from my point of view but 82 seems to be to bright .
12 April 2013, 21:09
Beautiful!!!!!!!!! I wait for the painting when you decided the colours...
12 April 2013, 21:33
Looking forward to the painting,and if you like the vallejo rlm colors.
13 April 2013, 06:05
A good print of the well-known colour photo of this aircraft can provide some guidance. As K. Merrick points out in his book, there are traces of RLM82 near the fuselage balkenkreuz, the rest is probably RLM83 over RLM75. The RLM 75 seems very light in tone, as it is typical in the late war Bf's built by Wiener Neustadt, like this one. Heavy mottling and exhaust staining complete the interesting picture...
13 April 2013, 11:01
Hi Aghis, which book are you taking about? in "The official Monogram painting guide ..." K.Merrick stated the color as 74/75. But as written below, the second color besides 75 is seems to be a dark green tone. Also the inside of the fuselage Balkenkreuze seems to be green. Contrary to the Fujimi insruction the spinner has to be painted 1/3 white.
13 April 2013, 11:58
Luftwaffe Camouflage and Markings Vol. II is the reference. Indeed, the balkenkreuz inside colour is green, maybe 82, darkened by overspray (the fuselage yellow band is also oversprayed) or lighter version of 83. the 1/3 white spinner sounds correct.
13 April 2013, 12:05
Have a look in my albums here: The green I used for the fuselage is to simulate the same kind of tone: Not as dark as 83, not quite 82 either...
8-109 G-10/U4 | Album by Barber
13 April 2013, 12:14
right, the yellow fuselage band is oversprayed in the upper area. I would use 75 to do this
13 April 2013, 12:33
The lower fuselage is also oversprayed by a dark colour, as well as exhaust gases. Especially the area behind the balkenkreuz is oversprayed by a dark colour that could be anything. Late war Luftwaffe tones are so questionable that almost anything that looks and 'feels' right, is right! 😉
13 April 2013, 13:30
I agree. The overspray and the exhaust gases are clearly visible
13 April 2013, 14:38
Good luck Christian, I am looking forward to seeing your interpretation of this late war bird.
13 April 2013, 15:27
75 and 76 are applied. Let it dry overnight. 83 will follow tomorrow.
@Stefan: 76 was well to spray. 75 not. It closed the nozzle so that had to open it by spraying ona sheet of paper. I will see how it works with green tomorrow.
13 April 2013, 17:53
Looking forward to that result! 😉
Nice so far! The latest 109`s are the best... 🙂
13 April 2013, 18:44
Sounds familiar,some colors spray very well others are a pain in the ass. 🙂
14 April 2013, 07:27
Some progress today. New pics added.
@ Stefan: Green made no problems
14 April 2013, 20:34
Painting is corrected and future is applied. I will paint the wheel wells and start with the decals tomorrow.
15 April 2013, 21:05
Today I started to apply the decals (new pic). I use the original Fujimi decals. Adherance on the model is o.k. but they do not seperate from the paper. I have to seperate them by using a toothpic. Maybe because of their age. Did somebody made the same experiance?
17 April 2013, 20:43
@ Aghis: I know that you also know the color photos of this plane. When I take a look at the well known photo of the right fuselage side it seem that the main landing gear is partly red. What is your opinion?
20 April 2013, 20:53
Thank´s Augie. Meanwhile all dacals are aplied. New pics will follow tomorrow
20 April 2013, 22:09
absolut interessante Bf 109 , der Aufbau der Lackierung ist ein wirkliches Lehrstück , klasse Arbeit
21 April 2013, 04:28
Beautiful ones interesting to see how you work. Until now, a beautiful mess
21 April 2013, 07:12
so far I've watched your painting pics a couple of times....very interesting method
21 April 2013, 07:47
Looks great Christian, nice paintjob, looking forward to the endresult 😉
21 April 2013, 09:15
Yess I agree with all previous postings here! 🙂
Nice smooth paint finish!
21 April 2013, 09:28
Thank´s for your kind coments mates.
All decals are applied it is on it´s feet now ( new pics). I also reworked the paint partially and did some slight pin wash. I am well inside the foreseen time schedule and will have a break now to build a start wars snow speder together with my daugther.
21 April 2013, 19:30
Excellent work, Lemmy! Now you have to come over to my house and mottle the sides of my 1:72 109!! 🙂
22 April 2013, 20:05
Thank´s Bill. I used my airbrush gun for this the first time as well as I used Vallrjos Model Air for the first time. The new airbrush is from the german company "Gabbert" with the fine nozzle. Until now I used an airbrush from Revell which is a Badger. I used this one for more than 20 years and I will still use it.
22 April 2013, 20:10
@ Bill: I am sure that you are also able to paint such a mottling.
22 April 2013, 20:11
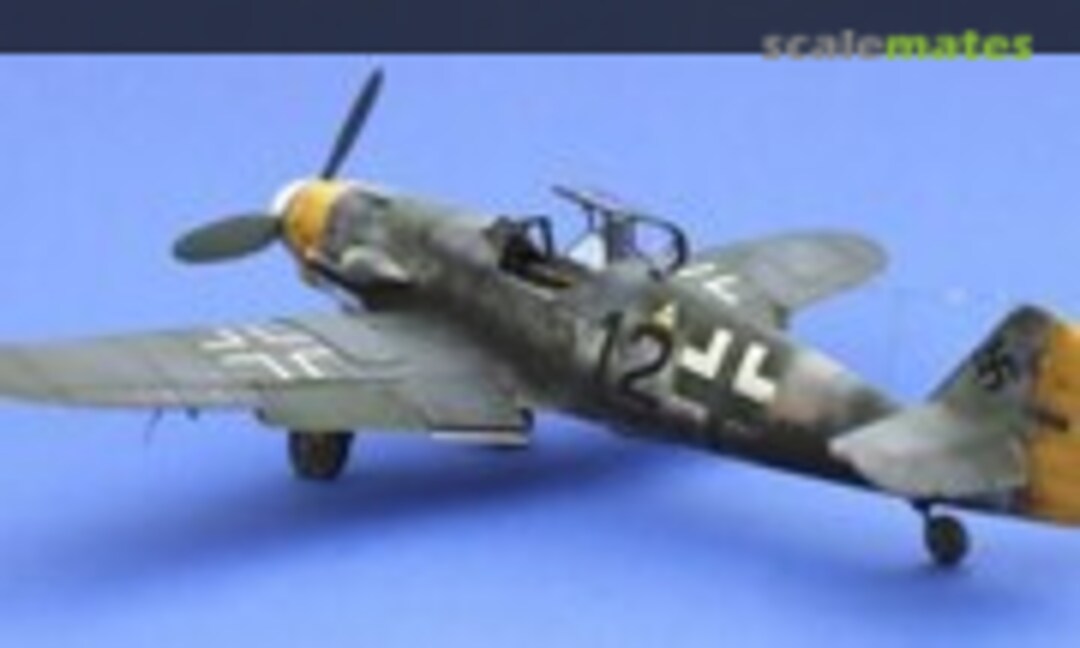
It is finished. New pics are added.
This plane has no wheel well covers which can be clearly seen on photos of the original plane. It also shows red markings on the main landing gear for 100 octane fuel ( thanks to "Barber" for the discussion and suport regarding this issue). It also shows no antenna mast.
29 April 2013, 17:16
You are welcome Christian, it is a beautiful subject and you have nailed the camouflage pretty well!
29 April 2013, 17:39
Wonderful Weathering!
The finish is spectacular!
Truly powerful and convincingly!
Great job!
29 April 2013, 18:57
Vielleich schaffe ich es morgen oder übermorgen ein paar Bilder hochzuladen,,,;)
29 April 2013, 19:02
It became a great looking 109 Christian, great waethering!, how was it to used for the first time the vallejo colors? the results look awesome, congrats Christian, this is again a beauty mate!
Greetz Phil
30 April 2013, 05:49
Thank´s mates.
@Phil: It went well. But it seems that the behaviour differs between the diferent color.
30 April 2013, 16:08
Perfect build Christian, what a beauty. Thanks for showing us the stage by stage build, lots to learn from the photos. Love it!
13 April 2014, 08:41
Hi Christian. The finished model looks great. The painting and the weathering make for a very realistic look. I especially like the look of the cockpit. Very nice and thanks for the photos.
18 April 2014, 02:31
Album info
Here are the first pics of this project. I used the SBS Bf109-G10 resin cockpit which is originally designed to be used with the Hasegawa kit but also fits to the Fujimi kit after thinning the sidewalls of the fuselage. The other detail kit to be used on this project will be exhaust tubes from Quickboost to replace the kit parts which are only triangles. The rest will be oob.