

de Havilland Sea Vixen FAW.2 (Xtrakit)


Comments
22 23 September 2012, 14:23
From what I read I'd wager that the PE fret designed for the Cyberhobby lkit may not fit into the pit of the MPM/Xtrakit bird. Not to mention that the navigators' office may be hard to be seen once the fuselage is closed?
I'll lean back and watch the story unfolding! 😉
23 September 2012, 16:07
That could be, but I've got a big hammer. I'll make it fit! 🙂 🙂 🙂
If it can't be made to work, there is a resin cockpit for the MPM kit. Strangely enough, though, the resin nose made for the Cyberhobby kit fits quite well. Better than the kit nose!
I also have replacement bang seats - the ones included with the kit are way too small, maybe 1:100 scale. Cyberhobby did the same thing, so their seats need replacement as well.
23 September 2012, 17:10
Bill , one hell of a job you want to do
but then again, once finished it will look perfect 🙂
23 September 2012, 17:15
I had a look at the PE against the Xtrakit parts. The PE is a bit larger, more so on some pieces than others. I think I can make it work. Looks like it will require some trimming though. I have a nice pair of PE cutters that should do the trick.
23 September 2012, 20:46
Not sure how I'm going to do the black stripes on the bottom...that will be a new skill learned.
23 September 2012, 22:19
Uh oh! I tried to test fit some fuselage parts today. I tested them alright, but I don't think that "fit" is the right word to describe what I found. Oh boy, this one is going to be interesting. 🙁
28 September 2012, 01:53
Damn, got this myself and was very excited about its release! Maybe better to "retire" this kit and invest in the Cyberhobby alternative?
28 September 2012, 06:05
I've read that the CyberHobby kit has its own problems. It was panned pretty good in the reviews when it came out. I've seen it built-up though, and it looks quite nice. The Xtrakit/MPM kit can also be made into a nice replica, it just takes more work! But that's why God invented putty, right?
The weirdest thing about both kits is the inclusion of ejection seats that are WAY undersize. CyberHobby seems to have copied the parts breakdown of the Xtrakit/MPM kit, especially in the pit. I bought some resin seats from PJ Productions, but they're underscale too (just not as much). Luckily I have two leftover seats from my Buccaneer that I think I can modify into the proper seats for the Vixen.
28 September 2012, 12:37
Bill, you are definately a masochist! I agree that, if its finally build, makes a fine replica of the original (No question, you are building it!) but your description of it sounds as it is a punishment and not a kit...😉 Anyway, you´ll make it!😢
28 September 2012, 12:44
I will document every grueling, expletive filled, putty filing, carpet monster eating step...
🙂 🙂 🙂
28 September 2012, 16:06
Don't forget the pinging faster than sound across the room Photo-Etch piece, Bill😄
28 September 2012, 16:11
Yes, that too Steve! Christian, I can't wait too! Just started working on the pit last night while waiting for some paint to dry on my Zero. I've determined that a bit of scratchbuilding will be necessary in the pit.
28 September 2012, 17:51
But you are right, why spending Money when you can do it in your own!
28 September 2012, 17:54
Pavla make a nice resin cockpit for the CyberHobby kit, but it may not fit this one. Since I'll be using the Eduard PE (with some modifications), I decided to just go with the kit cockpit.
28 September 2012, 18:20
Bill, you are on the right way! Go ahead, dont look back and make it your model!
28 September 2012, 18:32
Steve, I just experienced a "pinging faster than sound across the room Photo-Etch piece" moment! LOL!! It's also quite interesting to note that once the Photoetch piece exceeds the speed of sound on its way across the room, it is thereby rendered invisible for the remainder of time!! 🙂 🙂 🙂
Not a problem, just substitute a decal. 🙂
10 November 2012, 21:43
Bill Bill Bill, you forgot my warning didn't you. Now you'll have too wait until your model is finished, on display and partly forgotten... You'll get out the bath/shower, with wet bare feet and you will suddenly rediscover that forgotten lost sharp photo-etch piece...😢
10 November 2012, 21:56
ahhh the etch from doom... it will lurk until one day... you'll find it in your foot....
i'll be watching and waiting😉
10 November 2012, 22:56
Same happened to me, 5 minutes ago! I found it in my chair, puhhh...🙂
11 November 2012, 16:10
I've added some photos that show the progress. It's amazing how well the PE designed for the CyberHobby kit fits the Xtrakit. It's almost like the CyberHobby parts are the same size...hmmm, Cyber also has bang seats that are underscale, just like Xtrakit. Since Xtrakit came first, could Cyber have been doing some "creative engineering?"
11 November 2012, 21:38
Oh Uncle, I'm shocked! How dare you even to suggest the Chinese are copying kits (and whatever product on the globe)...
12 November 2012, 08:29
Looking great, Bill! The shape of the Xtrakit seems to be way more correct than the Cyber Hobby, right?
12 November 2012, 10:45
Progress looking good Bill, just watchout for the piddly-twiddley, teeny-weeny, pingy-wingy bits😢😢😢
12 November 2012, 10:58
Ben - my sense is that the High Planes 1:72 Sea Vixen kit is considered the most accurate for shape (although I understand that it is difficult to build, with a lot of fit problems). Both CyberHobby and Xtrakit/MPM have problems. Damien Burke over on the "Thunder and Lightnings" web site has a good summary of each available kit.
thunder-and-lightnin../seavixen/models.php
I assembled the main fuselage components last night, and I was surprised to find that the dreaded "fit" problems weren't so bad. Some clean up in the intakes is required, but it should be fairly easy. I think maybe some folks were just putting the two halves together and adding glue - and they ran into a lot of problems. If you study the parts, you'll see that in order to make the intake trunks fit you have to spread the lower fuselage in that area to make it wider. Once you've done that, things line up pretty well. More pix and details to follow...
Cheers!
12 November 2012, 14:30
Sounds like a lot of hard work, Bill... I'll be watching you build, keep the updates coming! 🙂
12 November 2012, 15:47
Great job sofar Bill, I'm tuned, youve did a wonderfull choice with this one, looking forward to the next pix, greetz Phil
12 November 2012, 19:42
Test-fitting revealed that the width of the forward fuselage (near the intakes) was not the same for the top and bottom pieces. This is no doubt due to the sides moving towards one another after being taken out of the mould. The bottom of the fuselage was considerably narrower (2-3mm) than the top. This is the reason why you can't make the intakes fit to the lower fuselage. What a lot of people have done with the kit is to get the intake trunks to fit on the top and bottom of one side (port or starboard) and then they've got a HUGE mess on the other side, impossible to make it fit, and usually resulting in the top and bottom fuselage pieces "twisted" relative to each other. Here's a better way:
Fit the intake trunks to the lower fuselage first. Make a temporary spreader (I used a 3mm diameter rod) of the correct length to push the fuselage sides out so that the intake trunks fit on both side. (You don't have to trim the bar off the front of the trunks like I did or cut the trunks into two; this is totally unnecessary.) I placed the spreader where the rear of the cockpit would normally be and I used superglue to get a quick bond. But don't take the spreader out yet, as the superglue is not strong enough and one side or the other will pop. Instead, with the spreader still in place, use a strong epoxy to make a permanent bond. I put the epoxy on the inside of the fuselage where it meets the intake; I also put a lot in-between the intake trunks and the belly of the fuselage itself. Hey, and while you're at it, glue a bunch of fishing weights inside, too, as I'm quite sure that the Vicky will need it.
(Sorry, I didn't take any photos of this part of the process. I hope I've explained it so you can understand it. If not, please ask!)
Let the epoxy cure for a day or two and remove the spreader. The fuselage sides are now held apart by the bond with the intake trunks. Now when the top fuselage was test fit, I found the alignment to be reasonably good, and certainly nothing that some filler won't fix. I then attached the top fuselage in the "normal" fashion. You noticed the clothes pegs - these were necessary to get a good bond along the trailing edge of the fuselage. Oh, be sure you locate the cockpit and wheel wells inside the before you seal up the fuselage!
So after all of this, I added some filler inside the intakes and along some of the seams, and along the splitter plate and sanded smooth. This was just a couple of hours work.
Cheers!
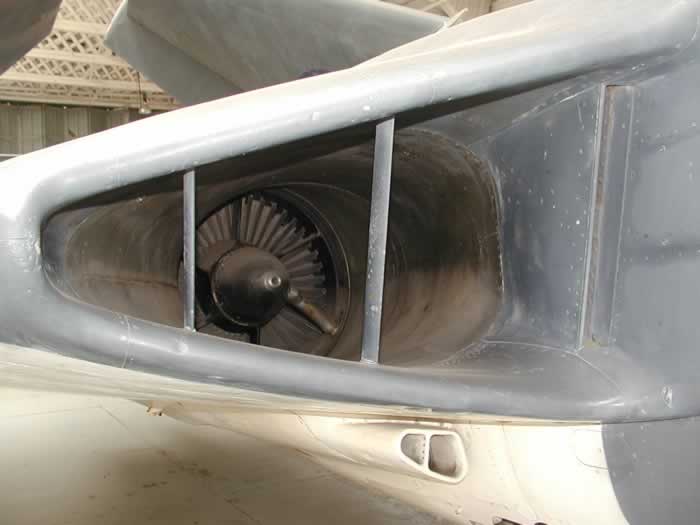
13 November 2012, 15:53
Some primer will go on tonight, and I can get a better look at how the intakes look. The other seams are no problem at all. There is a boundary layer intake or some kind of bleed control that is visible when you look into the intakes, along the fuselage wall. This will have to be made with card stock. It can be seen in this image, along with two vanes that are not part of the kit. More card stock!
[img1]
13 November 2012, 18:40
A lot of work in front of you! But im sure you'll tackle it! And to be honest, you knew what you will go through😢!
13 November 2012, 20:22
I can't stop! The Vixen is calling me like the Sirens! "Fix my air conditioning vent! Add intake vanes so I can breathe! Cover up those rocket pods I don't use anymore!" Holger, it's not even play, it's a sickness! But it's not the Sirens calling me, it's the Styrenes! 🙂 🙂 🙂
14 November 2012, 02:58
A bit more progress tonight - first up we had to do something with the trailing edge of the fuselage and inboard wings. Recall that I used four clothes pegs to clamp 'em down while the liquid glue was oozing out all over. This left a good bond, but the trailing edges did not come to a nice thin edge. Heck, they didn't even come to a blunt edge, they came to a square edge! Aye carumba...
So back to the sanding sticks. I love sanding sticks. I really do. I dream about them. They are my life.
15 November 2012, 02:50
One thing that I am finding very nice about the FAA Models Sea Vixen update set, is the pair of plugs they provide to help you attach and align the booms to the fuselage, which MPM/Xtrakit have engineered as a butt joint. (I am resisting making any jokes about using a plug on a butt joint.) They are cast in resin and look absolutely awful, like the master pattern was made from rolled up Tamiya tape. But, hey, they're labelled with some cuneiform characters that somewhat resemble a "P" (I'm thinking port) and "S" (sherry?) so you don't get them mixed up.
15 November 2012, 02:51
It's easy to see in photo 27 that the notch that is cut into the side of the fuel tank/boom extension is not aligned to the NACA duct (which, by the way, CyberHobby did NOT copy. Nope, they put their ducts in backwards, always useful when backing the Vixen into a parking space). Interestingly enough, if I shorten the boom, the notch may actually line up. But that makes me wonder about the rear end of the fuel tank/boom extension - if I shorten the booms, will I also need to shorten the boom extensions?
15 November 2012, 02:53
If we look closely in photo 27, we can see that the rear end of the boom extension ends several millimetres before the top of the boom starts curving up into the tail fin. Moving the boom forward (the effect of shortening it) won't cause any problem back by the tail fin. But would it be accurate? Photo 28 is a shot of the Red Bull bird (man, I'm glad they painted over this scheme), and notice where the boom extension ends. Right about where the curve for the tail fin starts! Enter dumb luck, my new best friend. MPM/Xtrakit may have made the booms too long, but they did not repeat their error with the boom extensions. Shortening the booms will make the extension's position more accurate. And, the booms get thinner as you go farther back. The kit's extensions will actually fit MUCH better around the booms where they're thinner.
15 November 2012, 02:54
OMG! Bill are you sure that you will go through that? If yes, respect! If not, you are a pussie😢! No, to be honest, this looks like a real challenge!When you tackle this, you can be proud and can manage all the other pig-kits out there, too!😢!
15 November 2012, 07:25
Booms shortened and added to the fuselage along with the resin radome! She's starting to look like a Sea Vixen!
This will be my last update for a week or so, as I'm off to Munich tomorrow. Second trip to Germany in a month. Must be the pretzels. Cheers!
PS. It's really the beer.
17 November 2012, 03:11
Nice progress Bill, have a nice tripp to Germany, greetz Phil
17 November 2012, 10:18
Hi Bill,
as I said previously, You will solve the problems. When this model is finished, this Sea Vixen will be an unique artwork!
17 November 2012, 12:02
Thanks, guys! Heading to the airport in abut an hour. I hope to visit Oberschleißheim tomorrow, but it will depend on my schedule. Cheers!
17 November 2012, 13:00
This is probably kicking in an open door but the bangseats are woefully underscale.
I was going to tackle mine a couple of weeks ago but untackled it later that same day ....
You are giving me inspiration again though 😮)
19 November 2012, 20:43
Yes, you are correct. The seats are about 1/100 scale. I've replaced them with aftermarket seats. Cyber Hobby did the same thing in their kit - why would they copy such an obvious mistake?
20 November 2012, 05:41
More pictures have been added. I've checked the size and proportions of the model against my plans (scaled to the 55' 7" length that we know MPM used) and everything lines up well! I also moved the navigators windows up, as MPM have it too low. Cheers!
23 November 2012, 22:29
No work, just modelling! It's more fun than work! I'm glad that you like it, I can't wait to get some paint on this baby! 🙂 🙂 🙂
23 November 2012, 22:48
Yet another update! After a bit of work, the fuel tanks have been mounted to the booms. It took a while (the fit is horrible) but I think it will end up OK. More photos added!
30 November 2012, 23:33
Hi Bill, this one comes nicely together, it will come OK, can't wait for the next pix😉
greetz Phil
1 December 2012, 08:48
Sea Vicky is assembled and primed. I am not happy with the shape of the front of the pinion tanks (tanks mounted over the booms on top of the wings). This wasn't obvious until priming. From the side, they look good, but from the top they are too blunt. Several new pictures are uploaded for your enjoyment. But back to the workbench I must go! 🙂
8 December 2012, 14:22
Looks great Bill, can't wait to see it with some paint on, awesome job you've did there, greetz Phil
8 December 2012, 15:41
Thanks, Philip! I finished reshaping the front of the tanks, now they're not so blunt and bulbous when viewed from the top. By the way, this kit is a GEM. Really, a GEM. As in Good Enough Model! There is no way that I can fix the remaining issues without cutting a new mould, so I'm going to finish it as it is. It certainly evokes the "mood" of a Sea Vixen, and that's what counts! 🙂 🙂 🙂
8 December 2012, 21:44
Congratulations on that one Bill, it is going to be a real eye catcher.
I will of course shamelessly steal your hints and tips when I find the courage to tackle mine 😮)
10 December 2012, 20:51
I found a glaring error in the decal instructions, and I've uploaded a few shots to illustrate. Basically, the decal sheet from Model Alliance would have you paint the stripes at an angle of 20 degrees from the aircraft centerline. The real figure is 30 degrees, verified by having a look at the actual painting instructions from the FAA (MoD). If you use the decal instruction's figure, you'll end up with six stripes across the bottom. In reality, there were only five. It's bad enough when the kit stinks, but now I can't trust the aftermarket either! 🙂 🙂 🙂
10 December 2012, 23:04
Hello Bill
Almost there! But i think that is not be the easiest paint that you have done... 🙂
11 December 2012, 01:07
Thanks, guys! In the old days without computers, we didn't know if what we did was wrong. Sweet bliss! I posted a photo of the Vixen in its white paint. Crummy picture, there is no detail or contrast visible anywhere. Oh well, we'll be fixing that! I'm using Testors Model Master glossy paints (Classic White, Deep Yellow, and just plain old Red and Black). My experience with these is that I need to let them dry for 2-3 days before masking and painting over the top. So the painting will be proceeding more slowly than usual. What to build in the meantime....?
11 December 2012, 02:53
I've painted the red areas on the Sea Vixen, and uploaded a couple of pictures. Next step is the one I've been looking forward to - the yellow and black on the bottom! This will make it a very unique scheme in my collection. Gotta let the red dry for a while though... 🙂
13 December 2012, 03:54
nice crisp lines between the red paint and the white
earoplanes make me nervous every time i try to do one it turns out rubbish
13 December 2012, 04:39
Hi Bill,
great Job, looks good. I'm excited until it is finished. :-O
13 December 2012, 05:18
Looking forward to the black and yellow color😉
great job so far Bill
Greetz Phil
13 December 2012, 08:00
Thanks, everyone. I feel guilty about not painting this in the typical Extra Dark Sea Grey over White, but I really like the TT (target tug) scheme. Besides, there are too many grey airplanes in my collection!
Karen - the demarcation lines did indeed come out nice and crisp. I always worry about this whenever I paint a hard edge. I don't want a ridge where the line is, nor do I want any paint seeping under the tape. I use paint that has been thinned way down, and build up the edge by spraying multiple (10-20) "mist" coats. I have to be really careful to not spray too much of the thin paint at one time! This time it worked OK! 🙂
13 December 2012, 14:30
Now I've gone and done it! The black stripes are on, and it actually turned out reasonably good. I made a mistake on the stripe that goes around the radome (lined the tape up to the wrong side of my guide marker) so the adjacent yellow area is 6mm too wide. Easy to fix, though, as I just need to spray more black. Would have been a disaster if the black were too wide, and I had to spray more yellow on top. Luck is a good thing, yes?
16 December 2012, 17:16
Looks awesome Bill, respect mate, another eyecatcher comes a life, great job😉
greetz Phil
16 December 2012, 17:22
I got another question Bill.
Would you recomend this kit?
There is one on ebay for sale for 40 euros.
16 December 2012, 17:49
Hi Bill!
Wow that looks like one heck of a tapeing job! 🙂 seriously, i am impressed and it turned out great! Keep us posted, i will be following this one!
Cheers,
Heli
16 December 2012, 18:05
Well done Bill,
the best colour choice for this aircraft. Now I've some impression how it will looks. I must built a drone too and don't wanna built a boring grey mouse. 🙂
Looks Vera nice so far.
Greetz
Dirk
16 December 2012, 18:20
Hi Duncan, have a look at the WIP thread here:
britmodeller.com/for..?showtopic=234929320
This will show you ALL of the gory details of my build of this kit. I can't say that I would recommend the kit, but I don't think it's as bad as everyone says. If you want the best Sea Vixen model, it's the 1:48 Airfix kit. No contest.
40 euros for the MPM kit sounds expensive to me - I paid about $25 USD.
16 December 2012, 19:39
Yes they did! And not just this one - I've seen pictures of other types painted this way, even a Canberra. From what I've read, all target tugs were painted this way. Probably so the fighters wouldn't shoot them by mistake while they were pulling the target! 🙂
17 December 2012, 11:42
More progress, even with the holidays! Transfers are on - but still a lot of fiddly bits yet to add. I'll have to scratchbuild the rear canopy bulkhead and the canopy jettison hydraulic ram. Not in the kit, but very visible when the canopy is open. I fixed the front fuselage stripe, that was really bugging me. What a dumb mistake that was! 🙂
25 December 2012, 02:15
What can I more say then WAW!!!!, great job Bill, love these colourful bird, greetz Phil
25 December 2012, 09:11
Bill, you know it ha? This is a medalwinner! Very colorful and smooth, what should i say than: wow...!🙂
25 December 2012, 17:29
Thanks, mates! So far, it has exceeded my every expectation. But that wasn't hard to do, since this kit has such a bad reputation. My experience with it was to take my time, and fix any problems that were there before moving one. By fixing the underlying problem that caused the intakes not to fit (warped lower fuselage), it also made the fuselage halves go together much easier. My only real problem was with the boom tanks, and I learned of the secret for making them fit only after I had them on! The trick is to sand the inside of the tanks until they are very thin. Then they fit over the booms beautifully. Oh well, I'll try that on the next one!
26 December 2012, 01:58
Bill, your result out of this nightmare kit is stunning!
All seems are so perfectly and clean, looks amazing!!
And your paint finishing is smooth and so fine, comes close to automobile paint finishing!
I have to concentrate very strongly on my project Airacobra, not to interrupt this and begin my Airfix Vixen ! 🙂 🙂
Greetz
Dirk
29 December 2012, 12:13
Thanks guys! I should finish this in a week or so. The holidays got in the way last week. 😉
29 December 2012, 21:41
Looking forward to the finish Bill, are Holidays not just there for modelling?😉
29 December 2012, 21:57
Hi mates! I have officially finished the Sea Vixen, and before the new year! I've added many pictures of the model, please have a look and enjoy! Now, what to do next?? 🙂 🙂 🙂
4 January 2013, 00:52
You can give me the addres of a good dentist Bill, my pine just smashed to the ground..
4 January 2013, 00:58
I know this kit has a horrible reputation, but I enjoyed building it. It took about two months, which seems to be my average for completing a kit. So not too bad. And Duncan, please take care of your teeth! You only get two sets if I recall correctly. 🙂
4 January 2013, 01:06
Bill, you topped yourself with this build! Thats an amazing vixen! Reserve this model a place for the medal. Absolute stunning! Thats a fact!
4 January 2013, 08:29
Thanks, everyone! I think it needs a bit more shine, so I will pop off the clear parts (just held on with white glue) and give it another clear coat that is a bit more glossy.
4 January 2013, 14:37
Hello Bill
Well... i think this one is your best work till now! At least is the one i like most. You have done an amazing work on it! Congratulations. I really like it... very much 🙂
Keep them coming my friend 😉
12 January 2013, 01:09
Thanks Vitor! How are things in Portugal? Probably warmer than here in Rochester! I'm glad you like the Sea Vixen. Next up is the old Monogram Tigercat. 🙂
12 January 2013, 02:18
Wow!!!
Vitor has said it all.!!
The Tiger stripes look gorgeous! 👍 👍
12 January 2013, 10:57
Wow, good job on this... I have the 1/48 scale kit to build - the red decals in my kit for the are on top of the fuselage behind the cockpit look too large for scale... is that true for the real aircraft?
29 April 2013, 22:23
In the Airfix kit? I don't think so - I've not heard that mentioned anywhere. Have a look at the numerous Sea Vixen walkarounds that are out there, and you should be able to see some good photos of the "no step" markings on the engine covers. The markings are very prominent, especially with the big X's in each box!
30 April 2013, 00:39
I don't recall if I mentioned this, but the Sea Vixen took the Gold Medal in the 1:72nd scale Jet category at the IPMS USA Northeast Regional Contest. The contest was back on May 4th. Kind of makes all the work worthwhile, but I probably won't build this kit again anytime soon!
11 July 2013, 16:55
My honest congratulations, Bill! Your hard and patient work paid out! Your Jaguar will make it, too!👍
11 July 2013, 18:58
Any horror stories on this build? I want to build one, I just don't know which kit I should build
11 July 2013, 21:51
Thanks! Dave, there were a few horror stories. Somewhere in my comments there is a link to the detailed build thread on Britmodeller. Check it out. 🙂
12 July 2013, 01:48
I like the color scheme. I like it, when it is colorful somehow. Well done!
8 October 2021, 04:04
Thanks mates. The Xtrakit model of the Vixen, and its CyberHobby clone, was a bit of a dog. Fun project though. I now have a new entirely 3D printed 1:72 Sea Vixen kit that looks to be the bee's knees. The detail is amazing. Plus, the shapes appear to be the best we've seen in this scale (of course the 1:48 Airfix kit is amazing as well). I can't wait to start this new Sea Vixen 3D printed kit. Stay tuned! Cheers, Bill
1 March 2023, 16:14
Album info
Why do I get myself into these things? This kit is a well known horror story. But tackle it I must, because it is there.


