Nieuport 17 Triplane WIP

Some modification of cockpit parts.

Wood simulated by paint

Some rigging added and parts mounted.

Seat with cushion (made from miliput) and Eduard Steel belts.

Oil pulsator made from 0.2mm copper wire, 0.4/0.6/0.8mm brass and a stretched clear sprue.

The left halve with pulsator, belt drum, kit PE and some rigging.

With the finished cockpit the fuselage could be closed.

I created a tail skid holder from real wood.

The kit holder was removed then.

The new part can be added after the painting of the fuselage.

Some Evergreen stripes helped to increase the diameter of the front ...

... to give the turned thin wall cowling a tight fit.

The lower wing is in place.

There is not much to see of the cockpit.

I will use a Vickers MG from Gaspatch Models and modified the mount for it.

The first thing was a brass bearing for the engine with a piano wire axle, soldered with PE remains.

A Small Stuff engine fits and can rotate easily.

There is enough space to add a brass oil tank between engine and wall.

I shortened the cowling a bit on the back. It fits and there is enough space inside.

Here I started to cut cooling slots with my little mill.

Done.

And finally I added some fake fastening. In real the cowling could be opened to allow engine maintenance without removing the airscrew.
On the model this is alu sheet bend to T-shape (on the Cent there is another piece). I used 5min epoxy as CA is not very strong on alu. After 10 or 15min (the glue was not yet hard) I removed overflow with a tooth stick.
On the model this is alu sheet bend to T-shape (on the Cent there is another piece). I used 5min epoxy as CA is not very strong on alu. After 10 or 15min (the glue was not yet hard) I removed overflow with a tooth stick.

New squeezed brass legs (from 1.2mm brass tube on a 0.5mm brass rod) thinner then the kit struts. I used the kit PE and the bend inner rod to connect the legs.

To be able to show what I mean this a crop of the picture on Wikipedia, please note the thin struts.
[img1]
[img1]


Another interesting part on the picture is the lower bar with axle. This one was broken on my finished Nieuport 11 
So how can this can be replicated and made more robust? And the axle?
I tried with 0.7mm brass rod.
So how can this can be replicated and made more robust? And the axle?
I tried with 0.7mm brass rod.

Soldered between the legs.

After cleaning and tinned I cut a piece of aluminum sheet and bend it around the brass rods.

So it is closed on underside.

Now the 1mm nickel silver axle is going trough the slots, and can go between the rods.

The undercarriage fits to the fuselage. I made also metal struts for the upper wing and pinned the middle ones.

And finally the undercarriage on the model. The suspension can now be done as on the original picture. This is not possible with the wide lower board of the kit.

Searching for decals: 4.5 (max 5mm) high, with and without white border?

I tried to cut masks for the tail numbers, but this was really not easy.
Here painted white.
Here painted white.

And masked again and painted black.
This is the better side, but I don't like the result. That is the absolute limit of the cutter. The 66 are ok, but with the white border the masks are not precise enough.
This is the better side, but I don't like the result. That is the absolute limit of the cutter. The 66 are ok, but with the white border the masks are not precise enough.

I noticed some fittings on the upper side of the legs, but there is no PE.
So I soldered very thin brass foils together, drilled the block and enhanced the holes to rectangles with a little file. Then I de-soldered the block. One is on the leg.
So I soldered very thin brass foils together, drilled the block and enhanced the holes to rectangles with a little file. Then I de-soldered the block. One is on the leg.

After priming/sanding rounds I painted the fuselage, wings and undercarriage. The I mounted the undercarriage, the wheels are not yet fixed.

The axle is hold by "suspension", made again from stretched sprue.

That is the look of the fittings, painted in blue grey.

Next I moved to the tail skid. The wooden block at the upper right I showed already. The wooden stick will be the skid. Below is a very strong spring steel with 0.14mm which I found in the camera, which I destroyed to get the tripod mount for my outdoor photo setup (I showed this in another thread). There a some special shaped sheets inside the camera. I cut this with a diamond cutting wheel in my Proxxon and cleaned with a diamond file.
All other materials like brass or nickel silver would not hold the model without bending.
The last part below is 0.2mm nickel silver, bend to a U-shape with soldered 0.2mm nickel silver wires. Two mounting plates with 0.2mm holes are slid over the wires.
All other materials like brass or nickel silver would not hold the model without bending.
The last part below is 0.2mm nickel silver, bend to a U-shape with soldered 0.2mm nickel silver wires. Two mounting plates with 0.2mm holes are slid over the wires.

And all parts mounted. The "bolts" hold now the steel plate in place.

After a little wood varnish glued to the fuselage. As last step two PE parts from the Eduard Nieuport 17 set added.

And in comparison to the drawing. Sorry forgot the picture before and now trouble with the lower wing ...

The steel spring holds the model easily.

This little Nieuport is now on its own foot.

I had two sets of the Eduard Nieuport 17 decals available to use the fuselage cockades for the wings. But I noticed on the pictures, that the middle red dot was big, on the decals very small and the overall size was not perfect.
So I decided to cut masks and use "WWI RAF Blue" and "WWI RAF Red" paints from Drooling Bulldog.
From top only on upper wing.
So I decided to cut masks and use "WWI RAF Blue" and "WWI RAF Red" paints from Drooling Bulldog.
From top only on upper wing.

From below they are needed on all wings.

This time I'm happy with the outcome! Only some overspray in the aileron cut, which I could fix with some white and a brush.

The decal arrived and are applied (the rudder was already painted with the same paints as the roundels), no clear coat yet.

That looks nice now, compared to my masking.

Since it is clear now, that I will build the A6686 I could add the cockades to the fuselage. The masks were done together with the others, but not yet applied.
The outer white ring was very thin and also on the original plane not perfectly applied.
The outer white ring was very thin and also on the original plane not perfectly applied.

Then I converted it to a biplane using wooden struts.
To be able to finalize the struts for the third wing I need a fix point.
To be able to finalize the struts for the third wing I need a fix point.

But to make the build easier I decided to add some details now.
Here the prepared intake pipes. To avoid a background light I added a small piece of black stretched sprue to the inner side.
Here the prepared intake pipes. To avoid a background light I added a small piece of black stretched sprue to the inner side.

And mounted.

I scratched an oil tank from plastic, ...

.. primed it grey, ...

... painted it with Alclad copper and glued in place. The real brass oil filler with cap is also visible.

I hope that the copper is later visible from the front.

Here you can see the reason of this clever shape. That has a technical reason:
At first oil and fuel tank were behind the engine wall, but with adding a Vickers MG with ammunition on the Nieport 17 there was not enough space. So the oil tank was moved to the front into this small area.
At first oil and fuel tank were behind the engine wall, but with adding a Vickers MG with ammunition on the Nieport 17 there was not enough space. So the oil tank was moved to the front into this small area.

Of course I drilled at first the cowling and then the oil tank.
I can only glue the filler cap after the cowling is mounted finally.
I can only glue the filler cap after the cowling is mounted finally.

A filler cap for fuel, this time behind the engine wall, was also added.

No conflict with cowling or Vickers MG.

After the ignition wires the engine and the compartment got a oil wash, glued in place and the cowling was closed.
I noted already now, that both wings are hanging down 🙁 The flower wire in the lower wing do not help! I should have removed it and glued in a strong spring steel wire. But now after all the painting?
So I started the rigging and used fishing line to hold the wings up. Better now.
I noted already now, that both wings are hanging down 🙁 The flower wire in the lower wing do not help! I should have removed it and glued in a strong spring steel wire. But now after all the painting?
So I started the rigging and used fishing line to hold the wings up. Better now.

BTW, here the "struts" from the conversion set! No way for me to use it! Of course wood instead.

I fiddled a long while to convert it to a triplane! There are still angles, where it looks wrong, but I don't need to show that pictures 😉 The problem is that the wings are not straight and warped too.

Here you can also see, or better guess the ignition wire on the lower half.

I think I have not mentioned it yet: back in March I have masked the ribs and shaded the wings with Gunze Smoke.

So it is not perfect, but I can live with it.

And finally from below.

What a carnage!

I used a big roll of self adhesive aluminium tape. I sanded it with fine wool and used it for the stripes.
The shoes are made from thicker alu foil and secured with CA.
That is my result.
The shoes are made from thicker alu foil and secured with CA.
That is my result.

The upper right ones was easy, but tried different things for the angled ones. In the end I cut strips at an angle.
I'm not completely satisfied, it's not macro and competition proof, but it couldn't be better in this size. In between I had to leave the workbench and take a deep breath ...
I'm not completely satisfied, it's not macro and competition proof, but it couldn't be better in this size. In between I had to leave the workbench and take a deep breath ...

The other side is also done.

At first I noticed that the airscrew was not yet in shape as I thought. Only the veneer was glued to a block, so I sanded it to the raw shape.

The side view is interesting. Pictures provided by forum members during my last Nieuport build were a big help!

For the aileron control levers there were nothing in the conversion set. So I made some metal parts with help of photos of the original Triplane.

Only the upper wing has ailerons, so the rods comes out of the cockpit and the levers end in the wing.

The rods are visible in the front view.
The raw airscrew is plugged on, so I noticed the engine could not turn completely 🙁
I had to remove the cowling again, but the problem is fixed now 🙂
The raw airscrew is plugged on, so I noticed the engine could not turn completely 🙁
I had to remove the cowling again, but the problem is fixed now 🙂

Due to the staggering of the wings, many rigging points are easily accessible.

Some more rigging lines are applied, but with every check of photos of the original Triplane I find more to add. At the moment I know 7 missing lines.

I found more rigging lines on the pictures, but I think that is complete now.

Another view on it.

The tail is now also complete and control wires added. I added four little frames to the holes, found on the PART Camel set.

The struts on tailplane are squeezed brass tube.

There is also a little rigging cross behind the cockpit.

The Gaspatch Vickers was painted, a cartridge case ejection got some brass on the lower end for a open outlet in view from below.

Used the PE frame from a Eduard STEEL belt set to create a windshield frame.

Windshield and Vickers mounted. The empty ammo belt chute is Eduard PE from the kit. On the front is also the sync gear connection to the Vickers.

Top view.

An overview with dry fitted parts.


Wheels got tire valves (lead wire). Masked and tires painted.

A little Nieuport decal, stolen from another kit.
While I was trying to photograph it, it fell off. A decal doesn't seem to stick to metal. Now I have re-glued it with clear varnish.
While I was trying to photograph it, it fell off. A decal doesn't seem to stick to metal. Now I have re-glued it with clear varnish.

The wooden airscrew got different layers of paints and varnishes to get the french brown look. The manufacturer logos added. After the decals are dry a final layer clear coat will follow. The prop boss on the picture can be mounted as last step.

The logos are beautiful and readable!

After the final clear coat the prop boss was added.

Also on back side. The airscrew is mounted now.

Forgot to show the outlet on lower side.

A light weathering was added too.

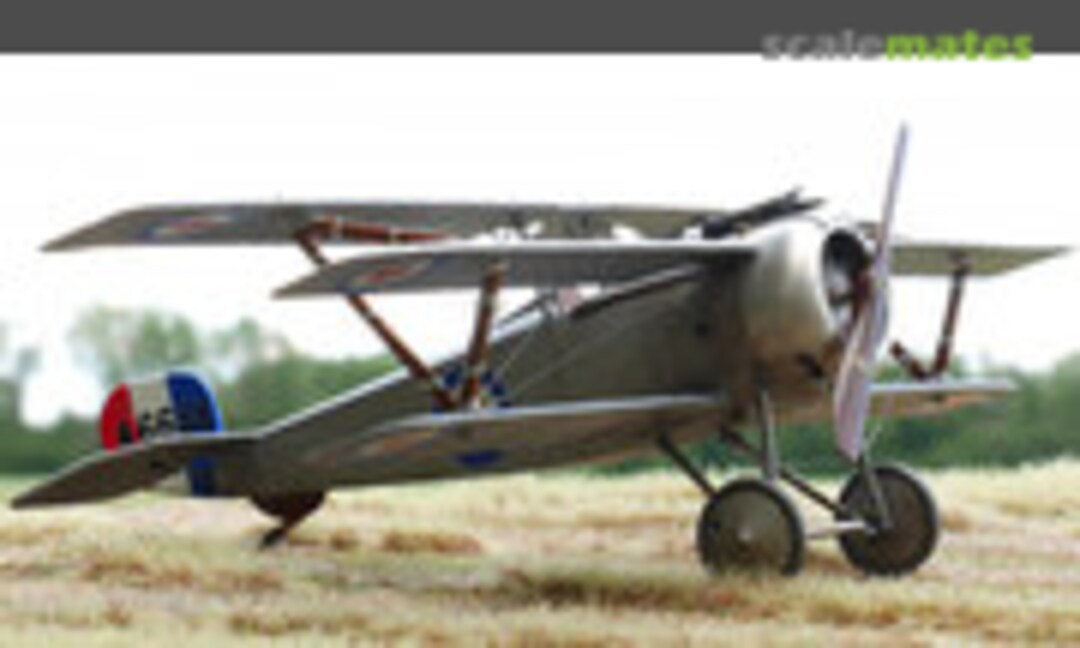
This bird is finished!
Comments
63 8 February 2022, 18:14
After the finished Camel I put another project on the bench. Some little things was done already, like some cleaned parts and a painted seat, but nothing reported yet. So now a serious start ...
The manual of the CSM kit helps for the work on the cockpit.
Does anyone here like to follow my new build report?
8 February 2022, 18:22
I suppose there will be things to learn and marvel at. So - I am in.
8 February 2022, 22:42
Welcome!
Erik, ich muß ja! Sonst bekommen ich den Stash nie im Leben abgebaut. Wobei, wie war das? Man kann nicht sterben, so lange man noch ungebaute Bausätze hat?
8 February 2022, 22:57
That Small Stuff stuff is really tremendous. Nice mill you have there. I suppose you presented it already elsewhere. I am keen on some detail. Gerne auch als pm.
9 February 2022, 16:48
The mill is a Proxxon MF 70, with "Teilapparat"
My favorite tools | Album by bughunter
Both are not perfect, the "Teilapparat" is not centric, the X/Y table only alu and not very precise. And I'm afraid that the engine won't last much longer either. There are instructions for converting to a brushless motor on the net.
9 February 2022, 17:19
Welcome Dietmar! I think there are some free seats in the first row.
Let's see if I can improve the undercarriage of a Nieuport 17. I thought about this solution for a while and experimented. It is not completely original, but an improvement over the kit plastic.
10 February 2022, 18:17
Welcome and thank you mates!
Yes David, since I have no chance to build all the types of biplanes of that time (I have a type book with only German planes of WWI: more then 500 types!, plus all the types of Austria, Italy, France and GB ...) I can try build more triplanes.
A SPIN conversion kit is involved here, but the wings are very thin and fragile. Only the lower wing has a wire in, but this is of the cheap flower type and not very strong. I think here a functional rigging with fishing line is needed to hold the wings, let's see.
14 February 2022, 17:24
Does anyone know decals of this font, with and without white border? 4 ... 4.5mm (may be up to 5mm) high? See picture 32.
This is very small for my cutter 🙁 The knife removes the inner parts during cutting. I will try again, but may be a decal would be a better option.
14 February 2022, 19:01
Looking great. Pegasus used to make an RFC serials decal sheet in both 1/48 and 1/72. I have the 1/72 version and it has serials in black and in white, with the white ones a little bit bigger than the black ones - you have to put the white ones on first, followed by the black, and each digit separately. Very fiddly, but well within your capabilities! Ony issue might be finding them - sometimes you can find Pegasus kits and decals on the Freightdog Models site. Here are some links to the Scalemates data base: RFC WWI serials (Pegasus PGS48001, 1:48) or RFC WWI serials (1/72 & 1/48) (Pegasus , 1:48).
BTW - I used the 1/72 set of these decals on my old Roseplane resin kit of this same aircraft: Nieuport Triplane 2 | Album by Uwe Kaeding (1:72). You can just about see the white borders in some of the photos - should be easier and more obvious in 1/48.
")
 (Pegasus )")
15 February 2022, 12:13
Thank you very much Uwe! That was a very good hint 👍
The sheet can be found in the www.fantasyprintshop.co.uk, ordered 🙂
15 February 2022, 18:46
The next Talent Show?! I am taking a seat of course and watching with pleasure and interest!
16 February 2022, 20:31
Frank, about mills, do you have an opinion or first-hand experience with the Proxxon FD 150 ?
And did you turn the cowling itself on the MF 70 ?
16 February 2022, 21:06
Today I added the next batch of pics of the tail skid and undercarriage.
Welcome Robert! You are late, or the project fast? I guess I have finished this bird here around 60~70%.
Boris, the FD150 is a lathe. And no, on the MF70 I milled only the cooling cut outs. This thing is not precise enough. No, the cowling is done on my lathe My favorite tools | Album by bughunter
I think the FD150 is a toy, it may work on some small parts, but the forces should not be underestimated. And the FD150 has only a aluminium bed and many other parts. The MF70 too, but that is not robust. May be it works ok for someone, but it is also very small. You may run very quickly into limits with that machine.
16 February 2022, 21:24
Thank you mates!
The SPIN conversion kit has no decals. I wanted to use fuselage decals from Eduard for the wings, but they didn't quite match this prototype. So decided to do masks and paint. That was a lot of effort (and some drying time in between), and risky to mask on resin, but it looks nice.
17 February 2022, 18:42
Really good work it is, bughunter! And you are really fast on this project 😉
17 February 2022, 19:16
progressing nicely.
You enforced the lower wing with a metal strut. May I ask how you placed it? Did you "just" cut a groove on the lower side of the wing? I am asking as I face a similar problem on a project and have not found a convincing solution yet.
18 February 2022, 10:31
Thank you Robert and Michael!
The resin wings are from the SPIN Models conversion kit (see project inventory). Inside the lower wing there is a "green flower wire" included during the casting process. The good thing that the wire is used. The bad thing is, that it is only done on lower wing and the wire seems not to be very strong. The lower wing alone hangs already, the other wings will put more load on it. I think I have to use a functional rigging with fishing line. All wings are very thin and narrow. May be a steel wire between the middle wings could also help.
Still a lot of work on the ToDo list ...
18 February 2022, 12:09
Welcome Marcel! I should be able to finish it before EME Lingen. Possibly I will be there. Is there a chance to meet you?
18 February 2022, 14:47
Good grief, this one is nearly over before I found it! Excellent work as always and quick as well.
18 February 2022, 16:56
Marcel, I hope the best (I would put up with the long drive)!
Welcome gorby 👍 Where were you? I'd (almost) given you up for lost 😉
18 February 2022, 17:50
Your working too fast for me Frank! 😄
It's almost as if you know what you're doing. 😉
18 February 2022, 17:53
I contacted Peddinghaus-Decals (listed here on Scalemates with 3500 decals and are able to print white). They made custom printed decals for me - Thank you very much!
Applied - I'm satisfied now. So I could continue on this project, but at the moment the DH2 has occupied the bench.
19 March 2022, 21:14
A master at work. Your fabrication skills as well as attention to details and accuracy is impressive.
20 March 2022, 04:48
Thank you Villiers!
I think I will continue on this project soon, once the DH-2 is finished completely. During the waiting phase for the decals the DH-2 take over the bench and was done in one go.
12 May 2022, 20:33
Thank you mates!
Today only a little update, but is cost me lot of work.
I experimented with different materials and methods, but do not liked it. One example was Bare Metal Foil, which do not want to stick to the wood!
Ok, now I'm happy that it is done.
25 May 2022, 19:12
It's really impressive that you can cut the stripes with the appropiate angle as to stay horizontal in the side view. I wonder what those stripes are on the real thing, and why they're not perpendicular to the strut's edge.
25 May 2022, 19:43
Thank you David, that was a lot of trial and error.
On the real thing the struts were hollow to made them lighter and consisted of two halves. The halves were secured with the strips. Why they are so angled? To be in direction with the airflow? No idea, but the same principle on the normal Nieuport 17 biplane.
25 May 2022, 21:00
Rigging finished, windshield scratched, the Vickers MG is mounted.
There is a light at the end of the tunnel, or is it a panoramic wallpaper?
2 June 2022, 17:55
You have incredible building skills! I'm amazed by photo 75, where you have control levers made of thin wire and still you managed to make a tiny hole on their tips for the control rods 😮
2 June 2022, 20:31
Ooops, almost missed another master build from @bughunter! 🙂 Following!
2 June 2022, 21:20
Thank you mates!
@ S M the control rod is 0.3mm
@ Ricardo Most of the work was done before I started the DH2, but was then on hold due to missing decals. I started then the DH2 as new project and this was done without interruption. In meantime the decals arrived and I have started the remaining work.
@ Alec My wife says it is ugly. I must admit it is 😉 The pilot has no good view, not to the airfield for landing and not to ground for navigation.
3 June 2022, 10:59
Frank, your wife has an aesthetic acumen, I'll admit. That said, my motto is "Beauty is in the eye of the beholder". Maybe there is a similar saying in German 🙂
3 June 2022, 13:54
Yes Alec, we say this also in German language 😉
The wheels are painted and last decals are applied.
3 June 2022, 16:13
Well, it's indeed one of the most ugly planes that have ever taken a flight. It's there right behind the Caproni Stipa...
3 June 2022, 19:20
Come on, Urban! Have you ever seen this:
en.wikipedia.org/wiki/Bennett_Airtruck 😄
3 June 2022, 19:40
What about a Nieuport 10 as Triplane? I will do two Special hobby Nieuport 10, one as normal biplane, the other one also as converted Triplane - the project exists already in 'Ideas' 🙂
4 June 2022, 12:01
If I don't find some missing small parts in my tinkering cave, this triplane is finished!
There will be another album with outdoor and light tent pictures, but this depends on weather and time constraints.
Thanks for watching and commenting through this build!
4 June 2022, 18:15
Congrats Frank, as always a great result and a nice and unusual addition to your collection. Looking forward to see some progress on your new camel the next days
4 June 2022, 18:26
Another beautiful creation, for sure. Superb workmanship that is never taken for granted, Bughunter.
4 June 2022, 18:43
Congratulations Frank, another stunning build. The bird may not win beauty prizes, but your skills and your willingness to share them means that you should -- wine prizes, I mean, and not necessarily beauty ones 😉
Thanks for another wonderful journey and ongoing inspiration !
5 June 2022, 17:37
Thank you mates for such great feedback, highly appreciated!
It is a nice model (of an ugly original), but definitely not my best or contest quality. I had not paid enough attention in the early states to the surface of the bad quality resin wings. A SPIN kit is a huge difference to modern injection kits.
5 June 2022, 19:27
Don't miss the new album with the final outdoor pictures: Final shots | Album by bughunter (1:48)
6 June 2022, 19:04