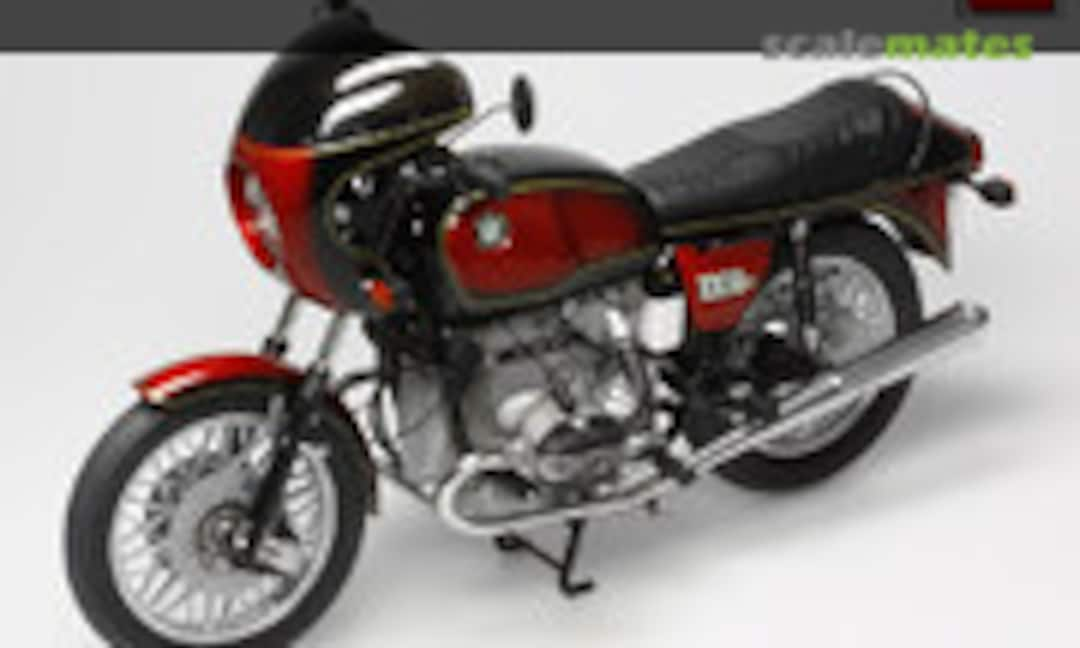
BMW R100S - 1978 - WIP

Step 1: painting the bodyparts. I used Tamiya TS-17 Gloss Aluminium, which I oversprayed with Tamiya TS-74 Clear Red. Finally I sprayed the black parts with Tamiya TS-14 Gloss Black. Next I fixed the decals and finally I applied 3 clear coats.

Step 2: assembly of the frame. The instructions suggest to assemble the engine first, and then fix it between the frame halves. I decided to assemble the frame first (and spray it black), to fix the engine afterwards with real bolts (green arrows).

Dry fit of the gas tank and seat support. The engine block still needs a weathering of course.

The engine block was weathered for more realism.

I tried to copy what I saw on the reference pics; an engine which is well taken care off, but with some oil stains and light weathering tracks.

This part is not present in the kit, so it was scratchbuilt. The coils will be hidden under the gas tank, so I didn't spent too much time detailing them, but still I tried to make it look realistic.

Now the bike is ready to receive the scratchbuilt part.

Here the coils are in place, and I lined up all the other engine parts as well to give you an idea of the next building step.

Lets' zoom in on these parts: they are all pre-assembled, painted and weathered because it will be hard to reach them once they are in place. The plastic chromed push-rods will not be used, I replaced them by metal parts.

Not only the coils were added, I also added the bolts which hold the rear suspension in place and which were absent.

Now I can finally fix the engine parts in place.

I start with the large cilinders, and the carburettors.

Next the other parts such as wiring and tubing is installed.

Finally the battery was put in place as well.

Next up is the swingarm. First I fix the rear brake, brake disc and rear wheel in place.

Next I put the rear fender in place.

In order to keep the bike in balance, now is a good time to fix the central support as well.

And of course the rear shocks can't be left away either. I replaced the funny looking chromed plastic parts by scratched shocks following the reference pics as a guide.

Once that is all cleared, we have a firm base on which we can continue the build. Now I fix all the wiring and tubing which will be visible once the bike is finished. Note that the fuel lines are still attached to each other; they will be cut later on.

Close-up of the engine and its wiring.

The tire treads were dry brushed as well to pick out the quite nicely looking raised sidewall and tread detail.

At the front I installed the radiator which is not present on all standard BMW R100S bikes, but since it was available in the kit I might as well use it.

The rear end of the bike was finished. I tried to simulate the taillight's interior with BMF which I pushed into the housing with a cotton swab. I think it turned out well.

All what was left to do now are the licence plate and the reflector. I replaced the plastic bolts by aftermarket metal bolts.

At the front I still had to fix the horns. I drilled them out en reshaped them to give them a realistic look since the kit parts were flat at the front.

Next it was the front fork's turn. I replaced the plastic injected brake lines by metal ones for more realism.

Same exercise at the right hand side. Once the wheel is fixed into the front fork I could also put the headlight and blinkers in place.

Then I concentrated on the handle bars. The large plastic cover unfortunately hides a lot of the detail, but there are still some switches and the dials to be looked at. I fixed some real meters over the dial decals and covered them up with epoxy glue.

Now all the parts I need to transform the semi-bike in a real motorcycle are ready to be assembled.

And that looks like this. The handle bars are still to be fixed, first I take some pictures of all sides.


Next I fix the handle bars in place and I connect all the wiring to the dials and handles. The completion is coming nearer...


Thanks to Wim van der Luijt I could correct an error in the fuel configuration; now the two fuel lines are interconnected like it should be.

Same exercise at the other side of course.

Next I could fix the gas tank and connect the fuel lines; I also fixed the seat support and the seat itself.

Before we will be fixing the cowling I couldn't resist to take a few shots of the bike without the cowling...

The missing exhausts are very striking here...

But they are next on the to-do list, so they won't have to wait for very long anymore...

Rear view. Also still to do is to correct the numerous spots where the paint is chipped because of the handling the bike while fixing parts... I'll do that once the bike is completed.

For instance, the aluminium painted fins of the cilinder heads always get chipped because I touch them when I am working at the BMW...

The cowling was painted a while ago, but the windscreen still had to be done. So I sprayed it with Tamiya TS-71 Smoke from the airbrush.

Next I fix the windscreen to the cowling, and all what's left to do is to punch 10 bolts and fix them onto the windscreen.
Comments
1 2 July 2015, 07:20
Thanks Martien! I still need to polish it though, but first I will let the clear coats dry for a week😉
2 July 2015, 07:51
That is a very hard finish to get right in 1:1 scale, I've seen some pretty poor jobs on both the 100S and 90S. I think you have done a good job on this replica!
2 July 2015, 12:54
What a great paintjob, Looks like parts for the real bike! Congrats!
2 July 2015, 13:42
Is this wrong that the photo of painted model parts kinda ignites the desire to eat them?.. 😄
Fantastic finish! Eager to see the whole model!
2 July 2015, 15:01

Thanks Guy! Believe it or not, I have a couple cans in my stash. I bought them many, many years ago but have never used them. Now that I see the results you've achieved, I will give them a try. 🙂
2 July 2015, 20:06
Unstable? Sounds like the guy holding the can (me)! Thanks for the advice. 🙂
3 July 2015, 00:21
A truly stunning result Guy. 🙂
You have set the bar very high old mate. 🙂 👍
21 July 2015, 19:02
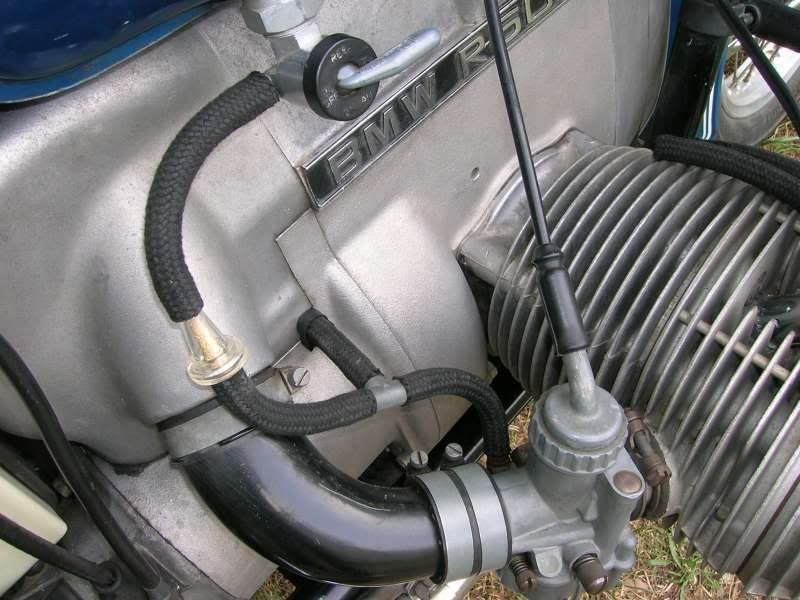
GReat build Guy! I have made my hands dirty on the 1:1 version more than once (on a 75/5 and a 100RS amongst others). From the years spent working on my bikes I see one thing that is missing. The fuel lines should be interconnected. If you look at the air filter housing there is a hole in the lower corner on the crankcase side. The fuel lines are connected through those holes.... Check this pic for clarity: [img1]
14 August 2015, 17:32
Good call Wim! I wondered why the little holes in the engine block were there... That mystery is solved now, and the error is corrected. Thanks!
15 August 2015, 14:22
The BMW is finally finished; the pics of the finished model are here : Finished model pics | Album by sennake (1:12)
16 August 2015, 08:35