

JSU-122S Construction


Comments
5 January 2013, 01:27
Hi Claudio,
I have no idea, how a JSU-122 looks inside. No, no details inside. I will just close the hull that noone can see through from the hatches to the bottom.
5 January 2013, 08:39
Its green!!!!! Like it.
(Hope Holger read this)
🙂
5 January 2013, 20:31
Hi Frank! Did the Tamiya one and can only say that this model looks very impressive when finished. A big bad and ugly monster. Anyway nice start mate!
5 January 2013, 22:22
More green for Markus...😉
@Christian: Yeah a monster. Dragon did a nice job on the casting structure of the mantlet and hull front.
6 January 2013, 19:09
Yeah Markus, i read it😢! Its Green!
Frank, good luck with this Monster! I'll follow this build for sure!!!😢
6 January 2013, 21:49
Had to disappoint Markus a bit... It started with the "Rolling Stones": "Paint it black!" and ended with the German Panzerlied "Schwarz ist unser Panzer!" (Black is our tank). Let's find out, where this is getting me to. The road wheels got their first layers of dirt...
9 January 2013, 22:45
Found out that the mud on the wheels is too dry. First try with matt varnish resulted in a "frosty" look. Good on a tank in winter, but that wasn't my intention. Satin varnish delivered a better result - a slightly wet look. Wheels rims and drive sprocket teeth were painted with polished steel, because paint and rust is worn of immediatly, when the tank is in motion.
The teeth of the tracks are quite big. I discovered that after I had painted the return rollers on the inside with earth-brown and pigments. 🙁 So I had to remove that and use polished steel instead.
11 January 2013, 23:37
Hi,Mate
Wheels look very good.Have you tried some AK products???They have some nice products to simulate wet Mud.But you solved the Problem well,too (Old School 🙂
But its not Green!!?????? Is that the right color or do you use it as a pre shade.?
12 January 2013, 10:45
Hi Markus, thank you! No, no AK products, just simple pastell chalk and for the bigger portions some diluted putty. Not green? Don't worry! It'll be green at the end. The kits base colour is light gray and is shining through the Humbrol green, if I don't paint several layers. I made a try with the gun tube, painting it black first, then green. I liked the result, so I decided to do it for the whole hull.
But you are right. Instead of painting it black all over I could have done it like a shading to get some effect after painting green, but... I'm still learning and trying, sometimes forgetting, what I should have known already...
Thanks for reminding, Markus! I'll consider it for the next kit to be build on Wangerooge......
12 January 2013, 11:28
Nix dafür 🙂
Sometimes we forget what we have learned.And is has nothing to do with the Age.
12 January 2013, 12:03
At least somebody in Germany is happy, when "the Russians are coming!" Fighting my way through the running gear. Got to continue now. More photos later this weekend!
12 January 2013, 17:07
What I like to use for the tracks and a fillers on tires for the mud is Elmer wood filler and then I just use glue the white gooey stuff and mix it with just dirt but I think you have better ideas lol great job
13 January 2013, 22:03
Hi Leslie, I never tried that, but heard of it. I've got to give it a try.
13 January 2013, 22:51
Too much dirt isn't good for health, so I started with the tracks of the kit (seems this one will end up OOTB).
The tracks look ok to me. 2 little injector marks per link, but easy to remove by scratching with the cutter knife. No filling needed. However, 82 links per side needed means 164 injector marks to remove. No big job, but gets boring after the first 30 links... The tracks fit smooth together. So far I haven't used any glue, just pushed the links together.
14 January 2013, 07:12
Hi Frank
The sag of the Tracks looks perfect to me.Looks great!!
14 January 2013, 08:54

The tracks looks great Frank, nice job so far, keep the pix comming mate😉
Greetz Phil
14 January 2013, 09:26
Fine, thanks guys! So I will start the 2nd track this evening the same way.
14 January 2013, 10:00
Hi Frank, you say the tracks just snap together but these are no Magic Tracks, aren´t they?
I have to commit that the sag of your JSU is looking absolute classic! Cant wait to see more! Go Frank, Go!👍
14 January 2013, 10:11
Hi Holger, as you can see, the tracks are just normal single links on 2 sprues. You need to push a bit strong, but the links don't break and stay together, but you can still adjust the angle.
[img1]

14 January 2013, 10:15
Moin Frank , deine Bauberichte inspirieren mich aber auch , die Haubitzen aus WK II sind , finde ich , sehr interessante Fahrzeuge , mal schauen , das Jahr 2013 ist ja noch jung 🙂
14 January 2013, 10:17
Oh my goodness... I have that in front of me with the KingTiger... But good to hear that its possibly like your tracks and i dont need to glue too much! I think the sice of the track are similar.
What about the barrel, is it from 2 parts or alu? I pressume the muzzlebrake is made of plastic?
14 January 2013, 10:19
All plastic, Holger, but ok for me! When I started that kit, I didn't know anything about metal barrels...
14 January 2013, 10:24
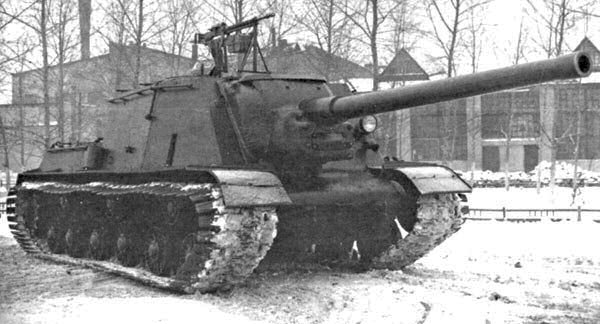
Now i know what i am up against lol.... btw.. Is it me, or does this thing use KV-1 running gear?
14 January 2013, 18:38
Hi Augie, as far as I know, similar running gear, but not the same.
14 January 2013, 18:45
Hi Augie,
SU-152 is based on KV-1S, ISU-122/122S and ISU-152 share the same upper hull, but use different guns. The lower hull and running gear is based on JS (IS) tank.
I've often mistaken the SU-152 for a ISU-152 and vice versa, when I started modelling. it took me a while to understand that they are different.
14 January 2013, 19:06
Thats right ,Frank.I googled it an thanks of you and the web iam now a little bit smarter 🙂
The SU-152 was the predecessor.
14 January 2013, 19:20
hehe 🙂 this is what i like, that we can discuss things like this and help each other
14 January 2013, 19:21
I love these tanks. Have a look at my stash and wishlist - it's nearly complete as far as KV and JS series is concerned. Trumpeter announced the KV-122. There was only 1 prototype built and obviously never used in combat, but I will have to add it to my collection. 😉
KV-122 (Trumpeter 01570, 1:35)
")
14 January 2013, 20:10
yes.. really Frank, I am a gamer too.. and WoT just interested me.. i mean come on.. tanks..
14 January 2013, 21:17
Puuuh, second track completed, but my fingers hurt now. No photos today.
14 January 2013, 22:53
Here we are - tracks fitted to the running gear. Treatment with paint and pigments started. Probably I can fix the upper hull today!
20 January 2013, 14:32
Just found this on the net. I didn't know that that Russians were using "Winterketten" for their heavy tanks. Friulmodel: If you see this, pleeeeeeaaaaaase..... 😉
[img1]
20 January 2013, 19:14
Painted the tracks and fixed the upper hull to the lower one. I had some self-created fit-issues, because the plastic-sheets fixed in pcs 1 and 2 were an idea to large. Result - the upper hull needed some pressure to sit correctly on the lower hull. Pics later this evening.
21 January 2013, 14:17
Simply outstanding, Frank! I love your weathering on this peace of steele! But what i pehaps love more ist that you´re going to become a quick modeler😢!
21 January 2013, 14:28
Thanks, Jose!
@Holger: I'm having fun! Seems this increases the number of kits in progress and completed...😉
21 January 2013, 15:48
Photo of the joint upper and lower hull added.
@Holger: Let's see! I hope, one week full time modelling on Wangerooge will be good enough to start and finish 1 model. As long as I'm not under time-pressure I can be quite productive...
21 January 2013, 19:04
As I said before.... Very well done. Will we see this one being finished at Wangerooge?
21 January 2013, 19:09
@Christian: I hope to finish it before Wangerooge and start something new there. I know for sure that I'll try some figures. I count on you and the guys to guide me... 😄
21 January 2013, 19:13
Hmmm, the reason I started the meeting on Wangerooge was to be guided by all of you, in modeling😢!
I'm really looking forward it and hope that wind and ice will decrease and the ferrys can do their work, regularly again!
21 January 2013, 19:57
@Holger: I can show you, which end of the paint brush to hold... and where to put the paint😉
21 January 2013, 20:44
More pics! Some detail parts added to the hull.
@Markus: Sorry, still no green, but paint will come soon.
21 January 2013, 23:16
Hi Frank
Are this resin add ons (engine grill,Horn,Lift hooks etc)?
22 January 2013, 07:30
@Jose: Thanks a lot! Glad you like it so far!
@Kim: Would be great, if we could finish our Russian monsters (KV-2, JSU-122S) the same time...😉
@Vorya: Hope I can start the final round this week and finish it by the weekend. Should be possible.
@Markus: Till now all 100% OOTB. The hull has got a basic coat of flat black before adding the parts. The added parts still have the original plastic color and aren't painted yet.
22 January 2013, 08:03
AAAAAAAAAAAAAAAAAhhhhhhhhhhhhhhhhhhh (light on) 🙂
Tracks look perfect!!Looking forward to see mooooooore paint!!
22 January 2013, 08:11
And a bit green for Markus! Actually I only wanted to paint the engine grilles before attaching the rear handles, but it ended up with a full layer for the rear hull. The grilles were dry-brushed with green. And it seems, that the black base coat did its work - at least good for grilles. I don't need a washing here, I guess!
22 January 2013, 22:55
And 2 total views added of the JSU on its way to take final shape.
23 January 2013, 00:17
I?ve got a KV-85 on the shelf for my next Russian build. This JSU-122 is inspiring me to perhaps build this model (or something very similar)after the KV 85!
Very nice!
23 January 2013, 05:21
Thanks, Jose!
@James: Looking forward to your Russian monsters. Will surely be great!
23 January 2013, 06:17
Its taking shape!Great,Great,Great.!
Want to build that to (maybe Tamiya)!
23 January 2013, 07:48
Looking forward to that, Markus.
My next JS/JSU/KV will be one with Friul tracks. The tracks of this kit are looking good, but when you move it around on the work-bench, the sound is sooo cheap... and I'm missing the weight...
23 January 2013, 09:41
@Holger: You'll get a video with sound...😉
Time to get some metal on the JSU. I'll try to replicate the fuel drum handles from candle-light aluminium...
23 January 2013, 17:38
Hi Frank, looks better every time. Let me see how you make the fuel drums. Sounds interesting.
23 January 2013, 17:56
You're doing a wonderful job! I really liked what you did for the gun optics - great idea.
23 January 2013, 18:18
Great progres Frank, the scratchbuild is a great improvement, I'm really looking forward to the endresult, deffenetly a beauty Frank
23 January 2013, 19:43
@Acki: Pics of the fuel drums added. As mentioned I am going to replace the handles of the drums by scratch-built aluminium handles. The ends of each drum show a gap, which I close with diluted putty and try to simulate the weld seams. One problem came up - the locator holes for the suspension of the drums are a bit off-set. That needs corrective action...😉
Last but not least I will try to add some more details, but have to check, if it works out as planned. If and once done, pics will follow.
24 January 2013, 06:21
Love the scratch-built aluminium handles. It really comes out nice.
24 January 2013, 09:27
hi Frank. your going forward realy good. What should be the final!😢
24 January 2013, 19:32
I had to get my wife's car running again. It doesn't like short distance rides combined with freezing conditions.
So I only did the handles of the fuel-drums and some more filling. No new pics yet, sorry!
25 January 2013, 06:25
And i had to free my bicycle from snow, this morning... Very uncommon here...😢
25 January 2013, 07:39
Just some snow only, but this weekend is expected to become the coldest weekend for this winter. No problem - I will stay inside and work on the JSU...
25 January 2013, 15:27
Hi, I didn't like the way the fueldrums were simply lying on their rests. So I added the suspension using Evergreen profile, wire and my smallest drill.
26 January 2013, 14:12
Pic 38..aha! I see what you mean Frank. At first I thought that maybe you had put the halves on backwards.
26 January 2013, 14:21
Hi, I changed the suspension for the drums again after I found a opicture of a WW II JSU with the right configuration. Now it is as close as I will come to the real thing. Alternative would have been to remove all the straps from the drums and new ones. Too much for me. Also some lifting rings were added to the engine hatches. After NAVY CIS the JSU will get some more colour and and I will try some wiring e.g. for the lamps.
26 January 2013, 19:17
Hi Frank - I'm always fascinated what you've done with the brush... (and the other things too...) 😄
26 January 2013, 19:49
So many details and crispy little parts!
I`m sure, in your real life you are a Siganese Man!
Sitting behind the oculars and laughing about me!! 🙂
26 January 2013, 22:27
You're kidding me, Dirk! When I think something is missing or wrong I do some research. Sometimes successful, sometimes not. It's all more by chance and surely not as thorough as others do.
Just found out that I have to change the lifting rings again, because they are a bit oversized. So far about the thoroughness of my researches...😉
26 January 2013, 23:55
Ah, sometimes i´d love to have a Siganese for myself! Especially when it comes to bend 1:72 seatbelts!
And Dirk, no he´s not a Siganese, i saw him live and he´s not that small😢
27 January 2013, 09:13
@Holger: 😄 Sometimes it would nice to have small fingers, especially when a small part has jumped the 100th time from the finger into the big nowhere. I don't have a carpet monster, but even on tiles, some parts never come back...
27 January 2013, 09:27
My Mum has a very small dog, i sometimes wish to train him to search for missing kitparts😢 "C´mon, Rommel, seek it seek it!"😢
27 January 2013, 09:32
3 new pics --- I exchanged the lifting rings with ones of smaller diameter. Now I like it better. I've seen that Dragon missed a handle on the rear hull. Guess I'll have to add some more wire there.
[img1]

27 January 2013, 09:42
Thanks, guys! I'll leave the handle on the back off. Some tanks had it, some don't. I'll have other chances on other JS/JSU tanks. Better I add some wires for the lamps and finally... paint, paint, paint...
27 January 2013, 10:17
I like those rings Frank. I've just put a similar section on my KV 85 and have the ring mounts in place. I wish I'd have seen this part of the thread before I glued the mounts to the hull plates, because I want those rings!! I may have to drill out some of the little sponsons/mounts that the rings go through. I'll have to make the rings (thanks for the pic on that) as Trumpeter supplied no rings.
27 January 2013, 14:29
Added some wires to the position lights, headlamp and horn. I was wondering, why Dragon's "wires" for the positionlights were short by just a millimeter till I discovered, that these are armoured hoses, where the wire runs within it. SO I just had to add the mising millimeter by wire of a smaller diameter.
@Markus: It's green all over now!
27 January 2013, 16:27
lookin' good frank, one caveat on those tracks though. My experience with Dragon tracks of this type is to not be bashful about using glue.
28 January 2013, 01:32
Hi James, thanks! Actually the tracks fitted very good without any glue. But once in place I used Tamiya Super Thin Cement and glued all together.
28 January 2013, 06:14
..yeah Frank, I've tried to get by with the same method but somewhere down the road, my clumsiness and stupid fingers caught up with me. I'd have everything looking good, then BAM! sections of track would begin dropping off, mocking me. I?d cry like a little girl and my wife would gather the children and usher them from the room.
Anymore, I start off with real slow drying, orange tube testors as I snap the links together. Even with this, I go back over them with thin CA.....
So now, I soak the tracks with glue (except around the front and rear wheels/sprockets)...and especially the "ground run"...
I'll admit it Frank, track work makes me uneasy......
Anyway, I used your ring technique on my KV 85. The first couple aren't too good, but I soon got the hang of it. Thanks for the post on that!
What's neat is that here at Scalemates, we now have 4 of us working on Soviet armor?
And all of the vehicles are pretty close in terms of hull amenities.
Keep up the good work, I'm following this one!
I'll post some shots of my KV as soon as I get to something worthwhile; which will probably be the PE fenders.
28 January 2013, 06:46
How amazing is that, Frank?
Superdetailing at its best - great job so far! 👍
28 January 2013, 07:46
@James: Just remember - I worked 2 days on the tracks + 1 day break, because the fingers hurt afterwards. It seemed as if there were slight differences in the sprues. The links of some sprues went together like nothing, others needed extreme, fingerhurting pressure. I can understand your frustration.
The rings - actually it isn't my own idea. I saw it somewhere on the internet years ago, but remembered it right in time. The problem is to keep them round, when pushing the ends together.
Yeah, the Russian fever is going around, it seems. It's nice to see, how others work on the same or similar project and share the experiences and ideas. Looking forward to your KV-85. That's also on my list, but may be a bit later.
@Roland: Thanks, Roland! Not as good as your work, but I'm glad, you like it. I'd call that a "bit detailing". Superdetailing goes far beyond and isn't really my thing, I guess.
28 January 2013, 08:36
very impressive Frank , thanks for your photos showing construction process, very inspiring.
28 January 2013, 09:24
@Bill: Thanks a lot!
Today not much progress. Some more pics. Just added the rear light, painted the on-vehicle-tools and tried a kind of weld-seam on the roof ventilator cover. Not successful, but it's a start, since this is my first weld-seam ever.
And whatever I do, my workbench always ends up in a mess after a while.
29 January 2013, 00:12
Its coming together.Great work on the tool handles. 👍
29 January 2013, 07:47
Thanks, Markus! I checked some tips and tricks, before doing them. Not perfect, but it worked out satisfying.
@Jose: Now it comes to last parts and detail work, but before I've got to clean up that workbench mess.
29 January 2013, 08:44
Album info
Construction of the JSU-122S

