

AREA 88 : Kamikaze (Cessna 172)


Comments
1 5 October 2018, 23:26
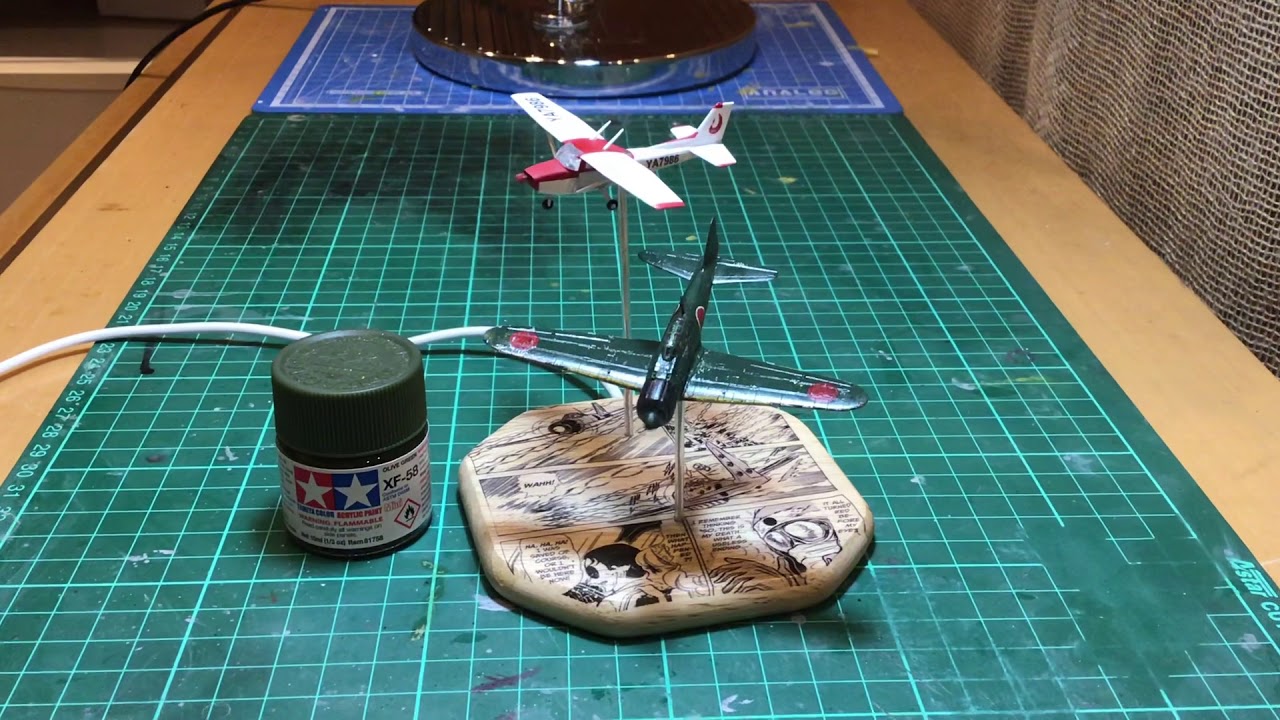
Thanks guys. This is one half of a "then and now" build as part of my 1/144 Area 88 project. The other half if a war-time Zero. I'm still trying to figure out how best to display it so that the "then/now" idea comes through... and not "why is that zero attack that Cessna?!" - which is more likely.
I'm using the mainly pre-assembled F-Toys "kit", but will be modifying it to make it less "pre-painted snap fit", so it's not much of a head start. The biggest challenge so far (right off the bat) is squeezing a round motor into the flatter cowling of the Cessna. It took some very careful sanding and a shaft extension, but I think it'll work. I'm just not sure the safety board would let the passengers sit so close (right on top almost) to the engine... so let's not tell them. 🙂
6 October 2018, 00:01
Classic movie stuff. The time travelled villain from the past, walks black and white in a technicolour world. All my idea of course😄
6 October 2018, 00:41
yeah I like that idea... I'm not sure I can make it look right though... it's pretty much sure people will say "why is that zero painted like that?"
6 October 2018, 01:21
Disaster strikes! Everything was going along so smoothly too... damn. The level of tolerance for the motor is tiny! Using a resistor, I had to lower the RPMs of the tiny DC motor so that it wouldn't shake the whole plane apart (or risk getting crushed by my wife's foot because of the buzzing noise). However, this weakened it to the point that ANY contact with the shaft will stop it from spinning, That, coupled with the very tight quarters for the motor given the cesna's Rather flat cowling made it necessary to be VERY precise with the placement.
So, of course, I ended up getting something misaligned during the glueing process and then had to try and rip apart bits that had CA glue... some of which leaked out the wire hole and onto the tail. I was left with some glued on fingerprints on the tail, and a chuck of plastic mysteriously missing (does CA glue eat styrene?). I also managed to slice a large gouge into the underside during the panic session.
I guess it was a good thing I was planning to sand the seams anyway... still I'm making this much harde/worse than it needed to be, and that's frustrating.
9 October 2018, 08:30
at the end, it will look really good as usual. what kind of voltage you use with those tiny motors? do you need some resistors to avoid frying them?
and going back to modelling, how good are those F-Toys? nice detail or is it very simple?
9 October 2018, 21:05
Let's hope I can recover it. While sanding I also managed to crack but not fully break the tail fin about halfway up. I'm on the razor's edge of scrapping it, ordering a new one and trying again. Let's just hope nothing else major goes wrong.
The DC motors run off 3.2v power - basically one of the coin batteries. However, given the lack of good hiding spaces on the thin wooden bases I've been using for these builds (unlike the thicker ones I've reserved for my Tintin builds), I've converted them to 5v USB plugs. So yes, you need to wire in some resistance. I would've anyway, because even at 3v the props spin too fast, so I think I'm using 220ohm resistors to try and slow down the RPMs.
As for the kits... we'll, if you've seen a Platz kit, you've seen an F-Toys... toy. The details are quite good, except around some parts where it's been sacrificed for "snap together" engineering. With the Cessna, my biggest complaint is the front windshield - there's four large posts on the inside corners used to attach it to the fuselage. They distort the image seen through the large windscreen, so I cut them out. My other, more minor complaint is that the paint job is thick and factory applied. It's good, but quite soft around the edges. What I should have done is soak all the parts in... something... lacquer thinner? first and then started as normal.
9 October 2018, 23:12
If paint is enamel you could use brake fluid, DOT 3 ,SAE J1703, ISO class 3.
10 October 2018, 05:57
Thanks Alex-Ovidiu! I'm not sure what will work. I tried Tamiya's lacquer and enamel thinners to little effect... although the lacquer did loosen it up eventually. I was thinking oven cleaner maybe... but brake fluid sounds like it's worth a shot too.
10 October 2018, 06:14
Greg, if you are going to replace te plane, you can experiment all you want on this one.
Keep it up, you can do it!
10 October 2018, 06:59
Greg , first this method works for sure on enamel paints , as I've used before to clean paint (mostly revell) from models. It has the great advantage that it doesn't attack plastic. Things work like this : you take the model, you put it in brake fluid and leave it for 1-2 days to soak. Model must be submerged in brake fluid. Very important is that it must be DOT 3 type, others don't work. I hope this helps! Good luck!
10 October 2018, 15:00
I tried with Dettol, nice result, but truly stinks. Better if you leave it in close container or outdoors
10 October 2018, 18:44
Thanks for that. I knocked over a bottle of Tamiya extra thin glue last night, so "modeling smells" are a bit of a touchy subject at the moment in my house.😉
Didn't do much work on this project, just applied some putty to the upper surface where the gap between the wing and the canopy was showing. I tried to apply a bit of Tamiya extra thin glue to close the gap as much as possible first. It helped, and I put the glue off to the side while I tried clamp it down... and three seconds later I knocked it over reaching for the putty. After the clean up I decided to take a break...😉
10 October 2018, 22:39
Welcome to the club. I knocked a bottle of Alclad Chrome on it's side. My cutting mat was full of clamps with just painted parts for the Honda. Luckily no parts were repainted. I do have a couple of shiny clamps now 😄
11 October 2018, 05:35
I did knock a bottle of alclad on a wooden table some time ago, not exactly shinny anymore 😛 thank god it was a old table 😄 😄
11 October 2018, 06:54
After all the talk of knocking over stuff, I was very careful while painting the figures. At 1/144 they're very rough, but I think they actually look a bit like Shin, Ryoko and her father Zenzou... well, a bit!
15 October 2018, 15:21
Ok... after totalling wrecking the first attempt at this one... I'm back in action. This time I used Spanjaard's suggestion to extend the motor shaft using the metal tube from a syringe. With a bit of solder to weld it together, it works well. With the motor sitting so far back it will disrupt the passenger cabin - basically getting rid of the seats completely - but it' much better than trying to cram the too big motor under the hood.
Just slapping together the pre-painted kit feels too much like cheating, so I'm trying to find something that will remove the F-Toys paint without eating the plastic underneath. Luckily I have a wrecked first kit to use as a test subject...😉
26 November 2018, 23:10
Luckily I found a couple that were both the right diameter and had no pointy end. Safety is our priority!
27 November 2018, 00:36
Lots of scrubbing with Tamiya lacquer thinner, but I finally got the thick paint off the fuselage. Still need to do the wing, but I didn't want to pass out from the fumes.
28 November 2018, 15:50
Ok. Got it all buttoned up and looking like a Cessna now. I'm disappointed that there's no room left in the cabin for for the figures I painted... but oh well...
29 November 2018, 15:09
He's already figured it out Martin... yes indeed it's a homemade decal. Very simple really, just print out the decal on the inkjet printer using transparent paper... spray and then apply. I use a fair bit of Tamiya Mark Set to make sure it doesn't lift off the wood but that's all there is too it. I actually started work on the Tintin tanker because I needed to fill out some space when printing this decal (you don't want to waste expensive paper, so you just fill at least the width of the page and then cut). So I looked around for something to add and decided to go with the Loch Lomond Whisky wordmark.
Of course once I had the Loch Lomond decal... I started eyeing the tanker kit... and here we are.😉
29 November 2018, 22:33
what do you spray with? special product? not water based i suppose or the ink may run
29 November 2018, 22:36
Ah there it is the Cessna Bird.. really an interesting combination 👍
29 November 2018, 22:41
It's not one you see very often. I was actually surprised at how much small the Cessna is than the Zero. I'm not sure why I was though... very different planes built at very different times... but still. It really makes me a bit upset that I couldn't squeeze the figures into the cabin, but after I ended up basically decapitating them to make them fit... there was really no point. From viewing distance it'll be more important for the propellor to spin than see the people inside, so I had to make a choice. Oh well.
Spanjaard - I use a Korean brand of inkjet decal paper name InCal - kmall24.com/incal-wa..ser-clear-white.html - it works pretty well. They have their own spray to coat the printed sheet, but I don't think it's particularly special. Any clear coat lacquer spray should work. Very light coats and nothing water based because yes, the ink does float right off (I tried it).
29 November 2018, 23:15
thanks Greg, i think i will wait until i get a laser color printer... and then i will certainly try. i could try with the B/W though.....
29 November 2018, 23:22
I operate under battlefield conditions... make do with what you've got on hand...😉
30 November 2018, 00:12
So I went through all the trouble to scrub off the white pre-paint from the white plastic, so I could paint it... white. It made more sense in my head.😉
30 November 2018, 14:55
Spanjaard, I had once used a laser color printer for decals but the ink layer was too thin and did not cover well thé background color . I now use Revell clear varnish to finish inkjet printer decals. On clear sheet I print the decals in mirror image , and put them backward on the model, they stick better.
1 December 2018, 12:33
You'd think 2kg of tape would be enough to mask a 1/144 Cessna... but apparently it wasn't...
Need to take a step back and come back tomorrow I think... grrrr...
2 December 2018, 14:08
Thanks Lode... one can only hope and try. Anyway, back at it tonight. I redid the masking and redid the red paint. It took care of the underspray. Once it's dry tomorrow I'll tackle the overspray. If that can be accomplished it should be a quick roll downhill after that.
Famous last words...
3 December 2018, 14:23
When you say underspray, what do you mean? Like did you not get the coverage you were looking for? Overspray I get. LOL
3 December 2018, 17:19
there's a fine line between a quick roll downhill and things snowballing out of control....pass the popcorn...I'm in 😄
3 December 2018, 17:54
underspray=bleeding under the mask. overspraying=masking 10cm, and getting paint at 11cm... well, in this baby, maybe millimiters😉
in picture 25, red line much almost at the bottom, is the overspray, right?
3 December 2018, 20:18
Well, gentlemen, what I mean is:
a) bleeding is when you lay down a strip of tape, paint along the near edge, lift the tape and then discover you hadn't quite pressed the tape down properly (usually because of some bit sticking out that you tried to just tape over) and that some paint has leaked under the tape into an area you were trying to cover.
b) overspray is basically insufficient masking. The part you masked worked fine (no bleed) so when you pull the tape the line is fine... then you notice a light misting of red over white wings in an area you hadn't masked because you thought "I'll be careful... no paint will get over there". To me, this also includes parts you THOUGHT you had properly masked, but some gap has allowed paint to travel in - but that's a slight distinction from a bleed and is usually based on how far away from the intended paint line it is.
c) underspray is just that. I thought I'd got complete coverage, but pulled the tape and discovered some nooks and crannies didn't get hit (or hit enough) with the paint. In this case it's basically a white trim around the windows that didn't get covered in red because my masking was too robust... and an uneven streak of white along the top of the red cabin where it meets the white underside of the wing. My tape must've not been lying flat so some of the part that was supposed to be red was covered accidentally and thus remained white.
3 December 2018, 23:12
In the last picture, you can clearly see both bleeding and overspray. The line between the red and the white paint along the engine cowling is not as sharp as I would've liked... and you can also see the paint that extended past the tape line because I obviously had a gap in the tape.
3 December 2018, 23:16
Alright gents... feast your eyes. A few homemade decals and we're done. I was pleased with how the tiny little Yamato Air Lines (YAL) logo came out on the tail. But I'm even more pleased with my own cleverness on the registration number. YA7986. Yamato Airlines 1979-86... the original run of the Area 88 manga publication.
5 December 2018, 14:20
Oh, and as usual... just to prove that the motors actually work...
Youtube Video
5 December 2018, 15:54
Thanks guys! I'm fairly happy with the result. I'm just glad that I think my work on the Cessnaseems to have improved it. Since it was pre-painted, I was worried my work wouldn't be able to bring it back at least to the level it started from when I opened the box.
Now I'm not sure which one of my in progress builds will take the pole position... the B-1/F-4E combo? Or the Tintin train tank? Or the Supermarine S.7? Hmmm...
5 December 2018, 21:29
Yep, gotta with Spanjaard on that one. 😄
And absolutely awesome as always. I will be truly picking your brain once I get to the lighting stage on the fire truck. Which actually shouldnt be too much longer. Maybe a week.
5 December 2018, 22:21
Once again... added a few final pics while uploading to my blog - strobez.ca/wp/index...144-kamikaze-cessna/ - which features a few of my comments about the build, but also the few pages of the Area 88 manga upon which the build project is based.
18 December 2018, 09:51
Album info
A 1/144 Cessna Skyhawk, the modern-day half of this duo-build project along with a 1/144 Zero.


