
Thread started by RobiH
added a new photoalbum.


55 20 April, 16:48
Paintwork, weathering, accessories, position of figures: everything just fine!
1 21 April, 10:01
Wow!! God, I'm so jealous! Still I'm but a baby in modelling terms. I be a toddler soon hopefully. Then a child. Then I might even make teenager! lol
Great work Robert
Ps you bought the figures separately?
1 25 April, 06:02
Do you do YouTube videos? I've got so many questions. What's the part hanging in the back of the turret for example?
25 April, 06:08
On both sides in the grab rails, you mean? They're two links of spare track.
1 25 April, 09:49
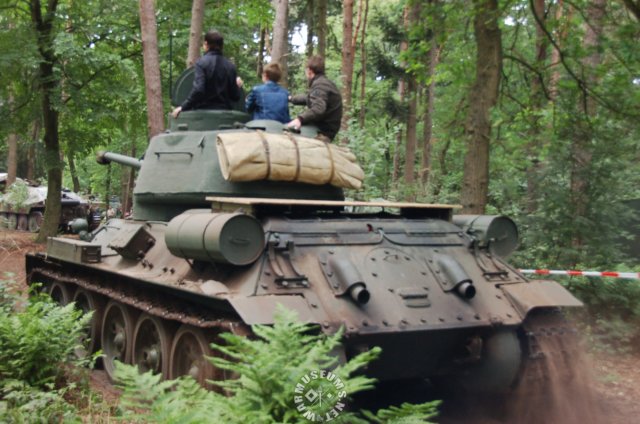
@Danny, many thanks, you make a good job !!! no one is born a master.... I don't have a YT channel or similar, no drive and time for that, I'm already so slow with the build of a kit, also patience and research take time. On the back of the turret are lashing straps for a tarpaulin or something similar (is that what you mean?). I always make research and watch historical photos and film footage to get ideas that can be applied to the model. The two top figures are from Master Box set MB3568, the driver is a left over one from an old T-34 Tamiya kit (which I never build because of a missing sprue) [img1] [img2]


2 25 April, 12:04
@jakko and @Robert H, you see the 6 very small u shaped parts? One set angled upwards and the bottom set angled downwards? Where the decal is? Or would be if followed the Airfix guide? Where it says 329 on the drawings, you have a square item on top of the small u shaped parts. Are they spare track as Jakko suggests? They're not the same colour as the rest of the track. I don't think. Actually I think it is a tarp as you said Robert. And you should know 🙂
By the way that's the first t34 pic I've seen with the fuel tank slots without the drums attached. I just watched a Russian film called Iron Fury with a T34 that was sans fuel tanks and it threw me for a moment. Since beginning modelling I'm constantly looking at the vehicles and boring my brother about it all. 😂
1 25 April, 17:46
Do you mean parts M6 in steps 11 and 13? Those are the loops that the straps go through that Robert mentions. In the photo he posted above of the real tanks, the rolled-up tarp (or whatever) is tied to them by means of the three straps you can see on it.
2 25 April, 17:59
@Danny - Jakko described it well what the part no. M6 are and were used for. But I don't know what you mean... like "329", which square item?? Could you provide the parts and building steps numbers to make it a bit more specific? another pic of the rear view of a museum T-34, mounting brackets for the rear fuel barrels and a attached tarp on the rear of the turret [img1]
1 26 April, 09:53
I think Danny means the turret number on the rear, per page 10 of the Airfix kit instructions, though the number is actually 342 🙂.
2 26 April, 10:12
Yes the decal number is 342. I'm sorry I didn't get notifications for your replies. I can see now it is a tarp on the back of your turret Robert. On my build I'm just having the decal but the small u shaped brackets need to be added after the decal and some painted white to make it look realistic.
I hope I get as good as the both of you. One day maybe. 🙂
1 5 May, 11:38
@Robert H. Sorry I missed your comment somehow. Yes it was the small brackets that are used to hold tarps like in your pic. I couldn't work out what they were used for. Now I know 🙂
1 6 May, 00:55
I'm sorry I'm so slow. Got some health issues at the moment but I'll pull my finger out asap 🙂
You know on the edges of the wheel rims, edges of the tracks, etc where it looks like bare metal has started to show thru the paintwork? Is that done by dry brushing with a metallic paint? Or with pencil? I know some use a graphite pencil to give that effect. It looks good 🙂
7 May, 04:12
You could do either, and you can also just paint (rather than drybrush) them with a metal colour. Though wheels generally only show bare metal where the steel rubs against the track, so on a T-34 that would be the rims on the inside, the ones facing the other wheel, not the outside.
As for the paint, I prefer Humbrol Polished Steel for things like this: brush it on, wait for it to dry and you get a metallic medium grey. Then take a soft toothbrush (I suggest buying one specifically for this rather than taking a used one) and buff it up with that.
1 7 May, 08:40
So you take a little of the humbrol brushed steel paint off with the (new) soft toothbrush?
By the way I'm glad some good modellers like yourself still use humbrol for some things. I was beginning to think it was just us amateurs 😉 though I do have a few others now. Especially AK interactive and Ammo Mig. Actually looking at all my German AFV kits I'm gonna need a gallon drum of dunkelgelb!! Lol
7 May, 12:54
The thing about the Polished Steel is that the clue is in the name 🙂 It's dull when you apply it, but rub it with a brush or a cloth, and it becomes shiny like real polished metal. Because, I suspect, that's what it is: paint with metal particles in it fine enough that you can buff them up.
As for Humbrol: I buy OLD tins of Humbrol any time I come across them — anything from before Super Enamel is excellent paint, but you obviously have to use it sparingly because every time you use it you're depleting what remains of it in the world 🙂 I wouldn't use it to paint a whole model with, but it's one of the best types of paint for drybrushing you can get. The newer types of Humbrol, from 1997 or so onward, are OK, but the older ones are simply better. (How to recognise old tins, you ask? Easy: robdebie.home.xs4all.nl/models/humbrol.htm 🙂)
1 7 May, 17:18
I´ve lot's of Humbrol tins (hundreds, old and recent). I really like them and I still use them a lot. Thank you for sharing 👍
I've also some tamiyas and one vallejo primer 😄
2 7 May, 21:48
I must admit when I was a kid all we had was humbrol enamels in the tins (I still have a sand colour one Jakko lol). And it really put me off. The cleaning up. I do prefer the acrylics. 🙂
1 8 May, 11:58