

German WW2 80cm Railway gun "Dora"
- Scale:
- 1:72
- Status:
- On hold
- Started:
- December 17, 2018
News: I've finally found out, that there are 72 handwheels on each of the four sides. A photo show them to be numbered up to 72. And, that also means, there are sets of four handwheels inbetween the pistons on the side, and not just three as I once thought, this is also made clear in photo in the book on page 108. 🙂
Warning: This kit seems to be such a mess. The weird perspective in photos makes this cannon seem larger than it is.
Might as well try scratch build 95% of it. I have asked Hobby Boss for at least one extra sprue with the hand wheels, so that I can at least have enough hand wheels to glue on when these are visible from outside the model.
Project inventory
Full kits
 Railway Gun \"Dora\" (HobbyBoss 82911)")
/search.php?q=*&fkMATEID[]=28845&showast=no&fkWORKBENCH[]=WB28845&page=projects&project=51831
Photoalbums
90 images
German WW2 80cm Railway gun "Dora", with corrections
1:72
I have added another image, showing the photo I found very relevant for figuring out this. Both sides, measures 9mm, wit...


Project: German WW2 80cm Railway gun "Dora"
Comments
3 17 December 2018, 14:50
So.. I hear there are corrections to be made to this kit. I better hop to it. In the beginning, I will rely on the videos by "Nigel's modeling bench" on youtube, and then I will have a look for myself when I get a book I ordered. I think I will do some other changes to the barrel.
Disclaimer: I don't quite know how to best correct the Hobby Boss kit, but I will try.
So far: I ordered a pack of six separate metal rails of the type O gauge zink silver flat bottom rails (Peco IL-7FB), something in between the possibly over-sized rails and the most realistic sized rails, to try make the new metal rail fit to the plastic sleepers and other track parts. I ordered a book in German with lots of photos which will arrive later this week. I have started to investigate shortening the barrel and tweak all the wheels. I will try to fix the shape of the eight carriages if I can figure out how, or at least add some missing detailing with styrene. I will try add details to the breech, and more. I might attempt to correct the lower part of the main body if it makes any sense to me. The height of the hand railing is also something that is suspected to be a little wrong.
17 December 2018, 15:08
It is a nice thought, but that would be a lot of work. The important thing for me is to try figure out the basic stuff. Although all of this might look complicated, doing one thing at a time will eventually lead to completion. 🙂 A little here and there and the kit would be done in no time.
The most important correction is probably the shortening of the barrel, and I thought it was a good idea to make this drawing to bring some sense to the chaos of all the different variables that make up the carriages and how it all looks.
I will probably find more things to fix and I will try mention them, but I don't think I will make some definite build guide, unless maybe I can try keep track of the changes I make.
26 December 2018, 21:13
Edited.. Heh, I will have to keep scratching my head about this.
Uuuh. Looking at proportions of a drawing and the kit, now suspect that the kit is ca 0.72 m too short in the middle in total. As if someone put a ruler across that one drawing in a book, and measured the bottom length, but failed to see that the two pages showing the drawing is shortened because of the way the two pages are put into the book. Hm, I think that would also explain why the kit seemed too tall. The drawing that is spanning two pages at the center, would show undistorted height, but a too-short length, because of the two page span.
Comparing the kit top, to the drawing in the book, I might get lucky, as it seems that the top part is proportional to that drawing. Unsure about the ass end of the top side.
This is so exciting! 😄 It is close to 03:30 in the middle of the night, time to go to bed.
30 December 2018, 02:18
I am discovering more things. I have good hope of making all of these changes. Top part of cannon, is not supposed to start at the front edge, but have an inset of about 5mm according to photos.
In sketch version 20, I have arranged the numerous hand wheels in sequence, and the spans in between the hand wheels was made equal. I added a third hand wheel where I once thought there were only two, and fortunately it made sense to also widen main shape by 5 mm, perhaps two fixes in one if I am a little lucky.
I think, if I turn out to be a little lucky here, if extending the main shape by 1 cm in total (0.72m in 1:1), I can perhaps just extend the big floor on rear top, by same amount.
Full png file: ibb.co/LZHdJMX (re-re-re-re-re-re-uploaded)
Note: The German book on railway cannons, on page 160-161, have a side view plan drawing, however this looks like a concept drawing, and not the real thing, so I don't trust the measurements given. Maybe just a related project.
Same drawing, but with the other half added to show the full length of the main shape.
ibb.co/P10fsT6
When switching over from Photoshop to GIMP (free) the transparency in the layers got messed up and pixels for antialised lines for the wheels got shifted. Have to clean that up later. Unsure if I want to re-work the wheel area on the carriages more, as it would probably require further changes to the kit parts, which may or may not be difficult.
30 December 2018, 14:34
Hrm..
So.. looking at the plan drawing on page 160-161 in that German book on Railway cannons, it is all too clear that this particular drawing is not the size of the Dora cannon. More like 81% of the Dora (or, some parts are). And clearly the shape of the top carriages look off on that drawing.
The tallest part of the ends of the main body that stretches between all the carriages, are clearly as tall as a human. When I convert the numbers given on the plan drawings in the book, that end, is merely about 81% of what was expected, and low compared to the height of a human figure, even if that human figure on the photo was as low as 160 cm tall, the end would be no taller than 160, around 155 cm.
At least the kit part on the ends, looks about the correct size, in simply assuming that the human figure is 183 cm tall.
I can't help wonder if photos possibly could have been be doctored, or if maybe they used oddly tall/low figures on some of the photos intentionally.
*shrugs*
The quest continues to try figure this all out.
I had to start making a larger drawing, to better get to draw those numerous hand wheels along the side of the main shape.
31 December 2018, 13:05
Soon, I will get to continue and eventually finish the detail drawings needed to make the desired changes to this kit, without making a mess. 🙂 Project having been on pause for about a year now. The model itself will require some planning and changing, but it looks to me it will be fairly easy, if only a little time consuming, expecting to be re-using a lot of the kit parts. I think it will be worth it.
As for the most elaborate change, basically, the two larger parts will have to be reshaped a little, removing a lot of detaling, and re-building that detailing with styrene, starting with a flat strip of "metal plating" that goes across the whole thing on the sides which is also a base for all the numberous tiny hand wheels. From that, if placed accurate, the rest of the details will follow. I will consider 3D printing some of the numerous tiny parts, but eh, a bit expensive and doens't improve the look that much I think (the tiny round base for each hand wheel).
The tricky part is making the accurate drawing based on nothing by more or less unclear photos in a book.
For the 24 pistons on the sides, I have ordred Albion Alloy brass tubes in imperial measurement 5/32 and 3/16. This should be a nice fit, for having one cylinder fit into the other, and also fit the desired size of the pistons on the model. Didn't cost too much, at least being something affordable. One pack of each below, will do nicely.
ALBBT5 - Albion Alloys - 12" x 3/16" Round Brass Tube (3 pieces) # BT5 - £ 4.32
ALBBT4 - Albion Alloys - 12" x 5/32" Round Brass Tube (4 pieces) # BT4 - £ 3.94
27 September 2019, 13:04
I like your project. I have this baby in scale 1/35 in my stash. Do you have an idea what was used as a method of propulsion for this gun? May is be electric or perhaps a locomotive?
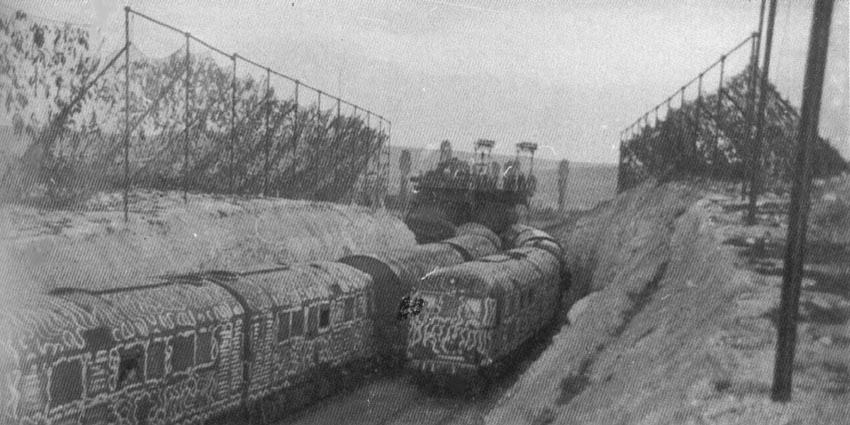
11 March 2021, 06:01
In my book on this subject, they seemed to have used modern looking diesel locomotives. On page 165 in this German book on railway cannons, it says D 311 locomotive. So because of the whole thing being built/assembled onto two railroad tracks, they used two or maybe four locomotives I guess, unsure if they had locomotives on both front and rear side of the cannon after it was assembled onto the train tracks.
[img1]
11 March 2021, 08:51
To clarify, this project, is at this point, a 95% scratchbuild type of project. 🙂 So let's not get carried away by upvoting this project. 🙂
Project is currently on hold, because I need to scratchbuild a lot of parts using a lathe machine, which I do not currently own.
11 March 2021, 13:52
No pressure! We are here to have fun.
Reference the propulsion: Thank you for the info. I think that I have the same reference book!
Best regards
11 March 2021, 18:13