

He-219 "Uhu" Groupbuild


Коментари
20 July 2015, 21:48
This is an image from the Zoukei-Mura web site of the aircraft I am going to attempt in the Groupbuild. 🙂
20 July 2015, 21:51
NO no, just an image of a completed one from the ZM website.
zoukeimura.co.jp/en/..s/sws11_ta152h0.html
21 July 2015, 10:07
This is where it lives, @ Zoukei-Mura. Take a look. 🙂
zoukeimura.co.jp/en/photogallery/pg_sws06.html
21 July 2015, 19:44
It is the prototype kit build for Zoukei-mura´s Concept Note book by my good French friend Marc Guerrero. The Concept Note book is a must-have for anybody interested or/and building a ZM kit! 🙂
22 July 2015, 11:43
Thomas, Thanks mate, and the concept notes are on their way to me as well. 🙂
I still read the Ho-229's notes as it sits now on my coffee table. :-/
22 July 2015, 11:52
Thomas, you haven't built the "Owl" as yet or have you. ?
Because I would love to bounce some ideas off you about the build if you have.
But even if you haven't, I will still love to tap into your skill cabinet for some advice and tips mate. 🙂
It looks to be so intense in all aspects of its detail, I just know I will be as gentle with it as possible, meaning, nothing radical, like a folded wreck on the side of a runway somewhere. lol :-/
I hope the ZM crew have had a good time in the USA at the IPMS convention.!
Catch you later mate. 🙂 👍
23 July 2015, 22:38
Damn Kerry! I'm speechless. You cease to amaze me with your marvelous works!
24 July 2015, 01:30
Clifford. !! If your referring to the image at the start, It is NOT mine, but a "lead in" image for the group build from the ZM web site.:-/
But thanks for the amazed look on your face LOL. 🙂 👍
24 July 2015, 01:48
@Rui S, I will if I can get my hands on one. I will have to beg the boss. (wife). LOL.
24 July 2015, 01:51
Kezza, I own two He 219´s but so far have not started one of them. If possible add the book of Daniel Zamarbide to your Concept Note book. Daniel is a stunning modeller and his way to paint the He 219 is impressive:
christian-schmidt.co..9057&language=en
24 July 2015, 05:53
Thomas, It would be a real honour to have you join our group build my friend.
A master builder of your stature would bring a level of excellence I am sure all would be happy to experience and be part of. 🙂
Would you like to. ? Please. ?
🙂 👍
24 July 2015, 07:21
And it would be good to see you too Mike. Have you signed in on the build as yet ?
24 July 2015, 10:27
Not being able to join in I would like to know if there is a link to this GB?!?
24 July 2015, 12:50
Hi Thomas!
You wanna join? Cool!😄 Please sign up here: He-219 "Uhu" Groupbuild (13. September, )
24 July 2015, 13:54
Ironically enough I've just been offered a swap for the 1/48th Dragon Ju188 Avenger I won for two 1/48 kits, a Dragon Horten and a Tamiya He219 UHU !! 🙂
Destiny calling ? 😄
What should I do ??
24 July 2015, 14:37
I am going to try and get ahold of the Revell 1/32 HE-219. I just sent Hunter Cummings my 1/32 scale kettengrad, go figure. I actually forgot I had 2 1/32 ME-262's in my stash. DUH!!!
25 July 2015, 02:32
The correct German word is "Kettenkrad". There is a nice website on this amazing vehicle:
kettenkrad.de/index_e.htm
25 July 2015, 08:12
I still need to move my modeling stuff from Belgium but I will join after that ! Cheers.
25 July 2015, 11:30
The build will be a long one Pierre. So no need to rush anything you are doing, and we ain't goin' no where. LOL
25 July 2015, 12:10
I am checking with Vegard to see when he will be ready for the start. 🙂
12 September 2015, 10:25
........... "I can smell a change in the air guys"
Vegan diets can be brutal,
you know "they're" strong when the dog winces 🙂
12 September 2015, 11:50
The opening image is just from the ZM web site and nothing we have done as yet, but now it's open season on the Uhu. 🙂
13 September 2015, 13:30
I did a swap recently for my Dragon Ju188 1/48 kit for a Dragon Ho229 and a Tamiya He219 UHU, both 1/48, both with some extra photoetch and some Master brass antennas 🙂
Both are nice kits too.
So I guess YooHoo, I gotta UHU too 😄
13 September 2015, 13:44
Ooooh, almost a UHU train 🙂
The Tamiya kit has some nice features, the metal cockpit bay particularly,
this aint gonna be a tail sitter for sure 😄
Although the way it handles the front ariels is asking to broken during the build,
some pre emptive cutting might be prudent there. Interesting plane though 🙂
13 September 2015, 14:56
Hello Uhu builders! My Tamiya Uhu is still in the box since the 1990's...
13 September 2015, 16:26
Good morning all you fantastic people. 🙂 I think we are about to have some fun. hahahahaha. 🙂 👍
13 September 2015, 20:30
Thats awesome. Hopefully i find time to start with my 219 in 3 weeks
14 September 2015, 03:07
All the time in the world for you to be part of the GB Soeren. No rush. 🙂
14 September 2015, 03:36
OK. I will make my next build the 219 too (after I finish my Sabre). How do I join this GB?
14 September 2015, 04:08
Join the event under He-219 "Uhu" Groupbuild (13. September, )
@ Kerry
Yeah I know, but still not sure if I really should do it 😛
So many new stuff in this build and still not 100% comfortable currently with my airbrush....
14 September 2015, 04:21
John E, just by being here you are already part of the build. 🙂
No one is excluded and as long as you have an unbuilt He-219 of any scale, your in. !!!
Welcome mate. 🙂
And Soeren, I have never become comfortable with any airbrush I have owned or used, as there is always something that will crop up when you least want or expect it. So join in any way mate. 🙂
14 September 2015, 05:27
I m already in! 🙂
Till now im comfortable with mine, but I will get a second one this week.
I meant more the work with the color! Gunze works quite ok now, after a little bit testing yesterday, but the AK , MiG and Vallejo colors are not really friendly to me in the moment 😛
14 September 2015, 05:34
Soeren, are you using the correct diluent for Vallejo (or AK or MIG) ? Sometimes this is the key for a succesful paint job. Try to use the recommended thinner of each brand. Cheers.
14 September 2015, 08:10
I do.
Ive every thinner for each of theses brands 🙂 and even the Flow Improver for Vallejo, but sadly it isnt really working.
So a lot of practice and training ahead of me! 🙂 Luckily Gunze now works quite well with the use of the Leveling Thinner.
14 September 2015, 08:15
I remember that to paint my I-16 I used Vallejo paints and it was my frist experience. It was not easy to find how to paint with them. As I remember I used more than 1 bar and 50% of paint / 50% of thinner using a Sparmax DH-2 airbrush. Cheers.
14 September 2015, 09:20
Thx Pierre!
Yeah I will give Vallejo a new try as soon as I got my Hansa 281, because I head that they are more difficout to use with a Evolution.
14 September 2015, 09:58
Now I'm using also an Evolution, and never tried Vallejo paint using it. BTW, with my Evolution I've already used the following with no problems : Humbrol, Tamiya, Gunze, Xtracolor, Modelworld, AK (Xtreme Metal), Alclad and AKAH colors. Cheers, Pierre.
14 September 2015, 11:43
I only bought one color set vom Vallejo for the Luftwaffe.
But like I said, I also know a lot of people who are using those colors with great success.
So I think it willbe possible with some more practice😉
The first step is now to get more comfortable with the Gunze colors so that I can also paint the Luftwaffe camos without speckels 🙂
14 September 2015, 11:47
Well, I have started doing the engines and all that goes on them. 🙂
14 September 2015, 21:20
Vegard Pedersen started the build here just yesterday Mike, and It is, I believe, something the other participants were keeping an eye on for the start too, and as Vegard was also waiting for his Uhu, I was also waiting for his indication that it was happening. :-/
14 September 2015, 23:00
@Michael Some people have started already, but most people starts building this week, maybe even next. No need to have everyone start at the same hour when the build is going for at least 6 months! 😄
14 September 2015, 23:24
Fair call Vegard, and thanks for clearing that up for me too mate. Cheers. 👍
14 September 2015, 23:27
I will start this weekend. Nice to see the ZM kit parts because they are very detailed and I will try to improve some Dragon parts based on them. Cheers.
15 September 2015, 05:18
Cant wait to see your build Pierre! 🙂 I will probably learn a lot of it and will use that then on my kit! 🙂
15 September 2015, 05:24
Thanks Soeren, happy to know my build will help you, and I'm sure I will use your build in the same way ! Cheers.
15 September 2015, 05:26
😢 I must admit that I dont know for what you will use mine, but thanks 😛 😛
15 September 2015, 05:28
Looking at your Horten for exemple I can see you did a good job on it, so I beleive I will learn things with your He-219 build for sure.😉
15 September 2015, 05:31
😢 Thanks.
But this build will be a new territory at all : Resin parts (wheels), PE parts (cockpit - antenna) and also the camo will be more than challanging... 🙁
I think the camo in 72 is the step of which Im most afraid of...
15 September 2015, 05:33
This will be something new for all of us to share and learn with.
Thanks for making it so interesting guys.
I hope it will be an enjoyable experience for the novice and those more experienced of us. 🙂 👍
15 September 2015, 06:38
Im 100% sure that it will be or better said: It already is!
Scalemates is becoming more and more a really great community! At first it was only a page to manage the stash etc for me, but now its a site were we re planning stuff like this! 🙂
We definitely need more Groupbuilds 😛
15 September 2015, 06:45
I have posted an image of the piping and tubing that is for the engine build. Please take extreme care when handling these parts if you are building the Zoukei-Mura kit.
There is a fair bit of a clean up to do, and I used a brand new scalpel blade to effect the trimming, as the cutting off of these flow gate excess points will not take heavy handed treatment. 🙂
15 September 2015, 06:50
Soeren, I still haven't decided exactly how I will present the Owl, but as long as I have all the parts available to make the engines look the part, I might as well use them.🙂
It would be a pity to not show what is in the kit, but I will enjoy what there is for the moment. 🙂 👍
I am really looking forward to see what you brings to the table. 🙂
15 September 2015, 07:18
Yeah and the ZM kit offers so much especially in 32 you can show nearlly everything! 🙂
In 72 this is a lot more harder!
15 September 2015, 07:19
Hi Soeren, so for PE parts just be carefull to do not bend them if it is not necessary. The antennas are for sure very small parts so try to cut them using a glass support and using a new blade. For resin parts, once you have removed them from their 'sprue', try to eliminate any 'bubble' using some Mr surface for exemple. When sanding the wheels attention to have the correct angle related to the tarmac. To glue them use SUPERGLUE. Regarding the camo I'm affraid also just like you.....I don't know how I will proceed to paint the model....😉
15 September 2015, 09:15
Thx for the help Pierre! 🙂 I will probably come back to you as soon I start my Uhu! 🙂
15 September 2015, 10:20
All good advice in this build and Soeren, you are for sure going to learn a lot of new skills. 🙂
15 September 2015, 10:28
Im sure about that! 🙂 And really looking forward for it! 🙂
I will probably build 2 He 219, if ive enough time and the first kit is finished (and good 😛 )
15 September 2015, 10:29
😢 At least you have faith in that 😛 😛
But at first Im more curious about your ZM kit!!! If it will be nearly as good as the Ho 229, we will have another show runner!
15 September 2015, 10:49
You are too kind Soeren, But thanks for the vote of confidence mate. 🙂
15 September 2015, 11:04
🙂 I will also change my He 219 project to he A-7 so that we have more than one He 219 type of Dragon in the GB! 🙂
15 September 2015, 11:07
James, I appreciate your comments mate, and from what I can gather from the research on the Damler-Benze engines, they were certainly complex indeed, but the colouring of the oil and coolant piping has me a little concerned, as I have not been able to clarify wether they were as brightly done as depicted in some of the other builds I have seen. :-/
🙂
16 September 2015, 22:06
I agree with you James. Impressive as usual Kezza, and the pistons in That 1/32 kit??? never saw that in AFV...
16 September 2015, 22:10
Rui, I seriously considered having one engine "Exposed" like in a 'cutaway' you see in museums. This sort of detail is something I have come to 'expect' from the folks @ ZM. 🙂
16 September 2015, 22:15
Yah, good consideration. ZM rocks hein? Expensive but with high quality in return.
16 September 2015, 22:25
James, I think that is a good suggestion mate, but I am still wondering if the original colours of these items were like what is portrayed in some ZM builds, if you know what I mean. 🙂
16 September 2015, 23:53
...... the approval of ones peers is a mainstay of societal congress and congruity,
we all seek it one way or another regardless of whether we like to admit to it or not.
It's one of the by products of being social animals😉 😄
17 September 2015, 02:58
Kerry, it looks like you're having a lot of fun with those engines, despite the piping color. 😉
17 September 2015, 03:41
John, as I was saying to Rui S before, I can always depend on the ZM kits to give you the best detail OOTB of any kits around. 🙂
You cant help but take that little more time and effort to compliment what they have produced for us. 🙂
Thank for your comment mate. I do enjoy these kits so much more now. 🙂
17 September 2015, 05:05
Very nice engines in deed ! Just need in my opinion some oil on them....but I think you are about to do this Kerry ? Can't wait to see more mate ! Cheers.
17 September 2015, 05:27
Hi Kerry!
Excellent start on Your Owl. Those engines are looking very good indeed!
17 September 2015, 06:02
Pierre and Christian, thanks guys for your input and, the touch of "Burned Umber" is definitely on the way Pierre, as I can see me spending some quality time in getting it all looking the part, and I am still to fit the exhaust pipe headers yet, so, stay tuned. lol 🙂
17 September 2015, 06:34
It looks really great! 🙂 The engines are already a masterpiece Kerry! 👍
17 September 2015, 06:37
Pierre-Christian, according to the instructions, on page 12, there are 120 parts all up. !!🙂
And each one is a masterpiece of the toolmakers art mate. 🙂
17 September 2015, 06:58
I just stumbled over this and Holy Moly what a big bird and amazing details. The huge amount of plastic frames – wow.
You made a good start on this Kerry and I will follow your build with interest. I still have ZM little Brother, a Mark I Models He-219 in my stash😉 I guess the little one could be displayed on one of big brothers wings🙂
Cheers, Christian
17 September 2015, 08:06
I believe that without any doubt! 🙂
But its better when I stuck with 1/72 or may stash will grow to unthinkable heights 😛
17 September 2015, 08:08
I will never have time to build all my stash....not good not good...... need to find more time for building models....kkkk😉
17 September 2015, 08:48
Wow Kerry that is giant kit. good luck mate and please keep putting pictures of the progress.
17 September 2015, 09:26
Antonio, I am in for a good time with this kit and I just cant help but photograph each piece I do, mostly for my own record, but I am more than happy to keep posting as many as you would like mate. 🙂
17 September 2015, 09:44
Thanks Kerry but from the look like of you progress and the detail that you are putting on this model I can use your photos as reference, for my Tamiya one, really great work so fare.
17 September 2015, 12:21
No denying human nature😉
Also credit to where it is due and Kerry does do good work 🙂
17 September 2015, 15:31
Es-Haq, !!! G'day mate, thank you so much. 🙂 I hope your well. ? (u)
18 September 2015, 01:19
I am really impressed with all the amazing detail in each piece Hanno. The standard of the ZM kits is awesome. !! 🙂
18 September 2015, 06:57
It obviously is, and you`re making the most of it ! Can`t remember having seen an engine kit with even the pistons depicted , top level kit that is .
18 September 2015, 07:39
Uh ! Man, what are you doing to us?!? 😉
What a kit, what a details...I am stunned!!
18 September 2015, 07:44
Worth every penny Hanno, in fact, I almost made one of the engines as a "Cut Away" exposing the cylinders. 🙂 👍
Kerber, every time I look at what is left in the box, I too am stunned mate. and these are only the very beginning of the build. LOL 🙂
18 September 2015, 07:58
Almost missed your miracle here, Kezza! Wonderful work as I expected to see from you! 🙂
18 September 2015, 08:25
As I'm very slow I think I would need 10 years to build a model like this😉 I would like to see a model on 72nd scale detailed like this....
18 September 2015, 08:25
Hi Kezza great paint job on those motors.
Can you show us the acrylic based "Artists paint pens" that you use?
18 September 2015, 11:48
I can do that for you Rui, and I will see if I can find a link too. 🙂
18 September 2015, 11:49
Rui, as you asked for the type of pens I use, I hope that they are clear enough to read the brand on the pens. POSCA paint pens.
Any self respecting artists supply shop will carry them , any where in the world, @ about $5 or $6 bucks each.🙂
And they have good fine tips too. 🙂
18 September 2015, 12:01
Holger, thank you my friend. 🙂
They have turned out as well as I could do, and considering the 'handling' you have to do with them, they are quite tough. 🙂
18 September 2015, 12:04
One of my favourite German aircrafts. Will be watching as I know this will be a great build! Thanks for the POSCA paint pen info. Will have to look for those.
18 September 2015, 16:45
Excellent work at the engines. I guess one engine alone has much much more parts than my tiny little He-219 in scale 144🙂
18 September 2015, 17:51
Thank you everyone. 👍.
I thought the ZM 'Skyraider' was complex !, but this kit is worth just sitting and looking at the parts for hours, well, I have done that and I still continue to do so. 🙂 🙂
I am absolutely hooked by these kits. !!
I really did wonder about all the colouring of the 'plumbing' attached to the motors, but my friend Rui S has found some stunning images that have answered my questions about that, and he has posted some for me and he is going to post them on his "Military Thinking" album he has started , so check them out for some awesome detail if any of you are doing the ZM kit. 🙂
18 September 2015, 19:46
Fantastic work on the engines. More parts on them than in a small 1/48 kit 😄
18 September 2015, 20:06
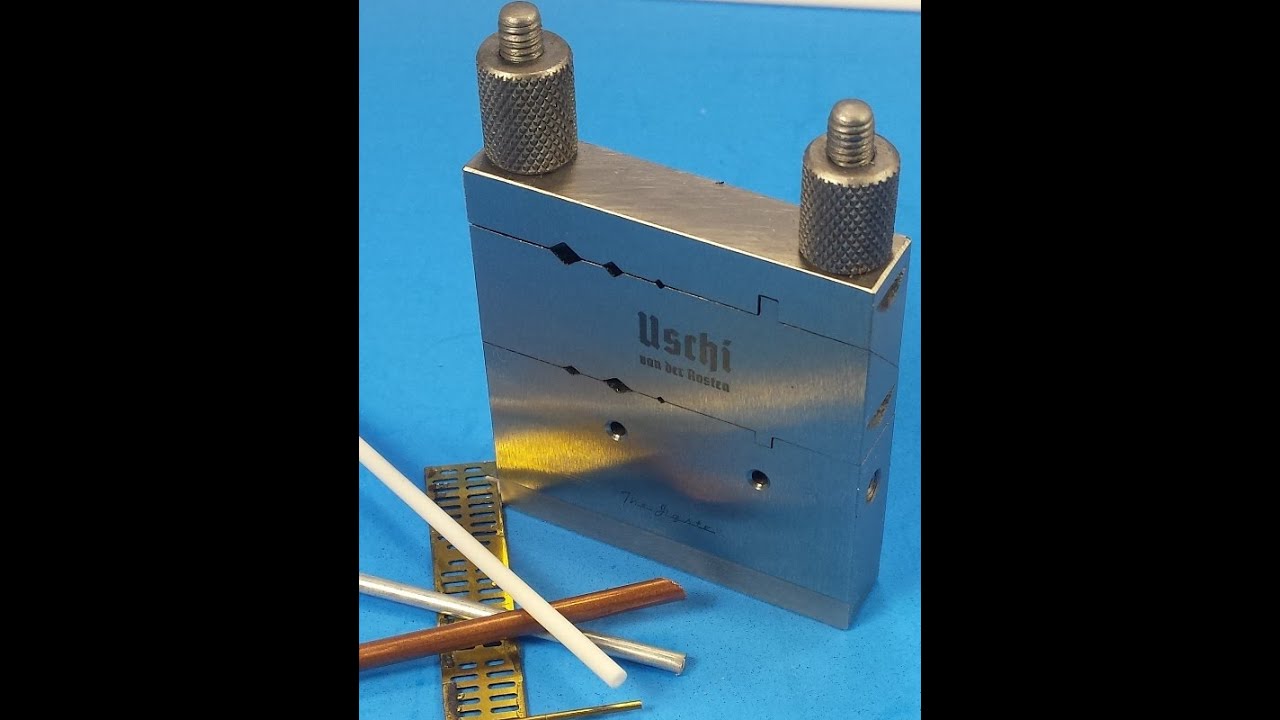
I am off to buy the Uschi clamp device, as this will help me make the gun barrels from the brass tubing I have look better. 🙂
Youtube Video
18 September 2015, 20:08
Perfect results yes, but fast, Mmmmm Maybe, I prefer to take my time . 🙂
18 September 2015, 22:59
Not fast, but faster results, like all good tools. Speed its an enemy of perfection.
18 September 2015, 23:41
Well, I have just been totally put off Vallejo Paints. 🙁
I sprayed the cockpit area ready for detailing the instruments and even though I thinned it right down, the paint just smothered all the fine detail and it dried 'tacky', and even after it was in the sun for a full day, it still felt 'tacky' and held every finger mark from when I handled the parts, and I thinned it with water.
So, it looks like I am back to thinned enamels for the detail I need to preserve and have.🙁
I removed all the paint with methylated spirits.
19 September 2015, 09:23
How much PSI did you paint with? And have you tried to use primer before applying Vallejo?
19 September 2015, 09:49
Vitor and Vegard, Thanks guys for your concern and Vegard, thankfully, NO damage was incurred. OO-)
Vitor, I was thinking along the lines you mentioned, and I will be doing the cockpit colour without a base, but with enamels, as they can be thinned right down and they retain good colour. and after the instrument drybrushing I have always had great success with, I will then seal the lot with Testors clear coat, but ultra thin. 🙂
19 September 2015, 09:51
That is good to hear Kezza 🙂 I hope I don't run into the same trouble when painting my kit with vallejo!
19 September 2015, 10:17
I have repainted the cockpit walls with a mix I have blended using enamels and the results are exact.🙂
Every little detail is now visible and It will be so easy now to detail the instruments . 🙂
19 September 2015, 12:05
Kerry, reading about your trouble with those Vallejo colours just s..., good to see you got them off again.
The pistol on the side wall, I don´t think it to be a Luger (a WWI weapon), but the flare pistol.
19 September 2015, 17:43
Yeah mate, they came out looking good and I am happy with the results. 🙂
20 September 2015, 01:45
Yet again impressed by you sharp and clean work and all the amazing details in that kit!
Cheers, Christian
20 September 2015, 09:31
I am loving all this attention guys, and the fact that I can share it with like minded people makes it all the better. LOL 🙂 👍.
20 September 2015, 09:34
Rui, I am almost cross eyed now, having to hold all of this under a magnifying glass, and wear the bifocal magnifying head set. Duh. !!! :-/
But I can say now, that it is starting to make a bit more sense to me. !!! 👍
22 September 2015, 13:18
nice build so far Kerry... it's one of the most beautyfull planes ever flown...
22 September 2015, 14:10
Thank you Bart for your compliment, and I must agree with you. The Germans were light years ahead of all others when it came to flight development, that's for sure. 🙂
Everything they put their resources behind were fantastic. 🙂
22 September 2015, 14:35
Thank you Christian, It will be a long project, as I have all the panels to open up, and I must be so pedantic about the RLM colours to be exact.
I am in no rush. 🙂
22 September 2015, 15:06
All the interior is to what is called out in the instructions, but when it comes to the cammo blotching, it is RLM 65 and 66 I believe, as that what the website I have found says it is for the one particular pattern I want to replicate.🙂
I will post the web site link next so that you can see just what I am looking at mate.
It has so much info on ALL the Luftwaffe sqns and unit markings.🙂
22 September 2015, 21:14
Christian, this is the link and all the info comes under the banner on the right side, "Luftwaffe Units" button.
asisbiz.com/Luftwaffe/njg1.html
22 September 2015, 21:24
Well everybody, I have always used acrylics with a sense of doom. 🙁
The images I have posted are of the muck I had to remove after I was thwarted at every turn to try and get the superfine detail of this kit to come through after applying the thinnest coat possible. Grrrrrrrrrrrrrrrrrrrrrrrrrr. 🙁
Acrylics behave in a totally different way from enamels, in that they do not "Lay down", meaning, that as soon as they hit the surface you are colouring, they "STOP". 🙁
Meaning, they do NOT want to go 'deep' into the details, like rivets, lines, or recesses like the enamels do. 🙁
Enamels have what is called, "capillary" action, 'flowing' into all detail and revealing everything, including the scratches from superfine sand paper works.
Acrylics are after all, a plastic based paint and are less 'aggressive' on plastic surfaces, and they don't 'etch' the surface which means that they do not 'hold on' to the plastic.
So, I am going back to the paint medium I can trust to do the right thing, and enamels are the only way for me to achieve the results I am used to.
Cheers. 🙂
23 September 2015, 00:53
The "Chipping effect" you are looking at Choppa is the remains of the paint I am stripping from these parts that the acrylic paint smothered totaly. :-/
Did you read my comments above before you said that. ?
23 September 2015, 01:25
..... yeah I did but I just liked the look of it 🙂
do you need special seals in your airbrush to use enamels ?
23 September 2015, 02:28
Choppa, I renew all the seals and Teflon washers in my Iwata "Eclipse" every six months, otherwise they go rock hard with the solvents I use to keep it perfect.
I have now stripped ALL the paint off the parts I had applied acrylic to and I now have all the detail back I had previously given up hope on ever seeing again 🙁.
So from this point on, everything will be as good as I expected from the start, now I am back to my enamels having only used the Valljero paints I bought from ZM to do the kit with, but I am not a big fan of their paints as they are just too thick, even the "Air" lot, just not happy with the results at all, and believe me Choppa, I have given them a fair go in lots of situations, but they just never performed as promoted. 🙁
23 September 2015, 02:56
""I renew all the seals and Teflon washers in my Iwata "Eclipse" every six months""
I assume you buy them in bulk then ? 😄
One of my airbrushes has gone on the blink and I can't work out why it is pumping air into the gravity feed paint cup from the front, stripped it cleaned and repeated changed various nibs etc. can't work it out at all.
23 September 2015, 03:15
Well Kerry it's a pity that You have to remove all the acrylic paint, and I agree when You are saying that they are crab for painting fine details. Did You ever use enamel colors from the Xtracolor range? They come in all RLM tones and are easy to use.
aero-spezial-modellb..d-WK-II:::1_2_5.html
I'm using them for years now and never had any trouble with them.
23 September 2015, 06:07
Christian, NO, I have never used them, as all I have ever used was Humbrol, Tamiya and Revelle, but I will look on BNA here and see what they carry. Thanks again Christian, I am so grateful for your help mate, as always, your there with something to help out. 🙂
Cheers. 🙂 👍
23 September 2015, 06:16
Well Kerry, these color dry in a gloss finish which is usefull for applying decals an oil washes. You don`t have to use "Future" or something similar. Only a cote of matt varnish in the end in everything is fine.
23 September 2015, 06:57
Excelent Christian, just what I need, and currently I am using the gloss humbrols and the rlm colours with them is quite on the mark, along with the colour chart for all the German RLM colours, It's not that difficult to mix some of my own occasionally too. 🙂
23 September 2015, 07:30
Kerry, I understand you are upset about the result with Vallejo color, but as mentioned before and shared with you, the Vallejo colors are usable with good result, but you have to handle your airgun in a different way – pressure, distance to the model etc.! I use them on my scale 144 wingy things and on my scale 350 ship models with a good result!
Well if you'd like to change the brand , I agree to Christians suggestion and can highly recommend Xtracolor. I have used them with a good result before I changed to acrylics. There is one important topic about the Xtracolor, you should use them only with Xtracolor thinner and you have to make sure the surface is clean of grease, dust etc.! I have had problems with ripped off paint when masking the Xtracolor, because the color is extremely fine pigmented. By the way, they have acrylic color too - Xtracrylix😉
Otherwise excellent progress, I just follow it with great interest.
Cheers, Christian
23 September 2015, 19:01
Your work speaks for itself 🙂
Can you do chipping effects with enamels ?
24 September 2015, 05:10
Kerry, everything is fine my friend🙂
Different and personal experiences, requirements, methods of work etc., etc., and a lot of different materials to use to get the best result everybody expect from his own work.
We still live in a modelmakers paradise, because we can try and choose materials etc. to get the best result.
By the way, any progress mate?
Cheers, Christian
26 September 2015, 08:26
I am waiting for some Humbrol paints to arrive Christian, and then I will have all the RLM colours I need to proceed with some comfort. 🙂
I tried and tried with the Valljero acrylics, but I am just not all that impressed with the results I was getting mate. :-/
26 September 2015, 08:48
What is your suggestion for the interior color - RLM02 or RLM66?
As you mentioned before, use the materials with the best result for your requirements. It is a hobby and it should make fun without being upset because it does not work as expected.
Happy modeling Kerry🙂
Cheers, Christian
26 September 2015, 10:08
Christian, I am a perfectionist when it comes to ZM kits, and the RLM will be 66. And I have always taken my hobby seriouslt. 🙂
26 September 2015, 10:30
Nice progress on the cockpit. The paint job You did is excellent!
28 September 2015, 11:25
The cockpit looks very nice ! I can't wait to see all cockpit parts together. Cheers.
28 September 2015, 12:17
Thank you Christian, and I am really happy with the results now. 🙂
I really appreciate your approval my friend, it means a lot. 🙂
28 September 2015, 12:17
Just discovered some more picture. This is what an UHU cockpit should look like!
28 September 2015, 12:25
The last three images I posted were all out of focus, so I have done three more. 🙂
But I will post clearer ones. :-/
What have you discovered Christian. ?
28 September 2015, 12:32
What I discovered? The new pics You`ve posted. 🙂 It`s a very well looking cockpit!
28 September 2015, 12:46
The Cockpit looks awesome and absolutley realistic!
Like I said a few times: "A new He 219 benchmark" ( till now 😛 )
28 September 2015, 12:48
LOL, You know, I really thought you had discovered some images I hadn't seen as yet. :-/
But for the life of me I didn't know you were referring to mine. :-O
Thank you for that great compliment guys, I am really happy you like it. 🙂 👍
Soeren, 🙂 (till now:-O)
28 September 2015, 13:52
I really wanted this build to look like the photos I have seen and downloaded, and I am so grateful that you all like my attempt. 🙂 👍
28 September 2015, 20:52
Very nice cockpit work, Kerry! Did you paint some of those dials by hand? How do you manage that?
28 September 2015, 23:25
John E. Thanks for that mate. 🙂
I use POSCA artists paint pens that have super fine nibs that deliver just a speck of paint as you need it.
It is acrylic and the colours are great.🙂
I have become comfortable with them and prefer them to the Tamiya paint pencils.
All arts supply stores world wide carry them, and they are about $5.00 each and last for ages. 🙂
google.com.au/url?sa..4jX-qA7Qs0fh_Ll0E4ZQ
29 September 2015, 00:45
Kerry that is a great tip thanks mate, by the way your cockpit look really great.
Thanks for the photos
29 September 2015, 22:29
Easily done mate. And you will notice that there are so many applications these pens and pencils can used for in modelling.
A new enjoyment factor when the paint looks better than with a brush. !! 🙂 👍
29 September 2015, 23:12
Just watched the (for me) new pictures, Kezza. Colourful but not overdone cockpit and instruments! Rock on! 🙂
30 September 2015, 06:37
Kerry I checked your link and here in Dublin there is a shop that stock them I am going to have a look in the next few days.
30 September 2015, 07:38
Gents, I am pleased you like my efforts, especially Mr Thomas Mayer, the GURU of ZM kits. 🙂
Antonio R, The one tip I can pass on, is when you start to use the paint pens and draughtmans pens, store them with the tips downward, otherwise it is quite difficult to get the ink 'flowing' again and it is easy to damage the fine tips. Take care mate.
Cheers. 🙂 👍
30 September 2015, 07:42
After managing the small "FIT" issues, the fairings went on as the instructions suggested, by scraping a small amount away from the opening the radar aerial passes through and the fit is totally flush, with MINIMAL glue. 🙂
30 September 2015, 21:59
The Zoukei-Mura He 219 is too big and too expensive, but with a Tamiya Heinkel 219 I would like to still participate in the Group build 🙂
1 October 2015, 08:23
Jens, Grab your glue and what ever else you need and get on board . 🙂
The more the merrier. 🙂 👍.
Your more than welcome mate. :-0
This will make album 92 mate 👍
1 October 2015, 09:04
OK, then I have one more try: D, the ARC has in the move unfortunately not survived
arcair.com/Gal11/107..e-219-Gerber/00.shtm
however, it can or should even be better 😄
1 October 2015, 09:36
@Jens, would be fine to see you joining in!
@Kerry, your progress on that bird look very nice. According to your progress and feedback and looking at the well detailed manual it seems to be a well detailed and designed kit🙂
Cheers, Christian
1 October 2015, 17:47
This is totally awesome Kerry, my compliments on your work on this great kit!
1 October 2015, 17:58
Kerry you are moving very fast! Too fast for me, as I´m still struggeling with the cockpit of mine. But anyway You are doing an outstanding job on this one! Keep it comming mate!
1 October 2015, 18:44
Mr Bruer, Ristits and Myerhoff. !!! I am so grateful for your warm compliments on my efforts gentlemen.🙂 👍.
The instruction manual is so well thought out and it has every suggestion and clue on how to overcome some potential problem.🙂
I may seem to be moving fast, but believe me, I have pondered over each part of the build, not wanting to make any unredeemable mistake, and even then, I have found myself stripping back paint and re applying it again. !! :-/
I have said this before and I repeat it now, but these kits juts won't let you get ahead of your self. All the skills in the world come to zip if you make a blunder, because the fit is so precise and the clean up of each part to achieve that is so exacting.
My only regret is that there is so much work and detailing that will never be seen, but in saying that, it just goes to show how much access the design team had to this aircraft, and they have left no stone unturned in bringing this high quality kit to life.. :-/
I am looking forward to the finish, but then again, I'm not. !! :-/ 👍
Cheers. 🙂
1 October 2015, 19:59
So, in a nut shell Kerry... I think that You are a big fan of ZM Kits😉 And believe it or not, this can`t be overlooked by anyone😉 I just have Your ZM Horten in mind...
1 October 2015, 20:16
Christian, I am so pleased that there is now a manufacturer that has made it their goal to bring scale modelling to the next level mate. 🙂
Their dedication to giving all modellers a level of detail that has now become the "Benchmark" that all other manufacturers have tried to produce but not quite achieved. 🙂
It is heartening that the scale modelling industry is constantly changing, as it was first 'altered' by the after market items that Verlinden kicked off with and many others have joined in.🙂
The ZM kits have what I call, "Integrity", meaning that every one of the kits produced have been exhaustively researched, all where the actual item is currently housed.
They must have demonstrated some pure intent when they were given access to the Ho-229, as no one else had been able to get the engineering detail they did.
It would have been a tool makers nightmare years ago to produce anything like or similar to the Ho-229, as it was when all the steel dies were cut and engraved by hand, but with lazers and acid today, the copper/bronze dies in use today take meer weeks to make, compared with years for some kits we all complain about that had such poor fit issues.
In a word, LOL, YES, I am a HUGE fan of ZM kits, as there is nothing left to the imagination.
Cheers mate. 🙂 👍
1 October 2015, 20:46
Kerry, first I share your sentiments about ZM completely.
Second, let me join the others in complimenting you on your superb work on the ZM He-219. Just beautiful!
1 October 2015, 21:16
Anthony, I am flattered by your compliments mate, and I do hope your a convert to the ZM world of joy. ?
My Skyraider is still partially built and I am gradually getting some work done as I get the urge, but they are always a kit you can come back to without missing a beat really. 🙂
1 October 2015, 21:45
Well, I have the ZM P-51D and have been lusting at the various other ZM kits including the Skyraider and Uhu He-219. Just reading the instruction manual is a pleasure. It will be awhile before I try building the P-51D, meanwhile I am going to give those POSCA paint pens a go. I love the detail work you've done.
1 October 2015, 22:08
Mate, the posca pens are brilliant, and the colours are strong/vibrant.
I do believe that the ZM P-51D is a superb kit also.
I built the Tamiya one, but I am yet to do the ZM, and if you do do it, please post everything you do. !!! 🙂 👍
1 October 2015, 22:32
Choppa, The do not clog at all, and if anything, they can supply a little too much at times , so i always wipe away any excess that may come out from the tip, and that way you get a fresh lot of paint that is easier to 'control'.🙂
But it is something you will have to experience to know exactly what they are great at.
Cheers. 👍
1 October 2015, 23:01
Good idea to use the decals. Guess it will look nice and even it is not to be seen it is important to know it is still there😉
I had the same with my scale 1/48 Beaufighters scratch build interior parts🙂
The joint looks smooth, well done!
I noticed the upward firing cannon – schräge Musik. Do you know if all aircraft are fitted with this special gun system and if so, doe they have the barrels above the surface or just a small opening on top of the fuselage? I read somewhere the used a special sight for the gun system. Is this sight included too?
Cheers, Christian
2 October 2015, 07:03
The gun barrels are just inside the fuselage I believe, and I don't know of any other aircraft that were fitted with it but as of yet, I haven't seen anything like a gun sight mate, but I will look at doing one anyway I think. 🙂 👍
I must ask Rui if he is aware of any other gun systems like this one, he should know, (Mr encyclopaedia. ) 🙂
As for the join, it really has turned out well, but Mr Surfacer is an amazing product. 🙂
2 October 2015, 07:09
Thx Kerry. They used the uppward firing system in other Night Fighters too.
Just found this:
en.wikipedia.org/wiki/Schr%C3%A4ge_Musik
2 October 2015, 07:12
WOW, Just about everyone had one. !! :-O
I was totally unaware of these facts and thank you all for the information.
Amazing. :-/
2 October 2015, 07:45
Hey Kezza, you should stop giving me false nicknames, hehe.
That 92 photo made me think, Mate. The instructions photo is great, just like photo 99 hehehe. Nice progress.
BTW, great info, Christian
2 October 2015, 13:48
Rui, lol, I will be more careful from now on as to what I say about your talents as a researcher mate. :-P
But anyone who scrolls trough your "Military thinking" album would have to say that your a most dedicated and resourceful guy, and Master Guru is fitting, and there is always a kind and supportive word to any one who turns to you for help, and Professor is an other one I can think of. 🙂
So my friend, get used to all the slaps on the back as there are heaps more to come.🙂 👍
hehehehehe:-/
2 October 2015, 18:40
By the way everyone, have any of you see this web site. ?
histomil.com/index.php
As it has some of the most amazing original images from the German side of the WW2.
Some are graphic, but the detail for modelling is something else.
Cheers. 🙂
2 October 2015, 18:46
Beautiful work, Kerry! Just had a look at your latest pictures. Love it!
The wooden floor in the back fuselage was for maintanance work by a technician, possibly even during a test flight? I remember having seen seat belts on a makeshift seat there in the back. Imagine such a ride!
3 October 2015, 07:46
Thomas, Thanks for your reassuring comments mate. 🙂
I am certainly having an enjoyable time. And all the bits fit exactly where they say they will. LOL. 🙂
I would have been terrified in the back of the Uhu, as the crawl space in flight would have been just about zero. !! :-/
Cheers. 🙂 👍
3 October 2015, 08:40
LOL, Hi Kezza, you are tireless Mate hehehe.
I will have to learn to live with the pressure you put on me and don't disappoint anyone. So thx for your nice words about the "MT".
I've come across some nice videos in that site and is in my favorites since 2014.
Keep on the good Work Sir.
3 October 2015, 11:08
We are both 'scrounge hounds' mate, as I am constantly looking for items of interest, mostly for my own entertainment, but when I come across something that I think others would get a kick out of, I will tag and post it.
You can never know too much Rui. And besides, I love reading you way of handling compliments, and you are Sooooooooooooooooo diplomatic. hehehehehe. 🙂 👍
3 October 2015, 11:45
Yah, nice to know that.
If I share all my hobby favourite sites I would have to make a dedicated thread with hundreds of entries hehehe
3 October 2015, 12:58
Really nice progress!
Always a pleasure to see your current progress! 🙂
3 October 2015, 14:22
If there is one thing I have learned over the years, it is that you MUST study and read all the stuff in the instructions.:-O
I almost made a huge blunder when placing one bulkhead.
I had it back to front and failed to notice the odd shape. BUT, all is good, because I usually 'dry fit' everything almost immediately I have an assembly in place and that's when I caught my momentary lapse of concentration.
3 October 2015, 19:59
Soeren, hi buddy and thank you for your 'hello' mate.🙂
I see your Ju EF 128 is coming along nicely too mate, and that little seat and straps is cool. I love it. 🙂 👍
3 October 2015, 20:00
How many parts...almost everything important is here...Man must have 2 models for building...one "open totally" for the visitors and one in "ready to flight " status... Btw, Your work is on very high level, so the finished model would be "masterpiece".
4 October 2015, 14:26
Thanks Kerry 🙂
And I agree that the straps really nice and I can only recommend them!
hlj.com/product/WKOFP-22/Air
4 October 2015, 15:39
That looks like half way but I guess it isn't🙂
Very nice work on the main fuselage parts and engines. Looking forward to the wing assembly!
By the way, thx for the interesting links. I never saw this side before!
Cheers, Christian
4 October 2015, 16:12
Mates, thank you all for your interest and support, as it helps me keep on with being positive. 🙂
Christian B, it is almost half way, finishing the tail assy last night (yet to post images), and I have been doing a "sub assembly" type of build, getting all the major components ready for the big "Glue and run" time. 🙂
Kerber, I would love to have two kits and, display one as a 'look inside' version, but as i only have one, I am still yet to decide just how much I will 'leave off' for some vision of the control rods that run the length of the fuselage. ! :-/
I have a 'diorama' in mind, but nothing too elaborate. 🙂
As I have said before, It is a pity that SO much of the detail in this kit will never see the light of day, as the ZM crew went to a great deal of effort to replicate everything of this aircraft. 🙁
The wing system will be an adventure I am looking forward to for sure. 🙂
Cheers. 🙂 👍
4 October 2015, 20:27
Rui, The dio I am thinking about is just so that the inside workings can be seen, without it all looking too busy. 🙂
5 October 2015, 13:55
Hey Kezza!
Great build so far, i didnt expected something else! 🙂
But one annoying question, please:
I always thougt the Luftwaffe cockpits had to be RLM66 to this particular time. But yours Looks very "Grey". Am i just wrongly informed?
5 October 2015, 14:19
Holger, the RLM66 is the colour I have done the interior area of the cockpit with, BUT, I lament that the bright fluro lamp I use to work under has a tendency to give my images a 'washed out' brightness to them and the colours that come back seem to be a lot different, but what I will do is take some images in natural light and I am sure you will see that darker 'grey' come out. But also, in my defence, I have seen some images of the Uhu in storage awaiting refurbishment that seem to have different colours from what is recommended in some build instructions, and some look decidedly a lot 'lighter' in colour. But I knew that this 'issue' would crop up somewhere, and I am quite happy with the way I have portrayed my build, even though it may not be to some others liking, but I have done my best with what information I have had available mate. 🙂
Cheers. :-/
5 October 2015, 18:22
Holger, I have posted two images in the hope that it can be seen that all internal paints used were not of the same RLM colours, or exactly the same and some are much 'lighter' SO, all Uhu's were not all the same inside and there seems to be some variations of the colours used at different times.
5 October 2015, 18:41
I am constantly stunned by what you show us here Kerry. This is airfraft construction work rather than modelmaking. A brilliant kit in the hands of a brilliant modelmaking craftsman. The framework of the wings looks awesome !
5 October 2015, 18:51
Well,!! Hanno, how do I respond to your most gracious compliment, knowing how creative and talented and competent a scale modeller you are my friend .? :-/
And it is exactly as you said. 🙂
It is the kit makers that have given us the tools to work with and I am just doing my best to follow the construction advice and glean what visual information I can to help achieve that final result mate. 🙂
And the comment about aircraft construction, well, I will have to agree that it certainly is very much like I am on an assembly line with each step I take in the build, as it give me a total understanding of the engineering planning and implementation of these plans like no other build, except for the Ho-229 and all it's intricate internals.🙂
I have a degree in Civil Engineering and I know what it takes to draw up the plans of a complex design that all can understand who build it, and this kit is a real challenge to 'get it right'. 🙂
But again, I am humbled by your words and I am most grateful that you said them.
Cheers my friend. 🙂
5 October 2015, 19:36
Thanks a lot for the cockpit photos Kerry ! Great job so far mate, the engines look great ! Cheers.
6 October 2015, 05:27
Everything looking Great Kezza, Take your time and keep on the Great work.
6 October 2015, 11:32
The detail in this kit is something else. Doing an amazing job with this one.
6 October 2015, 12:19
Many thanks everyone. 🙂
Yes Rui, my slow boat up the Rhine is the pace. 🙂
6 October 2015, 12:34
Wow Kerry what a fast and nice progress. It seems to me you'll finish your big bird faster than I my tiny one! Or do you have some brownie doing all the work at night🙂
By the way, thx for sharing the cockpit photos – much helpful!
Cheers, Christian
6 October 2015, 15:42
Christian, I am at a snails pace, truly. !!
The brownie gnome gave me the shits, but it was his squeaky voice that did my head in, so I gave him the flick. 🙂
I am agonizing over each miniscule piece and double checking every thing twice mate.
As far as the main wing spar and the fitting of the sub assemblies, even that, I am constantly going over the fit and shape and dry fitting as much as I can before I feel confident enough that I "have it right".:-/
I am now going to look for the link to the web site I found all those images of the Uhu on.
back soon. 🙂
Ah Ha, I found it and it is so full of all you will need.
google.com.au/url?sa..ust=1444244366540106
And this one.
google.com.au/url?sa..ust=1444245197386981
I think Rui would agree these are good sites. 🙂
6 October 2015, 18:56
Squeaky voice is pain for the ears! I understand you kicked em out🙂
Well, I know you have the patience to get the best out of everything. That's one reason why I take my hat of your skills and results mate!
Cheers, Christian
6 October 2015, 19:01
LOL, Christian B, thanks mate, you not only always have a kind and encouraging word me, but it extends to all of us, and it helps so much. 🙂 👍.
And as for the squeaky voice, ! I found was that he was into my helium when I wasn't looking LMFAO 🙂
Cheers, Kezza. 🙂
6 October 2015, 19:27
Once assembled your cockpit looks great Kerry ! I think the color RLM66 looks good too. Cheers.
7 October 2015, 05:27
Thx for sharing Kerry. Amazing photos in all details. Ähm helium, what are you doing with helium in your model workshop – or are you next to a modelmaker, civil engineer an airship captain? 🙂
Cheers, Christian
P.S. the last photos inspire me much to build an engine with open hatches for my Uhu. Guess I'll give it a try at the coming weekend?!
7 October 2015, 19:14
Christian B, The "helium" comment was meant to be a joke mate, as in "the gnome with the 'squeaky' voice". 🙂 🙂
The engineering I retired from many years ago and I only dabble in things that are my own personal projects now and, plus, my hobbies keeps me well entertained. 🙂
With the Uhu build, I am working on exposing all the internals as well, with the 'open hatch' system.👍
Like I said to Christian M, I have now decided to build the whole model in sections/sub assemblies to reduce the "handling" and the chance of doing damage as the handling becomes more intense.:-/
Thankfully, the dry fitting is so exact as the parts are so precise, sub sections make it possible to do it .
The only areas I will be gluing permanently will be the wing internals, such as feed chutes for the cannon system and air scoop/heater feed.
My progress I am going as slowly as I can, as I don't want to glue it all together now in case I need to change things.
The engines in the images are just resting in their brackets and are not glued in yet, as this lets me remove and keep them to one side as the handling intensifies, because the last thing I need is to see all the cowling actuating rods start snapping off. :-/
Cheers. 🙂
7 October 2015, 19:41
Well everyone, I have done a trial fit of the main fuselage before I skin the wings with any sort of coverings, just to see whether the feed chutes locate where they should and I am pleased to say, it all fits perfectly and NO adjustments are required, as I am following the instructions "To the letter" and I am extremely happy with my progress. 🙂
8 October 2015, 09:14
Aha, the next Owl is arising on a bench! Ist like Hitchkocks "The Owls" here actually😢😄
8 October 2015, 12:01
Hehe Kerry gotcha. I thought it was a joke as my answer was🙂 🙂 🙂
8 October 2015, 17:59
Your's is becoming fantastic, just for inspiration: dqscaleworks.blogspo..by-ricardo-abad.html
9 October 2015, 09:01
Bart, Mate, I saw this some time ago and I am just amazed at all the detail he has added. Like all the hydraulic lines , and then, !!! The brass fittings on the ends too. !!
There are some very creative people out there and it does have an effect on you. :-/
The ZM kits are just so well made, they drive you to do the very best you can, otherwise you have not honoured all the hard work that went into all their research and development. !! 🙂
I do appreciate the link, and I will now be revisiting this link and soak up all I can.
Thanks again Bart. 🙂 👍
9 October 2015, 09:20
Kerry you displace us all with your fast and excellent progress🙂
9 October 2015, 19:52
Thank you all for your comments and support on this, BUT, Guys, I am NOT "Going fast", and this is as slow as you will ever get me to go. !!!
I admit, I post a heap of images, but the "Progress' is really not all that much.:-/
Over 80% of what you see is still not permanently glued in yet, as most are sub assemblies for fit accuracy, to be all bought together whan I am totally sure it will fit as well as it can.
I am trying to be totally thorough in all I am doing, but I am almost asleep on this build. TRUE. 🙂 👍.
9 October 2015, 21:05
LMFAO. 🙂That's the funniest thing I have ever heard. LOL🙂 Thanks for that. 🙂 🙂 👍.
9 October 2015, 21:25
Well, It pays to be careful and tack fit where ever possible, and as it has happened.it payed off :-/
I didn't fix the engine and wheel naecells with a pile of glue, and as it turned out, I had them in the wrong place, where they should have been a full 1/8th of an inch closer to the centre of the wing spar, as when I glued the wing surfaces in place and fitting them exactly as indicated and instructed, this HUGE gap decided to show up and I had to come up with a solution to close this gap without taring the whole thing apart. 🙁
Locating the exact "Tac" spots, I applied some fresh Tamiya liquid glue to them and it actually 'softened' that join, and I then used the tapered structure of a wooden clothes peg to create a "wedge" that I forced into the wing spar in between the nacelle and the spar.
The two nacells did what I wanted and they 'slid' over and closed that gap, I then fully glued the whole structure in place.
A lucky save. 🙂
12 October 2015, 07:58
Thank you Soeren, but a disaster was avoided, as I miss positioned the Engine nacelles.
12 October 2015, 09:09
This is looking amazing. Such a detailed kit. Doing a superb job mate.
12 October 2015, 10:53
I can understand that! 🙂
But you managed it after all!
Hopefully I can manage to build my He 219 too in the next months.
12 October 2015, 12:28
Soeren, I learned a long time ago, that with complicated builds, you only tack the parts together as you go, BECAUSE, if you run into a "Fit" issue and it is fully glued, your in trouble, BUT, if you tack it with small bits of glue in places that will not be obvious, there is every chance you can disassemble and correct, then go ahead with the main assembly once the problem has been rectified.
I need to know what brand your kit is mate. ?
Because if it is a ZM kit, I have come across some issues that the instructions do not alarm you to, and it could have been a lot worse had I not been slow about the build. 🙂
12 October 2015, 12:48
Kerry you know that I only build 72 🙂 But I stopped my groupbuild participation to focus on my normal kits, before I go full in with resin & pe parts plus a not so easy to build Dragon kit 🙂
So Im now more a visitor who is stunned of this amazing work 🙂
12 October 2015, 12:56
The Dragon kit, we need to say, is not an easy model and has several points that need to be improved but the big problem I think is related to the parts fit. Soeren, try to work on the fit problems before to put these main parts togheter mate....in order to avoid to sand a lot and loose surface details😉 I will post photos about this later, for now the fiselage halves have a good fit. Cheers.
12 October 2015, 15:39
Thx Pierre for the info, but I like said earlier: I will not particapte in this GB 🙁, but hopefully in the next one.
12 October 2015, 16:26
Soeren, Whatever you do mate, it is good to know your always around. somewhere, watching us 🙂
We are still keen to know what your doing mate.🙂 👍
Cheers. 👍
12 October 2015, 19:18
I am impressed with the work here. Engine details are especially well done!
12 October 2015, 19:21
Pierre, You mentioned the "fit" problems with the Dragon kit. :-/
What areas are you referring to. ?
As I am actually getting some other kits in differing scales of the He-219 that will sit beside the ZM kit at a later date in my display case, and it would be handy to know what to look for in advance mate. 👍 🙂
Cheers.🙂
12 October 2015, 19:23
THX Kerry. Currently I cant do anything because I m in bed with a cold and fever...
And I must admit a row of Uhus from 144 to 32 is an awesome idea! 👍
Thats even something I would consider😉
12 October 2015, 19:30
Eric, Did you see the earlier images of the engine 'internals' I posted here. ?
The engines are just so beautiful in the amount of detail provided and It is a shame that so much of them won't really be 'visible', but at least I know what's inside now and I appreciate the ZM kits even more for their fine detailing in everything else they do. 🙂
12 October 2015, 19:35
Hi Kerry! If you ever have build a Dragon Aircraft kit in 1:72 You might know what Pierre is talking about. All those kits are beautiful detailed but suffer from fit problems due to their layout and quality of the casting. They behave like good short run kits as HUMA or early offers from MPM. That means they are great kits but you will have to clean up and dry fit every bit. I`ve build nearly all of them an was never disapointed. But they take their time.
Just an example: Do-335 | Album by worldinscale
12 October 2015, 19:47
Christian M, I am so grateful for your information mate, and I have never built a 1/72 scale Dragon kit as yet but that is about to change. 🙂
I have had enough of ill fitting things for the time being, but that I blame myself for, not paying attention to the finer details pointed out by those with more experience with this build in particular. :-/
That is NOT a criticism of the kit, but one of me. expecting way too much for all to be perfect. 🙁
Thank you for the link too mate. 🙂 👍
Cheers. 🙂
12 October 2015, 20:19
The Do-335 is a Gem Christian and for something 20 years old, it is astounding. just beautiful mate. 👍 🙂
12 October 2015, 20:24
Nice progress and now I know where to find a good example for radiator and cowl opening struts😉
Cheers, mate🙂
13 October 2015, 17:46
Christian B, fortunately, they come as standard fair with this ZM kit, but if you were referring to the image number 23 for the cowl opening struts, it certainly is a good example of what it is. 🙂
13 October 2015, 20:30
Amazing what you can tell us. Thx for the tea invitation, Mate, if you get my drift. hehe I always liked Lipton.
14 October 2015, 11:49
Rui, I have a really bad habit of thinking I can use EVERYTHING in my builds. LMFAO. 🙂
Even the clasp tags that you find on a plastic bag your bread comes in. !!!
14 October 2015, 12:38
Yap, I understand you perfectly, because I do he same. My wife accuses me of being an "trash" accumulator, but that's the only kind of aftermarket I'm in to. hehehe
14 October 2015, 12:52
The spinners swirls look very nice Kerry. The maintenance crew never ever would have taken the time you have taken to get is so perfect😉
14 October 2015, 18:17
Hi Kerry! The spinners look great, the under carriage too. I just have one question. When looking at You pix I noticed that the front armour plate in the cockpit is raised. I think that this is the wrong position when the aircraft sits on the ground, because the pilot wouldn`t see much during start or landing.😉 Do You agree?
14 October 2015, 18:27
Christian M&B, Do you think I should post some images of how I did the spinners. ? Because, while my daughter is here, I can get her to do the camera work. 🙂
Thanks for the 'head's up' on the AP Christian, It had never entered my head about the raised armour plate. !! 🙁
I am a bit confused though, as every image I have seen of the Uhu, it has the armour plate in the raised position, and I guess that is the reason I never thought any differently. :-/
But now that you mention it, I will now make some alterations and clean up my blunder. 🙂 👍
Good spotting Batman. 🙂 👍.
Cheers. 👍
14 October 2015, 20:53
Good choice Kerry, I also think that plastic parts are better😉 Cheers.
15 October 2015, 06:30
Well Kerry, that`s nothing serious about this armour plate. The question came up when I built the cockpit of mine. The Aires instructions mention this part as an option to raise or lower it. Otherwhise I wouldn`t have noticed it.
Please post some pics of painting the spinners. They will be an excellent reference.
Best regards!
15 October 2015, 06:43
Hi Christian M, I just posted the link to an album I created just on the masking and painting of the spinner swirls mate. 🙂Painting Swirls on propeller spinners using Parrafilm"M". | Album by RedRoo and I have seen that Eduard have masks for the spinner painting in 1/32, but at almost $8.00 a throw, mmmmmmmmm.
Also, getting back to the armour plate and what I am going to do about it. 🙂
I will position it out of the way, as I feel that the overall look of all that glassed area would look much better if it was not 'cluttered up' with a big lump of steel.🙂
It would, in my opinion, (And I believe yours) it would definitely look better without it, and that it needs to go. 🙂
15 October 2015, 07:02
I am inspired by the other top notch builds I have seen, but I get the feeling they got a little more 'grotty' than how I have seen it, and it is this dusty/grass airfield look I am trying to achieve, where the dirt clings to these exposed undersides, even if the ground crews took a great deal of pride in their Uhu's, there would be some that didn't get their daily "Rub down".🙂
15 October 2015, 19:45
Kerry, shouldn´t the propellers be painted in RLM 70 Schwarzgrün (Black Green)? I personally would go for this, as on other Luftwaffe aircraft.
16 October 2015, 14:47
Nice and inspiring progress Kerry. Lot of fine details on the landing gear! About the props color, I agree to Thomas. Guess they should be RLM70.
16 October 2015, 17:26
Quick progress! You are the spearhead of the groupbuild Kerry, not at the expense of quality though!
20 October 2015, 16:44
Great Progress! The undercarriage looks excellent! But I didn`t expect anything else from You. This will be another masterpiece from Down Under!
Cheers Kerry!
20 October 2015, 18:00
Damn Kerry you are to fast for all of us cause you took the paint right out of the bottle and start the compressor🙂
Nice work at the PE undercarriage. And she looks so sweet in her black dress😉
Cheers, Christian
20 October 2015, 19:19
Good Morning all. 🙂 !!!
WOW, What a list of correspondence to respond too. :-O
Gents, I can assure you all. I am going slower on this build than I have ever done on any of my other builds.....really. !:-O
I am being as deliberate as I can in all aspects of the construction as I just don't want a stuff up on my hands. 🙂
The bending of the PE doors was a case of necessity, as I have been a problem solver all my hobby life, and not having the Uschi tool for bending compound curves, I had to get creative. 🙂
The prop colour I agree with everyone about and I will change immediately. 👍
The 'spearhead'. ?? OMG, I thought I was following everyone else mate. 🙂 🙂
The Rolling Stones "Walkin' the dog" was running through my head the whole time I was applying the belly black. heheheheh🙂
Thank you all for your encouragement and comments guys, It makes my day for sure.👍
Cheers. 👍
20 October 2015, 20:15
All right. Now, I have just painted both props with XF-27. Tamiya "Black Green" and under the type of lighting I use it looks totally different. But the third image under low light looks better. 🙂
20 October 2015, 21:29
I've been swamped at work and haven't had much time for anything at all but I'm still following your build with interest. I'm so impressed with you work, Kerry!
21 October 2015, 02:30
Wow Kerry the spring system in brass and steel is pure modeling high tech. The looks really nice and is a big improvement in detail. Even it is not visible you always know it is there and this counts!
Cheers, Christian
21 October 2015, 19:27
Those people from ZM are a little bit crazy, but in a very positive manner. What a load of detail! And You did a perfect job as always!
21 October 2015, 19:49
Christian B, I am looking at the superglue I have and it is really not the quality I am wanting for the radar aerials, as I am wanting it to be the glue you use on your builds mate. Clear with nothing showing.🙂
Can you recommend something for me please mate. ? 🙂
22 October 2015, 00:54
Christian M, Yes, crazy, but when you look at what they have as standard detail in all their kits, the brass they have for the update is just a fraction better than the kit detail. :-/ But it is just as much fun to do. 🙂
22 October 2015, 00:57
(Mouth droppin´to the desk) Kerry, I had no idea about this landing gear improvement set! Must have slipped my attention. Another item on my "Want" list after having seen your marvellous work!
22 October 2015, 12:39
Thomas, they were part of the update kit mate. 🙂 🙂 👍
I have posted an image here of the complete set.
22 October 2015, 13:04
I have the main undercarriage installed now, and all that remains is the front wheel set. 🙂
22 October 2015, 13:16
Hi Kerry, sorry for the late reply. I can highly recommend Tamiya extra thin super glue:
[img1]

This was the best superglue I ever used. Bernhard Schrock gave me the hint!
You can apply it with a small needle, pin point to any part without any splotches.
Take a look to photo no. 9
MTB-794, WEM | Album by Christian Bruer (1:350)
Cheers, CB
22 October 2015, 17:36
My trip to Brisbane was worth every minute, The bits I needed were there. 🙂 👍
23 October 2015, 02:32
That´s the one I prefer those days: amazon.de/gp/product..i_detailpage_o03_s00
It has a black colour and give just enough time to make parts fit before it goes hard.
23 October 2015, 07:14
I was inspired by the seamless work with the brass items by all you most talented guys(You know who I am talking about 🙂) and as I needed to 'keep it clean', I used the Tamiya glue and I am stoked in the results. 🙂
23 October 2015, 08:23
Kezza, you should see me sitting here in front of my screen: eyes wide open and drooling! The antenna looks fantastic! But to see your Uhu on his own feet is just beautiful! I love the inner flaps slightly down! So cool!!!
23 October 2015, 15:13
I wonder why that bird was called UHU, it always looked more like locust to me, and in your latest pictures it is over-obvious.
Another brilliant looking step forward on your way to completion !
23 October 2015, 15:19
maybe UHU because it was also a hunter of the night... but locust... mmmh, not bad at all...
23 October 2015, 15:29
Holy Moly Kerry, for sure you must be happy about the current status of your impressive build! I can imagine you in front of your He-219 with a big big grin in your face🙂
23 October 2015, 17:30
Yap, looking GooooD. that black bottom is great Mate, also nice "micro drilling" hehe
23 October 2015, 17:53
Thomas,Hanno, Bart, Christian (All 10 of you 🙂), Rui and Aghis, All this attention is amazing guys, but the praise and words of support and encouragement are deeply appreciated. 🙂
I am enjoying my modelling more now than at any other time, as the quality of what is on offer these days just takes my breath away, but to see these words, from the finest and most talented modellers I have ever watched, are watching how I am doing, and that is more than I could have ever hoped for, because, I am only trying to follow all of your examples of your fantastic talents.
As a matter of fact, I am always smiling at what I achieve these days, and that is why I am so happy to post my progress, so all you guys can see how your works have encouraged me to do my best. 👍
The thing I love the most is being a member of the Scale Mates fraternity, is that I have never seen a bad word expressed or a nasty comment, and the kindred spirit is strong and healthy.
Your all awesome people.👍
Thank you again. 🙂
Cheers. 🙂
23 October 2015, 19:22
How on earth are you handling these tiny brackets? I have two eyes, but could need some more for such tiny work...
24 October 2015, 06:55
Wow! These antennas are real masterpieces. They are looking excellent! Very well done!
24 October 2015, 07:42
I wear watchmakers magnifying goggles, plus my regular glasses and I use some really fine tipped tweezers and my new tube of Tamiya super glue I bought yesterday. 🙂 hehehe 👍But, I am a little disappointed, as one of the shafts the brackets slot into has no slots, meaning I am solely depending on the super glue to be what holds it all together.
🙂
24 October 2015, 08:08
Hi Kerry, the parts will hold even without the slot. You can definitely trust the superglue when used correctly. That means you have to make sure the superglue surround the seam line. I used this method on all my ship models masts and yardarms and – knock on wood - I never ever had a problem although the yards are tensioned by the rig carefully.
And by the way, I completely agree to your words. I feel the same, inspiration, learning and no bad comments at all! Great community!
Cheerio, Christian
24 October 2015, 08:57
Thank you for that Christian B, and I am fast discovering how well the Tamiya glue behaves and I will be putting a lot of trust in it's integrity. 🙂
And I agree, that this is a great place to be. 🙂 👍
24 October 2015, 10:12
I have no words now, except: "my chin is all over the key board "?? with that «score» on canopy masking... (photo 232)???...
25 October 2015, 02:14
Rui, I know that the masks produced by the kit makes are good but I have been using Parrafilm "M" for so long now that it is just second nature to use and do it successfully.🙂
But it is great with so many other things.👍
Now, I hope you didn't hurt your chin mate. lol 🙂
25 October 2015, 02:28
Chris, Thanks mate, but I just hope my paint job turns out half as well as your He-117 mate, as that is a really nice effect you achieved there. 🙂 👍
25 October 2015, 06:24
"The cut made with the new blade should be just enough to pass through the film without any mark appearing on the clear plastic"
Hehe Kerry guess it is easier to write and read than to do. I can imagine if you are not carefully enough the Parafilm will not hold fast or you cut through into the clear plastic. But finally it looks neat and sharp – so you are the man!
Very nice and clean work mate!
Cheers, Christian
25 October 2015, 09:40
Hi Christian B, Thanks for that mate, and I should have made it a little clearer that the film will 'adhere' extremly well if the pinch between the thumb and forefinger was a firm and sustained 'pinch', but not that hard that it distorts the curve of the canopy and causes 'stress fractures".
Because it is then that the very path you need the blade to follow will really become more obvious/pronounced, and easier to cut.🙂
But, practice makes perfect hey. 👍
Cheers mate. 👍
25 October 2015, 09:48
Yep agree, practice makes perfect!
I used Parafilm one time on my F3 Demon
modellversium.de/gal..n-grand-phoenix.html
Great stuff because it never will rip of the paint. But it is much hard to handle – my experience - because of cutting and controlling the edges. Seems to be a good idea to cover a whole surface and than carefully cut out the areas to paint.
Cheers, Christian
25 October 2015, 09:59
Christian B, To cover a whole surface and then carefully cut out the areas to paint is exactly the way to do it, as I have done with mine above, but the coverage is always with a piece that will stretch way past the edges an d it can be gently pulled and tucked into the area inside the canopy like in image 230, and then, once the pinching is done and the cut is made, the excess is the part that is used to help remove the pieces that will expose the area for painting..
25 October 2015, 10:22
Picture 236: Kerry, don´t miss to paint the canopy frame RLM 66 first. This is the colour that should be visible from the inside of the canopy.
"Score mark"? Would you please tell me what exactly this means?
25 October 2015, 14:12
To "Score" is to make a cut that has penetrated the parrafilm "M" deep enough, to allow the removal of the part not wanted without it affecting the part you want to leave behind on the canopy.
The last thing you want to do is leave a mark behind that shows where the blade moved over the plastic, so, just enough pressure from the blade to assure yourself that no obvious 'damager/mark is left behind.
The first coat of paint I do understand that the inside of the frame will be visible and I can assure you that it will be done with the RLM 66 mate, and thank you for your concern that I may have missed doing it. 🙂
I am still trying to work out exactly the Humbrol enamel numbers to the RLM equivalent, as I am wanting to use RLM 75 and 76 for the upper surface colours, for the blotch and main colours, BUT, the Humbrol = is all over the shop from the colour charts I am looking at.
RLM 75 is = to humbrol 246 or 27.!!!!!!
And 76 is = to Humbrol 247, or 50/50 of 65&28. but all the above colours mentioned look nothing like the colours I am seeing on other charts.
Does someone have a definitive answer to this problem I am having please. ?
25 October 2015, 22:01
Do they stock XtraColor colours? This range has RLM colours that dry to a gloss finish. Behave as your Humbrol colours when working with them.
26 October 2015, 07:38
rlm.at/download/rlmpdf.pdf
See page 3. The red marking means that the colours have been referenced by Humbrol Authentic Colours.
26 October 2015, 07:41
The link above in your language: google.de/url?sa=t&a..dHyVyUYvkfHiuMqwLy5w
26 October 2015, 07:43
Problem solved thanks to your links Thomas, and that's one more thing I owe you for mate. lol 🙂
26 October 2015, 08:43
Hi Kerry, nice to see your Uhu progressing very well mate😉
As you are working on a big scale, don't you think it would be better to paint your model by free hand instead to use 'masks' ?
Cheers.
27 October 2015, 07:58
Kerry, the high gloss shine: is this a lacquer or did you use XtraColour paint?
What a work to apply all this tiny blobs of BluTack! Will you later get their borders slightly raised to achieve a less sharp colour border?
27 October 2015, 08:16
Thomas, all the edges of the 'blobs' will have 'soft' edges mate, like you see on all the other Uhu's.
I wont be using much paint to create the blotches, as I am wanting soft appearance, even though there are some cammo jobs that have quite defined edges.
The gloss coat is Humbrol thinned with acetone.
My decals will lay down perfectly with no 'silvering' over this finish, and the RLM76 will be thinned out as well to help the gloss effect come through too.
Cheers. 🙂.
27 October 2015, 08:28
Pierre, my hand is not that steady for free hand and that is why I have chosen a cammo pattern that fits with my lack of accuracy necessary for 'freehand". 🙂
27 October 2015, 08:30
I'm so free and see such a result, masked with patafix
Ju 88 C-6 Dragon / Revell | Album by Starterset
27 October 2015, 08:37
As always this is looking great. Very interesting way of doing the camo. Looking forward to the result.
27 October 2015, 09:57
Man oh man, so am I and if it turns out anything like Jens I will be a very happy chappie.
27 October 2015, 10:00
Well, I think I have to buy some Blu Tack! This camo looks very nice!
27 October 2015, 10:23
2000 wet and dry all over to make all surfaces even as possible, and like I said on the images.
I am wanting honest criticisms and opinions please, as I am not adverse to going back to the start. 🙂 :-/
27 October 2015, 16:22
Kerry, the Uhu's camo was most of the time reverse mottling. Do you have a reference photo of your aircraft ?
27 October 2015, 16:56
Aghis, I have just posted the images of the aircraft I am working from. 🙂
27 October 2015, 17:07
They are painting free hand snakes as reverse mottling, using a colour looking like the so called RLM84. Usually the snakes were even more dense. Why don't you try the same method (on an old model first) ?
27 October 2015, 17:54
Well Kerry you explained that technique before and the execution and result speaks for itself. You mentioned you chose this method because this is the one for you to get the best result and you did!
If I would like to paint it I guess I well choose a free hand painting just in that scale, to get a light overspray on the splotches, but I think this is nitpicking! Everybody has to choose a method to achieve the best result, and everybody has a personal touch.
I much like your interpretation and work and I'm looking forward to the final work. Kerry, you now leave us all behind!
Cheers, Christian
27 October 2015, 20:12
Well, I totally agree. There is only one UHU left ( not the danish one) which was restored. Those people chose the reverse camo which is absolute right when looking to wartime pictures. But there are many other pics out there which show a different paint job. The reverse camo is only one way to go.
27 October 2015, 20:45
Gentlemen, I am really excited by your comments and suggestions, and Christian, like you said, 'There were many variations out there' and not all cammo schemes looked exactly alike, and as I knew I couldn't get that 'soft edge' on ALL the splotches, I can take heart that the scheme I did try and replicate had those sharp edges to their blotching also. 🙂
as the buiolder and seeing it right up close, I do have some issues I created that I will have to rectify before I can honestly say I am 'happy'.
But once again fellas, many thanks for your interest and help.👍
Cheers. 🙂
27 October 2015, 22:04
Hi Chris, and I have yet to do all my preflight walkround to make sure all the bits are there, but not too long now mate. 🙂 👍
28 October 2015, 04:13
I also like your paint job! The photo of the Smithsonian Uhu is another camo type and I think yours fits the Uhu much better!
28 October 2015, 05:54
I will disagree with you Christian on the "nitpicking". Of course beauty is in the eye of the beholder, so I am allowed to have my opinion ? Thank you. Kerry is doing an excellent and admirable job, but nobody's perfect, certainly not me.
28 October 2015, 06:14
To tell you the truth guys. I am really not that happy with it at all, as the paint mix I first made was way too thin and had to make huge correction and the painting finish suffered, and I am really tossing the idea around in my head to strip it all back and do it a gain, because I have spent so much time and energy on the build to see it all go down the tube because of a F&%k up. :-/ .
28 October 2015, 06:27
If youself are not happy with it, then do it again.
I will bet that you will always think about it when you finish it now with this camo paint!
28 October 2015, 06:34
I agree with Soeren, you will always be annoyed when you look at it and you dont like it.
BUT, i do like it even when i wished the borders of the blotches would be more soft. Maybe, doing it freehand would be more appropriate?
Oh i forgot to say: Good mornin´dudes!😄
28 October 2015, 06:41
Yes, I completely agree with both of you and that is exactly what I needed to see written here.🙂
Thank you gents. 👍. 🙂
And good morning to you too mate. lol 🙂
28 October 2015, 06:52
Good morning, well, almost midday here in southern Germany... 😉
Kezza, no offence, just my opinion: the camo looks to hard for me. Maybe reducing the contrast between the two colours would help. A slight overspray with heavily thinned lighter camo colour would soften the hard looking appearance?
IF, only IF you are going to strip it: how would you do this without any damage to the plastic and the canopy?
28 October 2015, 10:04
absolutely Thomas, I agree with your observations and suggestions mate.
It all come out wrong, but I am not all that concerned about what I have to do now, as I do it all the time with some of my really old models that have become 'tired' looking, so instead of buying a new model, I just give them a 'facelift" you might say. 🙂
Then the polishing with the Tamiya 'fine' .
28 October 2015, 11:15
Hey Kezza,
That's a courageous thing to do in this build.
I've look into the UHU photos, and yes, we can see different camo schemes.
Military Thinking MT1 | Album by mig (1:35)
Off course you know what's best to do, but...
I think you could before striping it, airbrushing a tin layer of the lighter colour between the patches...? If someone can do that its you, Mate.
The advantage of this would br to decrease the size and the percentage and density of the mottling, as well as maintain a reversed camouflage system, but with the periphery of the spots blurred. (Have you think about that?)
Gooday Sir
28 October 2015, 11:36
Rui, I really underestimated the effect and it is really not what I had hoped for, so it will be a lot easier to get back to square one and start fresh.
I don't mind doing the repaint Rui, as I have mastered the process from reviving so many of my earlier builds.
But thanks for your input mate, I do appreciate every one's candid and honest words.🙂
And a Good Day to you too sir. 👍
28 October 2015, 11:44
Ok Kezza, You Know better.
I honestly think, that alternative would perfectly do the job because you would have the bubbling pattern already laid out.
28 October 2015, 11:49
I feel it is important to show you all, the canopy frames after the Parrafilm "M" is removed and how clean the edges are compared to using factory cut masks.
28 October 2015, 12:14
Hehehehe, I am glad you got a chuckle out of it Rui. 👍 🙂
SCORrrrrrrrrrrrrrr. ! :-O
28 October 2015, 14:22
How have I missed all of this. The whole thing is just totally awesome! Are you sure it won't fly when it's done? LOL. I love it.
28 October 2015, 19:01
Hi Clifford. Oh, how I wish that was so mate, but I have spent way too much time on it and to prang it, as that would do me in. hahaha 🙂
28 October 2015, 21:17
Thank you James, I am trying to currently get on top of the paint stripping I need to do.:-/
The next painting attempt will be with a whole lot of advice from the other mates here, as I thought I was on a good technique, but I failed miserably. 🙁
1 November 2015, 05:51
Hmm
Looked great to me, like the rest of us, you are your worst critic?
1 November 2015, 16:02
Guys, I am always my own worst critic, but with the comments and advice I am receiving from all my mates here, I am in no doubt I have made a big blunder and I must correct it while I can. :-/
The great thing about brake fluid is that there are no 'fumes', it washes away with water, leaves no residue and it wont affect the plastic in any damaging way.
but be patient and let it 'work'.
Cheers lads. 🙂 👍
2 November 2015, 00:23
Es-haq, Thank you my friend.
It's been a real experience and getting it right now is most important.🙂
2 November 2015, 23:15
Kidding, it'll be another masterpiece when done. I (we) have faith
3 November 2015, 00:40
LOL, I am most grateful you all have so much trust and faith in me, so, I will do my best. 🙂 👍
3 November 2015, 02:31
Clifford, Thanks mate. :-/
I did try too hard and this is the price I pay for being over confident. :-/
But I cant just let it go as it is.
Oh well. !!!
3 November 2015, 23:02
I just noticed a Revell 1/32 He 219 at the LHS is it too late to go grab it up and throw my hat in the ring?
8 November 2015, 01:24
Chris, It is NEVER too late mate. Just like the Spad with the Yankee Top Hat being thrown into the ring. 🙂
Welcome aboard. 🙂 👍
8 November 2015, 03:13
I have just finished sanding the rough edges on the blotches and It looks like I wont have to strip it down. !! 👍
8 November 2015, 04:04
Hey Kerry, bit quite here - so unusual. Would be fine to see some photos of the current status. You spent so much time and excellent work in it, I'd like to see it progressing again.
Cheers, Christian
8 November 2015, 15:36
I will do all that once I am feeling a little better, as my date with my Doctor is today and my mouth will be sore for a while.:-/
9 November 2015, 15:15
Sounds like a visit at your local dentist?! Good and speedy recovery Kerry!
9 November 2015, 17:36
Oh Kerry, I am with you! Glad my appointment with the dentist is over... Hope you won´have any pain later!
9 November 2015, 21:04
Hey Kerry, I feel your pain, I had 1800 bucks worth of dental work a couple weeks ago, thank gawd for group insurance so my wallet didnt hurt at all but my teeth still go ouch when I sip hot coffee. I also went to the local plastic model pusher today and picked up a Revell 1/32 Owl, I'm gonna try cracking into it this week...hopefully I can live up to the master builders here.
10 November 2015, 00:42
Hi Chris, :-/ My pet dread, and I really never look forward to it, but I do the same as you to ease the pain and visit the PMP for a fix. LOL 🙂I am fast becoming a big fan of the 'Mini Art' kits from the Ukraine. !!!
10 November 2015, 10:52
Yes Thomas, and the variation of subject matter from Mini Art is really quite large.
Other than the WLA bikes I bought, I also got the 1/35 German staff car Type 170V "Cabriolet" B and the complexity of the engine build parts is just superb, with two choices of roofing. !
My interest in continuing my modelling has a new momentum now, and it is because I have discovered kits I had no idea existed, but since the QMHE and the traders there, I saw a swarm of new stuff and I just didn't have enough money. lol 🙂
10 November 2015, 17:01
Kerry really some great progress here, I know the the feeling not be happy with the painting and remove it (did you try detol?) by the way i got some uni Posca pens and really are good i will keep adding as the art supplier gets more in, thanks again for the tip lol
12 November 2015, 05:12
Detol. ???? Really. ? The disinfectant .??
If that works, I am buying gallons of the stuff. 🙂 hahaha
The brake fluid takes for ever to start working, but at least it breaks down with water..👍
12 November 2015, 06:39
I have take some time to look and read your step by step.... or book .🙂 It was worth to take some time for it. Awesome work, Kerry . Unbelieveble.And a pleasure to watch and read. 👍👍👍
12 November 2015, 08:29
Martien, I do my best to involve any one who happens to pass by, and if what I do helps and supports a fellow scale modeller, that is my reward, and thank you so much for what you said. I do appreciate it mate. 👍
12 November 2015, 10:38
Yep the disinfectant it work well with Tamiya colors and Vallejo ( i believe any acrylic but this are the only one i tested)
[img1]

one advice use gloves
12 November 2015, 16:13
I am still a long way off saying I am done with the Owl, but as I constantly get distracted by other projects I have on the go, it could be some time before I can really dedicate some solid time to cleaning her up. 🙂
13 November 2015, 01:37
Rui, I will be attending to some personal issues that will distract me for a short while, but in the meantime, I am experimenting with the Detol and what it is capable of. 🙂 👍
13 November 2015, 10:50
Hi Kerry, look at this build.....
modelforum.cz/viewto..t=73068&start=15
Cheers.
13 November 2015, 20:09
Thomas, I thank you for your well wishes mate. 👍
I will be feeling much better as I repair and get past the headaches. :-/
Cheers my friend. 🙂
13 November 2015, 22:07
Well, I would never had believed it unless I saw it with my own eyes. :-O :-O :-O
Antonio R suggested I use the powerful disinfectant "Detol" to remove paint, and I have only now tried it and WOW, it just works totally better that I would have ever thought. AND, it smells nice hehehehehe.🙂 👍
3 December 2015, 06:06
Getting close to it but my commitment to others has me bound for a while, and as I said, I was never really happy with what I had done and, I JUST HAD TO FIGURE OUT A WAY OF CORRECTING MY STUFF UP WITHOUT CREATING YOO MANY PROBLEMS, AND DETOL HAS ANSWERED MY PRAYERS. !!!!
3 December 2015, 06:20
Album info
Give owls a chance
Group Build
He-219 "Uhu" Groupbuild
13. Септември
13. Септември