

Frying Egg

The fit on the saddle was really odd so it was time to add some more blankets

The seated figure will need some modifications so he appears to be in conversation with the standing fig like in the box art


I found some camel toe!


The Honey is going together well so far. I’m leaving off some of the real tiny PE that’ll never be seen on the interior. This kit has great detail.


The kit is a nice build apart from awkward seam lines that have been tough to remove. But boy did I underestimate the amount of PE in the Eduard set I added. For such a small tank it has a LOT.

It was a bear finding references for the Honey's turret. I pretty much guessed on the location of the smoke dischargers. I need to add a little bit of detail to the vision ports on the inside as the PE looks really two dimensional; and I'm leaving everything wide open so you can see the interior.The vision slit PE bits are upside down in this pic; at least as far as I can tell the Eduard instructions are wrong.

I'm pretty much done with construction on the M3. I'm going to prep the base and move over to the figures next.


Looks like I need to add a little more detail inside the inner walls since everything will be open.

The PE vision blocks just looked really flat so it was time to try the 3D printer to make some bespoke parts. The printing was the easy part. It took three times to get the mesh created properly so it would work. I kept forgetting that each piece is only 5mm wide and kept adding too much detail.

Here's one of the printed sets. They came out pretty well.

I couldn't seem to get the camel to stand flat, so I ended up sawing off three of the feet, pinning them with copper wire and repositioning them. Some putty to fill it in and he's a good camel now.

Here's the tentative arrangement. I was originally going to use the kneeling fig in the lower right to be the cook, but then I thought: "Wait. If it's hot enough to fry an egg on the hull, how is he kneeling on it?" So now I have a guy standing on a barrel. On to the chicken cage next!

Worn out Braun shaver foil = 1/35 chicken wire!

The mostly finished hen crate for the camel. Some leftover PE from the Eduard Honey set adds some punch. I’ll add some rope handles when I figure out how it’ll be carried on the camel.


Interior is done. One last look before I button it up, though all of the hatches will be open and you can see quite a bit.

Never say never! I finally painted something from the Tamiya livestock set that I bought in the mid eighties.


I've gotten the camo on finally. This was the first time spraying AK Real Colors. They went down nice and smooth once I figured out how much thinner to use (a lot), but clean up was a pain for me. I'll try my hand at post-shading for the first time with some Vallejo acrylics instead since I only have the three AK colors I bought specifically for Caunter camo. I broke a bunch of pieces off as well. Yay.

Painting of the lower hull done. I'll do some of the weathering of the tracks before I put the upper hull on.


The chipping got a bit over done but I’ll pull it back with some sand weathering.

Yikes, it took a long time to get the first figure for this painted. I tried out the glaze technique from Uncle Night Shift (Youtube Video) though I used a dark brown base and a warm white highlight spray. I think it's working . . .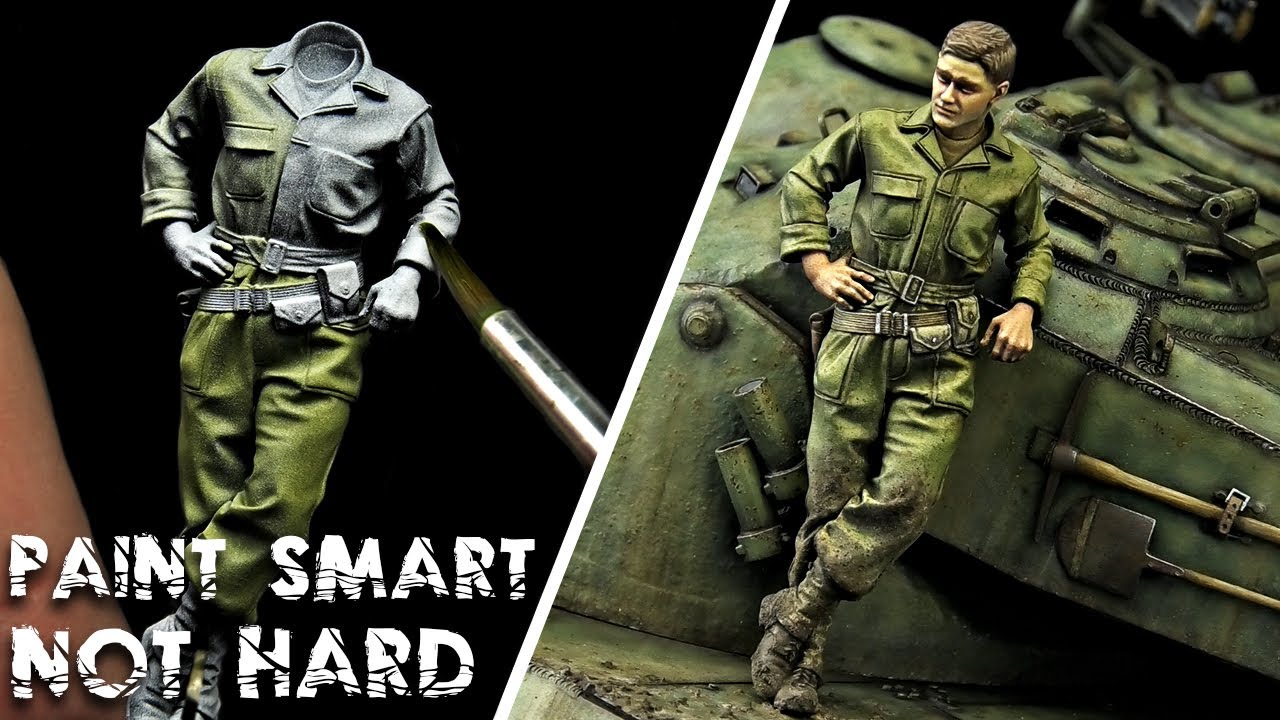

Here’s my latest 3D head sculpt print. This time I chose a particular expression for my reference to fit a particular pose for this diorama. I can’t believe how much fun it is making these. ? the hardest part is getting the scale right for the particular figure. Even this one is close but still looks to big to me. I think I need to exaggerate the details a little more for the 3D printer to make use of all of the detail but it’s cool.

A little paint and wash to see what it look like. This guy will be standing on the tank cooking the eggs. The pose is him rising to wave to the guy that sold them the eggs.

All the figures are together. Some more filling and sanding of the joints I modified and they'll be ready for painting. I still haven't decided what will be in the hand of the top left figure. The Master Box figure has a card or candy bar in his hand but I make make it a spoon or knife. Or leave it alone. We'll see. I also reworked the camels feet to add toenails. 😉

Three of the figs painted. The Indian soldier and the camel are connected now; the soldiers hand was glued to the camel and painted with it to make sure it wasn't "floating" then the figure was glued to the hand. Both will be attached to the base as a unit.


3D sculpted and printed head so I could get the expression I wanted. Not to mention I finally got to use the eggs from the Tamiya animal set that I purchased in the late 80s.


I love the heads on these Master Box figs

There's a Tamiya chicken in ther

Hot enough to fry an egg!


Benghazi Burner!
Komentarzy
72 7 July 2021, 02:49
'camel toe' is exactly what I was thinking when I took the photo. 😉
7 October 2021, 17:49
Nice progress and nice idea. Like your chicken. Although I really like it, I am a bit afraid that the camel will take a lot of attention from the main story you want to tell.
27 January 2022, 17:26
Yeah, I'm actually thinking I might leave the chicken box open to make it more obvious. I'm hoping that the cook holding up an egg will give it enough focus.
27 January 2022, 21:47
The Tamiya masking tape ripped some of the paint right off of the photo etch, even after an etching solution.
8 February 2022, 21:56
The chipping is fine, the sand and dust will mellow it and I bet there was one with that much chipping.
27 May 2022, 01:29
Ahh.. i see it goes further🙂
For me, the painting fits perfectly!
And if you're unhappy with the chipping, just put enough sand over it😁
In my opinion, chipping can also be part of the personal touch...
27 May 2022, 04:55
Thanks guys. I've gotten better results with hairspray chipping, but I bought AK lacquer paints for this and realized it probably wouldn't work, so I did sponge chipping and it wasn't what I intended. BUT, the sand will take care of that.
27 May 2022, 13:21
Wow! Superb in every department. So much detail to find and enjoy. May I ask how you created the egg shells?
16 April 2023, 14:24
@bruce huxtable I made the egg shells using the one Tamiya egg remaining on the sprue. I dipped the egg halfway into some 3D resin, making sure most of it dripped off. Then I put it into my UV light curing station (a big coffee can with a UV rope light inside). Once it cured I carefully popped it off the plastic egg and repeated. 🙂
17 April 2023, 17:51
Thanks everyone! I'm glad you like it. I've got a simpler one in mind for my next one.
17 April 2023, 17:52
Your creative solutions know no ends, Michael. Soo many details all contributing to an excellent story in your vinette.
17 April 2023, 18:27


