

Il-28 'Beagle' - Trumpeter

The sprue layout - looks deceptively simple. There are a few unused parts, or at least without being mentioned in the instructions.

Sprue A - Engine nacelles, landing gears and internal parts. The cockpit is pretty simplified, but unless you want to display the canopy open, it should be quite sufficient. I have however some additional resin cockpit parts and also a very detailed photo-etched fret for the crew area, so an open canopy it will be.

Sprue B - wings and plenty of bombs. Lots of small ones and a big bad one.

Sprue C - the main fuselage is split into the traditional left and right halves. It all looks quite straight and true, but it is still on the sprue tree so I cannot be sure.

Sprue D - the transparent parts. The canopy can be posed open, which is nice although the parts are rather thick. The glass nose however is... well, not so cool. I will explain in a minute.

Sprue E - the added parts to make the Soviet built Il-28 from the Chinese H-5 (which is molded on the main sprues). The wing tip tanks are optional, so check your references whether you want to use them or not.

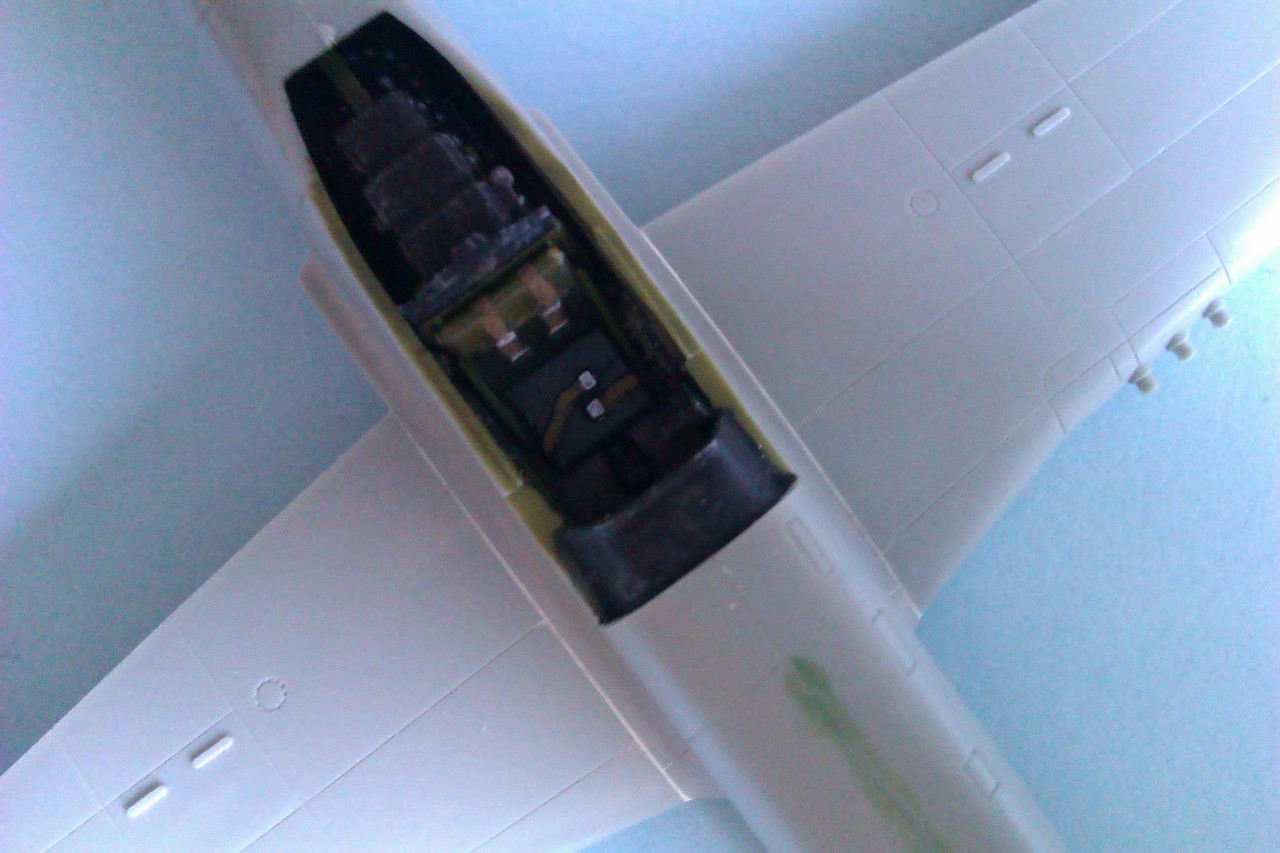
I am not sure what these rows of protrusions are supposed to be; exhaust ports for the gun? But there is nothing like that on the Il-28 - on the real aircraft, this area is as smooth as a baby's bottom.

The parts as molded are actually for the Chinese H-5. To convert it to the Soviet built Il-28, the rear turret needs to be replaced. The molded on turret needs to be cut off and the parts from Sprue E added instead. The cut line is marked on the inside so it should not be too hard. For the other parts, you will need to rely on your own references here, because the instructions won't tell you which parts to use.

Lots of bombs: small, medium and large. But I have already decided that I will build a Hungarian Air Force 'Beagle' and AFAIK they never carried a single bomb, not even a dummy one. Why? Because they simply didn't have one. Not sure what the Hungarian Il-28's would have done in a war; use harsh language I guess... So a closed bomb bay it shall be on mine.

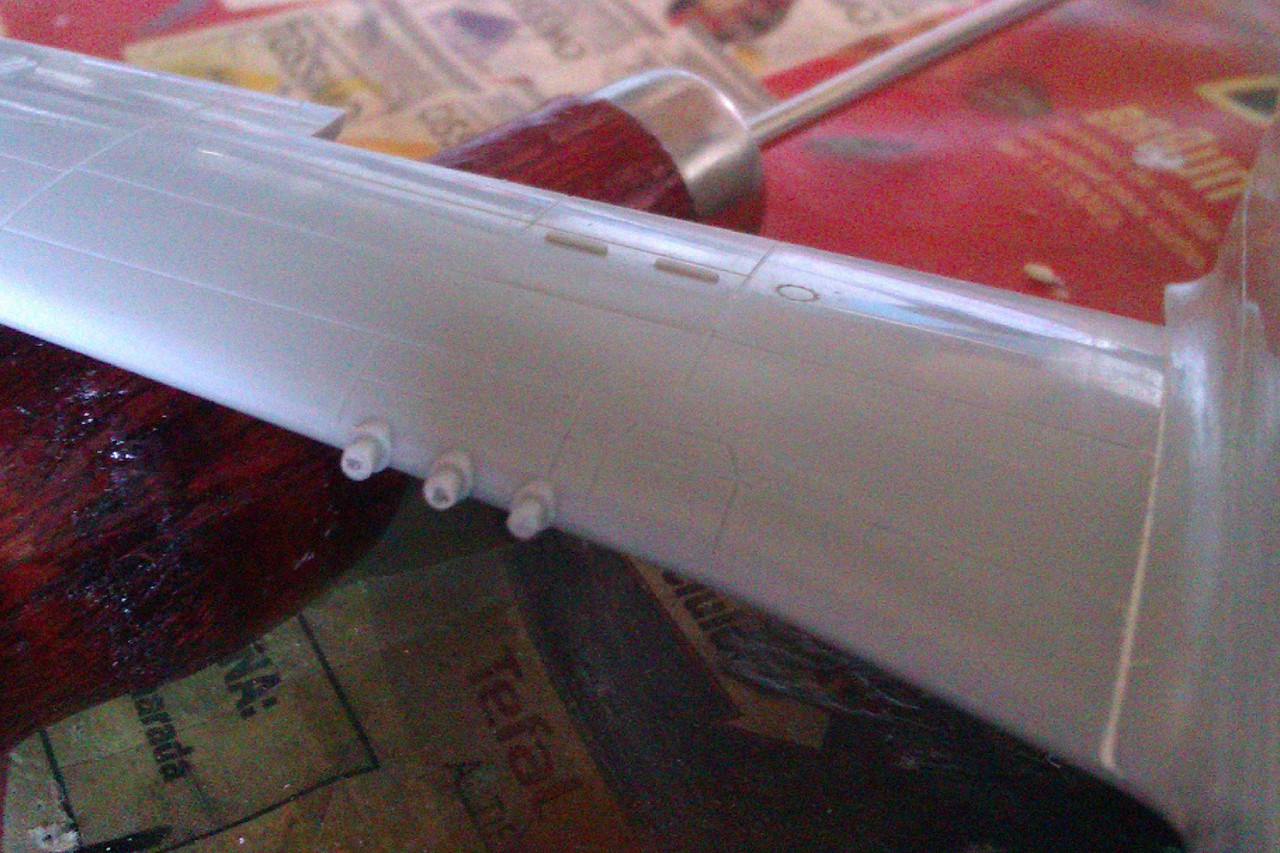
Panel lines again. Yes, wonky is the right word: the panel lines look like they have been carved into clay or soft cookie dough. Well, it's not a disaster, but not exactly Eduard quality.

The wheels need to be assembled from left and right halves, but since the tires are slicks without any treads, no problems there. They possibly look a bit too thin, so one might need to add an extra styrene disc between the halves. Also two pilot figures are provided, but they look a bit like the Michelin Man and not particularly realistic. I won't use them. The gear bay doors are provided as one piece items and need to be cut apart if you want to display the model with a gears out configuration.

Okay, so here are the transparencies again. There is a glaring error with the nose cone, at least if you compare with photos (or even the box art illustration): the disposition of the glass panes is totally wrong. And since Trumpeter for some reason represented the frames as recessed lines (like a ham in a net if you understand what I mean), you cannot just sand them off and paint them on. The rear gunner's transparencies are equally bad. I looked for a vac-formed replacement, but no such thing turned up, and since I cannot vac-form parts myself, I guess this is what I will have to deal with. The good thing is that the painting masks from KV Models that I have bought are correct for the (incorrect) Trumpeter parts.

The provided decals come on two separate sheets. Three options are provided: a Chinese camouflaged H-5, a Polish or a Soviet Il-28 with natural metal finish.

The Chinese national insignia decals are misprinted; the yellow printing is badly out of register. Well, I won't use them anyway but will resort to my third party (Hungarian) sheets.

The construction description in Chinese and English is clear and easy to follow, with color callouts for Tamiya paints. It does not look like a complex model to build, but of course, possible fit issues (that I have been warned about) may call for a lot of work.

This is actually a bit funny, the illustration shows the Chinese national insignias on the wings upside down. Seriously?

Here are the extra parts to be used - mainly for the interior. The resin parts are for the Bilek/Italeri kit, so possibly not everything will fit, but some parts may be usable. The "Kuivalainen" set is actually Eduard, just relabeled in Finnish for some reason.

Here are the PE parts - a lot of redundant stuff, but I can select what suits the best.

The resin parts for the navigator's deck need a lot of reshaping to fit - the resin parts above, original parts below.

The resin floor is sanded in shape using the original plastic part as template. Let's not forget drill holes for the nose gear!

Some additional shaping later - the resin part to the left, the original kit part to the right. Some openings between the cabins need to be cut out.

The pilot's resin rear bulkhead (to the left) almost perfectly fits the rear canopy, just needs some careful sanding. The original plastic part (to the right) is much too slim and would need a lot of padding.

Dry fitting the two cabins. Whatever you do, do not use the locating pins on the fuselage walls as they are much too low and would make the seat disappear deep inside the fuselage. The photo shows about where the floors and rear bulkheads should be. The Eduard PE set actually shows this correctly in a diagram.

The two side consoles need to be shortened about 2.5 mm. The bottom of the part should be in line with the bottom of the "rectangle" on the side wall. Also shown in the instructions on the Eduard set.

Right console cemented in place ...

... and the left one too. Note that the consoles are moved slightly inward or they will not fit into the fuselage. They will be embellished with PE parts later. The clumsy rudder pedals are sanded off as they will be also replaced with PE parts.

Some ejector pin marks repaired with Tamiya White Putty, and the two cabins are cemented to the left fuselage half. I was thinking of reproducing the "quilted" wall covering with metal foil, but I don't think I will bother, it won't be very visible in this scale anyway.

The completely blank nose landing gear bay door improved with the Eduard PE set. It does not really fit perfectly, so some superglue and styrene strips are used to fill a few gaps. //Note to self: Don't forget to sand off those bizarre rows of bulges on the side.

Rear end of the fuselage sawed off to be replaced with the correct(ish) gun turret for the Il-28. It was pretty easy, the plastic is very thin along the prepared cut lines.

Starting to assemble the PE and resin interior "boxes" and things. The real Beagle has a claustrophobic and cramped interior, but the model is just kind of "neat". Also, some of the consoles and panels are way out of scale and would not fit where they should, so some artistic license will be applied.

The resin ejection seats were further detailed with some brass from the PART photo-etched set, as the resin molding was a bit soft and the ejection handles broken off. The edges of the back cushions were sanded to look a bit more like actual cushions and not just metal plates. Seat belts will be added later, replacing the molded-on ones that I tried to sand off as much as possible.

Internal parts primed with gray UMP Ultimate Primer and left to dry a day before detail painting. The yoke has the right shape but is like 5 mm too short, so I ended up using the kit's own yoke instead.

Seats painted (Hataka Soviet Cockpit Blue frame and Tamiya Rubber Black cushions), Eduard PE seatbelts added.

Interior detailed, painted and generously weathered according to my own photos. Some scratch made stuff was also added to make it appear as busy as the real thing. And yes, the cockpits of the Hungarian ones were really painted in that hideous, industrial, zinc chromate yellow color (here Tamiya XF-4 Yellow Green).

The other side is not much to look at, just a few consoles, an oxygen hose and the navigator's godawful seat.

Ejection seats cemented in place - note the correct level of the pilot's headrest. That's why the cockpit floor needed to be raised. Unfortunately there is not a hint of the Norden (copycat) bomb sight in the front, not even in the Pavla resin set. However, it is a too complex shape for me to scratch build it.

The Hungarian Beagles did not carry a single bomb in their entire life, so I decided to cement the bomb bay doors in a shut position. Also because the bomb bay doors are super thick and without any inner detal whatsoever. But as you can see, dry fitting reveals a nasty gap between the closed doors.

The gap is too wide to try to fix with filler, so I added an Evergreen styrene strip as a shim on the edge of one of the doors.

Yep, it resolves the problem nicely. Still just dry-fit of course.

The rear gunner's station is detailed and painted. The frying pan-like thing is the gunner's seat, made of PE. I guess it would need a cushion, so I will make one in a minute. Anyway, very little will be visible of the inside, although I will leave the access hatch open.

I deviated from the instructions saying that the turret halves should be added to the fuselage halves - instead I assembled the turret as one piece. I figured it would be easier to get everything straight and true this way.

I also added a backing plate from styrene strips (painted black on the inside), or you would be able to see straight through the fuselage.

The rear gun sight is not represented at all in the kit, and since I thought that the turret would look very empty without it, I scratch built one myself using some leftover resin parts and a tiiiiny bit of acetate film. It's silly things like this that make modeling fun!

So there, the gunner at least has a cushion to sit on. Three round styrene pieces punched out with a hole puncher, cemented together and the edges rounded off. Painted in brown leather color.

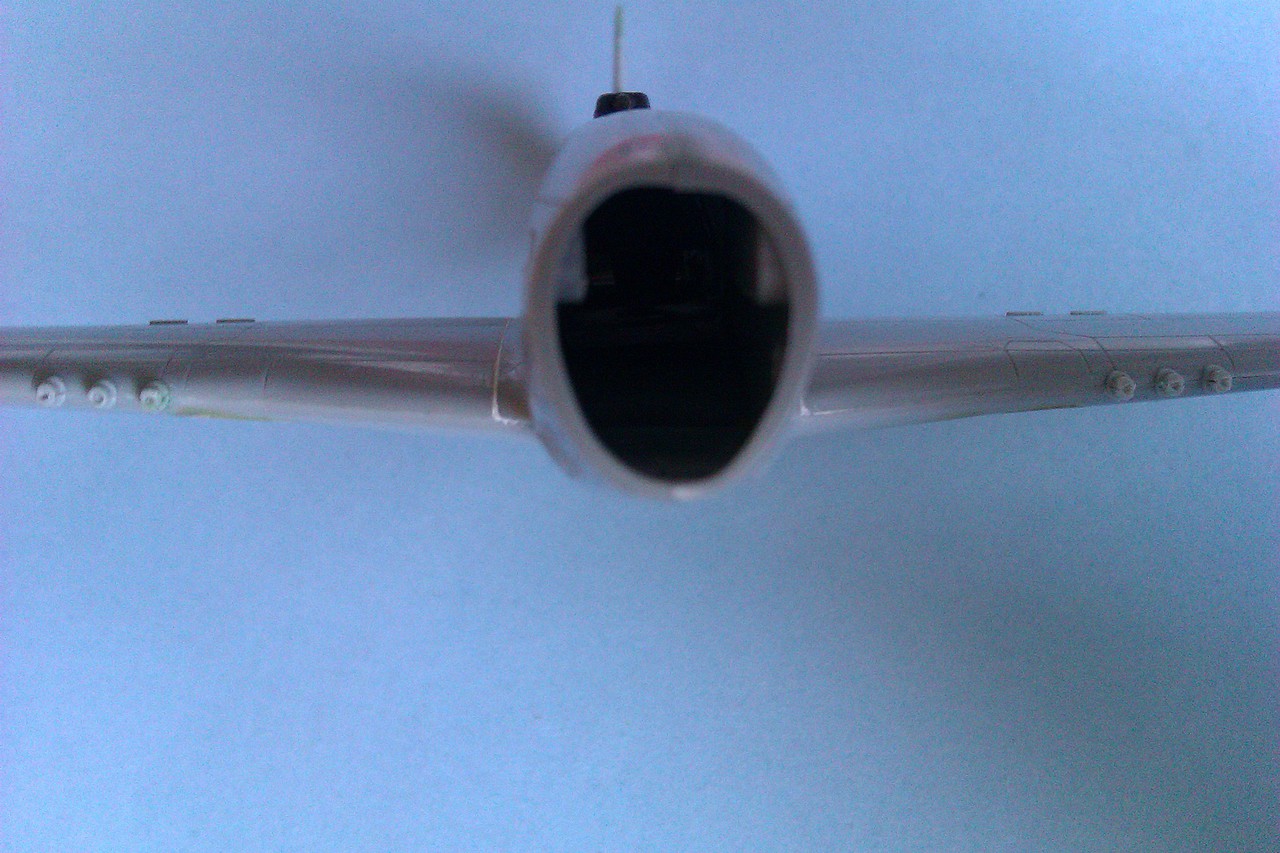
The instructions call for 20 grams of ballast, but I added 40 grams of steel washers superglued into the front of the fuselage. I absolutely hate tail-sitters.

Fuselage halves joined without any major issues.

Finally! Those offending row of thingies from the sides are finally sanded off. It should look like this, like in this picture. Smooth.

One or two dots with injection sprue marks, but really nothing worrying. Some sanding and polishing and the join the line is good as gone.

The dorsal radar bulge needs a little more attention with Tamiya White Putty, but nothing alarming.

The new tail section cemented in place. The gaps are then filled with my home made "Liquid Styrene" filler (pieces of sprue dissolved in Tamiya Extra Thin Cement). When dry, sanded smooth. This has proved the most challenging task so far. In retrospect, I would have left the old tail section as it is; the slight difference is not worth the hours spent sanding and filling.

The wheel well part needs to be bent in shape - that's unusual! BTW, the color callouts state some kind of light blue, but the gear bays were actually zinc chromate yellow.

I don't like the idea of jet exhaust pipes having a visible blank wall on the inside (the original part on the left), so I opened up the rear end (the modified part on the right).

A few gaps are blanked off on the inside with some scrap sprue pieces, putty and styrene bits to avoid light from the wheel wells to seep through, which would ruin the impression of an engine inside. The insides are then sprayed flat black.

Nacelle halves cemented together and the faceplate of the turbine installed at the front. The turbine front looks nice, but absolutely nothing of it will be visible with the splitter cone in place - not even sure why Trumpeter bothered.

Insides of the engine cowlings has a few ejector pin marks. The frontmost ones are clearly visible from the front so they were filled and sanded smooth.

Here is a potential pitfall: the splitter cone (here dry assembled) is too wide for the engine cowling and needs to be narrowed. If not, it will force the cowling walls outward, which then will make the intake oval shaped, and also create a nasty step to the nacelle body.

Wings assembled - easy peasy, although the trailing edges are a bit too rounded for my liking. I might try to sand it a bit thinner.

Pitfall no 2: if you don't sand the mating surfaces between the wing and the nacelles to a perfect fit, you will end up with a super nasty step instead of a smooth transition between the nacelle and the wing's upper surface.

Before continuing with the engines, I decided to do the navigator's hatch. This will be posed open, so some surgery is required to cut out the molded on hatch from its framing.

A hole is drilled in the center of the panel ...

... and the plastic is then carefully trimmed away with a modeling knife, taking great care not to cut my thumb.

Edges trimmed with a sanding stick and here is the finished frame! It feels super fragile so let's hope I won't break it.

Phew! Cemented into the aperture - it took half an hour of fettling and sanding, but in the end I was rewarded with a satisfying fit. One tricky task done!

While at it, I rescribed the panel lines that were partially lost while sanding together the fuselage halves. Just a few straight lines, so it was pretty easy.

The stabilizer is attached - note the correct dihedral! The fit to the fuselage will require some careful filling.

There are some annoying gaps at the roots of the stabilizer. I will fill these with my own 'dissolved putty', a tiny amount of Tamiya White Putty mixed with Tamiya Thinner to a smooth consistency, like thick yoghurt.

Dab the mixture onto the part and let it sink into the gaps. You can use a wooden cocktail stick or even a paintbrush to apply. The thinner evaporates in just a minute, so you need to work quickly.

Moist a cotton swab with some thinner without drowning it, and simply wipe it once along the filled line. Don't be tempted to go over the same area with the same cotton swab, or you will just smear out the putty. Take a new one if you need to redo it. Also, use a good quality cotton swab, not the cheap ones leaving lots of lints behind.

The result is a perfectly filled gap and no putty on the surrounding plastic. No need for sanding, just some mild polishing. If you need to add more filler, you should wait until the first layer is fully dry (4-6 hours). Once fully cured, the thinner will no longer remove the previous layer of putty.

Continuing with the engines, I painted the insides of the front cowlings and assembled them. Somehow I managed to mess up one of them by accidentally cementing the splitter cone in the center the wrong way up, so I needed to pry it apart and do it right. So annoying.

The cowlings were then attached to the nacelles... and as you can see, it will all require quite a few reshaping, sanding and polishing sessions for a smooth blend.

The parts are sanded together, but there is a snag. The profile of the top surface should be a smooth line, but the model instead has a U-shaped "valley" where the cowling meets the nacelle. This needs to be built up slightly. I use my own "Liquid Styrene" for this, small pieces of leftover sprue dissolved in Tamiya Extra Thin Cement. After 48 hours it has solidified completely and has become a permanent part of the plastic, which can then be sanded to the right shape.

Engines finally attached to the wings and the gaps filled with putty. Phew! Several days of filling, sanding and test fitting was spent trying to get everything to sit reasonably flush with the top of the wings without steps. Not sure why Trumpeter didn't mold the top of the engine nacelles together with the wing upper surface instead of this jigsaw puzzle assembly.

The contour of the nose does not at all fit the transparent part, so I needed to pad out the shape a bit with a few layers of Tamiya white putty.

Dry fitting the transparency reveals a really bad join. Thanks to the white putty-padded fuselage, it can be handled - just barely. Some white glue may then be used to fill the remaining gaps.

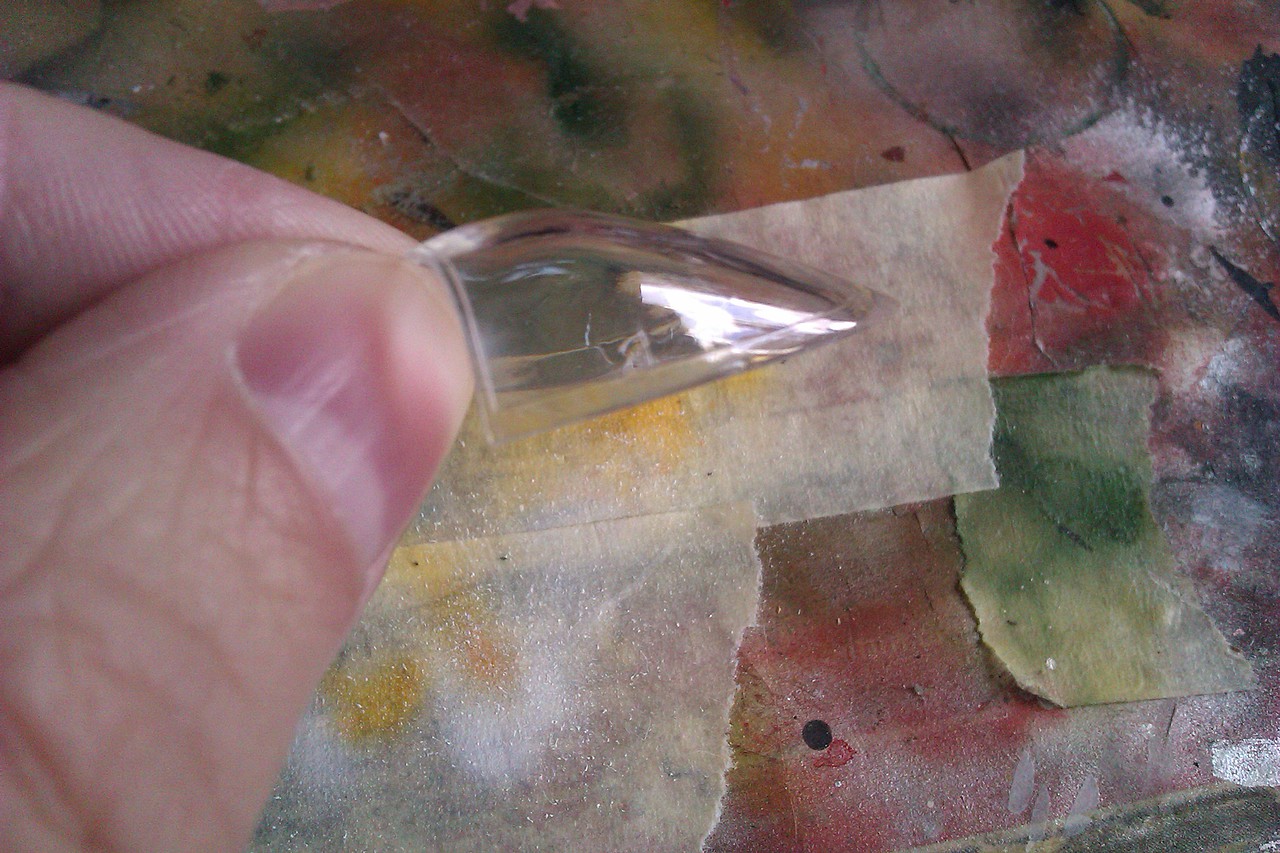
On the right side, things are worse, with lots of gaps and weirdnesses. The part simply does not want to follow the contour of the fuselage. I guess sanding and grinding the transparency to an inch of its life is the way to do it and, well, as you can see, the part is not exactly crystal clear to start with.

After two hours of wet sanding the dome, and then repolishing everything with Tamiya polishing compounds, this was the best result I could achieve. Now you can at least see through the panes! I plan to fill the remaining gaps with acrylic putty. Fingers crossed... Anyway, I won't attach the dome until the very last moment, or I will just end up with sanding dust on the inside.

Wings finally attached to the fuselage. But something seems wrong.

The fit is terrible - the panel lines do not meet up as they should, but the angle and dihedral is also completely wrong. Because of this, the engine nacelles end up with a poor alignment and instead of a smooth curve, it becomes a maze of steps.
Komentarzy
50 15 October 2020, 09:17
Yes, it looks like a fun build, but the limiting factor is my time... you know, work and stuff.
16 October 2020, 15:58
So, after only having built a few kits completely for my own pleasure without any photos or public display in order to avoid burn-out, let's again do a photo-documented build. I am going to let it take time, but I intend to have fun.
19 September 2021, 14:46
Have this very one in my stash as well! Let's see how it turns out.
19 September 2021, 16:07
Still struggling with internal reference photos, but I will go with my own photos of the only Beagle left in Hungary. It looks like light gray (quilted) interior with turquoise trim, brown floor, light blue ejection seats, zinc yellow flight deck with green frames and red handles. Zinc yellow landing gear bays, green landing gears and green dorsal radome. OMG, that is an explosion of colors.
21 September 2021, 07:12
Are you going to build it as-is or trying to fix the shape issues?
21 September 2021, 07:17
No, I will build it as it is but with some resin and PE parts. Yesterday I did some dry fitting with tape and it actually looks pretty decent. But the engine bays are going to be an absolute pain to get flush with the top side of the wings. I will need to think carefully about how to install them so I don' have to sand everything to oblivion.
21 September 2021, 07:31
Mine is still waiting (with some resin), maybe your project will motivate me to start it.
21 September 2021, 07:36
Watching with interest - I'm sure to learn lots from your guidance 🙂
21 September 2021, 16:33
What a bizarre aircraft. The pilot has a comfy ejection seat. The navigator too, but he needs to get out of his and sit on a stool when he is doing his job. But it sure sucks to be the rear gunner. He sits on a hard stool throughout the entire flight and cannot even climb forward to his fellow crew members. If he needs to egress in case of an emergency, he needs to stand on the rear hatch and pull a lever, which opens the hatch like a trapdoor.
29 September 2021, 10:15
Interesting - I built the Tamiya 1:100 kit of this subject, and the panel lines on the provided nosecone were also incorrect. They were so indistinct I managed to just mask the nose code and paint it without regard to where the panel lines were and got an acceptable result in such a small scale.
29 September 2021, 11:46
Ben, I wouldn't have hesitated sanding down the frame lines on the nose cone, but Trumpeter has for some inexplicable reason decided to represent the frames as negative lines, or "grooves". Fixing the error is very difficult, or even impossible.
29 September 2021, 15:47
Thomas, you could try to fill the grooves with uv light hardening glue like uhu booster glue
29 September 2021, 15:55
Erik, thank you! Yes, that might work, but I think I would have a hard time making the refilled grooves to become part of the new glass panes. I would probably just mess up the part completely.
29 September 2021, 16:11
Learning lots from your approach to this build, and liking the cockpits's colour scheme. 👍🙂
29 September 2021, 19:25
Interesting subject and beautiful build so far 🙂
Following ! 😉
1 October 2021, 13:47
Thanks fellows, I will try not to disappoint. In all honesty, this kit is not nearly as bad as I thought it would be. There are a few pitfalls here and there, but nothing that cannot be solved by thinking ahead a bit. And a cool piece of hardware for sure. Soviet aircraft are tight! 🙂
1 October 2021, 19:46
I shot down uncountable many IL-28s in 'Strike Fighters 2' if I recall correctly. Nice touch as always though. Following. 😄
3 October 2021, 08:47
Getting to the wing and engine assembly, oh yes, I can see the hidden traps already. I will try to fix them before even reaching for the cement or it will be hell later.
3 October 2021, 13:15
Watching! (I'm wondering how it compares to Italeri's…& for me the IL-28 was a rip-off Canberra). Liking the commentary too!!
4 October 2021, 19:57
Andy & Łukasz, yes, the Trumpeter, Italeri and Bilek are almost the same. The Trumpeter features some of the Chinese H-5 clone details with the Il-28 parts added as a separate fret. The Airfix is a much older one (as old as me actually), with raised panel lines and less details.
4 October 2021, 21:17
Well Thomas I am slightly older than the Airfix and I have definitely got a few raised panel lines.LOL
5 October 2021, 15:25
Thomas, have you already used Vallejo's plastic putty for filling small gaps ? Plastic Putty (Vallejo 70.401, No) .
I think it is easier to use than your "home made" filler.
")
8 October 2021, 14:10
Erik, thanks for the tip mate, I may give it a try! I tried AK Acrylic Modeling Putty but I didn't like it much since it would not stick well to plastic, could not be wet sanded and also reacted badly to acrylic primers. How does the Vallejo work in this respect?
8 October 2021, 14:21
For me it works perfect : the tube has a tip with a 1 mm opening , so you can squeeze out a small quantity on any seam. It is actually water based, so you can even dilute it and brush it , and you can remove any excess with a wet cotton swap . It dries very fast, and has about the hardness as plastic, so there is no problem with sanding . As some putty will dry in the tip, I remove it from the tube, push it through with a tooth pick and it is ready again. Costs some 3 euro for a tube . I use Tamyia putty only for "larger" repairs.
8 October 2021, 14:42
Nice progress, Thomas 👍
I also have used Vallejo Plastic Putty. For certain uses good results are obtained. You can see it in the following album (excess removed with a wet cotton swap 10 or 15 minutes after applying):
Pics 15 and 16:
Lockheed U-2R/TR-1A Dragon Lady Project | Album by Cuajete (1:72)
And the following P-51's pics:
[img1]
[img2]
[img3]
8 October 2021, 18:53
I really appreciate that you put subtext on every photo you post in the build. I wish more people would do that.
8 October 2021, 21:17
@Erik & Cuajete, yes, it seems really good, I think I will order a tube and try it. Thank you!
@Skywalker, I think so too, it is kind of a log of the build this way.
8 October 2021, 21:27
Łukasz, I don't think the 28 is a very popular subject, but it is definitely growing on me.
8 October 2021, 21:52
Looking good progress 👍
Also a happy user of the Vallejo putty, just sometimes if sanded too thin in wrong direction, it will peel off.
9 October 2021, 06:58
Reading all your comments on Vallejo's acrylic putty I'll need to give it a second chance. I tried it on my Canberra and was not very pleased. When I wanted to wet sand it, it peeled off. Like some latex colour.
@Cuajete: The seams in your photos look very good. But doesn't the putty shrink a lot so that the seams are later on visible?
9 October 2021, 14:35
Although I have never tried it, I would not recommend sanding over this vinyl putty. I think that the most appropriate use and where the best results are obtained is on small cracks and to use other types of fillers to sand on wider gaps.
I have come to remove the excesses with the thumb's nail (better than with a blade as it is less harmful), when it was almost completely dried and the wet cotton swab was not possible.
In my case it barely shrunk the putty after drying completely, but as I have read somewhere a second coat of putty can be re-applied in case you have shrunk the first coat once it has completely dried. Better to remove the excess in one pass (without pressing excessively) because the putty accumulates on the swab and can accumulate during the second pass if you do not wait for the putty to dry. This putty is very comfortable to work for small cracks.
I hope I have solved all your doubts within my own experience.
9 October 2021, 19:50
Love that morning updates. I'm one of the followers or a wannabe at least. One day perhaps, if your build won't discourage me 😄
11 October 2021, 08:24
Yes, late evenings are my only time for building, so the updates are during my morning coffee if I am happy with the result. So far the Beagle hasn't presented any major difficulties, but I am slowly getting to that transparent nose... the horror. It fits so badly that I am not even sure how to start it.
11 October 2021, 08:45
Thomas, maybe you could convince Pavla to make a vacu replacement of the nose to complement the resin cockpit that they have made.
11 October 2021, 11:13
Erik, that would be sweet. But to be honest, there was not a lot from the Pavla resin set that could be used either. Almost nothing fit and some really significant items were completely missing that could have been more useful than the ones provided: e.g. a rear gun sight or the "Norden" (copycat) bomb sight at the front.
11 October 2021, 19:53
That front canopy will look fine, once you have finished filling, shaping, filling, sanding..... It will be worth the effort 👍
11 October 2021, 20:15
Hm, have you considered gluing some styrene leftovers to the canopy to get the fit and sand it all afterwards? Just asking 🙂
PS. Sad Pavla news 🙁 got this set.
11 October 2021, 20:21
Łukasz, no, the transparency is actually a bit warped and kind of bends inwards near the fuselage edge. I could sand down the fuselage nose to meet the transparency, but I would then lose the nice curve of the nose. I think this is one of those cases when one just has to do the best and not be too picky.
11 October 2021, 20:28
Łukasz, it would be fun, but a vac-maker machine for a few hundred Euros is not really on my purchase list right now... 😉
13 October 2021, 06:13
I admire your determination here, Thomas. Keep it up! (Trumpeter kits are deceiving, BTW...)
13 October 2021, 06:42
Hmmm, I had somewhere a link to DIY instructions 🙂 Lemme have a look
Found it, in Polish, but there are pics too:
pwm.org.pl/viewtopic.php?f=10&t=9395
13 October 2021, 07:36
Wow, what a difference the grinding and polishing has made! I need to learn from you 🙂
13 October 2021, 10:25
@Łukasz, ha ha, thanks mate, but that's even worse from the wife approval factor point of view... Gas burners and vacuum cleaners, man, I would be out in the doghouse quicker than I'd have time to say "Ilyushin". 🙂 🙂 🙂
13 October 2021, 10:28
@Bruce, yes, these transparent parts are very thick and were badly scratched, but did clean up pretty decent. Not Eduard quality, but not Mistercraft either.
13 October 2021, 10:58
The sanding and polishing did their job better than anticipated. So, you only need to fix that topside hole 👍
13 October 2021, 11:08
I'd love to learn more details about the transparency work, the reduction and polishing. It's a skill and I'm always nervous about those sorts of attempts.Perhaps you can enlighten us when you've finished? Bravo on the progress Thomas.
13 October 2021, 17:23
Andy, actually, transparent styrene is just like the regular opaque version, except that it is much more brittle and cracks super easy. But if you are careful, you can sand it to shape and then polish it back to clarity.
I use UMP sanding sticks, not skipping any grit as I move up from coarser ones to finer ones. Make sure that you don't accidentally break off a tiny particle from a corner, or it will immediately scratch everything to hell and you will need to start over from square one.
Then finally I use a nail polisher stick, purchased in the local ladies perfume/nails/beauty shop for peanuts. As the last step, I polish it all back with the three Tamiya polishing compounds (red/blue/silver) using cotton swabs and microfiber cloths. I have a different cloth for each of the three compounds. I also wash off the part under running water when changing compound.
No magic involved, just a lot of elbow grease and patience. The polishing part takes a lot of time, expect at least half an hour for a 1/72 canopy, 10 minutes per compound. For the Beagle nose, I think I spent a whole hour, while watching YouTube.
I never use the Future / Gauzy stuff. I must be stupid nor something, but I just cannot seem to make it work, it always ends up milky or runny or with tiny annoying bubbles stuck in it (and no, I don't shake it).
13 October 2021, 17:57
Looking so good, Thomas 👍
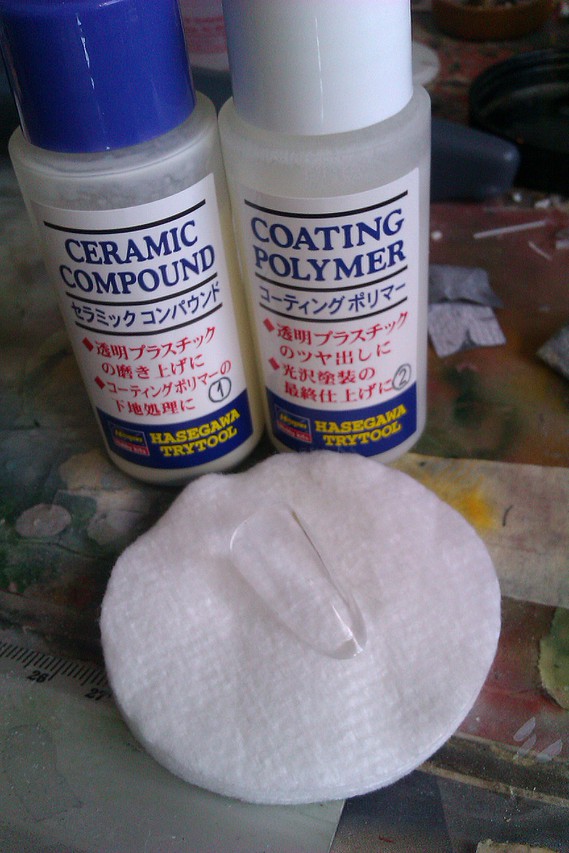
I used the same method for the canopy of my P-51 as explained by Thomas and it was pretty good, but then adding the following Hasegawa products to improve it:
1. Ceramic Compound (Hasegawa TT-25, No)
2. Coating Polymer (Hasegawa TT-24, No)
")
")
This was the result:
P-51D "Red Tails" Project | Album by Cuajete (1:72)
[img1]
[img2]
13 October 2021, 18:36
I admire the patience of modelers who decide to sand and polish transparancies...
13 October 2021, 18:44
Cuajete, thanks for the tip, I will check it out! That P-51 canopy looks flawless.
13 October 2021, 19:24
You know, it's sort of destiny where I come from 😉
And I don't mean sanding 😛
13 October 2021, 19:25
Finally attached the wings to the fuselage! A pretty dreadful fit that needed a lot of sanding and scraping. Since there is no "panel line" where the wings are joined, it all needs to be filled and sanded flush. That's going to be many hours of work.
16 October 2021, 11:54
It certainly has a look of its own, Thomas. Good luck with the filling and sanding... it'll be great to see it at its best 👍
16 October 2021, 14:05
Still sanding and filling those wing joins. I tried top align the top surfaces as much as possible, but it is still pretty poor. And because of the natural metal surface, there is no camo to hide imperfections.
18 October 2021, 10:00
Maybe that would help (pic #11):
Canberra PR.9 XH175 - Xtrakit 1/72 | Album by centuryfan (1:72)
18 October 2021, 10:02
Cannot remember when I last had to fill and sand a model as much as this one, losing panel lines for each session, which I then need to try to rescribe. It is quite annoying, but I am slowly getting there.
8 November 2021, 06:37
I think out friend Thomas hasn't logged in for a couple of months already.
Hope he's doing fine
29 June 2023, 19:34
I abandoned this model as it just looks horrible. The engine nacelles and the wings look absolutely wrong from every direction and that nose cone is abominable. It is simply not worth spending additional weeks and weeks trying to clout this dog's turd into shape.
6 March, 08:21
Heyy, Thomas,
I feel sorry for your project! I would have been happy if I could have read it as a whole article on Makettinfo.hu.
8 April, 21:03
The tamiya 1:100 is also pretty bad. I finished mine but I think redoing the nose 6 times killed my mojo for several months.
8 April, 22:39
Album info
Got this kit for free from a buddy who had it in the stash for over a decade but decided that it wasn't worth keeping, so I thought I would give it a shot. It's a pretty strange looking aircraft, very Soviet, rough and rugged but it looks like a fun and slightly challenging build.


