

Revell KV-1 Model 1940 LKZ


Kommentarer
7 17 January 2014, 01:52
Thanks Cliff.
Thanks James.
I didn't plan on doing any scratch building, but sometimes I can't help myself.
17 January 2014, 05:03
Thanks Kim.
Thanks Martyn.
The kit's not too bad Martyn. Not the best, but not the worst. The tracks could have better detail. There were some offset mold lines to clean. And a few parts were too fragile.
17 January 2014, 17:47
Looks nice Mike. I started an album for my KV-1E build but I need to get back to it to catch up to you. Little scared of the length and link tracks.
19 January 2014, 01:37
looking good... good that you couldn´t help yourself with the little details😉
@Martyn: It often differs what´s in the Revellboxes... If were speaking of WWII subjects, most of them are reboxes, Dragon, Zvezda, Italeri or in the last years quite often ICM. It´s often the better deal, as they know how to make decals and selling theyre selling the kits cheaper...
19 January 2014, 01:40
Thanks Alan. link and length ain't so bad. Don't be skeered.
Thanks Fab. I had a suspicion that this was a rebox.
19 January 2014, 01:58
Thanks Hunter. I kinda just breezed thru this one. You can tell I didn't put a lot of effort into the turret interior. For this one I'm gonna try some heavy mud and weathering.
19 January 2014, 04:04
I haven't deciced yet. I'll probably go the cheap route because...well...I'm cheap. 😛
19 January 2014, 15:54
I'm thinking of using plaster or celuclay for the bulk of the mud and then painting it...as opposed to using a ton of (expensive) pigments.
19 January 2014, 23:12
Mix celluclay
A ton of dirt from thegarden (dried out) and a ton of white glua and water
And some different brown paint colors
20 January 2014, 01:34
The garden is frozen and buried under a foot of snow at the moment Hnter.🤔 otherwise I'd give it a try.
Thanks James, would acrylics work. I don't have many enamels.
20 January 2014, 12:03
I've only used enamels, Mike. I've heard that acrylics work but might change colors when going from wet to dry....but that pearl of wisdom was from an outfit promoting their enamels.........that outfit would be AK Interactive.
20 January 2014, 13:05
The thing about pigments, Mike, is that they aren?t really meant to lend volume. My experience has been that you have to think of them more like paint. As such, they are a very forgiving paint that lend themselves to correcting, layering and blending. Used in this way, they are actually quite cheap. A little goes a VERY long way; unless you spill the bottle which I seem to be prone to doing. I use odorless turpentine aka turpenoid to apply them. The odorless turpentine is a benign medium that won?t chew up any paint underneath whatever you?re applying it to.
20 January 2014, 14:12
I am just getting into the world of pigments
WF how are vallejo pigments?? I am thinking of getting them, vallejos pigment binder and a ak interactive pigment
What are your thoughts on vallejo pigments over all ?? They are 5 dollars cheaper than the ak interactive and mig pigments but have a bit more
20 January 2014, 14:25
Vallejo pigments are of a finer texture. I don't think this matters because after you combine them with whatever you chose to apply them with (turpenoid or white spirit, etc) they dissolve into a slurry. I've also found that the binder really doesn't do much.
Someone, somewhere put this issue to Mig Jimenez and as I recall, he didn't come right out and agree..........BUT he did say, and I paraphrase here: "Models are for looking at, not touching!"
20 January 2014, 14:30
Ok thankyou very much and I will get some white spirit and get the vallejo pigment sets 🙂
20 January 2014, 14:41
Mike mike mike 🙂 thats why you save some from summer such as I did lol
Its helpful in oh so many ways😉 I could send you a bag of dirt😉😛
20 January 2014, 14:42
Well Hunter, I'd pass on the white spirit. I got some from my local art store and really can't tell any difference between the white spirit and the much cheaper turpenoid.
20 January 2014, 15:05
Thanks for the info James. I like to use rubbing alcohol to apply pigments. It works well as a fixer and it evaporates quickly.
@Hunter: I wonder what my old lady would think if I got a bag of dirt in the mail. 🙂
20 January 2014, 15:07
That's another advantage of turpenoid Mike. It DOESN'T evaporate quickly; this gives you more time to blend the pigments and make other adjustments.
Another thought on pigments: I tend to use them on the horizontal surfaces whereas I tend to use oil dots on the vertical surfaces. That's just how I've found myself using these mediums........who knows? I might change with time.........
20 January 2014, 15:12
Mike it wouldnt be that strange😉 although you might get a
"Seriously mike, who the hell sent you a bag of dirt" lol 😄
20 January 2014, 15:39
Lol. You guys are killing me. Hey, stranger things have happened. 🙂
James I actually like that it evaporates quick. I mostly just use pigments on the tracks and lower areas of an afv for dirt effects. But I've never done heavy mud at all. This will be the first time.
20 January 2014, 20:45
Very nice preshading 😄
What airbrush do you use?? It looks perfect
21 January 2014, 12:07
And how did you make the bolts for the spare traxks??
It looks great
21 January 2014, 12:10
I used a no name el cheap-o air brush I got on ebay. $20 from China.
And I make my own bolt heads by slicing hex rod.
21 January 2014, 15:19
Decals on. Couldn't get them to lay straight over the pistol ports, and there's some silvering, but hopefully weathering will cover it some.
25 January 2014, 01:30
Great job 😄😄😄 what color did you use fot the russian green ???
It is the best color that I have seen
You are turning this one into a master piece😄
25 January 2014, 01:34
Thanks Hunter. I used Hobby Color dark green 320. Probably no where close to accurate but by the time I'm done it won't look the same any way so...
25 January 2014, 01:43
Looks great Mike. Way ahead of me on my KV-1E. The green you chose does look nice, especially with the preshading. I used Tamiya dark green spray can and much darker than yours. Need to lighten it up with dot filtering. I look forward to seeing it after the mud goes on. I used MIG Russian Earth pigment mixed with plaster and the acrylic gel that MIG sells. Came out thick and hard to spread and apply with a brush. Used their recipe but too much plaster I think. White glue may be easier, and cheaper, alternative. Good luck.
25 January 2014, 02:43
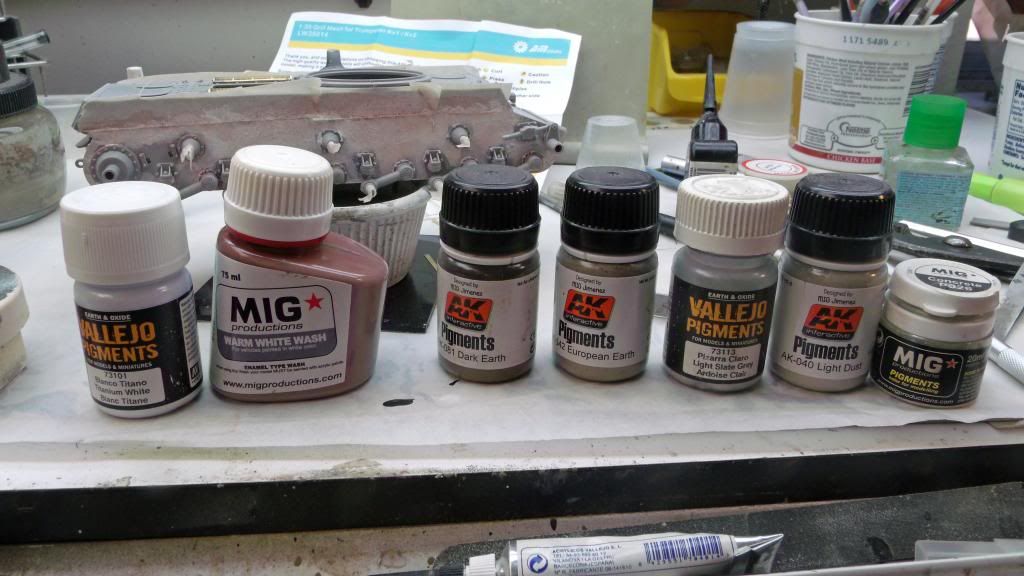
Here?s my KV-1 as a WIP [img1]??.I used acrylic Gesso for the base then the products in the third picture for the detailing??.here are my notes from my build log,[img2] ?I?ve decided to use the airbrush method of applying mud to the lower hull???..then I?ll detail that with the above pigments.?

25 January 2014, 03:15
Thanks fellas. Thanks for your help. I can use some input with this as it's uncharted territory for me. Kv looks awesome James.
25 January 2014, 18:23
Looking good Mike.Like the colour modulation, who says a single colour scheme has to be boring🙂
25 January 2014, 21:28
Thanks Augie and Martyn.
A few more pictures added.
I did some heavy handed dry brushing. So there's more modulation. I hope it meshes well with the heavy weathering I have in mind.
@James: I meant to ask...what's this about applying mud with an airbrush?
26 January 2014, 00:01
Mike what he means is
1. Take your mud mix and load a brush with it
2. Put the loaded brush in front of the place where you want mud.
3. Take your airbrush with low psi (about 15) and lightly spray
4. This will be easier to build up layers and it can give you a sprayed mud effect
26 January 2014, 00:09
Hunter pretty much summed it up Mike.......it's an all right method....nothing earth shaking, but when combined with other applications it's the way to go for heavy mud...
26 January 2014, 01:51
Any updates??
Or did the cat keep you away from the bench because he thought it was his throne??😉😢😛😛
10 February 2014, 02:13
Thanks Kim.
Yes Hunter I've made a little more progress. Been taking it slow. I'll put up a few pics when I get home from work.
11 February 2014, 18:26
Okay pics are up. we're in the home stretch. Just have to add the mud some pigments and finish up a few details and I'm golden.
12 February 2014, 02:27
Beautiful😄
Dix you use the same colors for the streaking on the kv as you did on the firefly
12 February 2014, 02:34
Yup. Pretty much. Just mix 'em up a little. Tans, browns, blacks. I just mess around until I think it looks right. I have a cheap basic set of oils from Walmart. Has everything you'll need. I've gotten pretty good at mixing colors to get what I want.
I made my own pigment for this out of pastel chalks using...I kid you not...red, blue, yellow, black, and white and came up with a nice dirt color.
12 February 2014, 02:54
Looks great Mike! Those oils really help, you got to love them.
I got a question. I?m building a KV-2. The hull is identical to a KVV-1???..I think.
Those boxes mounted on the fenders (they are on my KV-2), could any of them possibly be exterior fuel tanks? The Russians seem to be big on that type of thing???.also???
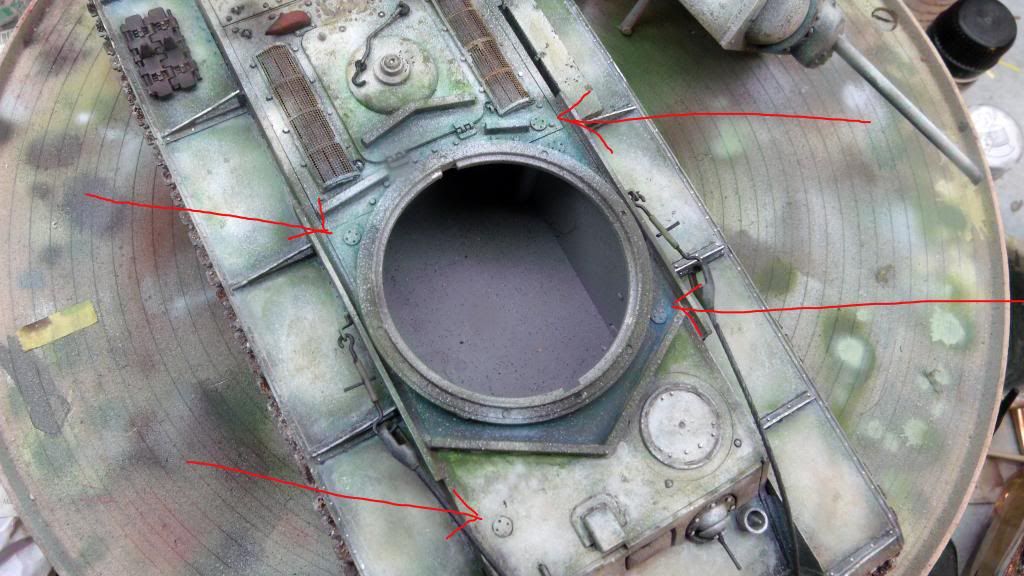
On the photo seen here of my KV 1, are the indicated covers accesses to interior fuel tanks?[img1]
I can?t find any schematics on the web that would indicate??..here?s a neat link that comes close..but no cigar subsim.com/radioroom/showthread.php?t=186618
12 February 2014, 03:26
Thanks Manfred! 🙂
James I'm not an authority on Russian tanks or any other for that matter. 🙂 The boxes on my KV's fenders are, I think, most certainly for storage. They assembled like storage boxes, look like storage boxes, and had molded on handles (with I replaced with wire).
So that leaves only one other place for fuel...indoors. And since I don't see anything else in your pics that look like filler caps, then the indicated objects might be them.
Obviously I'm speculating here so maybe someone who knows will chime in with some facts. 👍
12 February 2014, 18:00
Thank you for the response Mike.
What got me wondering is that I?m in the finishing stages of my KV 2 and want to put some gas spillage stains around the fueling ports and would like to be reasonably confident that I have identified them. One of the things on my KV 2 looks similar to the other things that are tool boxes. However, it is so ever slightly different. That?s the one I?m thinking may be an exterior fuel tank. The Russians seemed to have a penchant for this. Some T-34?s have those box like structures mounted on the aft glacis plate, while other T 34?s have box like structures mounted (see photo) on the sides that appear to be some sort of storage unit, but are in fact fuel tanks. I can live without the fuel stains, but it would be nice to know.
[img1]

12 February 2014, 18:34
On the rear engine deck are two hatches, they look just as the ones for the crew...
Could it bee that the fueling ports are underneath it? If not i´d be fairly interrested what´s behind them...😉
12 February 2014, 18:51
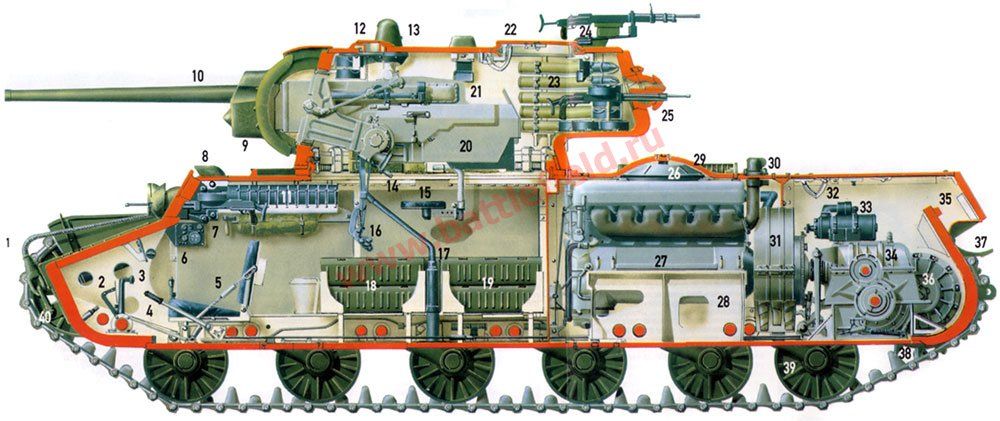
me too Fabian, here'e a cut away off a KV 1 S.......note the AA machine gun. From the sketch, it doesn't look like there's much of anything underneath those two hatches.....[img1]
12 February 2014, 20:30
so they might just be engine/gearbox accesess covers...
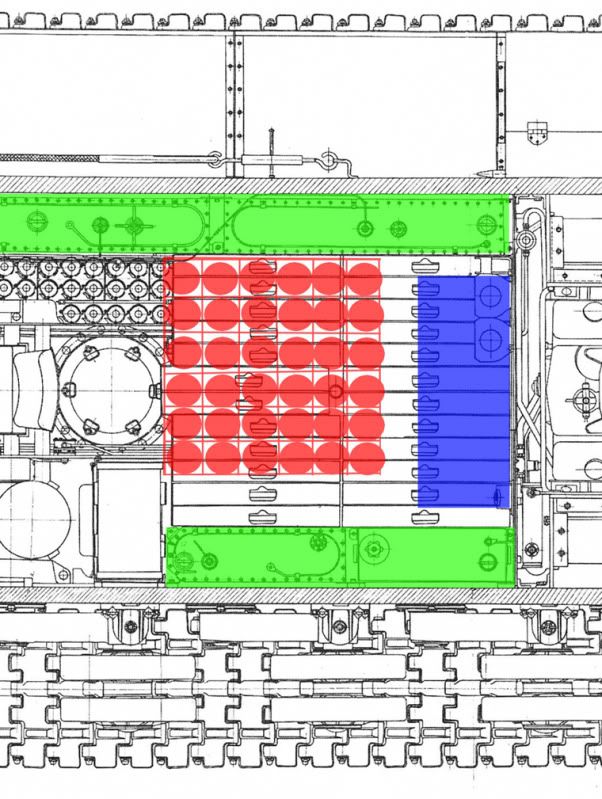
the best I could find was a blueprint of a KV-2 with the fueltanks marked in green... the caps from above could be somehow related to them... but they seem way to unpractical for refueling....
[img1]
12 February 2014, 20:51
Actually Fabian, directly above the green areas is where those tool box looking things sit; except for the forward green area. This lends credence to the theory that those are not tool boxes but are in fact some sort of housing for a fuel receptacle....
12 February 2014, 21:31
or not...........looking at a bunch of KV1 pictures makes me think not.....to hell with the fuel spill stains on my KV 2!!!!
12 February 2014, 21:44
seems to be a good mistery... as we couln´t find out, before frustration got us 😄
12 February 2014, 22:11
Not an expert but from what I know, the hatches marked in the photo you attached James seem to match the position of the fuel tanks. The tanks ran down the left and right flank in front of the engine inside the hull. One side, the right I believe, was a bit longer than the other so would explain why one hatch is forward in the right corner. The boxes on the fenders were for storage. The large domed round hatch in the middle of the engine deck accesses the engine and the two round hatches on the rear of the deck give access to the transmission compartment since it is a rear wheel drive tank. That is my best contribution, so you may be OK with the fuel stains on those four hatches.
12 February 2014, 22:20
...Thanks Alan! I?m going with your opinion/theory. This is a lot of discussion for what?s going to turn out to be a couple of smear marks that will be no larger than a pin head!
Sorry about hi-jacking the thread on your KV 1 Mike...but like they say......Youtube Video

12 February 2014, 22:28
This puppy is done. Last few pics are up. I decided not to go real heavy with the mud, didn't want to overdo it. I'm happy with the result.
3 March 2014, 01:27
Thanks Hunter.
I mixed it from craft acrylics and added corn starch to thicken it. There's some static grass here and there for realism. And some light applications of pigments to vary the tone slightly.
3 March 2014, 01:36
..Sure looks like a KV 1 to me, a very nice KV1 at that?..I know what you mean about the mud. I?ve spent hours on tracks and wheels just to have them obliterated by mud. When the airbrush method first became popular, I saw a video of a guy completely cover a great Kubelwagon he?d made. You could not even tell what was under the mud! It might have been a golf ball for all the end result presented.
Anyway, a nice balanced build you got there with allot of different simple yet fun techniques thrown at the project, real nice job.
3 March 2014, 01:41

Thank you James.
It was a little heartbreaking to cover the tracks with the mud. They did look pretty good before, but....I had to have the mud on the tracks to tie in with the rest of the tank. This was my first attempt ay mud this heavy, it's not something I will do very often...it was fun none the less.
3 March 2014, 01:48
..Yeah that?s it Hunter, good find. I remember heavier mud, but that?s the way it goes. I acquired that set and it is a nice tool to have. However, I wouldn?t put too much into the special plaster that comes with the set. I use regular plaster of paris and have never used the small pack (about a quarter cup) that is supplied????..
3 March 2014, 02:03
Thanks james 😄
I wont buy ak interactive as much now
I am waiting on mig ammo to hit the stores here
3 March 2014, 02:18
AK is good stuff. Actually, it was nice of them to throw in some plaster of paris, but there is not anything special about it, IMHO.
As far as I know, MIG AMMO is still unavailable in the States??????
Adam Wilder suggests adding light colored mud first, then darker shades on top of that. This seems counter intuitive to me. I have done it this way, and tried lighter on darker. I really could not tell the difference. What does seem to matter is to throw a bunch of different tones at the mud.....cement colored pigment is a good one. Also, dab the mud with gloss varnish to simulate wetness. IMHO of course.
3 March 2014, 02:30
Im talking to the ceo soon
It was really nice of them to add that ahhaa
But mig ammo is half the price
But ak interactive is really ggod stuff
3 March 2014, 02:39
The exact same size
Ak interactive stuff use to be half the price it is now
But their american retailer and producer here quit working for them so the prices of the product went up 5 dollars because of the shipping charges
Mig ammo is half the price of ak interactive amd mig productiond but half the price
3 March 2014, 02:45
I'm glad I bought a bunch of pigments before the prices went stupid. If I ever run out I'm confident I can make my own from earth tone pastels. It's a lot cheaper and something I think everyone should try.
3 March 2014, 05:15
Mike,
Mig ammmo is only 5 dollars formtheir pigments, streaking effects and other weathering products
Same with vallejo
3 March 2014, 11:21
I was unsure about the Revell kit but seeing your work on it you have gave me the confidence to get it and make a good model out of it. You have done a suber job with it! Congratulations and thanks!
3 February 2016, 03:51
Nicely done model Mike. Congratulations 👍
I agree with you:
«I'm confident I can make my own from earth tone pastels. It's a lot cheaper and something I think everyone should try.»
I've tried and I'm happy with the results. Most of them to my wallet. hehehe😉 😄
13 February 2016, 14:20

