

AJ-213 Old Blue

The mold line on the starboard side of the nose is somewhat bulgey, it required more attention than the rest but sanded okay without losing details.

The portside inserts on the nose are tricky to glue in cleanly. Had to shim the back with .2mm card.

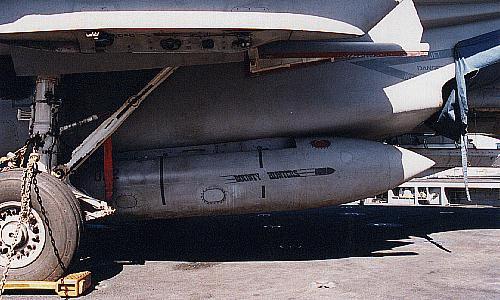
Someone had a bit of a brainfart here, the droptanks holes are wrong while the engravings are in the correct position. Also showing are some of the mold lines along the length of the intakes, nothing too hard to remove.

Again, needed a slightly trimmed .2 mm shim for this wing glove piece to sit flush.

Seemed much better than sanding all the engraved details. Might need to rework the lip around the wing root with epoxy to reduce the gap.

Old Blue is back on the bench. Since my painting sessions are few and far apart, I spent some more time working on the wing pivots to try and correct the shape and lessen the gap. 2-parts Tamiya epoxy was stuffed and shaped over some packaging plastic. The wings still slide in fine, hopefully this epoxy won't tear away at later stages. Sprue goo was used for the shoulder and glove vane gap.

Tried to busy up the NACES seats. The kit cockpit decals worked well. They are a strange colour, but that goes along ok with the VF-213 all black cockpit. Added a drop of smoke to the green screens on the decals, will probably rework those. Then a few more touch ups and bits to add I'll be able to close the cockpit.

Always satisfying to see a Tomcat take form during assembly. The nose section needs quite a bit of body work, but the rest is similar to other kits.

Current state of the cat. Primed with Tamiya white primer, fixed quite a few blemishes and tried to finetune the panel lines. Painted with MRP098, very pleasant paint to use, and blue parts sprayed with a Tamiya X-14/XF-8 6:1 mix. It is probably too light but I liked the way it pops.
Next step is the so-called langley stripes, after I think of a way to make sure the decals that lay on top are in the right spot.
Also, I took a good look at the Modelkasten sheet and I'm kinda disappointed with the decals quality. For example, the stars on those stripes are not pointing in the right direction...

Painted the langley stripes using the decals as templates. Result is mostly symmetrical, fingers crossed for decal application. I might have to cut the roundels up to realign them properly. Also corrected the nose pattern symmetry, painted the wing bags in H305 and antislip patterns in xf-63. Not really happy with the latter, perhaps I should have thickened them with some surfacer before painting.
Next step will be metallics, and on to decaling.
Next step will be metallics, and on to decaling.

This one poorly designed decal prompted me to finally buy a Silhouette.

While I'm prepping to paint the stars and filets on the blue parts, I started assembling the gear. Most of the piece numbers given in the GWH instructions are wrong, and need to be swapped left to right.
Thanks to whoever uploaded the annotated instructions on here, this saved me from a bad headache.
Thanks to whoever uploaded the annotated instructions on here, this saved me from a bad headache.

Lantirn comparison. Academy F-14, F-15E, Hasegawa, and GWH from the VF-31 boxing. I will try correcting the GWH front shape, if I can't get a good enough finish I'll settle for the F-15 Academy one.

Why do we do this to ourselves 😄

Getting there. Had to move one of the stripes back a good 5mm. Gently rubbing a Q-tip with 70% alcohol erased all paints (Tamiya and MRP) back down to primer.

First decals are on. Looks like the orange-yellow was a decent match for the modelkasten decals. It's kinda weird how most Japanese decals have reddish yellows. Also, the lion is a different design on the sheet...

Something funky about this here lion. This'll have to do with some black paint to hide the stars, I can't be bothered sourcing the Hasegawa decal or trying to mask such a finely detailed logo. Also, the stars pattern is way oversized while the stars are too small here as well, hence the barbaric cuttings. It's a shame the design is so poor on this sheet, because it's otherwise nicely printed and the quality is very good.

Well, I just had to try fixing the lion. The design used on the Modelkasten sheet is from the CAG bird AJ200 prior to the last cruise, when it was updated. Also, the small lions on the tanks are missing from the sheet :/

Slowly making my way, finding out what can and can't be done with the silhouette. First try went ok, had to cut a couple more modified masks to get the mane right. Will need to fix that outline though.
Commenti
39 7 January 2020, 13:19
Following with interest as I'm planning on building the -A version later on.
7 January 2020, 14:15
Nice one! 👍... which paint will you use for the blue? Seems quite a special hue...
12 May 2020, 20:41
Here's what I wrote down in my project notes from various kit manuals: xf-4 + x-14 1:5 (Tam), h65 + H34 6:4 (F-14 Haseg), 8:2 80 + 34 (F-18F haseg). Guess I'll try with the Tamiya mix as I have the paints and see where I get from there.
12 May 2020, 21:21
Interesting paint mix ratios. I have the Modelkasten F-14D decal sheet as well and want to use that on the exact same kit! 😄 It seems that I'm merely a copyTomcat of Pierre's work here on Scalemates.... 😄
12 May 2020, 21:25
Re. photo 3. what is the correct placement of the fuel tanks? I would like to know. 🙂
On my Academy 1:48 kit for the F-14A, the two holes are off center, more inwards. Probably wrong but I haven't yet figured out what is correct. My kit seem to have this set of panel lines like you have, and your holes are centered on those panel lines, but those are wrong you say?
13 May 2020, 05:20
Well I figure the correct alignment for the pylons is somewhere outboard near those pairs of plugged holes along with the two caps visible behind them. That's where Academy placed them on their new mold 1/72 tomcat.
More importantly than the pylon position, what I consider to be visually right is for the outer side of the tank to be aligned flush with the outer side of the intake pontoon. But that's only a personal guess based on observation 🙂. So if you move the pylon, you have to make sure the pylon angle remains right and the tank doesn't stick out.
The position of those tanks is somewhat of a trick question in itself because they look different in each picture, and they possibly sway while in flight.
Hope this helps 🙂
13 May 2020, 08:16
I think I saw in a photo, clearly that the fuel tank is horizontal with the ground, but I will have to check it again. I guess I was wrong about thinking the fuel tanks are centered.
15 May 2020, 19:07
Actually, I looked at another photo now and now it looks the tanks are aligned with the tilted inake shapes, heh I have to investigate that issue onwards.
16 May 2020, 08:49
These show what I tried to explain regarding the pylon being offset to the exterior: F-14 Intake Correction Set (Zactomodels Z32049, 1:32) and the tank being aligned with the outer wall of the intake anft.net/f-14/f14-detail-airintake-07.htm
Regarding the stance from a side perspective, the tanks are probably aligned with the intake indeed, so facing slightly upwards [img1].
")
16 May 2020, 09:13
nice to see this build pick up again. solid progress
20 September 2021, 16:28
Welcome back Martin, I swore to myself to clean up the backlog before opening another box 😄
20 September 2021, 17:51
Welcome back Pierre! Good to see you back as I was waiting to commence on my own build as well. 😛
3 January 2022, 22:16
Welcome back to the both of you! Hopefully I will find time to complete this in the coming weeks.
Patrick, don't you have a few tomcats to finish already? 🙂
4 January 2022, 08:08
Your masking skills amaze me! Good job on those stars, definitely better than the decals!
22 January 2022, 13:13
Thanks, it's mainly the Silhouette cutter doing a good job. It'll certainly look better than the decals after some refining though 🙂
22 January 2022, 14:27
In answer to your question on photo 14, I have come to the conclusion that model making can sometimes turn into a highly specialised form of masochism.
22 January 2022, 19:22
Pierre, beautiful work with the Silhouette for 1:72 scale. I have a Silhouette Cameo 4 myself. I was interested in your comments about washi vs Orafol flexibility. I was wondering if you have a "go-to" resource for best blade settings for Tamiya washi sheets and for Orafol 810? There used to be a good resource group on Facebook but I can no longer locate it and guess it may have been removed.
15 August 2023, 05:25
Hi, thanks for the kind comment. It has been a while since I last used the silhouette and I cannot access my settings right now, but as far as I remember it was all on the very low end of the scale with the autoblade and cutting mat. I think I used the same for both materials too. Will post again when I get around to checking these settings.
15 August 2023, 07:54
Album info
GWH F-14D AJ213 "Old Blue"


Group Build

Scalemates F-14 Tomcat Group build 2020
1. Maggio fino a 31. Dicembre 2020
1. Maggio fino a 31. Dicembre 2020