

Paint Job


Commenti
21 July 2014, 18:52
There you go! 😄 Good job so far! 👍
Luckily WWII German Armour doesn't have a lot of wheels, right!? 😛 lol
21 July 2014, 20:43
John - don't forget that most of the wheels need to be painted on both sides too. Sheez!
Thanks for the look and support guys. I hope to get the camo colors down later this week.
21 July 2014, 21:33
Yes, indeed! Two sides to be painted 😉 and then they need to be weathered too! Each one of them! 😮
I have a Jagdpanther on the bench as well (well.. on hold actually) and I can honestly say that I am not exactly looking forward to painting all those wheels 😉 then again, in the end, once it's done, it does look the part! So it IS definitely worth it 😄
Looking forward to further updates, Anthony! 👍
22 July 2014, 10:06
You are a lucky man when you have the help of quickwheels;)
Anthony, I´m looking forward your build, i love the Jagdpanther!🙂
22 July 2014, 12:06
John - agreed, just don't do what I did. I tried priming the wheels all black then went back to paint the base color. My thought was to use a stencil when painting the prime coat and be done. Guess who could not find his stencil when it came time to paint and the black primer required more dunkelgelb than I anticipated. 🙁 For now I am going back to the old way of painting base then rubber.
Holger - I did not have the help of quick wheels but I think before doing another early-mid war German vehicle I will have to do it. The road wheels on my kits are taking too much of what little paint time I have.
22 July 2014, 16:45
Hahaha! Misplaced the stencil! That's not good! 😛 Especially in your case when you have counted on using it and have based your painting strategy on it 😉
I have a few circle templates but none of them really work for me. They are never quite exactly the size I'm looking for. Maybe I just have the wrong ones?
As for the QuickWheel masks, even though they might seem like Walhalla, they are not 😉
I have almost all QW sets for most common WWII German Armour (see my stash). I have used three (Sd.Kfz.250 , Panther and Marder) and all three ripped the paint right off the wheels when I ejected them from the templates. The sticky side of the QW masks (in mine anyway) is way too strong. There is no way wheels come out "unharmed".
And it really was the QW masks at fault here! I ALWAYS let paint layers dry (cure!) for at least 24 hours and the wheels were also primed. The wheels were in the mask only for the duration of the paint session and some initial drying time, like 1 minute or so. So it's not like the glue of the sticky side of the QW masks had time to react with the paint.
I had to do all wheels all over again, by hand, which added quite a large amount of extra time (of which I have very little to begin with) to the project.
I have mentioned this exact issue in my Sd.Kfz.250 album here: 1. Project start | Album by JohnVK (1:35)
So be careful, QW masks are not always a time saver! 😉
.
p.s. don't be tempted by removing / covering the sticky side of the QW masks! It will ruin them 100%. I tried. Now the wheels either just fall out, which wouldn't be so bad in itself, as you could simply tape them on the back side or push them in with your hand, or whatever. But the problem is that now the paint creeps under the masking parts, where the glue used to hold the mask tightly against the wheel. So... yeah... don't do that 😛
23 July 2014, 06:15
QW masks are really not mentioned to be time savers, are they? They just help me to work accurate.
When you eject the wheels from them, there is always some ripped off paint. I first spray the wheels with rubberblack, then use the mask for spraying f. e. Dunkelgelb and after use i grab my brush and paint the ripped off paint again.
I dont know if i do wrong but thats the way i work with them... 😉 And i´m faster as without them...😄
23 July 2014, 06:46
Yes, they are meant as time savers as well. That is how they are primarily promoted 🙂 since you can simply drop in a large number of wheels and airbrush away. Do x number of wheels in the time you normally do one. That's what they basically say.
But given that paint is ripped off the "rubber" part, it doesn't really save any time at all. I would still have to go and repaint the rubber parts. So I could just as well airbrush in the base color and then brush paint the rubber parts. It would be equally fast, or slow, depending on one's paint skills 😉
But yeah, I agree, the accuracy part is a thing that would be beneficial. Unless the ripped off paint goes straight through to the wheel itself, in which case you would still have to brush paint very carefully to not get paint over the center wheel rims. If you look at my album again, you will see that in most cases the paint gets ripped off from the entire surface where the mask was, which is against the rim of the wheel.
Quoted from the QuickWheel manufacturer webpage (aside from the part where they mention the accuracy stuff):
"The QUICKWHEEL mask enables to paint many model wheels within a time limit of several minutes!!!"
I am most definitely not doing "many wheels" within a time frame of just several minutes... with all the necessary repairs it basically takes me almost just as long as when I am not using the mask 😛
The thing is, the paint should not be ripped off. I have seen quite a few people use them successfully in that way. They airbrush rubber black, put them in the QW mask, airbrush Dunkelgelb, eject. Done. No ripped off paint at all.
So I can't understand why in our case paint gets ripped off? What are we doing differently? Or wrong maybe even? I would really like to know 🙂
BTW sorry for hijacking your thread like this, Anthony! I will stop now 😉
23 July 2014, 15:24
John - do not apologize. On the contrary I found your exchange with Holger very insightful. Right now I am planning on going back to doing my road wheels by hand. It can be tedious but with patience the product is as good as you good wish. 🙂
That said, I have been contemplating QW as a viable option to help save time (sorry Holger) and I agree that they are promoted as time savers. (aren't practically all modern modeling tools?) 😉
So, if I do use QW in the future I will know to look out for possible paint removal.
Btw, have you tried giving the wheels a clear coat (future or acrylic) before inserting into QW? Might that help keep paint in place?
23 July 2014, 15:46
Glad is was useful in a way 🙂
I must admit I haven't tried a clear coat because I usually don't use any clear coats at all. Except for when it comes to decals, if I can't use the numbers / crosses templates I have for airbrushing them.
But I will definitely give that a try next time! Thanks for the tip! 👍 🙂
And yeah, you're right, hand painting does have some advantages as well, right? 🙂
23 July 2014, 16:05
John - do me a favor and let me know whether clear-coating w/ QW works. If it does I am likely to take the QW plunge with my next non-steel wheeled German AFV project. 🙂
23 July 2014, 17:13
Will do! 👍
In fact, I will do a test this weekend, starting Friday, with some Jagdpanther wheels. I'd really like to know if that is the solution to this problem as well 😉 will take a few days of course because I am going to let the individual layers fully cure before moving on to the next step.
I'll keep you posted 👍
23 July 2014, 20:24
Small update: progress on the test is slow. Unfortunately the weather isn't cooperating 😉 it's VERY warm and humidity is HIGH!! Bad combination! Paint takes much longer to dry, let alone fully cure.
So I think I will have this test finished by Monday at the earliest, since I do still want to make sure all paint is fully cured, to make the test reliable and easily reproducible! 👍
26 July 2014, 16:21
Warm and humid... same here... And the sea isnt cooling me at all... So modeling doesnt work for me, here! Its just too warm under my roof...😄
27 July 2014, 17:36
Yeah! Same here! Way too warm inside (apartment, flat roof, top level, corner of the building -> worst place to be during hot summers!). I am spending most of my time outside 😄
27 July 2014, 20:23
John - thanks for the update. I look forward to seeing your test results. 👍
Meanwhile, I completed the camo scheme for my Jagdpanther and E-25. I took a "peek" at the results this morning lifting a little of the blue-tac mask. I am not sure how well it will turn out. Like you, I am going to let the paint fully cure before going further.
I hope your weather improves soon. Of course here in North Carolina we hit 90+ every day during summer. 🙂
28 July 2014, 14:55
Pictures! Or it didn't happen 😉 hahaha! No just kidding! 😉
Yeah, I really think it is always best to let the paint fully cure. It will most definitely be for the better if you continue with consecutive layers 👍 especially since mostly you wouldn't need to add another layer of varnish before moving on to the weathering (there is not a single layer of varnish on my Sd.Kfz.250 and PaK38, for instance).
Can't wait to see your camo scheme! 🙂
'
'--- QuickWheel Test ---
'
I have completed the test with the QuickWheel mask and I think I can conclude that you are my new hero! 😄
It looks like the varnish layer has made it possible to eject the wheels without ripping off any paint. I have also thoroughly checked the varnished wheels and none of the varnish has come off either!
I did this test with two sets of wheels:
- Set 1 (LEFT in the image below) was merely painted with acrylics
- Set 2 (RIGHT in the image below) additionally received a satin varnish layer (I used Ammo of Mig - Satin Varnish - A.MIG-090)
Obviously it is VERY important that when you eject the wheels from the mask that you don't rip them out. You must remove them CAREFULLY and SLOWLY! Otherwise there is no way it comes out undamaged.
In the image below you can clearly see that while I was able to eject one wheel of set 1 without damage, the result with the second wheel wasn't that great.
Both wheels of set 2 came out unharmed! And I actually repeated the test by putting them back into the mask, let them sit for a few minutes (so the glue of the mask really grips) and ejecting them a little bit more forcefully. But the paint & varnish still did NOT come off! So it looks like this WORKS! 😄
I truly hope these results are reproducible with all QuickWheel masks I have. I will most definitely be varnishing my wheels from now on! 😄
Thanks VERY much for this suggestion, Anthony!! Like I said, you are a hero!! 😄 👍
[img1]

29 July 2014, 10:50
John - thank you and thank you!! I am truly happy to have been of assistance with the suggestion and hope to do so again in the future. 👍
Meanwhile, you have answered a HUGE question for me as I have always wondered about the QW gambit for road wheels. I think QW will be a tremendous time saver on the next German AFV. 👍👍
Also, I agree completely about letting the paint cure. It's the one area where I force myself to be patient especially since I use Model Master enamels w/ acrylic/future coats. I took the masks off of the Jagd and E-25 last night. The results were acceptable to good on the Jagd. The E-25 result was a "yuck" but not because of the paint but because I adlibbed/winged the camo pattern using my "non-artist's" eye and (you guessed it) totally messed it up. 🙁
Fortunately, the E-25 was just a project to keep my hands busy and I do not intend to repaint it. It was good enough that I learned my lesson. 🙂
Lesson boys and girls - if you gotta experiment with your own camo designs do it with a lesser kit you do not intend to repaint under any circumstances!! 😉 LOL
29 July 2014, 15:39
Yeah, thanks to your awesome tip I am back to giving the QuickWheel masks another chance! 👍 I'm really happy with that because if they work, they will most definitely save a LOT of time! 🙂
Haha! Adlibbing camo 😉 lol
I have tried doing camo free-hand quite a few times but that's just not for me. I simply can't do it. I always mess them up.
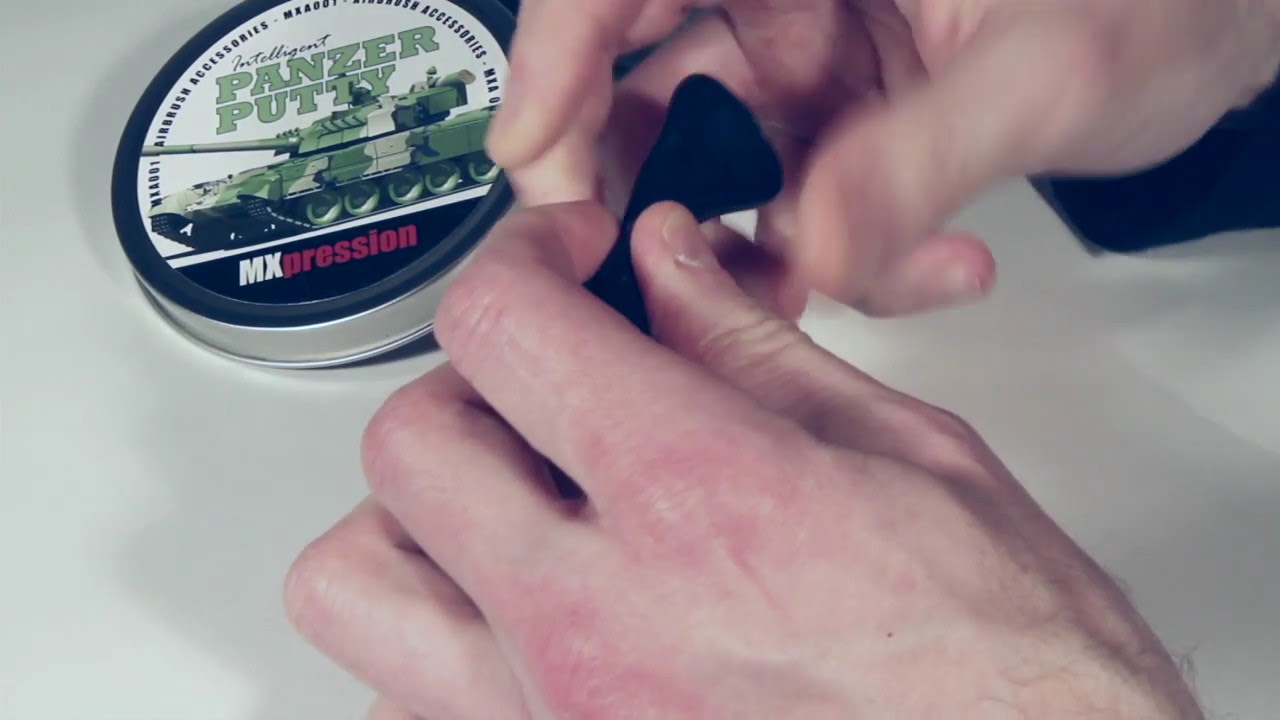
I need to prepare them with masks. I use Panzer Putty for that. If you haven't seen or tried that, i can wholeheartedly recommend it. It may seem a little expensive but it's absolutely worth it! I have two cans of the stuff.
Here's a video of what it does: Youtube Video
And using a lesser kit for experiments, that's a good lesson indeed! 😄
I currently have an old Tamiya StuG IV for paint experiments 🙂 I think has like a million stacked paint layers at the moment 😛 so once that one becomes unusable I'll use the next old kit 😉
29 July 2014, 18:36
John - I just checked the review for Panzer Putty. The stuff looks simply awesome. Definitely something to use the next time I have any projects requiring camo.
Thank you very much for the info. I think I will have to give it a try.
29 July 2014, 20:14
The panzer putty is a great stuff to use! I like it a lot but you cant mask something and then leave it for some days! You have to work instantly on a masked model.
Especially when you will apply a german WWII ambush camo, this is the stuff to go with!👍
30 July 2014, 06:13
Holger - no doubt that panzer putty is the real deal. Unfortunately, once again Europe is way ahead of the U.S. in that I cannot readily find the stuff here. I will keep an eye out for it.
30 July 2014, 14:54
Panzer putty is almost the same as Silly putty. I used Silly putty in the past and it is less expensive. Plus Silly putty comes in neon colors which looks cool.
30 July 2014, 15:56
Thanks Wayne because I already have a supply of Silly Putty, provided my kids haven't snagged it. I will give a try on the next time I paint. 👍👍
30 July 2014, 16:54
Album info
After long procrastination I finally sit to paint beast.


