

Lasst ihn saussen?

Trumpeter's 1:35 Br-52

The rear of the tender

Left side of the Br-52

Right side of the Br-52

Front of the Br-52

Top view of the engine

Replacement of the windows

Front view

Internal view

Added wiring

L.Z. Models stoker given a different cap

The other side

Converting a civilian to a stoker

Cast on sleepers and splti

Concrete side walls

Removing the cast on split

Split removed

Found the original side walls. Plastic card removed and damage control started.

Cast on details removed to receive resin parts.

Resin parts in place.

More than a wipe of putty

Damaged parts restored, puttied and painted

Surrounding wall of signal tower adapted.

Rear Side scribed: left: front, middle: rear, right: own handy work

New sleepers. Unpainted

Base with new sleepers

New sleepers and split

Real split, from aquarium split

Real wooden sleepers...

Rails and railshoes in place, measured but unpaintes

Basic layer of paint: red rust for the railshoes, darker for the rails

After a thorough was of black-brown.

I call the rails and bedding finished!

Another welcome addition: SMA's German Soldier at tge railway station

The clock as envisioned by it's makers.

The contents of the box.

The finished clock

The original chain works. Spoorwegmuseum Utrecht

The original chain works. Spoorwegmuseum Utrecht

The original chain works. Spoorwegmuseum Utrecht

Levers in the Spoorweg museum, Utrecht

Levers, rearside in the Spoorweg museum, Utrecht

Block manager, original

Levers for switch and signals, original

Block manager,Cardboard Stangel models, modified with plastic card+ chain

The last lamp of the signal box hangs

The finished Signal Box, rear

The finished Signal Box, front

The finished Signal Box, right

The finished Signal Box, left

The finished Signal Box, without roof, rear

The finished Signal Box, without roof, front

The finished Signal Box, without first floor

The finished Signal Box, overview

The finished Signal Box, with wall

The base of the main building

Lots of interrior parts. A puzzle.

Hard to get the walls at 90 degrees...

Complete with floor.

From another angle

Top view

Original doors of goods department

They do not fit!

First try of scratchbuild door

Compared to the original

Final products.

They are operational.

The lock is functional too...

The ceiling is in place.

With carrying beams

Wainscoting and wallpaper ready

The other side

The top floor

The goods department.

Ticket counter, outside.

Cupboard inside the office

Ticket counter, inside,

Dressing up the counter with papers, stamps and inkpad.

Entrance of the office.

Adding an extra wall to the first floor.

From stirring sticks, the roof deck is created.

Dry fitting the roof.

Adding structure to a piece of blank wall.

The inside of the main roof finished..

And being painted.

Since the original roof of the goods shed is less than satisfactory, I decided to create a new one.

Test fitting the pieces of plasticard.

Dressing the oudside with pieces of cardboard.

Adding white glue, to soften the edges

And take fine gravel for adding structure.

Putting on a layer of gray to simulate the mortar.

The first piece of roof added

Yet more dry fitting

Painting the main roof, also adding gravel in order to get the structure even.

Starting to put on the stone colour.

Not finished yet, but getting there!

Adding some propaganda posters

Just like real life, special plinths have been added

The obiquitous portrait of der Fürher have been added.

WIP on some accessoiries. Many more to come.

Creating some "life" to the outside walls...

Then there was (a desk) light!

The fingerprint has been removed afterwards.

Not too big, is it?

I consider the top floor done.

Added a nice stove.

And a self made great coat to the clothes rack.

The break up te open space, a storage room was created.

What's a storage room without storage?

The roofing is added.

All seams are covered with lead, just like the real deal.

Also on the annexes.

Yes! The station main building is finished and in place.

It has been adorned with paper ivy vine (which received a matt varnish coat from the airbrush) and grass tufts.

Also some black pigments were added.

Since the original clock was damaged beyond repair, I replaced it with a Mini Art clock.

After taking the initial photos, I discovered that I forgot to add a chimney. This has been added.

The dressing of the diorama has been started by adding both commercial and propaganda posters.

And a bench, which will be populated later...

The stoker is ready to clean up the cabin.

The broom is made of an old brush.

Not bad, for one of my first figures.

Tamiya's German Shepherd wil become police dog.

It already received a collar (not on this picture.)


My very first try at painting faces. Not bad, I think.

The whole figure. The handkerchief is made from puty.

The rear. This guy did some hard work!

The stoker in place.

Sweeping up the previously spilled coals

His shovel at his side.

View from the left side

A young lady on her way to somewhere

Toting her luggage...

A worker ready waiting for his train to take him to his job

The local gendarme enquiring for the ausweis of a traveller

A HJ Rottenführer cautiouslty watching the scene

Ready to jump in...

Tanned from the many days outside

This stern lady will take her place too

The specially made perspex hood

This nameplate was custom made too

Left side of the base, ready for it's occupants

Front view

Right view.

And again a bunch of figures ready.

And more to come.

Seen it all, hating it all... This elderly woman seems to have a downward attitude.

While this woman, obviously being well off, has a haughty look at things

This woman, toting all of her belongings, despite of the pleasant temperature, seems to have left her home. Forever?

Bulky clothes are more easily worn then put in luggage...

She can finally put her things down. Until her train arrives, that is...

This man seems to be rather nervous... Does he have anything to hide?

A young, well formed woman, who will certainly draw attention of the attending men...

This lady hasn't got a clue either when the awaited train arrives.

The rear side of the figure

A caring mum going on a journey?

This is more than needed for just the office...

Whilst her little boy has to stay behind...

With his grandparents

Mum and son together...

He obviously does not like the situation.

Returning from leave

His heavy pack leaning against his leg...

This little lady from Preiser will find her place on the station too.

Originally she took care of the catering for the soldiers with Frontürlaub, but not she collects money for das DRK (Deutsches Rotes Kreuz)

Her greatcoat has got an added hood.


Commentaires
21 6 February 2018, 15:05
Thanks! There is no space!! The Br-52 already exceeds the limits of the base with its 88 cm... 🙂
29 April 2018, 18:13
Finished a couple of new doors for the goods department yesterday. The originals did not fit at all!! They are operational and so is the locking mechanism...
11 June 2018, 09:05
Hi! Erwin,
Love your diorama, I really love your attention to detail
I'm building the same Custom Dioramics Diorama, full of faults, a really tricky assembly! Mine will have an Trumpeter BR86... 😄
I will save those beautiful images from the sginal tower to guide myself, only for reference, if I may! 😄
Cheers mate
Keep the good modelling
Keep posting
30 September 2018, 17:36
Hi Paolo,
Thanks for your compliments. Construction alone is quite a hassle indeed. I therefore try to do my best to camouflage this by detail and painting. Progress is slow, but I learn to use new techniques every time.
Off course I'm more than happy to share my experience with you. Please don't hesitate to ask me if you have any questions.
I just added some more photos of the wallpaper and the wainscoting
1 October 2018, 07:27
Updates will be very welcome indeed!
I will follow your project development with a big smile
Cheers mate
1 October 2018, 20:26
Bought some raw and burned umber oilpaints today to aid in painting the ticket counter.
2 October 2018, 18:14
Just added a few pics of the finished ticket counter, before mounting...
14 October 2018, 17:34
Since the Germans were fond of stamping their documents, I figured it might be a good addition to make a couple of stamps....
16 October 2018, 17:57
All those details are most welcome! Waiting for more...
Cheers mate
16 October 2018, 20:28
I develop new ideas while working on it, so more will come for sure
17 October 2018, 11:59
Have been a busy weekend! What does a rainy day... cheers mate. Keep up
12 November 2018, 16:22
Well thanks!! Danke... This is not just from the last weekend though, but the result of a couple of weeks on and off at the dining table/bench
13 November 2018, 08:22
Just added some more photos of the top floor. I am waiting for the materials to finish the main lights, the I can add the roof and put the building in its place.
31 December 2018, 08:15
You have been very busy! Good modelling and a happy new year! Cheers mate
1 January 2019, 18:45
Thanks a lot, best wishes to you an every one else too. Today I spent some time on accessories like luggage, a bench for on the platform and lights for the main building.
1 January 2019, 19:14
Make an 2019 a fantastic modelling year! Best, mate... cheers
3 January 2019, 15:00
Thank you very much...I wish you and your family all the best for this year and all the upcoming ones!
3 January 2019, 18:15
Great job. Schön umgesetzt. Decals von Peddinghaus? Waiting for more!
9 February 2019, 22:15
Dankeschön. Es stimmt das dass Decals von Peddinghaus sind. Ich fand ihn aber viel zu dik, und unlogisch eingeteilt. Nie wieder für mich....
10 February 2019, 08:34
Stunning work so far. Looks great to me. Keep going Erwin 👍
Is the main builiding scratch build?
16 March 2019, 09:12
Thank you for your compliments... No, it is the old Custom Dioramics kit. A big part of the interior and the roof of the goods shed is scratch built, though...
18 March 2019, 07:39
Thanks... I still have quite some accessories and figures to paint, so, though the base is ready, the rest is far from that...
3 June 2019, 05:57
I know it sounds boring, but I added another series of figures to the album.
21 August 2019, 10:44
@Olivier, because I've been doing figures since March... 🙂
@Paulo, thanks... I'm now constructing the last couple of figures. I think there will be around 10 more to come... Then accessories, and put everything together before I can call this one finished...
22 August 2019, 06:04
Well after such a long time, I think it is about time to finish this dio...
Now looking for a spare left hand for a female figure. The original was no good..
22 August 2019, 13:58
Just finished a little nurse from Preiser. Not a brilliant casting, but a subject too interesting not to include. I modified it by making her collect money instead of bringing coffee for the soldiers on Frontürlaub, and added a hood to her greatcoat.
Pictures in album.
16 September 2019, 14:08
Yes, she does 🙂
The painting of the skirt posed yet another challenge for my growing painting skills, as the Vallejo paint tends to dry too fast for longer stripes. Specially the white paint. I used glaze medium to solve this and, while not ideal, this makes the result a lot better.
17 September 2019, 06:08
Hi Erwin, what a unbelievable big project! Its lovely to see, how much heart you put in the little details! Really a feast for the eyes! Are the decals included in the kit?
17 September 2019, 11:52
Holger, thank you for your heartwarming comments. I really appreciate them. I finally near completion after I don't know how long. The building of the loc has been at a stand still for 10 years or more, so I don't know how long that took me. The station and signal tower took me more than a year, while I started painting the figures in march. The last ones are nearly done. I have painted 40 human figures, a cat and a dog when finished. Now busy with the last details of the figures and accessories for the dio, like suitcases, crates, a cart, sacks, etc.
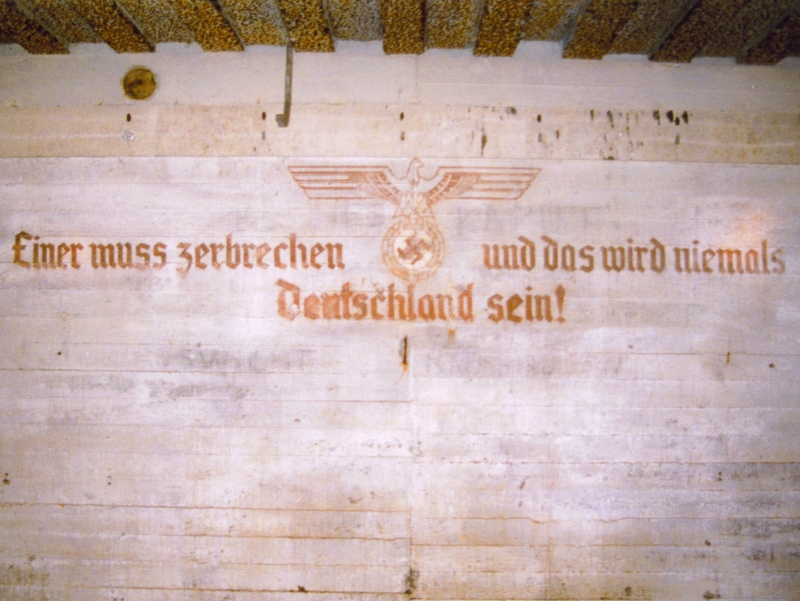
As for your question: no, these are Peddinghaus decals. I cannot really reccomend them. Besides the fact that the slogan is from the inside of a bunker of Batterie Todt (found that one out only later: [img1][\img] ) the carrier film is way too thick, and the text is split in half HORIZONTALLY!!!!! I can understand this for the swastika, but this was also the case for the slogan. It is almost impossible to cut it so that there is no seam visible, and on closer observation of the model, this is certainly visible... Having said this, the kit decals ware even worse for their subject, and there are no alternatives. So I had little choice...
17 September 2019, 13:23
I am really looking forward your end result. Or cant such a dio ever be finished?
18 September 2019, 11:32
I sincerely do hope so... As stated, it took me long enough... My intention is to have it ready this year. Probably next month or so...
18 September 2019, 12:24
Finally! Completed... Just uploaded the picture of this (for me) monnumental project. With a large steam engine, 40 figures, a cat, a dog an lots of accessoiries, this project took a long time to finish, but finally it is done... I hope you enjoy the pictures. Questions and remarks more than welcome...
29 September 2019, 19:07
True that... Mind you, I even managed to finish it this same month! Now I tumble in a deep hole...
29 September 2019, 19:15
I love the gentleman with his so well pressed brown suit reading the krant.
29 September 2019, 19:20
This one is from Stalingrad. I replaced the Zeitung with a paper sample from ETA though..
29 September 2019, 19:46
All I can say is wow! I've been watching from the beginning! Nice work!
27 January 2020, 15:00
This is awesome! I want to do something similar with my BR-86
14 August 2020, 18:27
WOW!! Amazing me Son!! I started to look for some inspersion tonight since I could only find a few dioramas on line, then found yours! looks like what I had in Mind!
Outstanding work Erwin!! from the ground work, figures, weathering and BR-52.....etc etc! I have the BR-52 and a few cars! I am planning on turning two of the small flatbeds into a couple of passenger cars! Question: do you have any info on the small passenger cars used by Germany? and could you tell me where did you get the decals for your BR-52, I've seen so many modelers with the black/red and camo versions, not sure if they are accurate for the early war years. But your Engine looks the most realistic so far!!
Thanks
Eddie
14 August 2020, 23:18
Gentlemen, I thank you. @Edward. I am humbled to hear that I am an inspiration to you. What I basically did is make up all, kind of small stories around the combination of station and Br-52, to depict the real world. Everyone has his/her own motivation to be somewhere and to go somewhere else. A station is thé place where these stories come together, albeit for a short while.
The type you commonly encounter in those days is the so called Donnerbüchse. If you search this, you are bound to get enough information.
As for the decals, they are from Peddinghaus, though I do not recommend them. The design is awful, with the text split in two horizontal,. That is, the actual middle sentence is split!
Plus the carrier film is very, very thick! Getting them on is a hassle and it is impossible to hide the edges...
15 August 2020, 21:44
Thank for the help Erwin! your right about the small stories, that is the basis for most Dioramas we as models build!
I looked up the Donnerbuchse and yes; I found the info I was looking for, so thanks. as for the decals, I found them on the Peddinghaus web site and they look crappy, but you did a very good job of placing them on your BR-52!
Well take care and stay safe!
Thanks
Eddie
16 August 2020, 02:29
My pleasure. On hindsight I regret using those decals, yet, on the other hand: a really viable alternative is lacking, since the kit decals are so bad, subject wise...
17 August 2020, 08:18
Hi, thank you for posting this amazing kit! It looks freaking awesome! I have been modeling for years. I've been into old steam locos since I was a kid. Is was thinking about doing this kit. I read an old review on Fine Scale Modeler. The reviewer said this kit is a hassle to put together. I am wondering if there were any major issues that you ran across.... I am also looking at the Revell 1/87 Big Boy kit also. But it doesn't look like it's very detailed.
Any suggestions for someone just getting into train building? (I do have experience in other genres, so I do have some skills building already)
2 June 2023, 02:39
Thanks for your kind words. I still look at this dio on a daily basis and am still happy with the results...
As for the difficulty of the engine: I can't remember any big issues with it (though it has been a couple of years since I finished it) . I did build it OOB, with only the real black coals and aforementioned decals added.
Handling the kit for painting was perhaps the biggest problem.
One thing : if you intend to do it as a war loc, paint it dark grey. The black over red livery is post war only.
I have no particular tips, but do try to think logically when painting. If you first assemble the kit completely, you wouldn't be able to reach every nook and cranny with paint. And study pictures of the real thing for weathering. Though there are no locomotives in this livery running these days, the placement of grease and soot isn't any different on the surviving samples as it would be during the war.
2 June 2023, 13:56
Wow, amazing big dio,
great details and charming locomotive,
congrats!
2 June 2023, 16:46


