

Dornier Do 228 LM - Pollution Control


Unfortunately, the model mostly has no countersunk engravings. So I'm re-engraving them now - for me to that extent the first time.

Since the rudder is not centered, i separated it from the fuselage half.

Open the engine intake.

Open the engine intake.

Open the engine intake.

Engine inlet modeled.

Engine inlet.

Exhaust pipe, completely missing from the kit.

Drilled out the housing for the exhaust outlet.

Making the exhaust pipe.
From left to right: purchased plastic pipe / drilled out / wall further thinned.
From left to right: purchased plastic pipe / drilled out / wall further thinned.

Sloping on the exhaust pipe made as on the original.

Finished exhaust pipe.

Finished air intake.

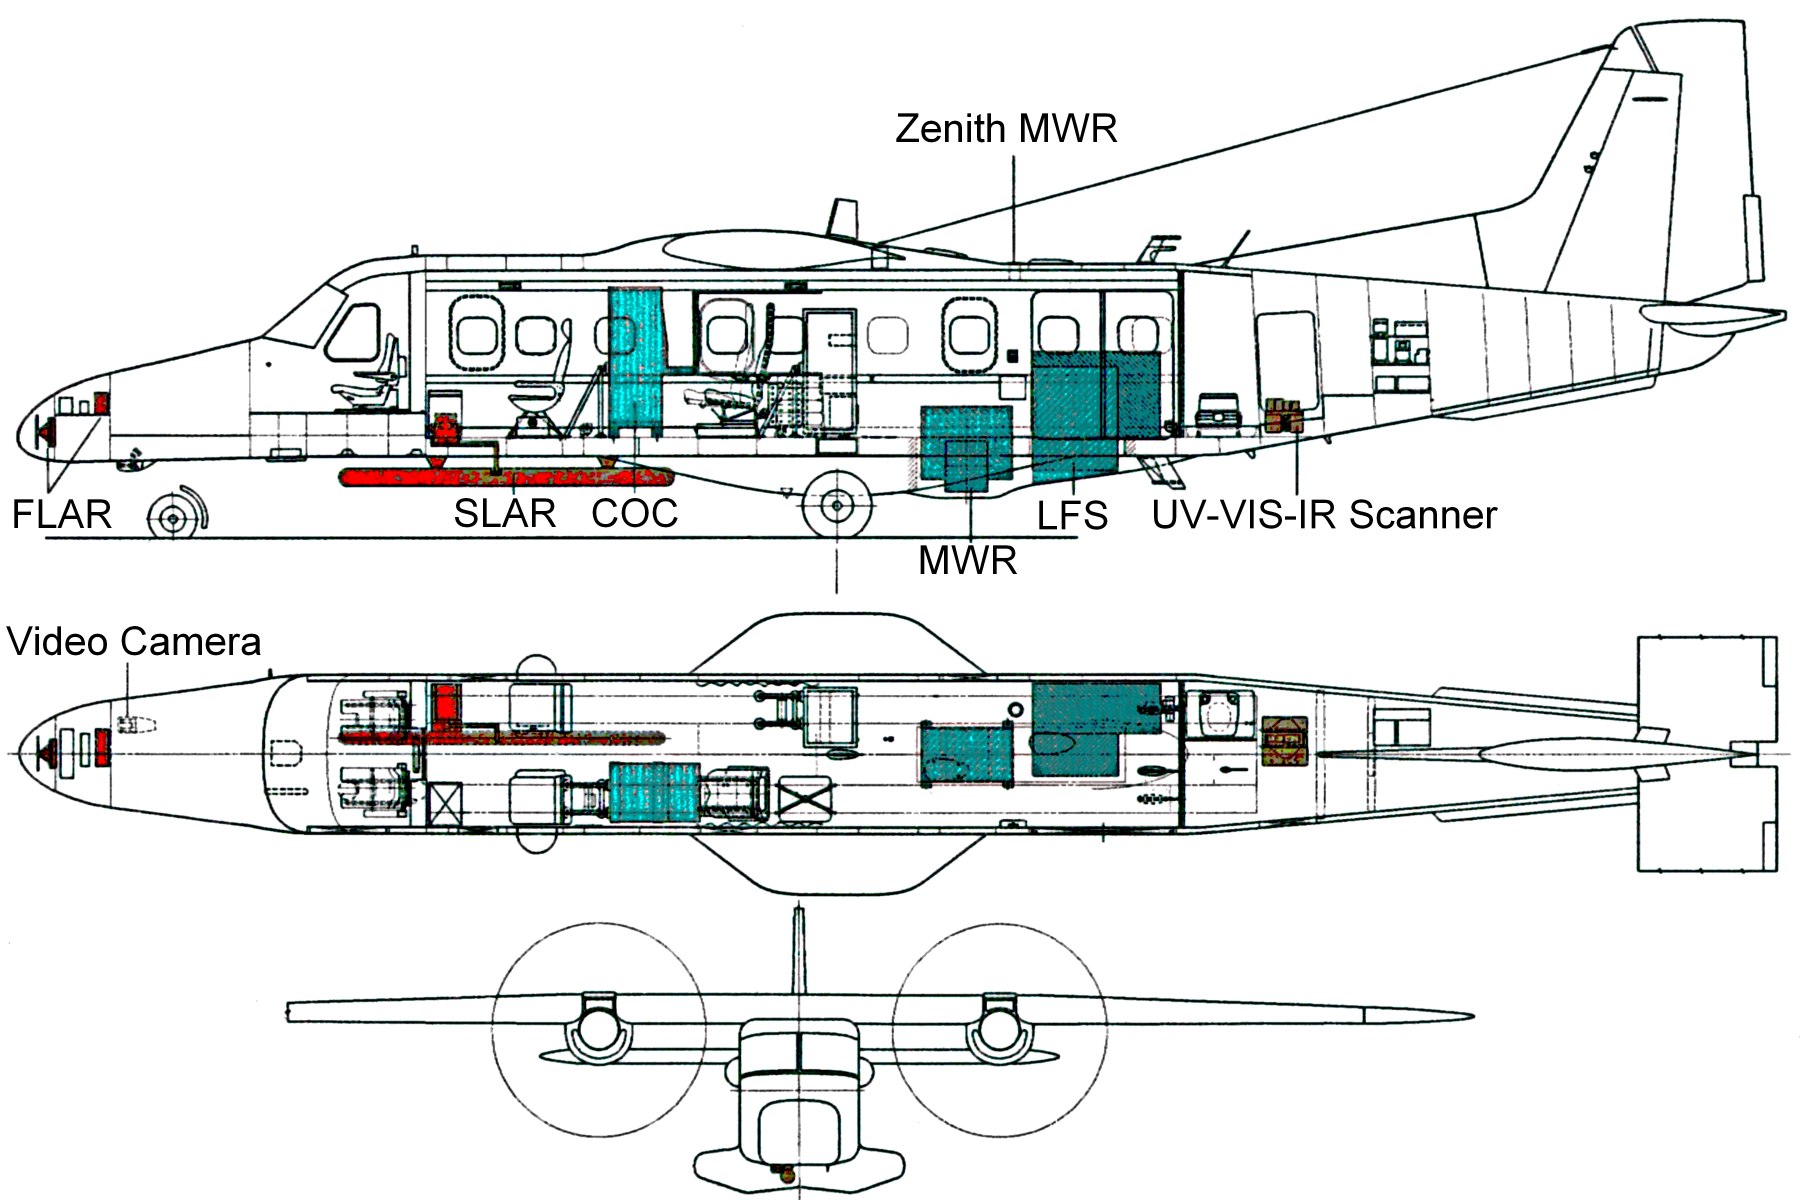
The MWR and LFS on the original. The sensors are completely missing in the kit.

Initial stage of scratch building the sensors.

Initial stage of replicating the sensors

Scratch building of the sensors. First pass tests.

Scratch building of the sensors. First pass tests.


Beginning of scratch building of the cargo / passenger floor.

Beginning of the scratch building of the cargo / passenger floor.

Control unit of the sensor phalanx an original machine, old building lot (like 57+01).

Scratch building of the control unit.

Scratch building of the control unit.

Scratch building of the flour and technical equimpent.

Scratch building of the rear bulkhead with a sliding door to the cargo hold and the toilet that was built into the original machine.

Reference: Photo from the crew. The control panel shows the modified version (and therefore does not fit my version).

This set goes really well with it.

Reference: Sensor units

Reference: Sensor units

The scratch built interior takes shape. Now with the seats in the cabin.

The scratch built interior takes shape. Now with the seats in the cabin. I have to raise the backrest for the two additional seats (see reference photo).

Corrected middle control panel (elevated).

Short overview.

Reference


Reference: Older cockpit


Spacers for retracted landing gear and landing gear door.

Slightly pimped tires

Rear stabilizing fins on the original. They are missing in the kit.

Scrachbuild stabilizing fins.

Putty and sanded hull.

Putty and sanded hull.

Reference: rear sensor phalanx.

Ready scrachbuild rear sensor phalanx.

Ready scrachbuild rear sensor phalanx.

Reference: Openes front landig gear so without front landing gear doors?!

Forderer chassis bay adapted for this purpose.

Gear wheels.

Modified landing gear door.

Scrachbuilding the forward landing gear bay.

Scrachbuilding the forward landing gear bay.

Scrachbuilding the forward landing gear bay.

Scrachbuilding the forward landing gear bay.

Fitting test of foward landing gear.

Fitting test of foward landing gear.

Reference: SLAR

Scratch build SLAR

Drilling holes für the SLAR

fitting test of the SLAR

Reference: Sensor or camera?

Scratch building

Scratch building

Assembly of the windshield


Sanding and filling, sanding and...

Sanding and filling, sanding and...

Sanding and filling, sanding and...

Sanding and filling, sanding and...

Sanding and filling, sanding and... it's slowly getting better

Sanding and filling, sanding and... it's slowly getting better

Sanding and filling, sanding and... which I now declare as finished.

Sanding and filling, sanding and... which I now declare as finished.

First painting work on the plane itself.

After a few hours of masking, the black paint on the leading edges of the wings and the glare protection on the engines.

Glued stabilizing fins at the rear.

Sanding and filling, sanding and... which I now declare as finished? No. filling and sanding continued again, after I found various defects in the surface after priming.


Decorative stripe sloping downwards

correction to my model

Gradually retrofitting small details

Gradually retrofitting small details

Gradually retrofitting small details

Reference: Openes front landig gear so without front landing gear doors but with fender

Scratch building: Front gear fender

Reference: Antenna base on the aircraft fuselage, two different ones with slightly different antennas

Scratch building the larger base of the two

Scratch building: Two antennas and base

Scratch building: Two antennas and bases, i will only attach the antennas at the end

Painted and stripped again and painted again several times until finally the basic course was ok - improvements still required.

Painted and stripped again and painted again several times until finally the basic course was ok - improvements still required.

Color edge not perfect, therefore repainted.

Color edge not perfect, therefore repainted. Now ok.


The landing lights are there. I didn't dare to recreate the spot with clear material like the original.

The landing lights are there. I didn't dare to recreate the spot with clear material like the original. So it's just hinted at in color. I still touched up the color edge.

Reference: Sensor unit.

Painting the sensor unit in the rear. Gray cover edged with a thin black stripe.

Painting the sensor unit in the rear. Gray cover edged with a thin black stripe.

Painting the sensor unit in the rear. Gray cover edged with a thin black stripe.
Commentaires
55 17 June 2023, 22:22
Will you build the early four-blade prop version with the Radar mounted under the nose, or the updated five-blade prop one?
18 June 2023, 19:10
Hello Cuajete and Markus. Thanks. 🙂
@Markus: I will build the 57+01 because the decals represent this machine. The 57+01 was one of two first DO 288 LM.
The 57+01 was never modified (among other things with five blade propeller) and was finally auctioned off.
I have to add the SLAR under the forward hull, the MWR and LFS behind the main gear accordingly.
I plan to add the equipments and seats to the passenger compartment (at least rudimentarily), so that there is no emptiness behind the windows.
I think the modified version with the five-blade-prob would have been easier to convert.
Tomorrow i'm going to go buy evergreen tubes to recreate the MWR and the turbine exhaust tube.
To recreate the SLAR i will use leftovers from the casting frame.
Information source: [img1]
18 June 2023, 20:04
I am currently in the process of detailing the engine nacelles.
The exhaust pipe is completely missing from the kit.
I made an air duct for the engine inlet so that you don't look into the empty engine nacelle.
A cross section of the engine can be found on page 10 of the document: reports.aviation-saf..28-0_D228_9N-AHA.pdf
23 June 2023, 18:18
Hello everyone.
I finished the exhaust and intakt of the engines.
The Donier DO288 LM was upgraded with various sensors, all of which are missing from the kit. so I started to scratch build the missing sensors.
I also started to recreate the interior so you don't look through the windows at an empty interior.
These works are now causing me to consider discarding the original plan (show the machine in flight).
Instead, i'm considering leaving it on the ground and opening the door at the back so you can see more of the - scratch build - interior.
24 June 2023, 20:31
That is serious modelling work!
Engine and Interiour looking great 👍
25 June 2023, 16:34
I just aquired this kit as I really like the livery. Your build provides valuable informations and insights. The engines have been lifted several levels with your improvements. Very well done. A problem I have not found a solution for yet are the props. Will you use the kits props?
I will certainly skip any interior as almost nothing will be seen.
Keep up the good work and please continue to share your experiences (as they will save me a lot of hassle 😉 )
26 June 2023, 07:24
Hello Łukasz, Ekki, Thomas, Cuajete and Michael, thank you very much and nice to have you here.
@Michael: Yes, during my research I also found that the propellers were not correct.
The original plan, which is still current at the moment, is to show the machine in flight.
That's why I haven't dealt with the propellers any further up to now.
29 June 2023, 19:55
I finished the interieur and the crew members. At the moment i'm gluing both fuselage halves together. Before that i had to adjust the interior and two figures because of the thick transparent parts. And the dashboard dosen't fit. I had to sand down some of the corners on this one.
13 August 2023, 13:18
Hi Finn an Cuajete. Thank you very much.
In the Kit the front landing gear are completely covered with doors but on my reference photos, the front doors are missing. A part of the landing gear isn't covered with doors.
20 August 2023, 10:45
Some news.
Scrachtbuilding of the SLAR and the other sensor/camera at the bug. And the assembley of the windschild. Here, however, extensive filling work is necessary..
And i put the holes for the step below the left front cockpit door
27 August 2023, 13:47
You build makes me feel bad. Even if I skip the interior - which I will - there is still plenty to do to turn this into a decent model. The referenz pics you share are very informative. Thanks for that. Great job so far.
27 August 2023, 18:10
Thank you both.
Little new: lot of work - little progress. Sanding and filling, sanding and...but it's slowly getting better.
At the same time I started a new "simpler" project: A4 / V2 (black/white testversion) just before the start | Album by Shar (1:72)
3 September 2023, 00:20
WoW! I know that kit and you have done a great job on it - especially with the cabin. Following!
3 September 2023, 05:15
The sanding and filling is finished. At least I hope I don't find anything again somewhere.
The windscreen needs to be polished as i sanded it down a bit on the edges.
I have now started painting the DO228.
10 September 2023, 07:44
This is looking amazing! Your attention to detail in the interior is truly stunning!
10 September 2023, 08:11
Some news:
After a few hours of masking, I could now start painting the leading edges of the wings and the anti-glare protection on the engines. I also glued the stabilizing fins on the rear.
Filling and sanding continued again, after I found various defects in the surface after priming.
16 September 2023, 23:08
Looks like you set a high standard for this build. Really anxious how this continues.
17 September 2023, 15:52
I missed this one and was planning for this kit at some point soon. Nice to see you took this build seriously! The Do228 is a beautiful plane!
5 October 2023, 11:08
Great scratchbuilt details, Shar! Looking forward to watching your progress.
5 October 2023, 11:17
Welcome Marius and Gordon.
After some unfortunate adversity, I finally found time to continue working on my Do228.
22 November 2023, 20:15
Went better than feared - I had the masking masks on the paint for a long time and was worried that this would cause discoloration. Everything was fine except for the tailplane, but the white paint had run into one of the beads on both sides. I still need to fix that and a few imperfections.
26 November 2023, 09:49
Didn't look at this for a while, this is turning into something really really special. Can't wait for it to be finished!
26 November 2023, 21:34
Greatings.
I noticed a mistake on the nose of the plane. There the blue color strip falls downwards (as does the glare protection). I have now corrected this.
I'm also in the process of correcting the small errors in the tail where the blue stripe goes up to the tailplane and, I started adding smaller details. I had previously left these out so as not to break them off.
21 January, 09:31
Your build is already well advanced, but I'm still going to grab a chair and watch.
21 January, 13:08
Thank you Nicolas. Nice to see you.
I have made more small details and I am almost finished with touching up the hull paint.
28 January, 09:16
Such a lot of fun watching how you worked this model. I have so much to learn! Thanks for sharing.
28 January, 10:00
Hello Simon, nice to read you and thank you very much.
@All some news: It took me many attempts to paint the airplane tail satisfactorily. But now I'm done there.
Next I painted the landing lights. Since I didn't trust myself to recreate a clear cover in the curve of the fuselage (like the original), I just indicated the area with a gray paint job.
I also finished painting the gray sensor unit in the rear with the black border.
Well, slowly but surely it's time to paint with clear varnish - unfortunately it's still a bit of a horror for me.
24 February, 18:06
Project info


Group Build
Sea Patrol Aircraft Flying Boats or Land Based will do! All nations and time?
1. Juin 2023 jusqu'à 31. Mai 2024
1. Juin 2023 jusqu'à 31. Mai 2024