
Tråd startad av guzbandu
lade till ett nytt fotoalbum.


224 26 April 2023, 02:33
Good work so far, keep it up! (and keep the parts of the model away from your assistant 😉... )
26 April 2023, 05:06
I have to barricade my model into my spray booth whenever I am not working on it 🙂
27 April 2023, 05:14
Hi Jennifer, you are on quite a mission if this is your first kit.
The airbrushed parts do look good.
As a hint: In case you want to orientate a picture differently, like pic 2 and 3 for example, you can do so by choosing the option "advanced" in the "manage"-menue.
May I suggest to further dilute paints you brush paint? The paint on the door seems to be rather thick. I for my part had a hard fight to alter my initial tendency to cover an area with one layer of paint - be it brush or airbrush. If you do a test brush stroke no stroke patterns should be visible. You will then probably need three to four passes to cover the intended area. Another thing that took me a long time to accept was to unload my brush on a piece of kitchen paper before I touch the model. If you then touch the model, it should not leave a drop or puddle but just a smooth thin layer of paint. Maybe this helps a bit on the way.
Keep us posted on your progress
Happy modelling
27 April 2023, 07:08
Good progress. From experience on this kit, ensure that you put the clear parts for the nose area on before painting. The fit of these is quite difficult. (masked of course). (not the actual gun transparency, that fits fine). 👍
27 April 2023, 07:16
Thank you for all the advice. In hindsight, this may have been a bit extreme for a first model. I definitely need to dilute more when I do brushwork. Thankfully that was done on the interior and should not show too much in the end. I will endeavour to improve going forward.
27 April 2023, 08:10
<<<<< I have a similar feline 'helper' who often appears, usually whilst trying to do the most tricky things.
27 April 2023, 08:20
Yes, her timing is generally remarkable, she tends to really pick her moments.
27 April 2023, 08:30
Great job so far - especially for a first kit! Looking forward to seeing your progress (both on this kit and afterwards 🙂)
My helpers are generally invisible, photo-wise, but their fur (especially now in the spring shedding season) sneaks into at least half of the macro shots 😉
27 April 2023, 14:22
Good luck Jennifer, it is looking very neat. I second the advice given on brush painting. Many thin coats and patience required. The fur of my two helpers are well embedded into the paintwork of my models!
27 April 2023, 17:13
Hi Jennifer, watching 👀 your progress with interest also, great work so far 👏👍
27 April 2023, 20:12
The cat is a vital element of the build for morale. Don't let it try to help; the lack of opposable thumbs is a detriment to assembly and sanding. Paint though is a different story 🐈
28 April 2023, 03:15
Hi Bernd, Juskifo, Tyson, Michael, Neil, and Rui. Thank you for your kind words and advice. Agreed the cat is a vital element for morale 🙂
28 April 2023, 03:25
I tried thinning my paint before doing brushwork tonight and it helped. Thanks for the good advice. My brushwork could still use improvement but it's better than before.
29 April 2023, 02:27
For a first kit, this is looking very promising! Live and learn and after three more kits, see how much your skills improved.
29 April 2023, 07:25
Quite an ambitious choice for a first kit, but it is also looking pretty good so far. Following with great interest.
29 April 2023, 07:25
Thank you, Bruce, Rando Dude, Martin, and Michael, very encouraging.
29 April 2023, 11:35
Just an unimportant suggestion, Jennifer: there is a functionality in the album editing that shows the last uploaded photo as the main one - it gives us the possibility to follow the development of your work 😉
29 April 2023, 12:59
Thanks Robert, that is a great suggestion, I will do that from now on.
29 April 2023, 19:39
Hi Jennifer, re pic 42: Dry brushing can definitely be an important skill for your arsenal, just be careful which brush you pick up to do it…I've ruined quite a few brushes picking up a perfectly fine detail brush and getting a bit too enthusiastic with it while drybrushing 😉
29 April 2023, 19:55
Hi Tyson, good to know, I won't use any of my best brushes but only my junk brushes when I do it going forward.
29 April 2023, 20:01
You must be very talented, Jennifer - I have never mastered a dry brush technique...
29 April 2023, 20:33
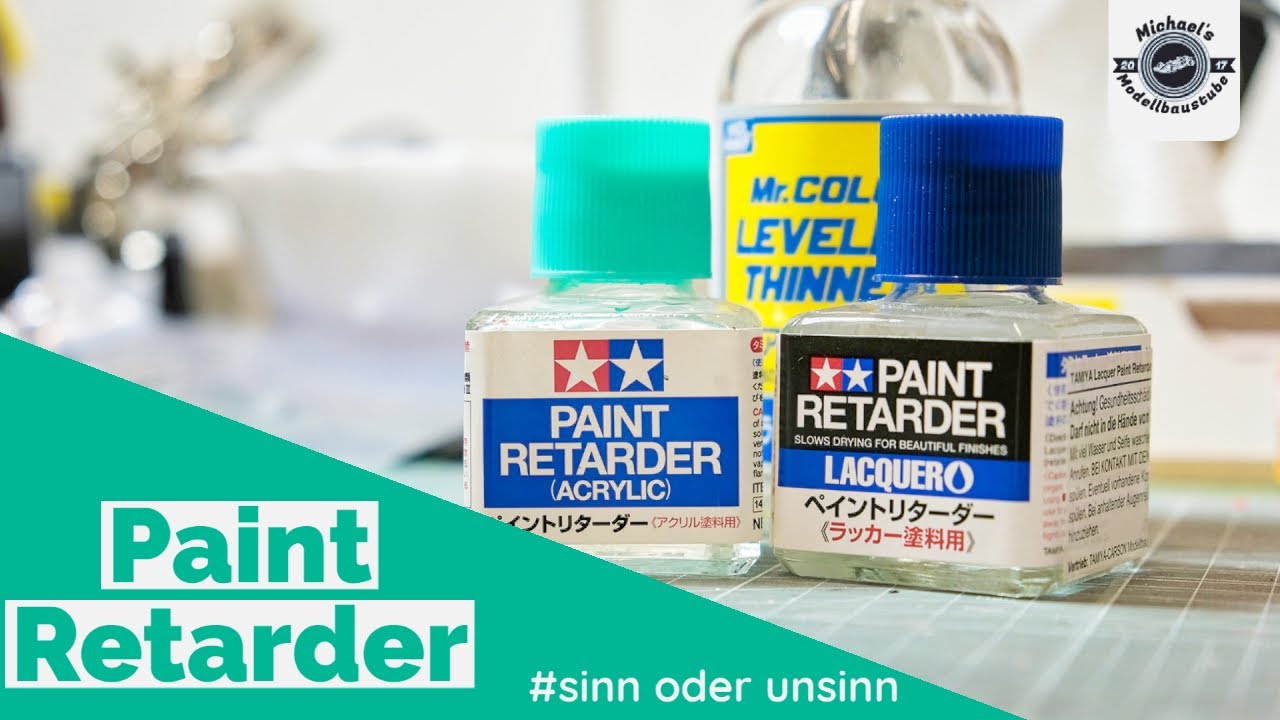
Looks like everyone is piping in with advice, so I'll share some… paint retardant. It's similar to thinner, but keeps the paint from drying too quickly, which cuts way way down on the brush stroke marks.
1 May 2023, 05:59
Hi Simon and Greg, thank you, Simon. I will try that Greg when I start working on the exterior. Thank you for the advice!
1 May 2023, 12:33
Thank you, Roland and Pietro. I am having a lot of fun with this model.
1 May 2023, 15:59
I'm a bit evangelical on paint retardant and it's the kind of thing I wish I'd known when I started out. The first time I saw it, the implications of slower drying paint were not clear to me. I mean, don't we always want the paint to dry faster? However, using it makes a big difference when brush painting.
This video isn't in English, but the results are clear to see:
Youtube Video
1 May 2023, 16:02
I am definitely going to try it, Greg. The video's results were clear and definitely a win. I had dismissed retarder since I had thought who wants their paint to dry slower, I can see now this was a mistake.
1 May 2023, 17:03
Jennifer, you're doing great! Even though the B-17 is not the easiest kit, you're doing very well. I really like your enthusiasm for model building. I wish your enthusiasm will last and model building will bring you joy.
4 May 2023, 21:08
Thank you David, I might even finish the interior one of these days soon 😛
5 May 2023, 17:01

Your work on this kit looks great, and love how supervisor is keeping watch over your progress. Mine just curls up and sleeps in my paint booth.
5 May 2023, 22:48
*wow* Skyhiker, thank you, it is going to take me a while to go through all of that. It's a forty minute movie 😛
6 May 2023, 02:16
Wow, great work so far! Congrats, it is really looking good! But to be honest i mostly like the pics with your red/white assistant... awww....
6 May 2023, 05:36
Have to say I never knew any lady modeller who's interested in military motif, and things look much better than my first model, looking forward to the final reveal!
6 May 2023, 07:24
Thanks, Edward and Chan, I fell in love with the Memphis Bell years ago when the movie came out. It was a lovely film. My assistant is definitely the best part of any project that I do. Thank you, Roland, very sage advice. These are just temporary holds while each 24-hour glue step sets but when I do the final glue of the two fuselage pieces (which is coming) I will try to keep that in mind.
7 May 2023, 02:22
Love watching your first build. It's really good! Love the pics with your cat in them. Also, you've inspired me to order a magnifying lamp.
7 May 2023, 09:36
Jennifer if you will be doing more 1:72 scale projects the best investment you can make is a magnifying headset. amazon.ca/Magnifier-..stable/dp/B08F6YZLH2
7 May 2023, 11:01
A focal length between 12 and 6 inches is best for most things in this scale.
7 May 2023, 12:40
Oooooohhhhhh, thank you Skyhiker, I have bought the magnifying headset, that is a great idea! Thank you, Simon.
7 May 2023, 13:41
John's advise is spot on. I use Fine and Extra Fine, and they are the best thing ever 👍 Use with water, and the sanding sticks last years. The extra fine makes the model smooth and shiny again 👍
7 May 2023, 16:14
не самая простая модель для начала в моделизме и у вас очень хорошо получается удачи в дальнейшем
7 May 2023, 19:56
Ok Bruce, very good to have that confirmed. I've already bought the sandpaper so I am going to see if that works as my pocket book has limits but will keep that in mind for the future.
8 May 2023, 03:47
Thanks to MM Scale Models for the video that taught me how to do the weathering techniques that I applied tonight. Youtube Video
8 May 2023, 05:04
Nice progress. Having a well organized working space doubles the fun.
May I ask which riveting tool this is? Looks pretty decent.
You may want to reconsider riveting your first model though, as riveting can be a source of quite some frustration (guess how I know).
Keep up the good and steady progress and have fun.
9 May 2023, 10:28
Thank you, Michael, it was suggested that I practice on a spoon, so I am going to try that and see how hard I find riveting to be. I imagine the real difficulty is in getting all the lines right though. The tool is by SM SunniMix: amazon.ca/dp/B09Q3D7..dt_b_product_details. I would really like to try the riveting as I kind of consider my first model to be a playground to try everything, Although scratch building I am saving for when I have more experience. I have been reading that applying the rivets to the primer layer is much easier than the bare model so I may try that.
9 May 2023, 14:00
Very impressed by your commitment and investment for a first model Jennifer. I think most of us (of a certain age at least) started with just a kit, a tube of stringy glue and a vivid imagination.
I find riveting to be less hard than you'd guess at least on flat sections. Concentric fuselage circumferences need guide tapes I find. They add a lot of interest to large flat surfaces IMHO.
9 May 2023, 20:32
Thank you, Robin, Dave, and Neil. Yes, a lot of preparation and research has gone into this model. One of the advantages of being a certain age is you tend to prepare more I think 😉. I am much happier with an organized workshop. You have sold me on doing rivets Neil.
10 May 2023, 00:39
Jennifer you will find that the size of the sprocket wheel matters when doing rivets. The smaller the diameter of the wheel the more control you will have and you will be able to reach further into the corners. Most corners will have to be individually done though. Embossing label tape helps to keep things straight. Proper blueprints are a must.
10 May 2023, 00:56
Hi Skyhiker, I have found blueprints and a very good video that goes through the process including the use of label tape. Thank you for the advice, it is much appreciated.
10 May 2023, 02:08
You might want to reconsider the layer of putty that you applied, it will be a lot of work to remove the excess. The stuff does shrink, but not that much 😂
Been there, done that.
10 May 2023, 07:25
Martin has a point. There is nothing wrong with trying out the putty but I have found that it is only useful for certain types of jobs. Most seams can be sealed and sanded using cheap super glue and sanding sticks. It's much faster, easier to control, doesn't shrink, sands down better and it is better for making panel lines and rivets because it doesn't crumble. If you go to a dollar store you can usually pick up a pack of 5 tubes for about a dollar. I usually buy 50 small tubes at a time. Larger bottles tend to dry out and should be avoided. Cyanno accelerator will make super glue set instantly and debonder will remove super glue from delicate areas. A decent set of sandpaper can be picked up online.
10 May 2023, 09:02
You can make a super glue applicator with a sewing needle. Just cut the top of the eye off to make a fork and set it in your pin vice hand drill. The super glue applicator will give you surgical precision. Put a small puddle of super glue in the wax of a tea light candle. Dip the applicator in and apply where necessary. The wax helps to keep the super glue from drying out too fast. If you make a lid for the tea light using tin foil it should stay liquid for two days and the lid will keep any dust from sanding out.
10 May 2023, 09:16
Hi Martin and Skyhiker, oh dear about the putty, I guess I am going to find out how hard it is to remove (at least from the top) and then I can try the super glue for the bottom. Skyhiker, believe it or not I found those blueprints doing searches on the Internet.
10 May 2023, 10:44
And if you add a little pigment to the superglue, it remains just a bit softer and you can see where it is.
10 May 2023, 11:18
Don't worry the putty should work fine. It's just the super glue is probably better in this type of application. Trying both in the beginning is the only way to know where to use each product.
10 May 2023, 12:57
Hi Jennifer, sometimes you can use the masking tape before applying putty (or whatever for same purpose) and sanding. Tape the sufaces alongside the gap, then you can sand at will.
In this case you don't worry about ruining the areas around. All rivets and panel lines would be protected by the tape, and you can even tear them off when the sanding is nearly done, saves up time, and keeps the surface neat.
10 May 2023, 15:04
Let's not forget Mr Surfacer Liquid Putty! Apply with a brush, cut back with IPA or Mr Surfacer Levelling Thinners.
10 May 2023, 15:14
The art is to make perfectly smooth surfaces after filling. This requires more sanding than what you have done so far. Work your way from 200 grit to at least 800 if not to 2000. Keep your magnifying glasses on and use a directional light to see any unwanted shadows from surface texture. For a gloss surface it is advisable to wet sand up to 12,000 grit.
10 May 2023, 15:14
Hi John, I will look into Mr. Surface Liquid Putty, it sounds time saving. Hi Chan, thanks for the pro tip! HI Skyhiker, added 5000, 7000, and 10000 grit. Does that look better?
10 May 2023, 16:10
It's hard to tell from photos how smooth it is. It looks like there is still a bump in the second panel of the tail. Between 100 and 600 grit is where most of the sanding should be done. Once the surface is even you can start polishing with higher grits. If you can cast a shadow in any area you should probably go over that section again. People always underestimate the prep work before priming but it is what makes for award winning work. Of course not everyone wants to make the perfect model. The main thing is to go as far as you want to and enjoy what you are doing. It is a hobby after all. But since you are just starting out it is best to learn what to look for in order to get the best results, which is why I've made these suggestions.
10 May 2023, 16:28
Hi Jennifer. What do you want to sand with a P5000, P7000 and p10000 sandpaper?
As long as you don't want to grind and polish clear parts (or high gloss finish), a P240, 400, 600 and maybe another P800 will work for everyone. 🙂
10 May 2023, 16:41
Oh, now I understand what you are looking at. OK, I will check for bumps. Thanks Shar and Skyhiker. I thought you were looking at how rough the surface was.
10 May 2023, 16:58
If it comes to putty you might consider getting Perfect Plastic Putty
Perfect Plastic Putty (Deluxe Materials BD44, No)
Similar to acrylic ones mentioned above, can be awlays reworked using a bit of water, even when it dries completely. Not as good as super glue as it crumbles, but it's sandable as well.
Not sure however what's the availability across the pond, they make it in UK.
")
10 May 2023, 17:48
Thanks for the pro tip Lukasz, I will look into finding a supplier here in Canada.
10 May 2023, 17:59
I can highly recommend Tamiya Putty Basic Type.
Tamiya Putty Basic Type (Tamiya 87053, No)
But just don't get it on your skin.
")
10 May 2023, 18:13
All of those putties are decent and have there uses but for a perfectly blended professional fuselage or wing roots, standard super glue is really the best. You won't have to chase the seams over and over. It is the cheapest, most efficient, fastest and does the job better than any other product. I would only use putty for areas that need sculpting where two part epoxy would be overkill. And I would only use water soluble white putty for small areas that need to be quickly filled where sanding is impossible such as near raised elements and when using super glue with debonder would be too laborious. Believe me I know what I am talking about, I have a masters degree in sculpture and 35 years experience as a professional artist.
10 May 2023, 18:36
Okay Skyhiker, your super pro tip has been noted. I will definitely pick up some little dollar store super glue packages. There is a store near my house.
10 May 2023, 18:48
I'm not sure I have super pro tips. I think for those you should ask people like Alec K, Bughunter, Spanjaard, Harvey H.W., Andrea Brenco, Jeanette Müller, Michael Phillips, or Roland Sachsenhofer and many others here as they have more experience in modeling than I do. But I'm happy to relay some of the experience I've gained in my time with this hobby.
10 May 2023, 19:17
I think Roland Revolvermann and Łukasz's method of using acrylic putty is good if you are very experienced or have a high quality kit that fits well together, but most kits are not like Bandai kits with perfect fits. Of course with practice any method can be perfected as Roland and Łukasz have proven many times over. Practice makes perfect, the tools are just tools.
10 May 2023, 20:38
Fully agree, this forum is about supplying all of us with options, but we choose ourselves what to pick, there's no one&only way to perfectly build any given kit 😁
10 May 2023, 20:49
I agree with the gentleman above and their Points of view. A lot of it is experiencing what works for you. On that particular kit you're working on. I know me and I have lot to learn still. That what makes it fun.
11 May 2023, 01:59
Sky you must have an incredibly good eye, I had to use a ruler to find the bulges. I did some more sanding and added a grey primer to try and "pick up" inconsistencies. It's not absolutely perfect but I think I may call it good enough.
11 May 2023, 02:31
Thanks, Dave, a very good perspective. And yes, this is terribly fun isn't 🙂
11 May 2023, 02:40
Hi Jennifer. With a black primer (and some playing with the light angle)you can see inconsistencies in the surface better than with grey.
11 May 2023, 04:56
Jennifer I think you are starting to get a feeling for what to look for. Congratulations. Surface structure, blended joints, clean edges and proper lines in the structure are the best things to concentrate on at this stage. As well as making sure you have clean and transparent clear parts and proper masking. Later you should look at the overall structure such as the angle of the wings and landing gear. Then move on to focusing on the painting; making sure your paint doesn't over extend or under extend the intended area, and making sure you have smooth surface layering, correct hues and values, and proper transitions to your various layers of paint and clean edges where necessary. Once you know where and what to look for it's is just a matter of practice and a desire to improve with each model that will make you proud of your talent and success. Welcome to the wonderful world of modeling!
11 May 2023, 05:09
Thank you, Shar for explaining the grit levels I should be using and Sky for pushing me to get it right. It looks so much better now.
12 May 2023, 00:23
Any behind the scenes action going on with this project? Been a bit quiet lately.
15 May 2023, 01:20
You have excellent timing Sky, you asked roughly an hour before I posted my latest update.
15 May 2023, 03:00
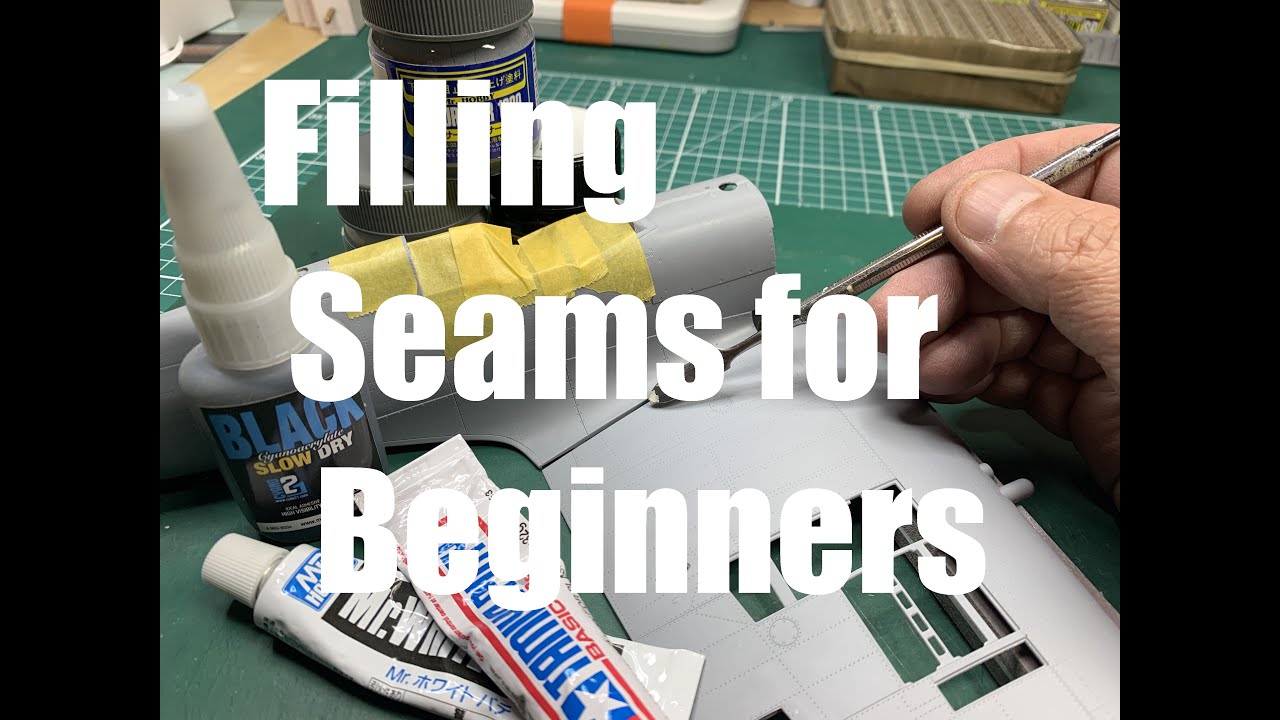
So I found a good video on how to fill seams. Youtube Video Thanks to everyone for all of their great advice.
15 May 2023, 03:40
The Eclipse HP-CS is the first and only airbrush I've bought, it's done really well for me so far, hope you enjoy it!
15 May 2023, 15:55
Thank you, Rando, I am looking forward to trying it out tonight after work.
15 May 2023, 16:00
Yes, the Iwata Eclipse (0,35mm) is a great, unproblematic and universal airbrush.
The switching from two different Harder & Steenbecks to the Iwata Eclipse was like a revelation for me. My partner has since changed too and is also totally happy. I am convinced that you could not have bought a better one for model building and as a beginner.
15 May 2023, 17:36
I have an old Iwata hp-b 0,2 mm that is a bit difficult to use because the trigger pressure is very sensitive. I'm curious if those issues have been fixed? I'm sure they have since my Iwata is over 30 years old. Perhaps I just need to replace my valve with a newer one.
15 May 2023, 17:50
Thank you, Shar. Sky you should replace your valve for sure, the Iwata is wonderful to use. I used it over my lunch break and it was mind-blowingly better than the starter kit that I was using.
15 May 2023, 19:49
Jennifer, it's clear that you have put a lot of effort into the preparation and that you really enjoy building the model. It's amazing the progress you've made. 👍 I wish you continued success!
17 May 2023, 11:40
Thanks, James, I have to admit I am a little nervous about the riveting, weathering, and decal steps coming up. I have bought plastic spoons to practice on.
21 May 2023, 04:41
Plastic spoons rock! Just learning myself and, along with cocktail sticks, they are my new favourite accessories... I'm mostly in this for the accessories!
21 May 2023, 06:39
I'm amazed you are attempting so many new techniques on your first model. Very nice work so far.
21 May 2023, 07:22
Great work so far! I'll admit, I like the idea of using zip ties to hold the fuselage together while glue dries. Keep going!
21 May 2023, 08:28
Nice progress so far Jennifer considering it's your first model,
congrats!
21 May 2023, 08:39
Thank you, Simon, gorby, Robert, and Pietro. Yeah, I love the accessories too! I am building my collection of "tools". Once my wings finish drying I need to go back and straighten that one engine, I just noticed it's fairly askew.
21 May 2023, 10:35
Mates advice are very much appreciated. Well done so far, Jennifer! 👍
You have a very nice furry assistant 😉
27 May 2023, 17:57
Check out my album to see what you can do with spoons, bamboo sticks and a cat toy WIP - MyFirst Gundam | Album by Mahoo76 (1:144)
27 May 2023, 18:19
Thank you Cuajete, Martin, and Shar. Things are taking shape and it is getting exciting. Mates are indeed greatly appreciated. The truth is I actually have two furry assistants who are almost identical looking, although most of the photos are of my girl Framboise. Loki is clumsy enough that I rarely allow him near my model. Very nice album Martin, I especially love the primary coloured spoons.
27 May 2023, 19:56
Great work so far! Not exactly a beginners kit, but you're doing a great job.
27 May 2023, 22:11
Yeah, it was suggested that I pick a subject that I was interested in so that I stay motivated and I absolutely love the Memphis Belle so... how hard could a Revell Level 5 be right? lol... oops... but I have to admit I am enjoying the kit immensely so even if it does not turn out as perfectly as a lot of the work I am seeing on this site, well it will be a great learning experience and my next kit will be that much better.
28 May 2023, 02:02
Agree with everyone else with how well you're doing on your first kit. Nice work on the interior. I'm impressed with your organisation and professional approach to building. Also, you've got a great setup with your spray booth and an excellent choice in the Iwata Eclipse, I have the same one. 🙂 My tip of the day, if you dont know already, is to pop a couple of beads into your paint pots. I use Non-Magnetic Hematite Beads, £2 for 100 @Amazon. They dont corrode or effect the paint and really help in shaking the paint ready for use. Especially if you use Vellajo acrylics, which are really good for brush painting.
28 May 2023, 03:39
I actually prefer simple stones that I washed before. They are dirt cheap and absolutely never ever corrode. 🙂
Your build is great to follow not just for the quite impressive progress you are doing on the fly as you devour all the input, but it is quite interesting to see how others approach problems and which tricks they use. And all of that in a nutshell.
Continue to have fun!!
28 May 2023, 17:46
Thank you, Mr. James, I am using metallic beads of some sort that I bought on Amazon, I agree they are great. Hi Michael, I had not thought to use plain stones, that is a terrific idea.
28 May 2023, 18:58
I am struggling with my right engine cover. I accidentally glued it askew and I can not figure out (yet) how to correct it. I used superglue in this case. I have tried taking some plastic cement and using that to separate the parts but since there is superglue in there not too surprisingly that did not work. I have ordered some glue debonder and will see if I can make that work but if anyone has any suggestions please let me know.
28 May 2023, 18:58
You can get debonder but I haven't used it and don't know how it would react with the plastic 😬
28 May 2023, 20:43
Do not have any experience with debonder, but superglue is quite brittle and often parts can be separated again by flexing the contact lines. I would try to pry the two parts a bit apart (best at a rather invisible spot).
28 May 2023, 21:17
Plastic glue does not dissolve CA glue. It would only damage the surface of the model.
Most debonders (CA glue solvents) do not react with plastic, but it is better to test them on a piece of plastic tree for example before use.
It is also possible that the debonder will not penetrate deep enough into the glued joint and dissolve all the glue.
As a possible solution (if all attempts to unstick the engine cover fail) is to cut the engine cover off with a razor saw. This saw has a very thin cut and the loss of material at the cut point is minimal. Carefully cut off the engine cover at the joint. After cutting, sand the mating surfaces so that the engine cover is in the correct position and glue the cover back in place.
And of course check the correct position of the cover during gluing. 🙂
28 May 2023, 21:35
Hi David, Michael, and Ludvik, okay thank you all for your advice, I will definitely test the debonder on one of my sprues before trying it on my model. I have tried prying the two parts a bit apart and that is not working. I have bought a mini razor saw and will pick it up tomorrow, let's see how well that works.
29 May 2023, 02:07
Any CA debonder will work. Just put it on and wait for 10 minutes. You may have to reapply a few times if you want to get all the super glue off. This is what I use... Glue Buster 28g (Deluxe Materials AD48, No)
")
29 May 2023, 17:13
A nice piece of work for your first project!
Keep on, it will be a very good start to scale modeling.
The only risk is, that your cat wants to play a little bit with it 😉
31 May 2023, 15:43
Hi Andy, I am actually building a plastic cover completely around one of my shelves to protect my finished model, complete with a hinged front using magnets to secure it so I can open it whenever I want. Believe me, I am planning on protecting my baby when it is finished. At the moment I have a cardboard-covered area protecting it until I finish the plastic shelter. 🙂
31 May 2023, 17:07
The riveting is looking very neat and I'm sure will add greatly to the finished appearance. Don't rush it!
31 May 2023, 17:31
It's really impressive what you do. I'm beginning to think that you're not really a beginner, 😉
31 May 2023, 17:38
I thought I was making enough rookie mistakes between my initial rough brush painting, the lack of use of flow improver, my seam filing, gluing the wings before doing the rivets, and gluing things at an angle that is so bad I am going to have to correct it 😉
31 May 2023, 18:46
Sound like a normal build to me... 🙂
I've made more mistakes on planes than anything else. Leaving things out after fuselage glued... 🙁
31 May 2023, 18:52
Shar, maybe our Jennifer is a ringer and really is the lady that does Jenesis models on you tube 🤔🤫😉
31 May 2023, 19:19
With so much advice you will be able to fly the thing 😀. Very nice to see your journey in words and pictures! 💪🏼
31 May 2023, 19:47
As a cat lover, I get where you are coming from. That "security box" is priceless!
8 June 2023, 02:59
Thank you, Robert, Cuajete, Simon, and Mona. Let's hope the cats decide resistance is futile, when they put their minds to it they can do some pretty amazing (and destructive) things.
9 June 2023, 09:46
As I understand this is your first go at model making?, well what a great start and super methodical too! Look forward to the finals at RAF Bassingbourne!
9 June 2023, 14:58
Mona, that is really sweet. My older girl might well sleep with my model but my younger boy likes to play and I don't think the model would survive him. Thank you, David, and Andy. Yes Andy this is my first model 🙂
11 June 2023, 04:35
Jennifer, I hope all is well with you. I haven't seen a post from you in a long time about your Memphis Belle.
29 July 2023, 12:15
Why modelers have cats is beyond me. Dogs don't trash your display case or your man cave. I can't see myself bolting plexiglass around everything just so furball don't mess with it ;P
29 July 2023, 23:46
Ludvik, I suspect the recent fires may have forced Jennifer to relocate for a time. Hopefully she'll be back with us soon.
30 July 2023, 09:32
I am well, I have stayed in touch with an old friend from high school and he recently had severe health problems I have had him move in with me and it has taken up a fair bit of my time. I plan to get back to my modeling work soon.
12 August 2023, 20:47
I was very pleased to hear that you're all right. 🙂
... and I look forward to continuing your work on the Memphis Belle.
14 August 2023, 09:43
I have finished decluttering my basement and moving everything in my guest bedroom closet downstairs so my guest now has a full closet, almost back to the model 🙂 Thanks everyone for your kind thoughts.
25 August 2023, 03:39
Aaaaaaand we're back. Missed you Jen. Glad you're ok and back in the saddle 👍🏻
19 January, 21:55
Glad to see you're back. Hope everything is ok and that supervisor (aka kitty) is still keeping watch over your project.
22 January, 01:29
Hi Dave, my supervisor is still active. My friend is fully healed, and I have mostly finished training for the new job, so I am very glad to be back, thank you.
22 January, 11:42
Now I meet the plane build! I've only seen the dio album so far. Following of course!
24 January, 15:13
I didn't realise how big that 1.72 model is. Are you going to metal finish or olive drab affair 🤔
24 January, 20:41
Thanks for the chuckle Mr James. Yeah, classic Memphis Belle colours for me.
24 January, 20:59
Just had a quick look at some of your photos and have admire the details you added to the kit.
25 January, 00:50
Thank you, Dave. High praise coming from a more experienced modeler.
25 January, 02:27
You might consider putting a cardboard on the bottom of your spraybooth and an aluminum wrap around the sides. Keeps the box longer in presentable shape. I personally like to quickly test shoot my gun adjustments on the cardboard too.
Repeating my mantra I definitely recommend a respiratory mask in addition to the booth. Whenever I change the filters I am amazed at all the stuff my lungs did not have to handle. Costs only as much as a decent kit. Choose the appropriate filters for your needs. And I was surprised at the minimal impact on respiration.
25 January, 12:06
Jennifer thank for the compliment. But let's be honest I'm old enough to know better but young enough and dumb enough to do it again.
25 January, 14:47
I'm 🤞🏼🤞🏼 for you Jennifer, that exterior paint session is both the most nerve wrecking and rewarding experience of the whole build. Enjoy this part! ☺️👍🏼
25 January, 22:16
Thank you, Desert Marlin and Patrick; I will try to enjoy the exterior paint to the fullest that I can.
25 January, 23:55
Hi Jennifer, I have found theses PDF step by steps are really helpful if you are keen.
acrylicosvallejo.com/en/step-by-step/
26 January, 11:44
Hi Stuart, those step-by-step PDFs look like a great help; thank you!
26 January, 12:34
Absolutely! Thanx a lot Stuart! 👍 I haven't heard of them so far and they look great.
26 January, 22:44
Great work, Jennifer! For a first kit, you're REALLY diving in! 🙂 Rivets! 😮
Also great that everyone is pitching in with help!
I found myself chuckling because your tool setup is so familiar! Almost the same model spray booth, 3-brush set, same airbrush pot/holder, folding table, similar iwata airbrush and I nearly bought those wooden-handled tweezers (how are they working out?)!
27 January, 02:44
Welcome, Tom, and thank you. Interestingly, we have a similar setup, as I did not buy all my equipment from one place. Are you new or recently returned to modeling? The community on this site is lovely and has been a big help as I have progressed through this first build. I love the wooden-handled tweezers; whenever I need a third hand, they are the first thing I pull out.
27 January, 04:49
Painting and gluing decals -this is my favourite stage of model building. It's the exact moment when a piece of plastic becomes a real model.
Keep up the good work!
31 January, 23:44
Thank you, Skyhiker, Ralf, David, and Ludvik; I have to admit this is exciting. I am getting close to finished!
1 February, 01:10
Unbelievable first effort - my first Memphis Belle at oh, say 8 , way back in the early 70's was done in one afternoon....very impressive.! following.
1 February, 01:58
Thank you, Casey; between when I started and now, I am already embarrassed by many of my early mistakes, but it has been an absolute joy to learn as I have gone along.
1 February, 02:26
Each model is a new learning experience if you challenge yourself to improving. I find that is the real joy in modeling.
1 February, 04:16
Our hobby is definitely more fun with our four legged assistants! I can relate to the need to keeping the crew and kit secured while you are away, cats seem to like taste testing the pilots. 😀
1 February, 15:34
Thank you, Skyhiker, Akaidada, CaptGPF, Nathan, James, David, and Cuajette. Have loved learning along the way with this model and could not have done it without my 4-legged helper.
2 February, 02:37
That's coming along beautifully………. everything you do looks so clean & neat, quite impressive👌👌
2 February, 23:37
Thank you, Mark; I have learned not to spray toward masking tape (I really should have known better), and I get to clean it up this afternoon.
3 February, 16:29
I cleaned up my messed-up paint job, but I have received feedback that I may need to do more sanding, possibly filling, and seam cleanup. I am going to go through all the suggestions I received and see what I can do. Expect a potentially much smoother model soon-ish. Through some minor luck, I managed to match the paint mix again almost exactly to the first mix of the olive drab.
3 February, 18:28
Soonish: time is relative when you are developing software or making a model. Looking good at any rate!
3 February, 18:42
Yes, Jennifer. Clean up. I bloody love that when I've cocked up a paint job. Wet and dry, sand the offending edges and holidays then respray 😤 Good luck Jennifer. 🤟🥸🤘
3 February, 19:22
Thank you, Mark; wish me luck matching the paint. Both the top and bottom are mixes. At least I can rely on weathering to smooth out some variation.
3 February, 19:55
Tomorrow, I will be buying a scribing tool to rescribe panel lines. I still have some paint cleanup to do, too.
4 February, 02:50
Only one?
Sorry to elaborate again, but maybe you'll find the info valuable nevertheless.
For (re-)scribing panellines you will encounter various situations that are best dealt with with different tools.
What's the shape you need? V or U? Most of the times it doesn't really matter, sometimes it does.
I take the liberty to just state what I use:
- saw: gives you a very good guidance as you can start at the still present panelline and continue into the panelless area. Creates a U-shaped groove. JLC is a classic, a lot of other brands and shapes are available. Blade width shouldn't exceed 0.2 mm.
- UMM scribing tool: has two ends and can be pushed and pulled. Sharp. External guidance recommended (ruler, tape or the like). Creates a V-shaped groove.
- punch: best for irregular shapes. Creates a V-shaped groove. Needs guidance. Works best with PE-templates (consider ordering some). Looks for ones with a wolfram-carbite tip. Gives you more punch for your buck.
- Scriber
+ Trumpeter: coarse and cheap. I like it for coarse work like cutting sheets. V-shape
+ Tamiya and others: Very expensive. Can only be pulled. Available in various widths, U-shape
- phiole/ampule cutter: dirt cheap. Properties similar to saw (highly recommended by my Master Modeller friend)
I got them all. I use the top three for 95% of my scribing. Buying UMM tools hurts - but only once. Then you should have a trusted mate. (Similar to Tamiya, but for scribing I would choose other options).
Hope that helps and doesn't confuse too much.
4 February, 15:23
@Michael Kohl, yes, thank you, that was valuable information. I would go to my local hobby shop and see what they suggest, but now I may combine the local store and Amazon. I already have a saw, and I will check its blade width. I had no idea I could use it for scribing.
4 February, 15:39
Hi Clifford, this is my first model, so I don't have a lot of context. I've found it to fit and be fairly easy to build generally. Have you built the 1/48 one? My modeling buddy is great.
5 February, 00:49
Oh shoot, it looks like I got the camo colour wrong... *sigh*. Guess I will figure out how to clean that up tomorrow. I hate my life right now ☹️ And I did three rounds of it without noticing it was wrong. *super sigh* So mistakes were made...
5 February, 01:46
What's wrong with it? Looks pretty good from here👌
Remember there were loads of variations of colours & finishes, especially on aircraft in service.
I still go by the "if it looks right, it is right" rule of thumb😂🐒
5 February, 01:58
Dealing with mistakes is par for the course. Like the time I cut the fuselage door on the wrong side. Or the time I used decal film instead of decal softener on a decal. Or the time....haha. You get the picture.
5 February, 01:58
Yeah, maybe I will just leave it, there was a huge variation in the various aircraft in service. Does anyone know how best to remove paint if I decide to "fix" it? Thank you, John and Munkyslut, for your feedback.
5 February, 02:03
I triple-checked the color Revell said to use, and I have it right. I am using what Revell says to use. It just does not match the photos of the restored Memphis Belle. Thank you, Ben. I think that will help me make a final decision. I am keeping it.
5 February, 02:13
I have not built the 1/48 one yet. I looked up the 1/72 kit and think I will get me one much more detailed than the 1/48 one. I have seen the real restored Belle and she has what would have been a "factory fresh" paint job, so the colors on your in service version are likely more accurate. I must say you are doing a beautiful job on your first model.
5 February, 02:20
Absolutely nothing wrong with the colour Jennifer. As mentioned, you're displaying an in service aircraft. Once you've sealed it and added your washes and weathering oils ect, it'll be spot on 🙂
Can only agree with others on what a good job you're doing.
5 February, 02:42
Regarding paint removal - If you use acrylics, windex / isopropyl 99% alcohol will remove it for you. If you use lacquer, go with Mr Hobby Leveler - DO NOT USE MR HOBBY CLEANER - as it will literally melt the plastic!
When removing paint, it's best to mask of the affected section and carefully wipe the paint off bit by bit. That way, the panel lines will mask the differential of the paint layers. You may want to rescribe some of the panel lines of the cleaned up area as the fluid will not reach those areas.
Lastly, reprime or re-layer the paints the same way you did for the other sections to keep it level. Like John, I think everyone here has had to remove paint in the past. 😀. That said, I think the paint looks good, I would keep it as is, or if you would like, maybe applying a filter to it may tint the color to something more to your liking rather than stripping off all the paint.
Good luck!
5 February, 02:44
Thank you, Clifford. Best of luck with the 1/72 kit; I have certainly enjoyed it. I would agree the light green would likely darken and if Revell is wrong, oh well, I like the colour. Thank you Michael, Mr James, and CaptGPF. I am not sure it is that I am doing such a great job as such a fantastic community is mentoring me. I appreciate the notes on how to remove paint CaptGPF. I won't be doing it in this case, but I am confident it will be helpful. It is only a matter of time before I want to remove the paint in some other case.
5 February, 03:30
Hi Jennifer.
I also had to remove the paint from my mosquito once. For more:
De Havilland Mosquito B.XVI at bombing | Album by Shar (1:72)
I used the following product and it worked great. Be sure to wear gloves.
Paint Killer (Carson Modelsport 500908113, No)
")
5 February, 06:24
Awww, thank you, Nathan. Thank you, Shar; I actually remember that, as I could not understand why you did it until you explained as the original paint job looked okay in the photos. That is good to know.
5 February, 11:30
Jennifer are you using Revell enamel or acrylic? Revells colors are approximations they are not anywhere near Federal Standard colors. Back before the Internet nobody cared if the colors were accurate. Modeling was something you did as a kid or after you retired. Don't worry about the colors too much. If you want to make things accurate then go for it on your next model.
6 February, 03:39
Looking good Jennifer, in service aircraft, doesn't matter what the base colour (Even a close approximation) looks like as operational wear and tear degrades it. And as you say weathering will cover it. It has saved a build I've done (All of them 🤣) many a time. 🤟🥸🤘
6 February, 07:43
Thank you, Skyhiker, Mark, and arron.
@Skyhiker I am using Revell acrylic. On my next model, I will be more careful with the colour.
6 February, 11:34
Jennifer, the base colour looks perfect, can't see anything wrong. I custom mix ALL my colours. If mine were as good a match I'd be really happy. 😃
6 February, 17:37
Are you enjoying yourself Jennifer? Then keep on right the way you are. Too many armchair experts. This is supposed to be fun, not a constant criticism/correction/ wrong paint shade barrage. My first 1/48 Monogram B-17 (A Christmas gift the year it was released, I BRUSH PAINTED TERSTORS KELLY GREEN. And I had a blast. That same summer, a fella had come to inspect our furnace, saw the Great Green Beast in the basement, and LOVED IT. Imagine my grin when this "really old guy" (to me,) turned out to be a WWII Eighth AF mechanic, and and actually worked on B-17s . Gonna build a purple P-51 and post it here.
HAVE FUN, THAT'S the whole point.
7 February, 02:06
I have seen nothing but EXCELLENT advice given in a very constructive and educational manner, as would be expected from the even more excellent modelers presenting it. I would suggest re reading what was said. Jennifer thought she was using the wrong shade. She brought it up. The other folks actually said what she was doing is perfectly fine. I saw no barrage.
Jennifer, for your first model you bit off quite a mouthful! Not an easy kit to deal with given its age. And you have been nailing it. Youre doing proper research and getting absolute top notch advice. Nothing I can add to what the others have said. Keep cracking, I look forward to seeing the finished product!!!!
7 February, 02:22
Thank you, Casey; I am indeed enjoying myself immensely. I have appreciated all of the advice and direction that I have received from the many experienced modelers on this site. Thanks to everyone's input, I have learned a great deal, and I love learning. I enjoyed the story of your great green beast, and I look forward to seeing your purple P-51.
7 February, 04:17
Thank you, Donald! I hope to have a finished product ready to show in roughly three weeks. Another couple of days on camo, a week for decals, and another week for weathering, with a layer of gloss after each stage.
7 February, 04:20
All that effort on the rivetting is paying dividends, Jennifer. The painting looks great, and all the fine details show up really well. I'm enjoying the paint scheme that is slowly emerging, and can't wait to see the next installment of your progress 🙂
7 February, 09:55
Thank you, Bruce. I am happy the riveting work is paying off; it was rather time-consuming and attention-demanding work. Doing the exterior paintwork is exhilarating; another installment is soon to come.
7 February, 12:19
If you keep enjoying this, that means you're on the best path to success - be happy with what your build 👍
You might not have spotted it yet, but you achieved one more unintenional success - for the 1st time ever I started thinking "hm, maybe I should get myself a B-17 too?" And I would be surprised to find I'm the only one here
Last but not least - that's one of the busiest threads lately too 😄
7 February, 20:57
Well, I already have one (Airfix) but it's got me thinking about actually building it 🤣
7 February, 22:39
Thank you, Lukasz, Rudy, and David. I am enjoying this, and I am happy with my build. Seeing what you three could do with a B-17 build would be amazing.
7 February, 23:41
Thank you, Ludvik; coming from all of the senior builders, yourself included, these compliments are making me blush.
8 February, 01:13
It is looking great. Are you sure it's your first model? Lol. You should be very proud of what you have done so far.
8 February, 02:38
Thank you, Clifford. Did you see some of the early shots of my detail painting when I did not know to thin the paint or use a retarder? Or the first time I filled a seam line? Or when I glued two parts to my spray booth? Lol, it is definitely my first model. I will never forget this model. Others may blur in my memory but I suspect this one will always be somewhat special.
8 February, 02:52
They usually do. My first one was a freaking mess. I got glue all over it and did not even attempt to paint it. I think I was like 8-9 years old. I did not start using an air brush untill about 5 years ago, I knew nothing about washes, clear coats, PE or trying to scratch build anything. It was not untill a friend of mine told me about scalemates that I really discovered the joy of modeling. I have made so many friends and learned so much from the wonderful people on this forum.
8 February, 03:01
Yes, this is a beautiful community. I have learned so much already, and I am sure I will continue to discover more. I have four models lined up to do when I finish this one.
8 February, 03:04
Thank you, Skyhiker, Carlos, and Dietmar. I ran late tonight, hoping to get a layer of varnish by Friday morning so I can start the decals on Saturday. Only to belatedly realize that the varnish will require at least 48 hours to dry, not 24 *sigh*.
8 February, 08:05
Now, coming in the last phase of this project, do you already know what the next will be 😬?
That's part of the fun too 😉
8 February, 08:23
Yes, I plan to build the Revell Big Boy Locomotive next. 😁 It's in my Stash.
8 February, 08:33
Here, here, Clifford 🙂 Advice on problems encountered, as well as feed-back on our creations, adds to the enjoyment of our hobby. Being inspired by the work of others has been a big part of this community, for me too 🙂
8 February, 13:09
Jennifer, you don't have to blush. Although I have been building models for a long time, I still (like you) see in my models that there is always room for improvement.
And this is a great place to find lots of new ideas, experience and friends to give you advice.
And that's what it's all about. 🙂
8 February, 13:19
Jennifer, I scrolled today through your build log. Impressive fast learning! It is may be not a perfect model (believe me, there is no perfect model). But the next one will be better! And you benefit greatly from the community here and can build on the experiences of others and learn from _their_ mistakes, which saves time and money not having to make such mistakes yourself 🙂
I had to grin when you glued the part onto the airbrush booth. I knocked over a large can of Revell Airbrush Clean in the booth and it still looks like that today. The stench was intense, but I was able to blow it off using the booth.
Don't put yourself under pressure to get a perfect result - the fun is much more important!
8 February, 22:56
That's a really interesting splotchy camo it had to break up the outline, looks like something that was added after it was deployed. I like how it's kind of faded and inconsistent in places, makes it look asymmetric and authentic. 👍
9 February, 00:57
Keep up the good work, Jennifer. If you could have seen the first model that some of us older folks built,it would bring an even bigger smile to your face. I think you've done a great job with it.
9 February, 02:30
You've done a great job so far, and it's great to see the addiction starting with the stash starting to grow haha, it's the one vice I beleive is good 😅 love the "Big Boy" Loco!
10 February, 00:23
Careful with that stash. Before you know it your home will be wall to wall shelves to hold all the kits. 😁
10 February, 03:32
I agree with Martin 🙂 she who must be obeyed was not happy when she looked into my stash cupboards! 🙁
10 February, 08:47
OMG yes, beware of the stash monster. Like coat hangers , It multiplies all on its own.
10 February, 09:35
That's right. The ability of most of us to buy new kits is significantly higher than the ability to build them. Which inevitably leads to ever more crowded warehouses.
I've told myself many times that I won't buy new kits until I've built at least some of the ones in my warehouses. But there was always a kit that I just had to buy 🙂.
And I'm also very lucky in that "she who must obeyed" supports me in my hobby and also buys me (maybe for Christmas or birthday) new kits 😄.
10 February, 09:59
Thank you for the stash warnings; I decided I wanted to build planes that Canada flew as part of the British Commonwealth Air Training Plan next (well after my Big Boy and my Titanic birthday gift). They are hard to find, so I decided to "preorder" them as it took weeks for me to get each of the ones that I have. I will try to stay disciplined and only buy one on completing one in the future.
10 February, 12:56
That's the best way Jen. Until that "once in a lifetime" kit then another. Just be strong and if the stash outgrows the store, I'm happy to look after the "excess" for you 🤣
10 February, 14:58
I plan on finishing my stash - even if I have to come back from the dead to do so!!!! Oh look! Sprue brothers has another sale….
10 February, 16:04
Jennifer, there's some great color footage of WWII Canadian training aircraft in the movie Captains of the Clouds with James Cagney. Check it out sometime. imdb.com/title/tt0034578/?ref_=ext_shr_lnk
10 February, 18:40
Too funny David and CaptGPF; Glad you'd be there for me David... lol. Thank you, John, very much!!! I have an Avro Anson at my local museum. The Oxford was flown in Western Canada and I am in Eastern Canada so I will have to live with museum photos. I will definitely check out the Captains of the Clouds footage.
10 February, 21:04
That's a great looking B17. Have some bombers of my own in the stash and you're build is quite inspireing. Good job. 👍
11 February, 20:14
Looking very good Jennifer, yes beware of the stash. It will sneak up on you. I will kick the bucket before I can build all of mine, but I keep buying them anyway. My kids will have a field day when I die. Lol.
11 February, 20:56
Thanks, Marcel; her name is Framboise, and she is the boss 😛. Thank you, Clifford; I am putting in a build-one-buy-one rule now that I have four models. I wish you luck with yours, how many do you have?
11 February, 22:23
Really coming together now!! Looks way way better then my first model 😅 the build one buy one is a great way to contain the stash haha I have 40 odd in my stash, and it makes it hard to know what to build next haha
12 February, 09:03
Thank you, Michael. 40?!? *wow* that is a lot of money. Options are good, though 😅. If I could do the build-over, there are many things I would improve on, but you have to start somewhere. Overall, I am happy with my results so far. I am looking forward to weathering and putting the landing gear on; I am so close to finishing now it's hard not to get excited.
12 February, 09:16
Only 40? I must be approaching 3 hundreds me thinks 😁
Still doesn't feel like the time to call a therapist (or psychiatrist) 😋
12 February, 20:01
Thank you, Dick; I'm finishing it just in time for Apple TV's "Masters of the Air" series to be aired. Yes, we definitely both like the big planes 😉.
12 February, 22:00
Would you believe 836, that includes kits and aftermarket goodies. Plus I have stuff I have not counted yet. That is why I will never get them all built. Lol.
13 February, 02:12
I have somewhere around 200. Haven't counted lately. LOL
Finish line in sight. Looking good!
13 February, 02:33
Thank you, Donald. Oh my "goodness," 836, 300-ish, 200-ish, that is a little mind-blowing for me. That must have taken a while to build up, I am assuming.
13 February, 02:37
I've just been watching some Masters of the Air clips on You Tube, and to see the bravery of the crews is sobering, especially as they were generally so very young....
13 February, 12:45
Three of my great-uncles flew on B-17s during the war. One died, and I had the fortune to get to know the other two. They were remarkable men.
13 February, 14:09
I think you will also keep the record of the most comments for a model 😉😜
13 February, 15:35
If we're including accessories, AND decals ? I have 2 lever arch folder brim full with decal options. Let's not mention reading and eduard… don't think I want to count 🤯
13 February, 21:32
Yes Tini, I think I will owe a lot of rounds of beer to folks when I finish this model. @David, this is all just mind-boggling.
13 February, 21:43
Desert Marlin, I could not agree more, they are a great buy for the price. In the next photo, I did the propellers using the flush cutters and the caliber of my result was so much better.
14 February, 05:01
Jen , some advice with cutters. If you are cutting small fine pieces like ,say, undercarriage parts or pitot tubes. If you try to cut the part from the sprue the risk (as it's still attached at points) is the tension can snap the part . Try cutting the sprue lugs from the tree. You can then cut the lugs off without the tension as it's not attached to anything.
14 February, 08:26
Good tip David, it also often means a steer angle to be able to smoothly cut coler to the model after being removed from the sprue 👍
But a good pair of nippers does make a huge difference Jen
14 February, 08:50
For really long thin parts, carefully saw through the sprue between the connection points.
14 February, 10:21
That's exactly what I was saying John. Thankyou for putting my thoughts into words clearer than I did 🤣
14 February, 10:55
Thank you, David, Michael, and John. I appreciate the advice. I also have a small saw so will keep in mind when to use it.
14 February, 13:26
I completed the weathering. I still have to do the engine's oil/rust/smoke and the landing gear/finishing details, but otherwise, this is done. Does this weathering look all right? The oil will take a week or more to dry, so I have time to correct it. I will post more photos tomorrow with it in the sun. Oh, and I have to put a matte varnish on the entire thing as a final step.
16 February, 01:44
Thank you, Jacquline. I've put up photos of it in the sunlight. Is the weathering good guys? Can I put it in the dehydrator and set it?
16 February, 16:31
Thank you, John and Marco; I appreciate the feedback. I did not want to set the paint until I was sure I should not remove or rework what was there. I scrubbed the wash in the direction of the airflow, and I left it what looked like a reasonable amount of grimy but I appreciate a few extra sets of more refined eyes confirming that it is ok.
16 February, 18:47
Check out some images of B-17's online. Note the smoke smudges leading back from the engine nacelles, both above and below the wing. You might like to have a go at those for a bit more detail, but don't overdo it.
16 February, 19:28
Looking great Jennifer, It is going to be very nice when finished. You can be very proud of your first model. I think I got back into to model building around 2014 or 2015 so that stash has built up since then.
17 February, 05:10
Memphis Belle is just a few steps from the finish line. Your honest preparation for building the model has paid off.
17 February, 08:47
Thank you, Clifford and Ludvik. Okay, roughly ten years to build that big a stash makes it more reasonable but that is still roughly 90 models a year that you are buying. Do you have a local modeling store or stores you buy from? They must really love you.
17 February, 11:32
There are no local Hobby Shops around where I live. Sprue Brothers, Scale Hobbyist, know me quite well. I have a group of E-Bay vendors I use quite a lot also. If you ever need aftermarket decals and other goodies check out Rebelalpha and decal supply corps on E-Bay. You can just type in the scale and the aircraft or what ever you are looking for and it will bring up what is for sale. I use E-Bay a lot.
18 February, 01:57
I second eBay, I check it a lot for good deals on aftermarket and kits. Maybe a bad habit lol. The stash talk is funny since I got my first kit in 2021 and I'm only at like 22 planes, and think my stash is huge since I don't have a ton of space. Yet some people have hundreds, it's hard to comprehend. I do collect a lot of aftermarket and conversions for what I have though.
That plane is looking spectacular, it's amazing what a little weathering does! 👌
18 February, 03:18
Thank you, Rando. I am relieved that you think it looks okay. I was worried I had overdone the weathering. For some odd reason, I was checking out eBay before I went to unmask my B17. The Canadian site has a lot of US sellers, but their shipping prices are killer.
18 February, 03:29
LMAO, Marcel, yeah, I definitely went for the record on comments with this model. This community has been remarkable in welcoming a new modeler, and I wanted to capture every moment of my build (perhaps a bit overzealous 😛).
18 February, 11:25
Yeah the guys are quite enthousiastic. They Just love women modelling. 😂
18 February, 20:07
My Memphis Belle is finally done. I can't begin to list all her flaws and she definitely leaves room to improve on my future models but you have to start somewhere. I've learned a lot building her. Thank you to everyone who has liked this project and a special thanks for all the constructive advice and encouragement I've received along the way.
19 February, 12:53
Every beginning is difficult and you have done it perfectly!
Don't look for mistakes in your first model. Enjoy the joy of having built it. Once and for all, it is your FIRST model. And when you come back to it after a while, it will bring back fond memories of your beginnings. 🙂
19 February, 13:22
Wow! She's looking splendid 🙂 I have no idea how you have managed not to break any of the gun barrels - I always have trouble with any projecting fragile parts.... The exhaust stains look very convincing 🙂 Congratulations on this very successful creation.
19 February, 13:31
Jennifer, you have do e a splendid job on this Fort. Not an easy build. Looks great 👍
19 February, 14:11
Well it looks fantastic to me Jennifer! No small undertaking for a first crack for sure. Have followed from the start 🙂 Be proud! 👍 What's next!?
19 February, 14:19
Thank you, Robert, Ludvik, Bruce, Sebastian, Alec, Duster_d, Neil, and David. @Neil, I am building the "Big Boy" locomotive next. It's in my stash. As soon as I finish my dio for the B-17, I will start a project for it.
19 February, 14:59
Nicely done, great work for a first build 👍
On the other hand I see that making the 72nd kits dirty wasn't tricky only to me at the beginning - my remedy was to play with few new Airfix kits with thier deep lines to improve that, just a food for thought.
19 February, 15:06
Whoohooh!!! What a 'Belle'!!! Congrats on a beautiful first model! No matter how steep the learning curve, you reached this first bluff in your modeling career. On to the next one! 👍🏼
19 February, 15:24
Congrats on your first build, Jennifer! The work you put into the research and techniques to paint and weather the bird certainly paid dividends! Enjoy the fruits of your labor, you are off to a great start and I look forward to your next build!
19 February, 16:13
Thank you, Lukasz, Patrick, Guy, Dick, gorby, and CaptGPF. This is very motivating for my next build. @Lukasz, I am planning on doing a new Airfix kit for my third build, I will keep that in mind.
19 February, 16:19
Nice work especially for the first project 👍
Regarding the stash discussion: do you know scalemates.com/cool-facts.php ? Please look for the Largest stash, but don't be shocked!
19 February, 17:08
Congrats Jennifer! You put a lot of time and work into your first model. 👍
Did you glue the front dome and top gun turrent (clear parts) with superglue?
19 February, 17:11
Nice work, well done!
Every model is a learning process. So, on to the next one and put into practice what you've learned with this one.
19 February, 17:16
Jennifer, we always remember our first model and you can feel proud every time you see it on the shelf. You have done a good job.
Congrats!
19 February, 18:47
Thank you, John, bughunter, Shar, Remco, Cuajete, and Mark. @bughunter 9648?????? I almost fell out of my chair. @Shar Yes, the top gun turret I glued with super glue and I learned the hard way not to do that again. It was the first clear part I glued.
19 February, 19:39
Definitely a finished model that can be displayed with pride! It looks awesome, especially for a first model. The flaws just help us improve next time, but I still make mistakes after 2 decades of building models, so don't focus on them too much or they will take away the fun of building. Looking forward to seeing the dio, and then 'big boy' 👍
19 February, 20:25
😘Nice! Great first Job Jennifer! 👍👍👍 I hopp this is the firs of many😁
19 February, 20:39
Congrats Jennifer, you've done bloody well for your first build. Will look forward to see what you decide on doing next. 👍
19 February, 21:12
Thank you, Pietro, Ethan, Michael, Hans-Jürgen, and James. For my next two projects, I plan to finish a diorama for the B-17 and then do the Revell "Big Boy" kit. All of this feedback motivates me to get moving on both of them.
19 February, 21:46
I can only agree with everyone else, great work and great result. Especially for a first build it looks really good 👍 😁
19 February, 22:50
Thank you, Rando Dude, Nathan, and Skyhiker. I've appreciated all your encouragement along the way as I have built this model.
20 February, 00:56
Well done Jennifer, looks way better after a coat of clear varnish. You can see your weathering at lot clearer now 🙂 As Skyhiker writes, many, many more to go. 🙂
20 February, 01:19
Jennifer, fantastic job! It's hard to believe that's your first build. You set the bar high for your next one!
20 February, 01:25
Congratulations, Jennifer! I'd have been super happy if my first model turned out as well as yours. You should be very proud.
20 February, 02:37
Thank you, Mr James, Donald, Landlubber Mike, Mona, John, and Lost_Erik. This first model's success has a lot of this community to thank. I could not have done it without everyone who commented with helpful instructions above and, of course, YouTube. It has been a lot of fun.
20 February, 11:41
Well done Jennifer. You are very talented and I hope that mine, which is in the stash, comes out half as good as yours.
20 February, 17:43
Outstanding job Jennifer, you can be very proud of your first model. Well done.
20 February, 21:00
This thread really went through the roof and with every right to do so. This was such an entertaining build. You achieved a really great first model! Especially when you look at the size of it, despite it being smallscale. I never would have dared to pick such a huge one for my first. Now I'm excited to see it in the dio. Carry on your work and you will shine!!! 👍 👍
21 February, 15:03
I think you may have set the record for longest build thread! LOL
21 February, 15:13
Bravo! belle réalisation pour un 1er modèle. Félicitation! Continue comme ça!
21 February, 16:46
It's seems that I'm one of the few that haven't left a comment! What can I add? I hope that you'll be able to continue in this beautiful hobby and enjoy your first and beautiful model!
I'm also happy to contribute to the record for the longest build thread 😁
21 February, 17:07
I forgot to add my like to this album... It would be good to contribute in case it also becomes a record for likes on an SM album 😛
Congrats again, Jennifer!
21 February, 19:45
Thank you, Villiers de Vos, David, Kenneth, Clifford, Vincent, Aman, Gary, Andy, DV888ster, Ralf, Donald, Antoine, Moreno, and Cuajete. I bought a 3D printer, and it arrived yesterday morning. I have been busy printing drawers (or trying to) to organize my modeling supplies. So much fun!
22 February, 03:11
Woohoo!! 3d printers add a lot of fun I find, what model did you end up getting?
22 February, 08:20
They went on sale so I picked up a Bambu Labs P1P. Long term I plan to get a resin printer as well.
22 February, 11:43
I would love to get a 3D printer, but that will never happen. Lol. I do not quite understand how they work. Do they actually print out a part in plastic, and what do you use as a master?
22 February, 18:04
Hi Clifford, yes, they print out parts in various materials. The most common material is PLA, which is a corn product. The master is an STL file, which is a computer 3D file that you can produce using various software packages; it is effectively a 3D drawing.
22 February, 19:22
Sounds neat. So you can print any aircraft part you can find a file for.
22 February, 23:05
@Clifford Keesler: I have a few pictures from a 3D printing process in my '1:72 3D printed NASA Sofia Boeing 747SP' thread:
1:72 Boeing 747SP NASA 'SOFIA' | Album by Wolfhound32 (1:72)
Warning.. 3D printing is addictive for scale modelers, because suddenly almost everything you always wanted for a model is printable 😉
22 February, 23:31
Jennifer, I'm following the Masters of the Air series, and your work is perfect. Congratulations.
24 February, 18:55
Thank you, Carlos. Yeah, I sent Nigel photos of my work to thank him for all the good tips he gives, which have helped me improve the quality of my work, and I was pleasantly surprised when he showed my work in his sixth video of the series.
24 February, 19:18
Nigel is a really nice guy, and his tips are really helpful. I love his series on the B-52, and if I ever get rich I will most surely use his advice when I get me a decent B-52 kit.
26 February, 01:21
Well done Jen, what a great achievement. I love it more because I am really enjoying watching Masters of the Air at the moment with the Flying Fortress B17F planes and it has inspired me to build one also.
Great work, keep it up and keep enjoying it!
2 March, 00:54
Oh by the way just scrolling through your feed and saw you grabbed yourself a Bambu lab printer. Good for you and happy printing. You will go crazy for the first few months then you will slow down to a much more acceptable amount of prints. 😂🤣😂
2 March, 00:59
Thank you, Stuart, I hope you enjoy your B17F build. Yes, I am printing almost non-stop at the moment, but I expect that to slow down eventually. 😂
2 March, 04:46
Ahh that's come out fantastic! Luv the underside detailing, bomb bay & landing gear & engine pod weathering are all first class💯
Some achievement for a first build!
2 March, 11:16
Great build, Jennifer! Love the weathering and painting. Fully second Neuling that is a really great start into our fantastic hobby. excited about your next projects 🙂
2 March, 11:24
Thank you, Munkyslut, corporado, and Juskifo. @Juskifo, for my next build I plan to do the Revel Big Boy 1:87 model that I have in my stash.
3 March, 11:47
She is still a good sized bird, even in 1/72 scale. Still waiting for my Hobby shop to get that one back in stock, all they have right now is the "G" model, which I want also. I am thinking of doing my 1/48 one after the Sky Raider. I am going to do it as Picaidally Lilly from the movie 12 O clock High. Gen. Savage's bird.
4 March, 01:18
OUTSTANDING, Jennifer! Hard to believe this your first build. Even better that you found enjoyment in the process/education. 😄
Looking forward to the diorama and your next kit!
12 March, 14:18