

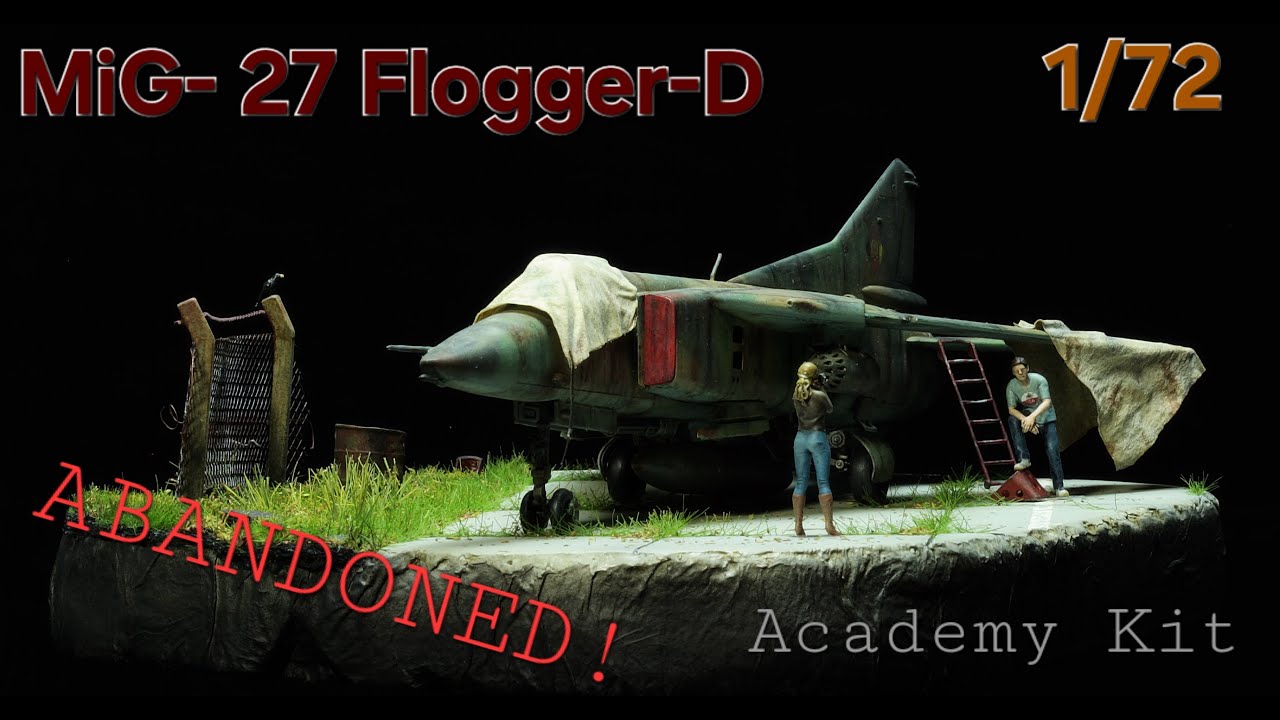
MiG-27 Flogger-D - GDR Air Force (NVA) - Abandoned Air Base Peenemünde

Damage due to storage. I hope hot water will help...

Damage due to storage. I hope hot water will help...

Some "stabilizers" to fix the damage.

Very simple cockpit by Academy. I will add just some small scratch build details.


Cockpit finished. Glued some steel balls to the nose for weight adjustment.

Canopy closed.

Poor details on the landig gear bay.

Some small details added.

Some putty is needed here.

Cut out this area.

Preshading with black color.

Main color - my first try to airbrush the camo patterns by free hand.

I think the colors are not the good ones for a NVA jet, but for my first try by free hand I will leave it as it is.

Wash with Tamiya Panel Line Accent.


Trying to make some chipping. Please do not pay attention to the logical placement, it is an attempt.

Final pictures.


Update 2022: repaint and heavy weathering for an abandoned fighter jet version in progress.


A new base with some old and rusty greeblies will follow.

WIP on the abandoned airfield


Airfield diorama base in progress.

Printed some stuff for the small airfield. Holy shit, that's really small and fragile. I hope I can get paint on it without breaking anything.

First accessories placed on the base.

Coming to life step by step...


Only with Resin printer: the old bike with 2cm length (0.8inch). The sign is made of a Red Bull can and a self printed decal.

I guess I will never like painting figures in 1/72.

For the base I want to try to put some grass on the edges of the concrete plates. So you need to make it with a grass applicator and electricity. The Original Grass-Master costs more than 90,- EUR, so I spent an hour to make it by myself for around 10,- EUR. Let's see how it works with the grass.

Final pictures!


Finished the small diorama now.


Comments
122 14 July 2020, 13:53
Thank you Alex. I tried my best but I still learn and need more Experience. In the long term, I will probably have to switch to an airbrush with triple action. With my current H&S Ultra, it is difficult to draw very fine lines.
18 July 2020, 21:40
Not a fan of whifs, but this looks really nice. I use H&S Ultra too and such freehand camo is still somewhere on the learning curve ahead of me 👍 What's the secret behind that silver streaks here and there?
2 September 2020, 20:38
Silver Streaks = Gray Streaks: since this was mainly a learning project for me, I tried to apply some chippings. Please do not pay attention to whether these are actually attached in really useful places. 😳
3 September 2020, 07:17
Nevermind the location, but I'm curious to know what the methodology was 🙂
3 September 2020, 08:18
Don't sell yourself short you did a wonderful job..And this is coming from an airbrusher!
3 September 2020, 08:28
Thank you Mathijs, that means a lot to me. And Łukasz: the chipping is done very simple with a 000 brush. I tried but I don't like chipping with a sponge as you do not have full control of every chip. Especially not on a scale of 1/72.
3 September 2020, 13:20
Schönes Ding Christian! ....vor allem wenn man den Ausgangsbausatz bedenkt 👍
3 September 2020, 13:56
cracking Deutsche-Flogger.....surprised DDR never had them when they were facing the West at the border.
3 September 2020, 14:46
I agree, the camo is looks very good! I use the H&S Ultra as well and I agree that it is somewhat difficult to make finer lines, but for the purpose of this camo it is more than enough (at least in the case with my F-2).
I also like the heavy weathering, probably too much for an in service vehicle, it gives a very convincing "still-preserved-and-exhibited-in-some-museum"-look though. 👍
3 September 2020, 20:15
As an airbrusher i would like to clear up a few "maybe" misconceptions about..."Freehand" airbrushing! first of all there are "free hand" templates!! i use them all the time! its just creating an outline which is then filled in or used as a temporarily block at places you dont want to mask with tape...great free hand templates for this kind of work are cotton wool or the thicker kind of electrical wire (the ones with a single copper wire!) they are round so a soft edge is always there, yet creates a fine outline for the camo scheme and you can bend it so it will follow the contours of the air frame or armoured vehicle your spraying...What i'm trying to say is...Make use of whatever material you can find to make your life easier, And dont think that if you use templates your work is any less of a "Free Hand" Airbrush job out there...you are only wasting energy with over-concentrating on trigger action, airflow, getting your paint mixture just right etc etc otherwise it could become something you're not looking forward to next time...And hey we are all in this for the fun of it...right
3 September 2020, 21:10
Mathijs, of course you are absolutely right, the focus is on having fun. And if you can make it easier for yourself, you can take advantage of it. Next time I wanted to use Uhu Pattafix to soften the edge a bit.
4 September 2020, 10:21
I think for 1/72 the edges you've got are great.
Just one more question: the ordnance is not out-of-the-box, is it?
4 September 2020, 10:55
You mean the armament (missiles)? Yes, they are OOB. I just added some cables in the landing gear bay and worked in rivets.
4 September 2020, 11:05
Christian, Maybe UHU has some solvents in itself and please be careful...and maybe a cheaper and solvent free option would be "DAS clay"
4 September 2020, 12:45
Excellent finish! Never thought this kit could look that good. You have good construction skills.
16 September 2020, 19:26
Das verwitterte Finish ist ja nicht schlecht gemacht und gehört dahin, wo es passt.
Machen wir hier Modellbau oder science fiction ? So leid es mir tut, ein solches Flugzeug hat es nie gegeben. Weder mit der Bewaffnung, noch mit diesem outfit.
Und noch ein Hinweis, die DDR Luftwaffe hatte nie MiG-27 gehabt. Das waren alles MiG-23BN und die waren in Preschen stationiert und nicht in Peenemünde.
5 November 2022, 15:39
@Bernhard: du hast schon meine Album-Beschreibung gelesen, oder? Es IST ein What If Modell und mir ist auch bewusst, dass es diese Version so nie gab. Und ja, ich mache viel Science-Fiction. Sehr viel. Das ist auch Modellbau.
Nicht böse gemeint, Kritik find ich toll, jedoch sollte sie schon angebracht sein. Wenn du mit solchen Flugzeugen nichts anfangen kannst, sei es dir erlaubt, aber dann muss es mir und anderen auch erlaubt sein, eben auch mal sowas hier zu machen. Vielen Dank.
5 November 2022, 16:24
Okay, hab ich nicht gelesen. Vergiss die Kritik, Entschuldigung.
5 November 2022, 17:39
Yes, very convincing.
May have omitted the weapons, at least the missiles...
May have added shocks also.
But this one is still il its box by my home, so...
10 November 2022, 16:22
Thank you. And you're right, I will still remove the missiles later. 😉
11 November 2022, 21:24
Really like abandoned stuff, And this is no exception!
Also a nice idea of a "what if" theme
11 November 2022, 22:40
nice work on this transformation. looking forward seeing the 3D Parts painted
15 November 2022, 20:22
That's getting better and better with every update 👍
I'm starting to believe LSK/LV really flew them.
20 November 2022, 17:49
Ok, so I have unfortunately not made more photos of the self-build, because this is actually about the model. Therefore a short explanation:
I bought an electric fly swatter on eBay. Furthermore you need a small kitchen sieve. This you have in the kitchen (Attention! Be sure to ask the government before to avoid trouble!) or you can buy it for 2,- EUR everywhere.
Now open the fly swatter and remove the yellow part completely. A long cable is soldered to one of the 2 visible soldering points, which will later be plugged into the glue area as one pole. And a second short one comes to the 2nd soldering point, which is then connected to the sieve (other pole). At the end of the long cable you solder a nail or a needle. I also attached a WaGo clamp here to be able to touch it well. Since the screen was made of chrome steel, I could not solder the cable here. I just clamped it with a screw, washers and nut. To attach the screen to the handle of the fly swatter you need a little improvisation, because each model is probably built a little differently. Small tip: a lot of hot glue helps a lot 😉
Finally screw the handle together again. Finished. Now you can put model grass into the sieve. These are electrostatically charged and stand up vertically when they hit the wood glue/tinker glue connected to the needle/nail. There are certainly more detailed instructions for this in your respective language on the Internet, often in model railroad forums.
24 November 2022, 09:19
I like it. Has a lot of atmosphere. Heeding Transalls advice and the addition of the figures really add to it. Schöner Modellbau.
25 November 2022, 16:19
I can't help but repeat myself here: Both your abandoned MiG-27 and MiG-29 dios are fantastic! Respects! 👍
11 December 2022, 18:39
In addition to the pictures I also made a short video of the Flogger with some dramatic music: 😉
Youtube Video
22 January, 10:47
Album info
The East German Air Force "NVA" never had that jet, but the predecessor MiG-23. So this is more a "What if"-Model.
UPDATE: Now, 2 years after finishing this model in 2020, I grabbed it out of the showcase because I do not like the finish anymore. The colors were wrong and the weathering was too much for a fighter in service and too less for an abandoned jet. So I decided for the second idea: an old NVA jet located on a lost place somewhere in Germany (Peenemünde, Usedom).

