

De Havilland Mosquito B.XVI at bombing


Comments
Yep, a good subject! Let me have a peek…..oh, and those details?, exquisite in this scale!
This is very good! I already have a Mosquito, but Tamaya is not the same. Here, Arifix leads in all indicators. You motivate me to make another Mosquito.
Well, awesome job, especially on the crew👍. Perfect work, following.
That is shaping up nice. I like the bomb bay detailing and colours.
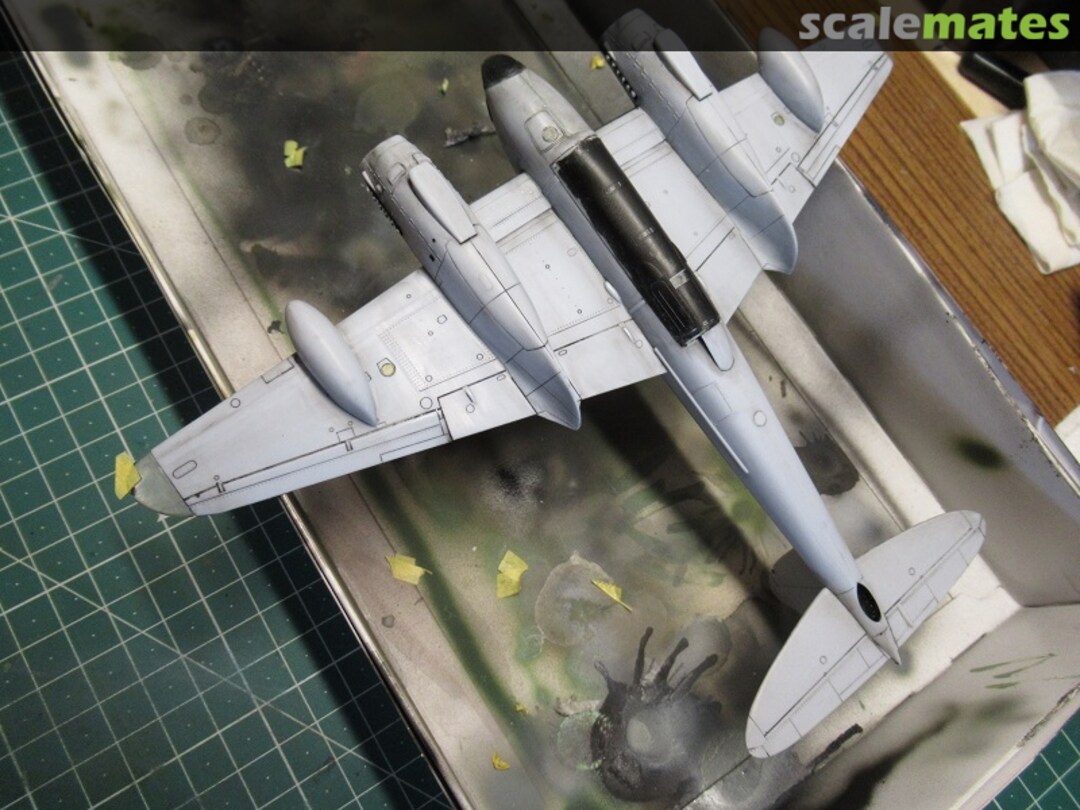
Thanks to everyone. Today i´m brushing the upper camouflage. At next, i will brush the bottom an parts of the upperside / rudder in black. At the moment, i´m searching for an aerial photograph to show it in the diorama ground.
Some little news, at next i have to painting the glossy clear coat, a job i don't like doing.
I feel the same. All the pre-shading, then color and camouflage is fun. The gloss coat means means business and committing to the look of the plane. It has to go right! Good luck!
I totally forgot to upload the pics. The camouflage is ready. At next, the glossy clear coat.
After comparing several original photos, I decided not to paint the course of the camouflage (green+grey) too hard. The gradient between the green/grey camouflage and the black underside and part of fuselage and the rudder is sharp.
I am very satisfied with the color (green(grey) gradient of the camouflage
Some little progress
what annoys me, i´m too stupid to paint decent glossy clear coat. I hope the matt finish improves the visual impression.
RESET: After I was not at all satisfied with the result, i removed the paint and will start painting again. I hope my dealer gets the decal as a replacement.
I don't understand what made you repaint?
Also, how the hell did you manage to remove the paint so well?
Thanks Andy and Bernd.
@Andy: This kit is really nice to build. The parts fit very well and minimal putty work was needed. Only the decal options are few.
@Живко : The paint finish was partial very creepy and the decals the decals have partially come off despite Micro Sol / Set.
For stripping the paint, i used "TAMIYA-Carson - Paint-Killer" (Paint Killer (Carson Modelsport 500908113, No)).
")
The "day" after reset: the decals are fully applied. This time i used decal adhesive + softener from tamiya. I also use "Micro Set" in three places. Only four decals tended to come off but with a subsequent re-treat with tamiya adhesive+softener all decals are now ok and holding. . I'm quite satisfied.
The satin finish is clear. Now its time to wait until the paint has completely dried. Then comes the wethering.
At the same time, i'm trying to visualize an optically rotating propeller, which has already taken more than a day. i initially liked my first finished variant but after a few days I didn't like it anymore. So I'm currently working on another version.
This looks great! I love the camouflage, why did you repaint it, it looked perfect the first time to me. I can't wait to see the finished kit, so close.
Cracking subject and Impressive detail administered at this scale. bravo.
Hi Jennifer, nice to meet you here. I repainted the mossie, because the paint surface was sometimes quite ugly, like a 320 sandpaper.
Oh ok, that makes sense, it really did not show up in the photos.
Some news. I removed the painting masks, opened the bomb bay, touched up with paint and added the bombs, painted the rear landing gear bay and the position lights.
I also painted the exhaust pipes in several layers, touched up the painting of the cockpid and bug hood.
Unfortunately i made a scratch in the bow hood 🙁
Hi Jennifer. Thanks but i totally forgotten to weathering the bombs, what I'm doing now. and the position lights are unfortunately wrong. The position lights are obviously clear in the original, so I stripped them very carefully so as not to damage the paint on the wing.
Beautiful job Shar. What did you use to weather the black? Is it a grey oil wash and some pigment powder? It looks good. I'm Looking for tips when I get round to finishing my Mossie.
Thanks.
@Jennifer: I think you always find something in your own model that doesn't suit you, but that others never notice. 🙂
@Mr James, for the black side i used a color i mixed myself (dark grey, dark brown, brown and black) that i applied with the airbrush (dirt on the flaps & co.). You can also use oil paint for this, which I will do in the future. I've gotten along very well with the oil paint method so far. That's why i weathered the upper side in the second attempt only with oil paint.
For the panel lines i used the panel line wash for black colour from AK. Light grey oil paint and oderless thinner ("white spirit") are cheaper and works the same way. You can vary the look of the pane line better with oil paint; lighter colours make the lines more noticeable/present, slightly darker colours make the panel lines appear more subtle, depending on how you want it. only it must not be too dark, otherwise you can no longer see it.
Finally i used oil paints in ochre (dust around undercarriage area and rear lower fuselage), burnt umber (general soiling in the area of the corners, for example) and engine grease in combination with brunt umber (engine cowling area, fuel tank & co.) and ochre, brunt umber and faded white as a dot method for general variation of the black colour.
I will apply the exhaust stacks with my airbrush, just like I did at my P-47 (brown -> black -> grey -> some heavily diluted black again).
A video that describes the basic methods: Youtube Video

When using oil paint and thinner it is only important that you apply acrylic based paint or clear coat first since these are not damaged by the thinner for oilcolours.
Thanks for that Shar. Interesting to know you've made your own black mix. Those browns will tone down the black and add a bit of depth to it I'd imagine. Hard to weather black, I wouldnt have thought to use the dot method. I'll refer back to this when the time comes. I also agree that you have so more control when using oils for pin washing and weathering.
Since i had to repaint the tanks again, it was necessary to mask them off. The result after removing the masking masks can be seen in the pictures....
Clear coat and i will probably not be friends in this life.
The final spurt is heralded!
I scratch built the protective grille in front of the air intake, painted the exhaust stacks and mounted the bomb bay doors.
They moosie has also recently been "flying" alone. The pictures will follow when I'm completely done. At the moment the slightly decorated floor of the display case is drying.
I finished it a few weeks ago but haven't gotten around to taking any halfway usable pictures. Here are the first pictures. More will follow; unfortunately, it's not that easy to get usable images.
An addendum to my idea: The photo is a print of a real aerial photo of test stand VIII Peenemünde Army Research Institute.
It was created after the RAF's massive bombing raid on August 17, 1943 (Operation Hydra with 596 aircrafts involved). Unfortunately, the operation did not achieve its full effect and so there was only a delay of around four weeks for the A4 (V2) project.
That's why there were repeated attacks on the facility and identified positions and facilities on or for the A4. As far as I know, mosquitoes were also used for this.
I don't know whether the machine I built ever flew such a mission against the A4 (V2) project.
For me it was more about the symbolism. The Mosquito - a nemesis for the Third Reich and its air force in the Second World War, repeatedly attacked important nodes of the German war machine through quick attacks. Here my case symbolizes the A4 (V2) terror of the Third Reich against England.
Album info
The photo is a print of a real aerial photo of test stand VIII Peenemünde Army Research Institute.
It was created after the RAF's massive bombing raid on August 17, 1943 (Operation Hydra with 596 aircrafts involved).
Unfortunately, the operation did not achieve its full effect and so there was only a delay of around four weeks for the A4 (V2) project.
That's why there were repeated attacks on the facility and identified positions and facilities on or for the A4. As far as I know, mosquitoes were also used for this.
I don't know whether the machine I built ever flew such a mission against the A4 (V2) project. For me it was more about the symbolism. The Mosquito - a nemesis for the Third Reich and its air force in the Second World War, repeatedly attacked important nodes of the German war machine through quick attacks. Here my case symbolizes the A4 (V2) terror of the Third Reich against England.


