

Tamiya's Sd.Kfz. 7/1 "Flakvierling" in 1:35 scale, with photo etch.


Comments
29 November 2018, 17:27
I wrote earlier that kit is mostly flash free, and I still think that is true, but obviously some cleaning up is required as flat surfaces tend to have a subtle raised edge at the ends. I like this kit a lot. 🙂 I will work on this project and the Challenger kit I started on. I hope I can finish in late December month. And with three sheets of photo etch this kit is fun to build.
2 December 2018, 11:32
The "alignment issue" is perfectly normal, the idler wheel could be moved to the aft to tension the tracks. Looks like a nice kit, but if you took the effort to add the PE, maybe it also pays off to replace the barrels with some that are drilled out or turned. I once made the Bronco Flakvierling and used some nice Griffon barrels for it. These will really catch the attention of your model.
[img1]

[img1]

2 December 2018, 20:43
I got some nice aftermarket market barrels and then there will be a tiny piece of PE around the fed magazine on the guns. Ah, and some PE for the shield plates which may or may not look too thin, and some minor two plates in PE.
The weak part of all of this will be my airbrushing skills. I know I can airbrush on a smooth surface, but I think I have yet to master airbrushing.
A trick I learned, was to prime with one color and be done with it. 😄 I did that with an artillery piece and it looks very nice, I will try to use mainly the German panzer gray primer from Vallejo, and maybe add the white. I wonder how good the white paint was applied. I also have Tamiya "snow" weathering pastel goo, but I haven't tried that out, if that can be used to camo a vehicle white or not.
Hm, I should experiment with primer + white pastel on a separate piece of plastic. Also, I have a bottle of Tamiya snow powder (feels a little moist in the bottle), so I should probably go for a winter theme given that the figures are wearing winter clothing.
3 December 2018, 16:17
This Tamiya kit comes with a tension feature for the rear wheels, but it is only for a few millimeters. I tried the tracks on, loosely, and it seems like the tracks will be a tight fit.
3 December 2018, 16:20
Very nice work. I've got the Flak 37 version. This pair are terrific kits and you're doing this one justice.
4 December 2018, 02:02
What colour did you paint the exhaust pipe ? Seems steel first and then dark?
4 December 2018, 19:32
Ah. Nah, that is just the shiny plastic. After scraping off mold lines, I like to smear the parts with liquid glue to make it more smooth, removing small fluff, making it more shiny.
5 December 2018, 12:51
Looking good so far. Enjoy how you put text onto the photo. What program do you use for that?
5 December 2018, 15:50
@Bryn Crandell , I use Photoshop CC (subscription based, about £10/month) Simplest free option might be eh um Gimp. Fusion 8 is also free (compositing) but is node based and somewhat complicated. Fusion 8 is imo better than photoshop for reducing photos to make them look the best because you can chose different sampling filters and easily preview the result.
Also, there might be more or less free online services that allow image editing and I am sure you can add text as well.
5 December 2018, 16:06
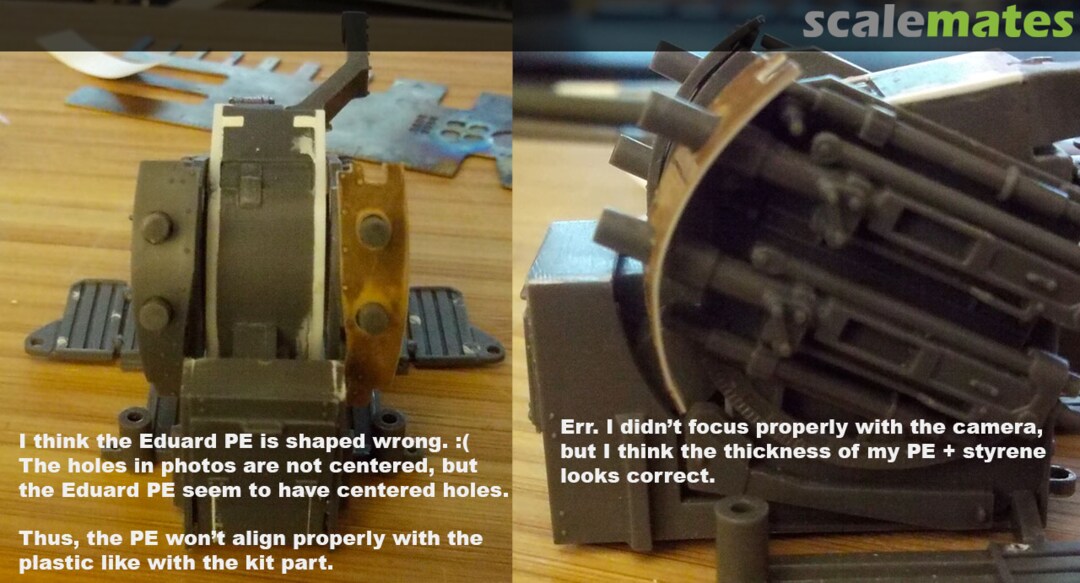
Btw, I think I will stick with the kit parts in plastic shown in image 12, unfortunately. I had fun making that part with PE + styrene and it looked really good. 🙁
I will try this again with the two larger PE shield plates for the "vierling", mixing PE and styrene to add thickness.
5 December 2018, 16:07
The PE part is not too thin, Treehugger.
flickr.com/photos/massimofoti/4902766860
5 December 2018, 16:51
I still think so. :| Imho PE sheet is 70-80% of the thickness depicted on the photo.
5 December 2018, 17:02
I thought you were comparing to the plastic part. Seen from the side, your adaptation seems fine. The holes should indeed be excentric, maybe it's adviseable to copy the outline on a metal sheet and try to cut it yourself.
5 December 2018, 18:11
I had hoped to avoid airbrushing a bunch of smaller parts but I don't think I can avoid that for the flak guns.
@Steven Van Dyck , I decided to just use the plastic parts. I managed to scrape off a lot of the plastic and they are now fairly evenly thinned I think. Probably a little too thick still, but I don't dare go any further else they might snap or bend.
Seems like I can't stall starting airbrushing, to get some paint on the chassis, and then finish working on the top side of the truck after that. Not sure how I am going to paint/assemble the flak guns.
5 December 2018, 18:40
Album info
I am happy to see that this kit stemming from 1972 is mostly flash free. All the wheels are flash free which really makes things so much easier to work with.
I like flat surfaces so I tend to go over flat areas with a flat fine metal file to make surfaces truly flat. Usually, seemingly flat surfaces aren't flat at all.
The photo etch consist of three sheets and seems to be still in sale which was nice.


