

AREA 88 : Kamikaze (A6M2b Zero)


Comments
18 October 2018, 22:25
After another mishap and almost propellor, the Cessna side of this project is on hold while we await reinforcements, so I thought I'd get started on the actual Kamikaze part of the part. I love the Sweet Zero.. so tiny, so perfect.
18 October 2018, 22:32
ok, so it will be me watching what you do with it instead of the way around 🙂 taking first row on this one. i may think about using a motor in one of mine too 🙂
18 October 2018, 23:04
I'd say go for it. The Zero is actually the perfect kit to try it on because the cockpit is far enough back that it doesn't get in the way, and the cowling is big enough and round enough to accommodate the motor easily. I'm just trying to figure out if I should use the kit's prop shaft or try and drill through the engine block interior to allow the motor's shaft to reach the propellor. The first option is easier, so we'll try that first, but it's nice that option B also seems relatively reasonable.
19 October 2018, 00:04
i will certainly keep in mind. at the moment i am quite short of modelling time so it may take a while 🙂
19 October 2018, 21:27
Given what I see there, wouldnt attaching the prop to the motor shaft be the way to go? Unless I am missing something.
Also, where do you get these motors? You have probably answered that a thousand times before, but I didnt see it or dont remember. LOL
20 October 2018, 16:10
Well the trick is that the shaft is not long enough to drive the propeller directly. Given the shape of the engine block, it will be hard to drill out the back enough to have the shaft come through. The engine is just about the same size as the motor. Also, extending the shaft is difficult. The extension needs to be perfectly centred because and contact with the sides will stop the motor (or an annoying "squuuueeeek"😢.
I got the motors off eBay for cheap. Just look for 8x4mm dc motors. They're the same thing (albeit sans off-set weight) that creates the vibration in your cellphone. They're a bit delicate... if the small wires come out they're useless. But they're fun.
20 October 2018, 16:37
Back in action after a week in Singapore... caught a cold though, so adding a pilot, masking a tiny canopy and painting a coat of aluminium was about all I could manage. It's pretty shiny, but a buff will tone it down and it's an undercoat anyway, so it'll barely be seen.
8 November 2018, 14:05
One model railroader trick is to extend the shaft with tubing. That way it is centered. I'm thinking of putting a motor in my next build, but the Ryan stm-s2 has a narrow fuselage.
11 November 2018, 14:56
Thanks for the tip, Ben. I'm not sure how to extend the shaft though. I've tried drilling out 0.8mm styrene tubes, but it's very difficult to get the 0.6mm hole centred properly. And any variance seems to set up a rotation that hits the side of the hole through which the shaft pokes... and any touching of the sides seems to be too much resistance for the motor to handle. So it gets hung up and stops. Very little tolerance for error.
11 November 2018, 15:11
hypodermic needles? metallic, thin and drilled already😉 size 0,8 is not a problem. do you need some?
11 November 2018, 23:56
Heh... Spanjaard offers to send me hypodermic needles and suddenly everyone shows up. 😄 Regardless, I'm certainly glad to see you all here.
Strangely enough I already had a small stash of needles (they're particularly useful for mixing the exact same quantities of A+B style resin) and one of the sizes does indeed fit the shaft size almost perfectly. Yet to be fully tested, but a promising option which might solve my problems on the Cessna side of this build.
Meanwhile, I need to go the the local hobby shop to get some Tamiya "Zero Green" acrylic paint, so I just painted the underside that Japanese grey/green. Then I spent the rest of the evening hunting around my cluttered workspace looking for the tiny little air-intake part that I dropped somewhere. After a meticulous search, I'm happy to report success. The carpet monster gave back his meal!
12 November 2018, 22:37
Did I go overboard on the paint chipping? Of course! I always seem to go overboard... sigh... I think I need Daniel to provide me a step by step tutorial on Japanese planes...
Now the question is do I use decals for the red dots? Or do I paint them on?
18 November 2018, 11:14
Thanks guys. I was all set to just apply a coat of future and slap some decals on, when fate intervened and broke my nozzle for me. I guess that means I shouldn't take the easy way out on this one and get ready for some painting...😉
18 November 2018, 12:44
I don't know any dry decals, I only have water slide ones. However, I guess I'm painting... so first I'm masking.
19 November 2018, 14:13
If you want to paint red circles, you need to mask the bits you want to keep green... 😉
19 November 2018, 16:09
LMAO... is THAT why this never works?!
Smartass...😉 Actually, since I used hairspray between the aluminum and green coats, I didn't want to mask it until I gave it a coat of Future to protect it from all lifting off with the masking tape. So the tape circles do two things... a) they let me line up the placement of the red dots properly because I have a heck of a time getting negative space aligned properly. and b) they preserve some of the "lifting ability" of the green paint underneath them for a bit more targeted chipping later.
At least that's my theory... we'll see if reality proves it correct or not.
19 November 2018, 23:18
There is usually a method to my madness... just not necessarily the correct one.😉
20 November 2018, 00:34
I successfully got the white stroke around the red side circles on. I kinda cheated and only painted the white ring instead of a circle on top of a larger circle. I knew I ran the risk of misalignment and gaps/overlaps, but I seem to have hit the mark on both sides. They're not quite centred, but that more on an issue with the red dots than the white ring. I also had a tiny bit of white overspray, but nothing a bit more chipping couldn't solve.😉
Still a bit more fiddling to go, but it's close now... and I checked to make sure the prop still works. Thank the modelling gods it does. That's all I need now is a lose wire...
21 November 2018, 16:01
I made the mistake of trying to move a decal on the left wing and screwed up the paint a bit. After some sanding and another touch-up of paint... I can still see it. 🙁
I also seem to have rubbed paint off the propeller nose as well. Time to put it down and walk away for a bit. There's still a few touch ups here and there to be done, but they can wait for a bit.
22 November 2018, 16:03
Thanks Roberto! I got the final panel wash on, so I guess the Zero is now complete... so there's nothing keeping me from getting started on the other half of this duo build... the Cessna. If only it didn't terrify me so... 😉
Anyway. Even though the entire project isn't complete, I uploaded a short YouTube video to see it in action!
Youtube Video
24 November 2018, 16:44
Thanks Spanjaard. I admit, based on how the last attempt turned out, that I'm a bit gun shy with the Cessna. But thisnisn't A hobby for the faint of heart, right?
24 November 2018, 23:55
i do not believe for a second you will leave that one to the shelf of doom😉
25 November 2018, 00:58
<<Angry mob enters stage right>> "Cessna, Cessna, we demand a Cessna!" <<Angry mob exits stage left>>
25 November 2018, 20:35
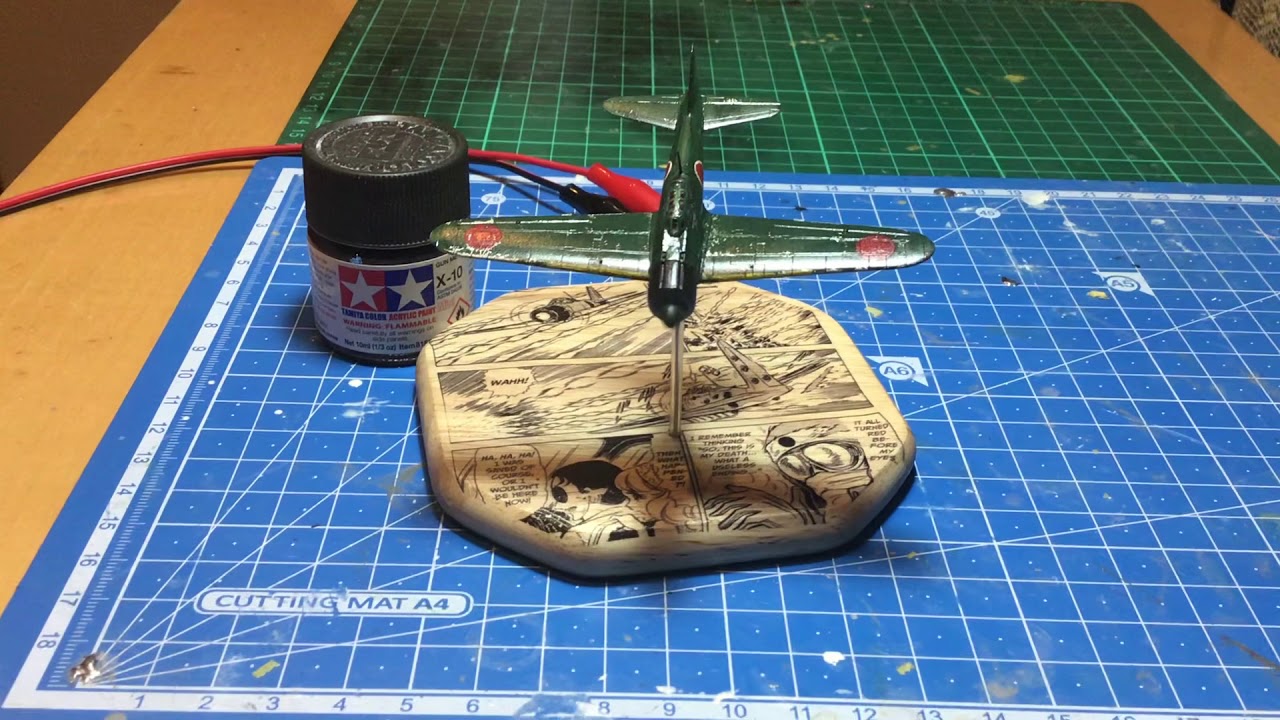
Come on Greg, come on Greg..bring up the Cessna... Your Zero looks fantastic and love that base too 👍
25 November 2018, 20:38
Looks like there's nowhere to run and hide now. Since the Cessna is an F-Toys (basically gashapon) kit and prepainted, I was debating taking the easy way out and just using it "as is". But that somewhat defeats the purpose, right? Model building is about the journey, not just buying a finished product.
So now I'm looking for some Korean oven cleaner that will take the tough paint off the F-Toys kit without damaging the plastic... stay tuned.
25 November 2018, 22:30
you can try with some alcohol first (no, the one you drink not, IPA or something😉 ) it is less agressive. if it does not work, then oven cleaning would be a good one. i got a bottle, but never used yet.
26 November 2018, 23:00
I've tried everything in my drawer so far... nothing really works although Tamiya Lacquer thinner does kinda work after a long soak and a lot of scrubbing. Not well enough. On the assembly side of the problem, it's going relatively well so far. I took your advice on using the shaft of a syringe and it worked. AREA 88 : Kamikaze (Cessna 172) | Album by strobez (1:144)
26 November 2018, 23:12
I was a bit worried about soaking the plastic in the Tamiya Lacquer thinner though... it will eat the plastic, won't it?
27 November 2018, 00:10
Martin is right on that. You can actually drop a piece of the sprue to n the thinner and wait to see how long before it affects the plastic, and once that is known, try with the old plane, and once that is sure to work, the model at hand
27 November 2018, 07:31
Since I realized that, being a pre-painted "kit", the sprues are also covered in paint... I now have lots of handy test pieces... which are currently floating in various jars of concoctions on the floor in the spare bathroom... something is bound to work. My bet is on the drain clog cleaner... but we'll see.
27 November 2018, 14:27
Why not hit it with some 2000 grit to smooth it out and just paint over the old paint?
27 November 2018, 18:53


