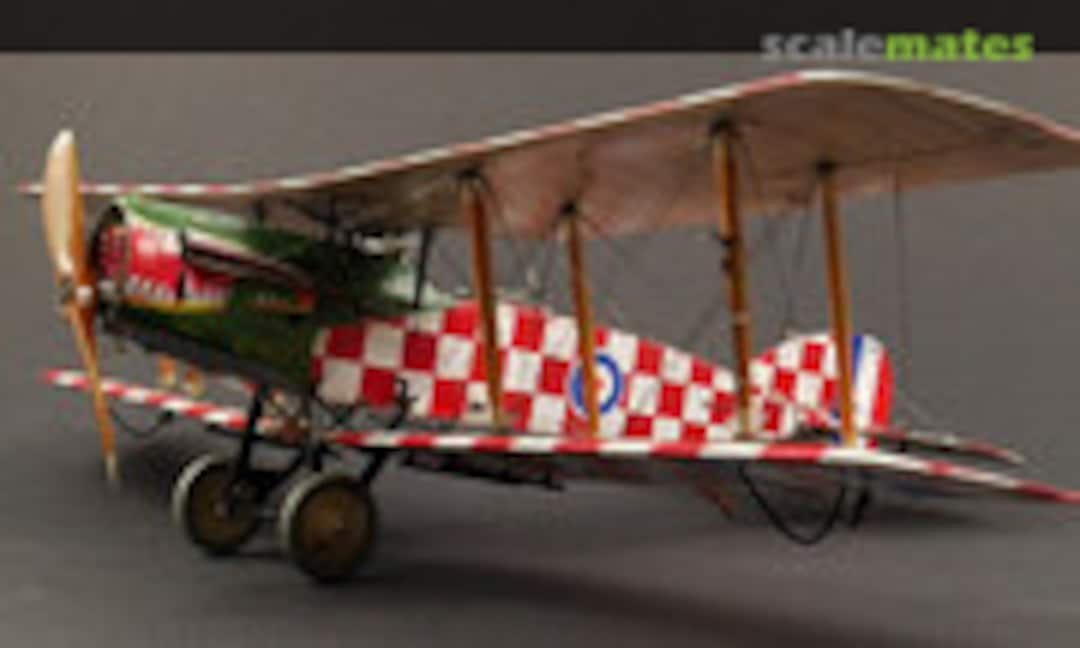
Brisfit Crocodile WIP


The kit offers open ...


Parts from a "Part" PE set.

Decal added and cutted.


Final.

Again a wooden propeller.

Looks nice!

Nice PE parts for wicker seat in kit

Basis soldered, structure also on back side

Colored

With cushion

The observer/gunner got a sisal floor for better stand.

0,1mm fabric added to plastic for bag on cockpit wall.

Some funny things like a window on the floor delays the progress.

Preparing struts.

Sanding of struts done.

Soldered a pach to mill my own PEs.

Milling.

Size of block matches Dolphin parts.

16 parts, 0,5mm pipes added. 52 holes to be drilled here.

On other side small distance to strut.

52 connectors needed.

finished prototype.

Looks great!

Engine dummy. Forgot a pictures after detail painzting


Mounts fro drums.

rigging

New outlet

Mounted

Sight from SE5a kit


black frames used.

Wooden panel done.


New axle.


With holder for RAF wires.


Please not the bushings.

Little compressor, Not for airbrush, but for fuel!

With wooden airscrew, able to rotate!

Completed undercarriage.

Added 0.3mm brass pins to all 4 ailerons

Same principle for all fins.

Continued with masking of upper wing.

Shadowed/darkened.

Added linen color and decals to lower wing.

Also decals on upper wing.

Brass construction for prop shaft, 1mm secured front and back, in a 2,1mm bush.

Can be plugged from the front into the kit part.

The air screw fits tight to the 1mm shaft.

... and can rotate very easily.

Putty, sanding, primed white with sanding twice. Painted white with MrPaint.

Masking - the sqaures are smaller compared to manual!

Masking completed, very fiddly!!!

Was not able to brush red due to snow storm, so started brass work again.

L-profile 1x0.7mm, 0.5mm brass pins, squezzed 1mm pipe. Compared to kit part on top.

This a bomb rack holders, different holes for different types. Will stay empty on model, as on the orig picture.

Chemical blackened so it looks used.

Brushed the red, result on fin.

Elevator, touched it during unmask 😭

Fuselage under and left side...

... top and right side.

Kit fitting

New brass one, and filler caps.

Added mounting rings

Red and white masked.

grey primer

Dark ghost grrey on top and below.

New mask cutted.

On underside with curving tape

The crocodile is painted

Underside view.

Crocodile with oil


Parts PE (wrong) versus Eduard from kit.

The kit frame is 0,7mm, but i brake it during cleaning. So new metal parts.

All together...

Start mounting, further metal bushes.

Painted in black and added rubber (streched sprue).

The finished Scarff ring compared to the original.

Can be mounted later on the finished model, my crocodile do not carry a LewisMG or a camera.

After shading some more parts in linen color.

Further work on the air screw: decal, tips, hub

Exhaust: brass pins, end opened and 4 layer aisbrush.

kit part left, replaced by Parts PE and wood

Drawing is wrong, needs to be folded other way around to get a bag for the glass.

Sanded the arc a bit to get it more deeper.

Removing decals also destroyed the painting.

Tyre decals have to removed too, bad looking and wrong font. All needs to be in capital letters.

Finished remaining RAF holders.

Wing brackets done. You see 188 individual metal parts!!!

All the paint layers on the nose are new.

I like the result with the yellow oils is better compared to the first try.

Decals added.

This time also the fish as one piece affair.

Looks nice with exhaust.

All the prepared subassemblies form a model now.

Strange trim - the fix part of the tail could be moved.

Used PE from "Parts" after a lost kit part.

emergency control from gunners cockpit, later painted black.

Scratched drain valve for the radiator.

Mounted. Do not start teh engine without water and closed valve!

Tail is mounted. Please note the light shadows.

For underside I decided for linen, so also decals.

Upper wing with alu maintenance lids and decals.

The special one for the middle part is not mentioned inm manual.

Dry fitting, but I need to prepared rigging before.

Also detail painting with black fitting and metal bolts on upper side.

All 16 wing brackets glued in.

Struts pins fits into central tube.

Dry fit of the 8 struts - no glue needed 🙂

During mounting the orientation have to be respected, on which side doubles?

Again the wings, because it's nice: view from back

Tried to add the fuselage to check the lenght of the struts: the upper wing needs to go more forward.

Some spares from the SE.5a build, used them for terminals on the fuselage. A broken off drill is a nice mounting handle.

Additional 28 indidual parts are four terminals for fuselage.

Added smaller tubing (0.4/0.6mm) for smaller inner rigging to upper wing, and 4 bigger ones for the wing landing wires.

Nice PE in kit: communication plate, but added wooden mount.

Please note my small plate on top of the Cent, compared to a picture of a half stripped aircraft of a museum.

Mounted on the wing, also the sight. Only the compass is missing.

Removed the sight again, its 3.2mm high, but there is only 4mm space between wing and fuselage! Made a new one.

New parts painted.

Light is going trough 👍

Mounted below wing.

After massive rework of the wooden base I glued the windscreen into its place

compass parts of the kit. I drilled a whole and glued clear sprue in.

Mounted on upper wing.

Now it fits, Aldis sight much higher

Close enough to the original

Rigging of tail added.

Lower wing mounted and pipes for Pitot tube added. Please note the rubber connection between middle and outer wing.

Upper wing mounted to the fuselage struts.

Main task in this project: masking

Outer winding painted in linen, 16 decals added.

Struts added, inner at first. Works without trouble.

Rigging added in less the 2 hours, the preparation pays back.

Rigging detail.

Accident! During exhaust mounting the engine falls in. Was able to open the ring and radiator.

The engine.

The last colored PE part from kit - a nice belt mounted to Scarff-ring.

The Scarff-ring mounted.

The gear si mounted, rigged, compressor got a 0.2mm pipe to fuselage.

The aft double terminal is mounted on the aft gear strut.

Bomb racks mounted.

Protective bow is a big thick in kit, so I made metal ones.

Painted and mounted.

Exhaust and engine mounted.

Added a piece of sprue to avoid such accident in future.

Made my own cogwheels from 0.23mm nickel silver. I do not own a cutter for that, this is more a emergency solution.

No real cogwheels, but enough for optical illusion. Pitty, that the dividing head has bad concentricity!

My cogwheel compared to kit one. The one on the airscrew is nice, but the second one is part 5 ?!

Created the sync gear body from brass. round, square, hexagonal.

My small one is left of the original.

The small cogwheel was to big, so I made another cogwheel.

After mounting I put the pipes around the radiator and into the fuselage.

Final view on the new sync gear.

Tailskid from kit, only some securing rope around the rubber added.

Mounted with struts from kit.

Wrong and bad decals, needs to be in capital chars.

New painted and different decals from a newer kit.

Created clamps from 0.3mm copper wire, 0,2mm hole and 0.2mm brass micro rivet.

Compared to original solution.

Elevator control mounted.

Clamped added also to the already glued rudder horns 🙁

View on the crossed elevator wires.

Painted the inside of ailerons dark grey.

Aileron control wires from slot in fuselage to lower wing.

Rudder horn with clamps on aileron.

RAF wire from controlled lower aileron to upper one

Rudder painted, because the decal was to small. The blue is not dry enough for clear coat.

6 wires on the inner struts.

Two ropes from upper wing to engine, used Gaspatch turnbuckles here.

Soldered nickel silver 3 rods and a PE

Added turnbuckles and a second lever with holes.

All together allow a radiator shutter control.

A special connector ...

forms a swivel bearing in two levels.

Mounted on rudder.

Two control wires on each side ...

... of course with turnbuckles.

Pitot tube was contained in the Part set.

A turned adapter for engine start was the last part!!!
Comments
3 6 July 2018, 20:16
I love this colorful bird and can't wait to see your Progress. Masking the wings was a hard word I think.
6 July 2018, 23:11
Grossartig; ist noch ein Platz im Abendkurs "Abkleben und Airbrushen für Meister"? 🙂
Schneidplotter oder der andere auf Kohlenstoffbasis?🙂
7 July 2018, 05:25
I have been dreaming about this kit for years. looking awesome!
7 July 2018, 14:24
Thank you, mates! I started already in march, but due to my "Daisy cutter" dio and the Ford-T it was on hold.
Stefan, hard work is underestimation!
Bernhard, I don't know, how Eduard is doing the masks - the page with quadrats was part of this Limited Edition kit.
Martin, this kit was released more then 10 years ago, but it's still available for a good price. May be the color work is scaring to much 😉
7 July 2018, 16:01
I have four Albatros biplanes to improve my skill for an F.2B build. If its half as nice as this I will be happy. How did you shape those struts?
13 July 2018, 13:14
Thank you! Martin, layers glued and sawed to stripes, and then formed with a sanding stick. See picture 22, from right to left.
13 July 2018, 16:36
ah cool, i thought the precision was achieved by something other than just than plain skill🙂
13 July 2018, 17:03
Fantastic....I'm in. Up to now I did not dare to start with biplanes. I'm sure I'll learn a lot here.
14 July 2018, 05:45
Thank you Norbert! Because you are new to biplanes some explanation: Many british biplanes don't have a rigging with ropes and turnbuckles, but so called "RAF wires". Those are aerodynamic profiled steel bars with a thread on the end. Normally I use turnbuckles from Gaspatch, but the "RAF wire"-type is hard to use.
14 July 2018, 11:46
Always amazed by you skills bughunter.... What tool do you use to hold your work on picture 25. And what brand is the drill bit? I can only dream to get to your skill level, but right tools can help 😉
15 July 2018, 13:27
That is my milling machine "Proxxon MF70", and to hold parts use the recommended accessories "Precision steel vice PM 40". I also own the recommended dividing head. A set of milling cutters are bought on a local modeling show, labeled Rynatec. See proxxon.com/en/micromot/27110.php
15 July 2018, 19:20
I am certainly keeping that proxxon reference for the future, seems a great tool to have fun with.....
16 July 2018, 16:18
You were not kidding when you said you did a lot of work on the undercarriage! Awesome skills Bug!
22 July 2018, 23:53
much welcome restart. finally got the kit myslef and your build seems to be one of the best references available
2 January 2019, 19:08
Gosh I wish I could get anything done at your level... Amazing!
2 January 2019, 22:29
Oh, I won some new fans? Thx mates and a warm welcome to the show to all of you! Don't miss my other projects 🙂
2 January 2019, 22:41
masking all those squares must have taken you ages... but well, everything you do must take ages anyway.... excellent. but i have to ask.... why the squares in the sides and top part are of different side? knowing your work probably it is because the original was like that but..... i still have to ask 🙂
5 January 2019, 22:14
Your fans Bugs, are like rabbits, we breed out of control every time you do stuff like this!
5 January 2019, 22:15
Here's another one Peter, count me in too! 🙂
Spectecular build so far 👍👍
5 January 2019, 22:31
Thank you mates!
@Model_Mania I was not able to add description last night, done now. May be it helps. Feel free to ask for details.
@Spanjaard I don't know, we have to ask Eduard 🤔 I know two pics, but the lower and upper surface are hard to be seen. My guess is, because the fuselage is more narrow compared to height, so with smaller squares you got also 3 rows as on sides. I had no other chance, because the amount of masking squares in the kit is very limited.
Please note also, that the left and right sides are invers, confirmed by orig pics! So even with the same square size on top/bottom you will get different transitions.
And a final tip for the builders of that kit - please remember that you have to mask the white squares, not the red ones 🙂
6 January 2019, 10:26
Thank you Tom and Björn! The painting of the crocodile will be another task, after the red is really dry.
6 January 2019, 21:42
Bugs, sometimes it is just wonderful to see what three (or thirty) levels above me looks like. I could sit through the pics you post daily. Please do not stop or slow down your production. People with the skills that you, Alex G, Maurizio, and your like have are a wonderful respite for the rest of us. Thank you for developing the skills, vision and techniques. Thank you most of all for sharing your work, the rest of us enjoy as much as going to an art gallery displaying an exhibition of the Masters.
11 January 2019, 22:41
Wow, what a comment! You made me speechless, really! THANK YOU
Today I tried to paint the crocodile, but I'm not sure yet, if the actual state is ok. The first try with a cheep oil have to be removed, driving to a artists' market for a new yellow and a "Medium L - imroves flow" for oils. The macros do not show the real impression, may be a browser setting of 50% is more the real size 🤔
12 January 2019, 17:19
deine Handfertigkeit beim Löten und Metallbearbeiteung bzw. Sauberkeit sind kaum zu übertreffen! Hut ab auch vor der kompromisslosen Lösung der Probleme! (Z.B Fotos 27, 29 und 45). Großartig.
12 January 2019, 20:38
@Bernhard Schrock Du hast absolut Recht! @bughunter He's right in saying that "your proficiency in soldering- and metal- work and the clean result is difficult to surpass." And he "doffs his hat to your manner of solving problems without compromises. Great!" 😉
12 January 2019, 20:55
Danke Bernhard, aber genau das denke ich bei Deinen Bildern auch immer!
Thanks mates!
12 January 2019, 22:53
Laughing my @ss off! Thought I'd help out... Hatte nicht mitgekriegt, dass du deutschsprachig bist.
12 January 2019, 23:36
Still has relevance Bilbo, I don't speak German so I appreciated your translation!
12 January 2019, 23:53
Every time in awe from your scratchbuilding microscopic metal parts skills. Your patience and skills are zen like, are you a buddhist monk by any chance?😄
13 January 2019, 11:33
Thank you mates! I'm not a monk, but a "normal" engineer hunting for bugs in software.
I added now the next partly metal scratchbuild assembly - a Scarff-ring. Alexander you will like it! It even has it's own wikipedia entry: en.wikipedia.org/wiki/Scarff_ring
13 January 2019, 19:35
Normal ist es bei Dir vielleicht. Ich denke Du solltest Deinen Nickname in Adlerauge ändern. Normally it's with you perhaps. I think you should change your nickname to Eagle Eye.
14 January 2019, 10:50
Danke Tom, I can't or should not change my trademark sign 🤔
This model takes a huge effort, which all the masking and painting, with 8 struts, many rigging lines. May be only the D.H.2 stripdown was a bigger project.
14 January 2019, 17:57
Thanks Richmond, I hope to be able to continue this weekend, update soon ...
18 January 2019, 08:50
Added new pictures after the windscreen is done, see orig here: [img1]
.jpg)
18 January 2019, 18:39
RAF wire brackets are finished - made from 188 individual metal parts!!
3 February 2019, 15:07
You, dear Sir, are crazy! And I doff my hat to you! 😉
3 February 2019, 16:42
188 pieces. I love it 👍 When you are bored sometimes (ha), I would love to read/see your process for making those, especially the assemblies in pic 101.
4 February 2019, 13:45
splendid work... also interested like Alec... seem to have overlooked this one, but man, what a build... To bad about the paintwork, hope you can get some replacement decals. Or will you draw your own?
4 February 2019, 14:55
Thank you mates!
@Alexander: I put on the decals respecting recesses/cut outs, but as result they were totally wrong positioned. The cut out was not for the hole of the exhaust, but hood. The openings have to be cutted later. And I was no more able to move , once cured a bit. The carrier film was on top of the color. It was a dumb mistake 🙁
For the assemblies please see also pics 24-31. I created a prototype there, but to do 16 is a different story. The "buckle" is 0.5mm brass with a cut (micro saw), squezzed flat, drilled 0.2mm, and secured with a "bolt" of 0.2mm nickel silver wire (CA added). Cut then with scissors. The thick end is a short piece of 0.7mm brass tube secured with CA.
It was a lot of boring work, but I hope the rigging is now a easy thing using the flat EZ-line.
4 February 2019, 15:31
Got it, thank you (my apologies for missing that section). Just fantastic work.
Regarding the decals: I just ran into a decal need myself and ordered custom decals for the first time from a Canadian supplier. He prints using OKI printer. It's relatively expensive, but the only option if one needs custom artwork, particularly with white. I have not yet received them, but fingers crossed... The biggest challenge was to have enough artwork to fill 1/8 page (the smallest order size). Ahh, the trials and tribulations of modeling in 1/72 scale 😄
4 February 2019, 20:15
Good luck with your decals!
On the Wingnut Wing page there is a picture of the mount of the RAF wires and struts:
[img1]
.jpg)
4 February 2019, 21:02
what a pity about those decals and paint... but i am sure you will find a solution for that.
4 February 2019, 21:39
Thx Spanjaard, the painting was done again, including oils. The first decals are located and drying, this time it looks better 🙂
6 February 2019, 18:17
Recovered the mishap with the decals with new painting. I really like the mouth with the fish, the exhaust looks like a cigar.
7 February 2019, 21:28
Shaking my head in disbelief from your microscopic scratched parts....
10 February 2019, 14:27
Your Brisfit will be a showstopper on every exhibition. Excellent work!
10 February 2019, 15:09
Thank you mates 🙂 Stefan, the first exhibition will be Fürstenfeldbruck 9./10. March. Hope to finish it before.
10 February 2019, 18:29
Interesting camouflage pattern. Did the English really hope to fool the Germans with it ?
10 February 2019, 19:23
Thank you Olivier. It was a "private" aircraft of the "Wing Examining Officer" of the No.33 TDS Witney. It was a training unit, so there are no Lewis mounted on the Scarff ring, and Witney is in the north west of London, so this was far away from the Germans.
10 February 2019, 19:48
truly stunning. and it is not yet finished.... the color scheme kind of remind me to those formation B-26 of WWII, so colorful 🙂 but certainly not the plane that you want to fly in the combat area
12 February 2019, 10:32
Those ends for the figging are a whole lot better then the original flats... Splendid work on the whole craft. What's the meaning of the plate in the last pics? To know who is the enemy?
[img1]
16 February 2019, 07:24
Thank you mates! Yesterday I had no time to add description to the pictures after upload, will do this now.
Bart, this was communication plate to the gunner in the open loud cockpit, so the pilot could point to the symbol and direction. The left symbols are clear: allied/unknown/germans, but I have no idea for the colored right fields. Any ideas?
16 February 2019, 16:35
No one a idea?
Next update added, with a rework of the gun sight. One step further, 3 steps back.
Now it should match this picture on WingnutWing page close enough:
[img1]
.jpg)
17 February 2019, 22:09
High, low, level?
Fore, aft, abreast?
Fighter, bomber, balloon?
Far, near, close?
17 February 2019, 22:49
Thank you!
Martin, it could also be related to arming of gun or release of the bombs (on the rack below the wing).
Dmitriy, but also a project with a high effort, at least in comparison with my other projects.
20 February 2019, 21:10
Thank you Clifford! I have to continue this weekend, to keep the chance to match the dead line in two weeks.
21 February 2019, 22:04
Next update, wing struts are mounted and also a big part of the rigging is done.
23 February 2019, 17:19
Thank you Cliffford and Alec! It was a high effort, but I like the result - it looks so real.
24 February 2019, 14:24
Next update - added pictures of landing gear and an accident with exhaust.
24 February 2019, 14:36
Thanks. Do you follow a specific "stretch" guideline for the EZ-line (I.e. if segment = 50mm, then the cut EZ-line = 50/x)?
24 February 2019, 14:46
No, I glue one end into the tube. I hold it without streching to the opposite tube and cut it shortly before. Put it with twezzer into second tube and add CA.
Here on the Bristol the "wires" are not longer then 50mm.
24 February 2019, 15:01
Beautiful.... (How do you do thumbs up emoticon? This plane needs 1000000 of them)
24 February 2019, 17:12
Thank you Chris! I can't type the command here, it will be replaced by a emoticon 🙂
For a HowTo see the FAQ in the upper right corner.
24 February 2019, 20:59
Thank you mates! Peter, you are right, in less then two weeks there is this exhibition/competition: 5. Fürstenfelder Modellbautage 2019 (9. and 10. March, Fürstenfeldbruck DE) My plan was, to be there with the finished Bristol, beside my other projects. And end of April here: 16. Modellbauausstellung der Modellbaufreunde Siegen (28. April, Wilnsdorf DE)
25 February 2019, 21:25
If you don't win, the contest is rigged 😛 You'll be winning the hearts of those who go, and hopefully a pretty ribbon or two you can show us on here 😄
25 February 2019, 21:32
Sync gear is done, pictures uploaded. Daniel sent me cogwheels 👍, but the letter never arrived 🙁 so I milled my own ones.
2 March 2019, 22:13
Thank you Clifford, I'm happy with the gear box. Now I'm doing the control wires.
3 March 2019, 12:42
Thank you! Just uploaded the next batch of pictures showing the control wires.
3 March 2019, 19:14
Thank you Bart! This build comes to an end, nearly done. Will be just in time ready for the exhibition next weekend.
4 March 2019, 19:00
Absolutely fantastic work! Every time I look at your progress photos, I drool a little 😛. Best of luck at the exhibition (take some pics there and post, so we can visualize 👍
5 March 2019, 12:02
Thank you Alec, the rudder is in place (again with crazy control) so no parts left. Only some washing and oils are on the TODO list.
6 March 2019, 20:23
I am absolutely stunned and excited! What a beauty- I wonder how you did that! Such a beauty!
6 March 2019, 21:27
Wow, thank you mates for such a great feedback! I uploaded the next pictures - this build is finished after one year (with some other projects in beetween) Thanks you for escorting me 👍
7 March 2019, 21:08
Thank you mates! I will add a gallery with the final pictures next week.
8 March 2019, 21:56
Thank you for all of you kept the fingers crossed - this bird was selected for the gold metal during the contest today - YEAH!
9 March 2019, 17:50
Congrats Mate! I never had a doubt about that! Well deserved Frank with this gem 👍
9 March 2019, 18:21
Well deserved, didn't want to know what one had to do to beat that...
9 March 2019, 18:30
Bugsy. ! What a delightful trip through your stunning build. 👍
Just brilliant. 🙂 🙂 🙂
9 March 2019, 18:36
Frank, truly unbelievable work. Seriously, this thing belongs in a museum. Congratulations and hats off is all I can say! Please continue spoiling us with these kinds of gems!
9 March 2019, 20:42
Wow! Thank you mates for your congratulations 👍 I uploaded a new album with the pictures of the finished model.
10 March 2019, 21:47
Album info
Imposition!