

"Daisy cutter" - Work in progress

platform

Struts

My loong folding tool was not looong enough 🙁

enough small parts to create 5 support profiles.

... which are are created from 8 parts.

Some brass profiles helped during folding process.

PE number 4

only number 5 is a little bit smaller.

Sometimes complicated folding, 8 small parts needed additionally.

Holding structure near to completion.

cast should be opened here - 16 times!

to act as lashing eye.

3 huge sprue gates needs to be cutted, on the back a PE part hides it. GPS sensor is a additional part.

Big thing!

The PE looks very real!

Very filligree castings for the tailplanes.

White Alclad primer, and yellow top.


Used Gunze H6 + H26


Position of slot ok.

Bug in kit - to far forward, opened further with PE saw.

rest of HGW fabric is great here!

16 holes and 0,4mm brass brackets added.

Opened the upper spars on the lowerr side.

Soldered a big PE after rolling (color comes from etching because it is thinner).

Glued 4 bolts.

Used Alclad white alu for paint job.

8 resin parts with thick sprue

Small parts

A lot of brass, view from below.

Resin parts are 1 pin too long.

Prepared platfrom.

Small brass parts mounted after the frame.

After painting frame mounted.


After problems with masks the yellow removed and freshly painted.

igniter painted.

Fins prepared.

Mounting place too.

Decals done. Very nice opaque white!

Self made fasteners.

Bolts are soldered.

Added the belts to underside.

Rigging finished!!! Horrible work! 😉

Dio finished, "only" the figure is missing.

Brass for scratch work

soldered.

Taken picture from walkaround, after graphical work printed to decal. Bare metal foil on the surface and black painted.

Size seems to be acceptable.

A fresh detail added 🙂

A evergreen base and a flat filed clear sprue.

Masking

Ready for mounting

Figure ws painted
Comments
2 1 May 2018, 17:20
one of this days i have to try soldering PE... but not in a million years i will get close to what you do 🙂
1 May 2018, 17:53
Thx mates! Here soldering is ideal to speed up the build. Parts fixed immediately and connections can be corrected. I'm not sure, which green matches the prime portal pictures: Gunze H16 ?
1 May 2018, 20:49
Hi Bughunter, no "How to" by you for soldering Etched Parts -No colour advice 🙂
1 May 2018, 20:57
Daniel, nice try 😉 You will need tin solder, a flux agent and heat with a soldering iron (copper tip prefered). Thx Urban, "as always" 🤔 I will try my best!
2 May 2018, 18:33
Everytime I see one of bughunter's builds I have to go lie down and reevaluate my life...
3 May 2018, 01:01
@Greg: I have my exhibition table right next to bughunter at the Modell Exhibition in Siegen.
Bitter sweet experience everty time... I can tell you 🙂
3 May 2018, 07:21
Wow, after such amount of great feedback and interest (Thanks mates!) I added descriptions to the pictures. Lets see, if I can take additional detail shots.
3 May 2018, 18:44
Thanks Daniel, I mixed H26 with H6 50:50. H26 alone was too bright in my eyes 🙂
10 May 2018, 21:03
that base is starting to look really interesting. excellent job on those letters!
2 June 2018, 18:52
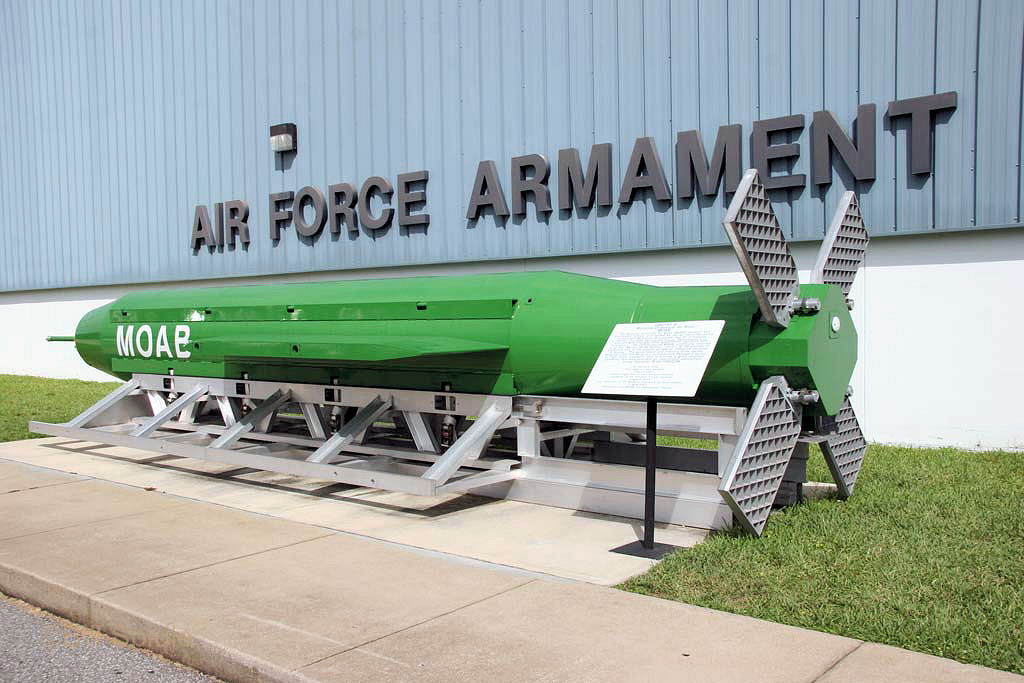
Thx, the intention was to replicate the original display. Klick on the GBU kit and you will find a walkaround on primeportal.net.
3 June 2018, 10:47
Great base Frank. I squandered an opportunity to visit the AF ordnance museum this Spring while visiting Florida. It was either it or the Naval museum in Pensacola, and I went with that (I was with my spouse, so did not want to push my luck 😄).
3 June 2018, 11:38
intention fullfilled indeed.... you only miss the light on top of the "F" 😉
4 June 2018, 06:49
Looks good, did you drill holes for the 0.4mm brackets? or did you glue these in place?
4 June 2018, 08:24
Spanjaard, are you sure about the light? I thought it is a nesting aid for birds 🙂
Bart, I drilled 16 holes and put the brackets in, so it is much more robust. But such task is much easier prior mounting 😉
4 June 2018, 18:51
ha ha ha, of course anything is possible.... the question is.... will you reproduce it? 😄 😄 😄 LOL
4 June 2018, 20:29
Uploaded pictures of the finished platform, some details are also prepared.
8 June 2018, 21:08
Added new pictures of the rigging, the dio is nearly finished. Only the figure is missing.
10 June 2018, 18:05
those fasteners really look horrible 😛 i will take note of that, maybe i can duplicate them when i need something similar.... excellent!
what did you use for the belt?
10 June 2018, 18:10
See picture 45 - this is the remaining fabric of HGW seat belts. I can't drop such material to the bin 🙂
10 June 2018, 20:09
Great Result so far Frank! An great idea with the facility manager taking care about the grass 🙂
13 June 2018, 15:00
and that puts it certainly into perspective... one bigass motherf***er of a bomb... nice sculpt to of the figure
13 June 2018, 20:40
and i thought it was my idea 😛 probably i read about it and forgot about it 😄 😄
13 June 2018, 22:34
Look at this photo and you'll see that the base plate for the information plaque is overscale. I hope that you haven't glued it in place yet.
[img1]

14 June 2018, 14:04
Urban, thanks for the hint! The presentation in this museum changed multiple times. I have pictures of three different plaques.
This matches more mine, for more pictures see the walkaround in SM linked in the kit page.
[img1]
It is may be still overscale, but not much.
14 June 2018, 14:47
Added some pictures of a special feature for Spanjaard and my friends from modellboard.net. Finished, will add a new album soon soon.
21 June 2018, 22:30
I added a new album, so don't miss the chance to see the finished diorama: "Daisy cutter" - GBU-43/B in Air Force Armament Museum Eglin | Album by bughunter (1:48)
22 June 2018, 06:24
you even added a few pieces of grass around. that is attention to detail 🙂
22 June 2018, 06:51
Great attention to detail! 👍 I really like the lawnmower man, and the grass cut lying on the concrete base. 🙂
22 June 2018, 07:30
Thx mates! Due to a posting of a friend there was an idea, I added some flowers and the title is now "Daisy cutter"! The double meaning tells the story 🙂 Thanks for visiting and commenting!
23 June 2018, 11:42
Album info
The PE of the kit was soldered. The Eduard brassin kit put into my first mini diorama with additional details and my first painted figure.


