

Villers Bocage Universal Carrier


Comments
21 May 2015, 23:58
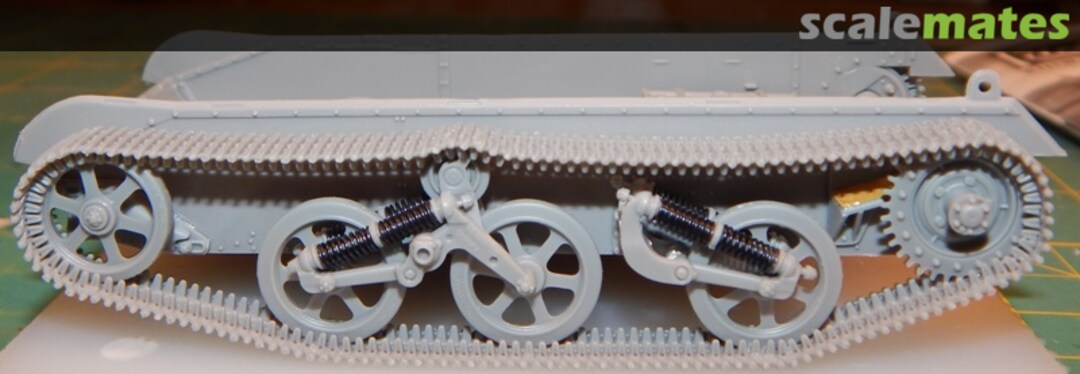
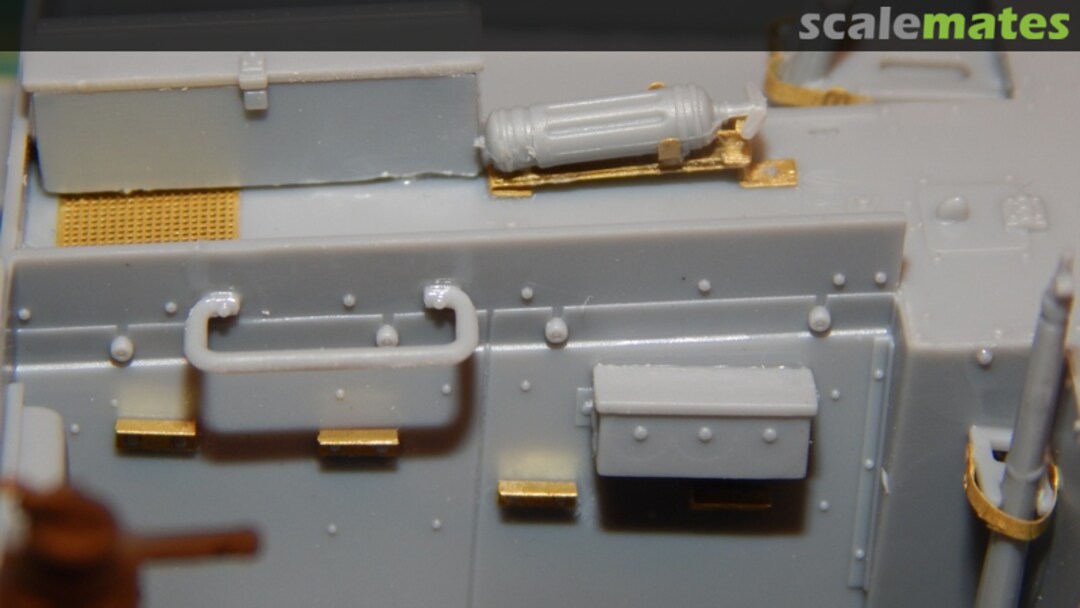
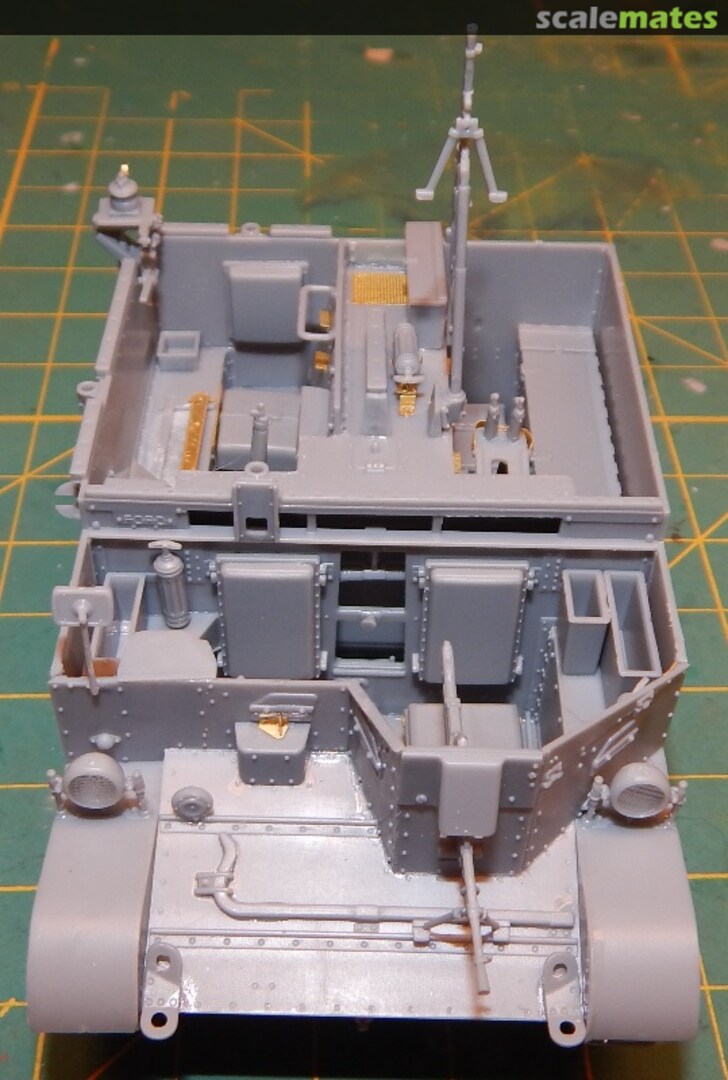
This kit is packed with detail. I had to stop working last night because the front seats are so complex and detailed and I was too tired to really concentrate. Some on the web have called it over engineered. I am in the " more detail the better" crowd and this kit meets and exceeds my expectations.
28 May 2015, 12:40
So...they could distill whiskey on this carrier? Must be because it is the Mk. 1.
29 May 2015, 06:43
more shots of this build added. The really fun stuff is coming. I am about done with the build and I am working the Black Dog resin stowage set up to fit. It was deigned for the Tamiya kit but a bit of sanding is all that is required to get most everything in place.
30 May 2015, 16:53
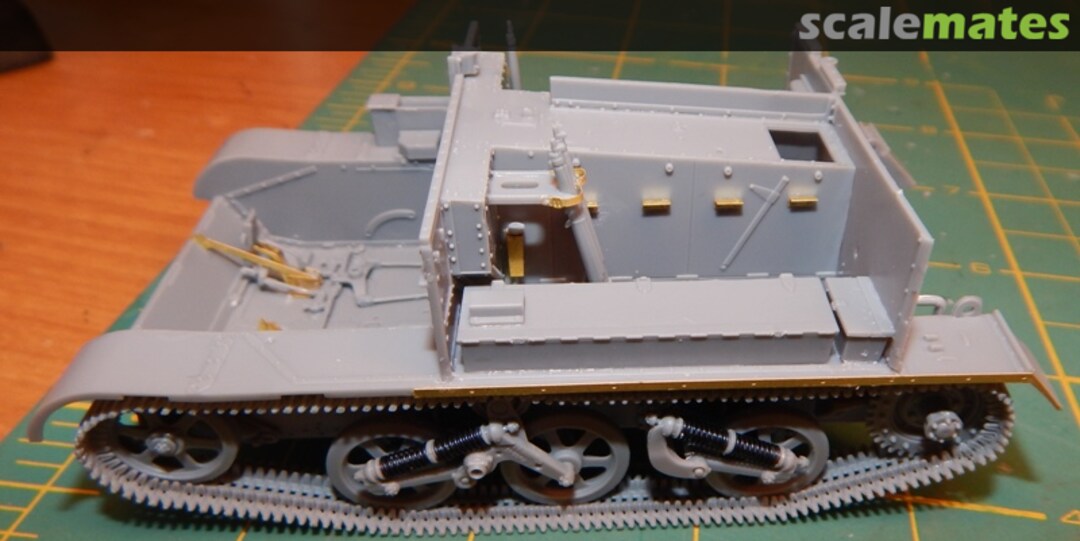
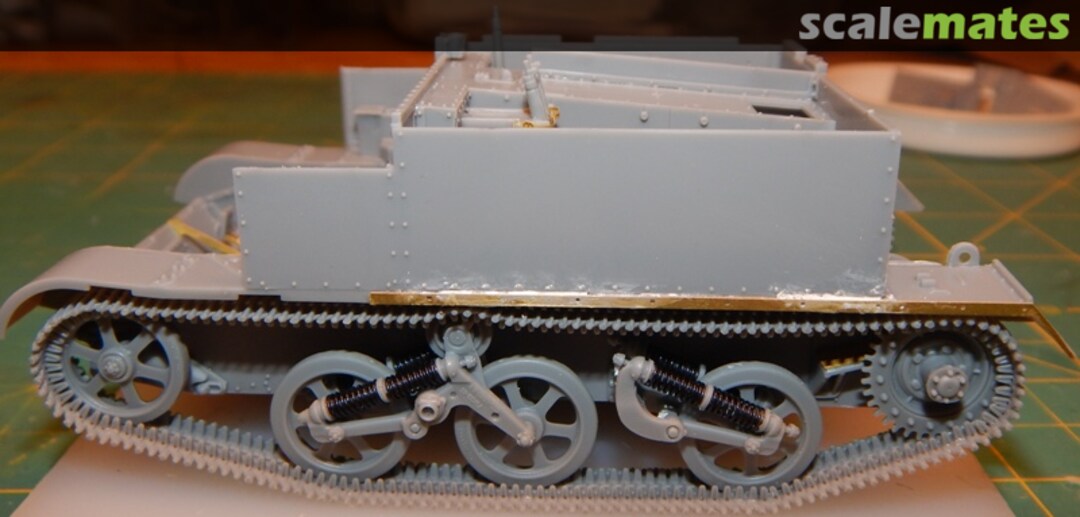
Thanks Leif, I am a bit behind on photos. I only have to add the cable/chain detail and the resin and the build is done. I add all the stowage to the vehicle before I paint, some wait but I find it easier and you have less issues with glue shmutz that way.
30 May 2015, 19:33
Hi Henry!
Good progress! 👍 Looking good!
Have you fixed the engine cover with glue or can you still remove it? It would be a pity, if that little gem would be hidden.
31 May 2015, 05:44
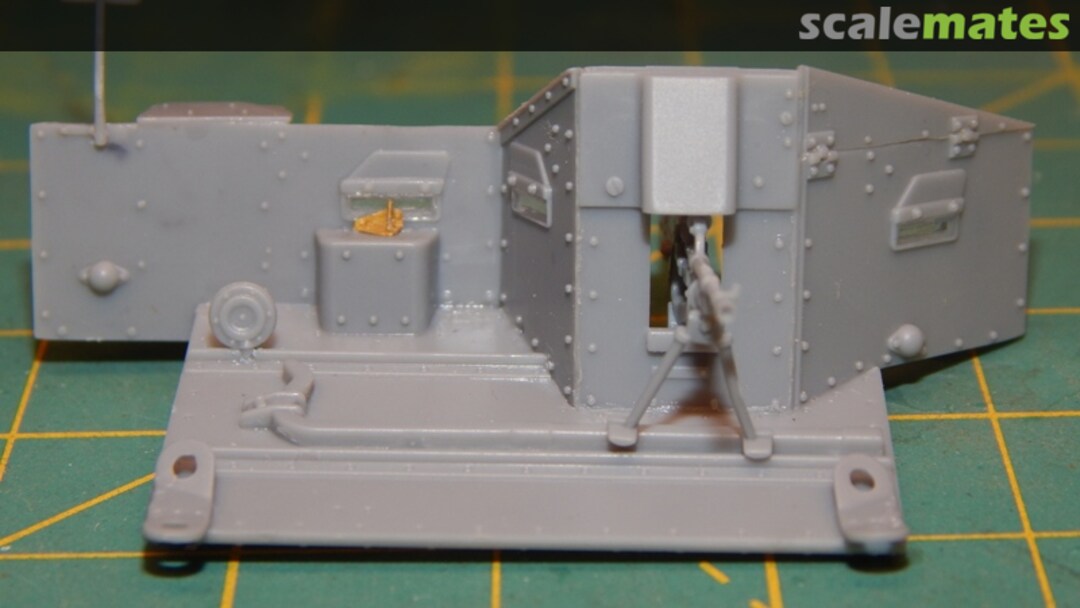
I fixed it. If I had really though about it I would have just added the radiator and kept the engine since the radiator is all that can be seen once the cover is on but in the end I added it. This vehicle will be part of a much bigger project and will have gear and stowage all over it and that would have prevented the cover from being removed.
31 May 2015, 13:11
interesting build with lots of details going on 🙂
One extremely minor thing caught my attention though,
The PE. radiator fan needs each blade to have a little twist just to give it some pitch like a proper air screw 😄
Like I said a very minor consideration, keep up the good work ! 🙂
31 May 2015, 13:44
Good catch; I need to remember that. In this case it does not matter since all but the radiator is covered but I do many open hood, exposed engine projects and I never thought of that. It is the little things that make the difference. One reason I began posting my work is to get the feed back. I can not improve if I am my only source of feedback.
3 June 2015, 12:09
this kit has a lot of detail in it... makes me think of the CV3/35 from Bronco...
3 June 2015, 12:26
Bart I built that kit also and you are right. I have build several Bronco kits and this Riich kit reminds me of them especially the tiny detail and detail you may not even see once the kit is complete.
3 June 2015, 12:44
WOW. !!! Fantastic in every way. 🙂
74 images of pure joy 🙂. This is the sort of detailing that can sit you down at 4.00pm and get up from the bench at 4.00am and you say, "Mmmmm, THAT was interesting" didn't get all that much done.
I am enthralled in what you are achieving Henry. Looks like more pop corn and beer are on order.
Now, where's that comfortable chair. ?
🙂 👍
3 June 2015, 12:46
Hey Henry. no worries, it's what we are all here for, constructive critique 🙂
and feedback, education and encouragement 😄
Anyhow, one thing I find that helps is if you have a general understanding of how things work errors like that don't seem to creep into the equation.
The number of models I've seen with the ailerons drooping in the same direction like flaps do, Wrong ! (except on certain modern fly by wire aircraft where all the surfaces can do aileron and flaps at the same time, electronically mixing functions)
or Chinooks with their rotors overlapping, WRONG ! they inter-mesh like cogs traveling in opposing directions, never do they over lap....
or propellers fitted backwards, once you understand how stuff works these things become glaringly obvious errors... anyhow......... thought I might take a moment to express a couple of pet peeves 😄
It does seem a shame that you are covering all that detail up, no way to make the "lid" removable ?
3 June 2015, 16:39
Kerry, thanks for the encouragement. Still a ways to go. I need a bit of lead for the front end due to all the stowage in the back causing it to lift in front.
3 June 2015, 18:58
NC, I thought about keeping the engine out altogether but in the end I wanted to see how it all fit. Since I am adding so much stowage I really can not see a way to make it removable. I will build one of these again with a maintenance scene to showcase the engine/
3 June 2015, 19:00
yeah I like that idea, a diorama for two !! 🙂
Think I might do a separate engine display for the Me109's and Spitfires that have engines in the kit
3 June 2015, 19:21
I know the car guys in my club will build the car and super detail the engine and display it outside of the car. Really nice stuff with all the plugs, belts and wires. I have a great shot of an original Merlin Rolls Royce engine in my photo stash. I will post it if you can use it.
4 June 2015, 01:43
I just have the one at present but it is at an aircraft museum a few towns over and I can run down there in the next weekend or two and get a full walk around of that engine. I will post when I get that done. I always love having a reason to go down there, great place with 5 hangers full of restored WW2 and a few WW1 aircraft. The military aviation museum, here is the link if you want to check it out. militaryaviationmuseum.org/
4 June 2015, 12:56
Great detail work and beautiful interior paint job, Henry. The "Taxi" is full now 😄
5 June 2015, 09:48
Yeah! 👍, everything but the kitchen sink, but then again, I had better go back and take a good long look at just what you have packed on there Henry. :-/
5 June 2015, 11:04
Just laid down the primer and base coats. I will start the detail painting tomorrow. I needed to do a bit of research on the British green used during the latter part of WW2. The best mix I found was a Tamiya mix. 5 parts XF-81, 1 part XF-58 and 1 part XF-71. At first I thought it a bit light but once dry it looks real good. I will post some shots in the near future.
6 June 2015, 01:18
Base coat detail on almost entire model. Still need to finish up the road wheels and personal weapons, radio and Bren Guns. Once that is accomplished I will apply a clear coat and a wash. I also need to find some decals for unit serving in 7AD, Normandy, 1944. The decals with the vehicle do not meet my needs. Any ideas?
7 June 2015, 12:29
Well, "It's off to war we go, it's off to war we go, hi ho the merrio, it's off to war we go."
Bloody amazingly fantastic, but where have you hidden the kids ?
I love it Henry. Stunned is more the word I am looking for. 👍 👍 🙂
7 June 2015, 22:19
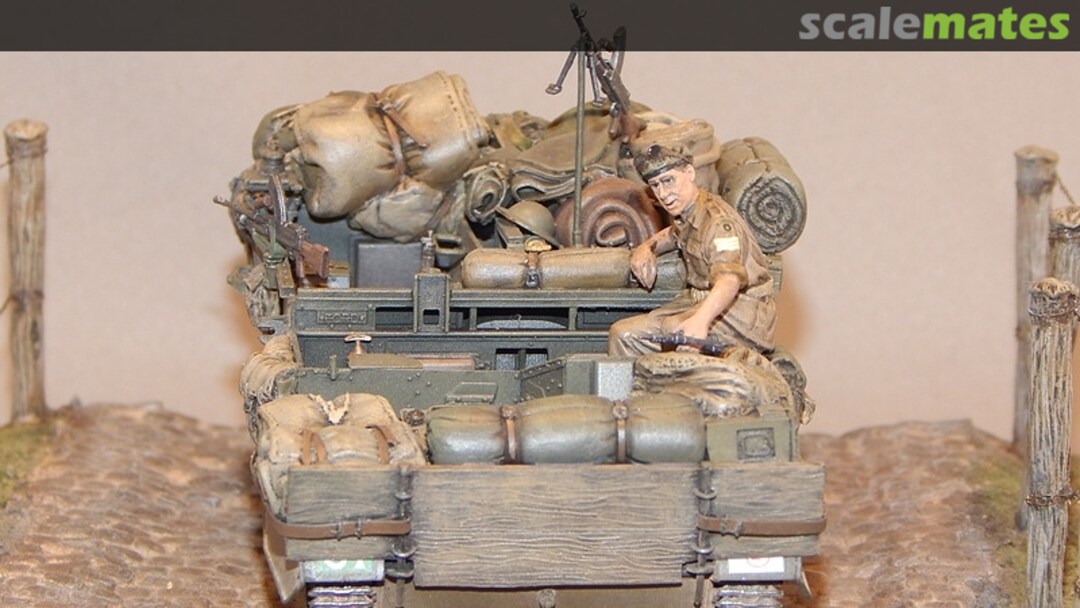
Thanks for the continued words of encouragement, the wash goes on today on the gear and a filter on the areas of the vehicle that are not covered(that part won't take long). When the wash sets I will begin to dry brush the gear. I like this part because I freestyle with various colors and shades. This make each item have a subtly different color even if the base coats are the same. I will also begin work on a base and continue work on the crew figure.
8 June 2015, 12:38
The carrier is completed. I have to finish up the crew figure and the base. I will also tinker with this thing for a bit if I see anything that needs help.
17 June 2015, 21:45
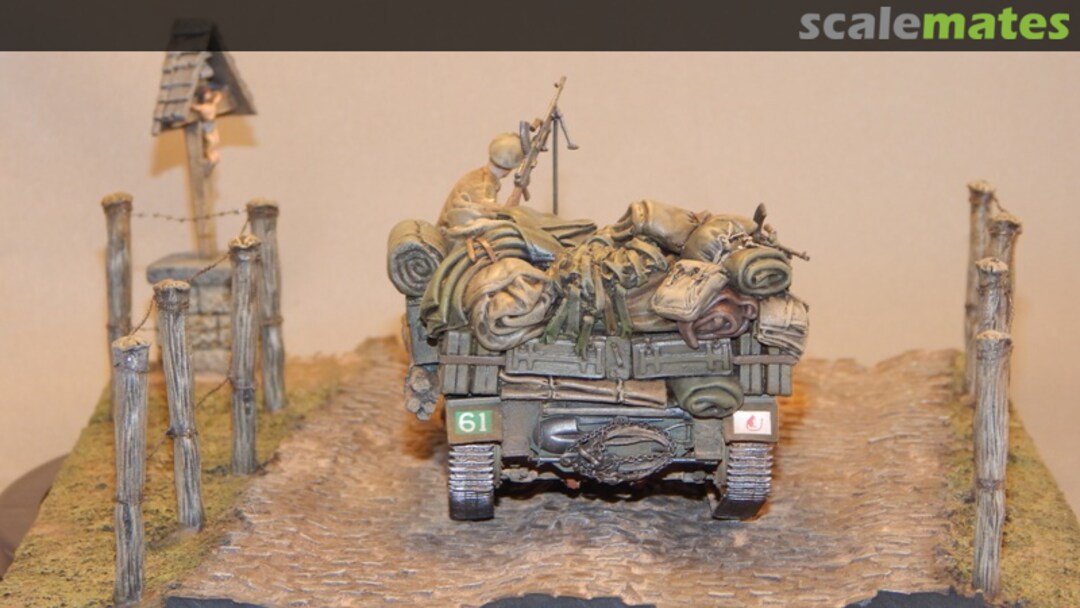
The markings represent one of the infantry battalions attached to 22nd armd Bgd, 7 AD, June 1944.
17 June 2015, 21:47
And so, the end is near and so.......Is this all part of a wonderful thing called a DIORAMA. ??????? :-O
17 June 2015, 22:08
This will be one of 9 vignettes, I am calling it the "Wittmann Sampler", and will have a representation of each of the vehicles Michael Wittmann was credited with destroying at the battle of Villers Bocage on 13 June, 1944. They will be displayed in a box, like the Whitman sampler candy box, only with some modifications to the candy box art and so on. I am almost done with the base and figure for the carrier, the 6pounder A/T gun is being painted and the M3A3 Stuart is on my build bench. I still have 6 other vehicles as well.
17 June 2015, 22:23
AWSOME Henry, and I am holding my breath waiting for the pics mate. And what a fantastic dio "Concept" for their display, and you got history with it too. 🙂
I am like you in having a number of builds happening all @ the same time. !!!
17 June 2015, 22:48
Thanks guys, I have had this project in my head for many years but the kits were not readily available and/or I did not have the time to give. At first I wanted to do this in 1/72 but all the vehicles needed are still not available in that scale and I prefer 1/35th anyway.
18 June 2015, 12:14
Henry, I'm glad you choose 1/35, also my favourite. Beautiful finishing job on that full, "Taxi" 😄
18 June 2015, 12:31
Thanks, I am finishing up the base and the figure to go with this guy. I am going to do a write up and send it to Boresite, FineScale and a few others and see if I can get it published.
18 June 2015, 18:53
Good luck with all of them, and I reckon they will be chasing you for items after seeing what you have done here Henry Milton. No worries at all. 🙂 👍.
18 June 2015, 20:37
That would be fun. I have done around 30 reviews for the AMPs website but never anything in a big publication. Free signed copies when I get famous....LOL!
19 June 2015, 00:57
Just waiting on some figures to arrive to round this project out. It just feels like it needs a few more Tommies to make it complete.
22 June 2015, 15:16
Well done on that base, Henry. Really like the wavy pattern on that paving stone old road. Congrats. Mate 👍 Are you going to put the antenna on that "full taxi"?
22 June 2015, 15:25
Another figure or 2, wip antenna, tied down, and a few other details. I like to tinker with stuff that is "finished" just to see if I can get any more out of it.
22 June 2015, 21:10
Great job on all parts, really nice, detailed dio! And indeed a few more figures would give it a great finish! How did you built the road and the barbed wire?
23 June 2015, 04:34
Thanks. I took the easy way and used a Verlinden resin base I had in my stash. I have several others that I plan on using. They are well rendered, easy to build up and us and save a great deal of time.
25 June 2015, 13:07
Added some detail to the radio and antenna while I was doing up the other figures. scratched out of styrene and resin. The head phones and mic are from my spares box.
27 June 2015, 19:52
Yup, anything you need, just look in the 'spares box', but be warned, there are things that are 100's of models old that you sorely missed at the time they 'Got lost" LOL. 🙂
27 June 2015, 20:33
I keep my spares bins fairly well organized. I can find radios, weapons, stowage and so forth quickly and that comes in handy. I keep everything left over from a build. I think I could build an entire Tiger I will all the extra sprues I have from Dragon. I do find items that make me wonder what I was thinking when I saved them. But then I just put them back, just in case.....
28 June 2015, 13:56
of course the moment you throw them away something will come up where it would have been perfect etc.
Murphies law and all that 🙂
28 June 2015, 14:14
That is why I keep a great deal of styrene, wire, scrape pe, and scrap resin at hand. If I do not have it I make it.
28 June 2015, 22:38
Done and done. That was a fun project. I have 2 more in work and a number of others in planning. Thanks for all the great feed back. This thing is better because you fellas spoke up and gave me extra sets of eyes.
2 July 2015, 00:15
By the way, Vignettes should have names, any ideas, and be kind "Get out of the road, JACKASS!!!!" is not what I am going for.
2 July 2015, 00:17
Album info
Riich models MkI Universal Carrier.


