Kitty Hawk Su-35S Flanker-E - WIP


Comments
1 25 September 2017, 13:17
Off and running on the latest project! Really excited to build this one...
25 September 2017, 13:18
Oh me like a lot! Check out the pair of afterburners ( . ) ( . ) on this! 🙂
25 September 2017, 13:20
Haha nice!!! Actually, I just added a couple of photos of the A.M.U.R. nozzles. MAN, are these things nice!!!!!!!!!!
25 September 2017, 13:23
Wow, next big incoming after the the exceptional 29SMT! I'm in 👍
25 September 2017, 13:27
Going to watch this. I have this kit and plan on getting the nozzles.
25 September 2017, 15:45
Flanker? first row please, i will bring the popcorn and a good dark beer! this will be something to enjoy!
25 September 2017, 16:47
Welcome everyone! Enjoy your beers and enjoy the show!
Got some work done on the cockpit tonight... Still need to add a light wash then this will be done. All OOB.
26 September 2017, 03:50
How is the kit? I know Kitty Hawk get a bad rep.This is their newest tool does it compare well with other manufacturers or is it another pig?
26 September 2017, 04:33
Hi Michael great Job on the MIG 29 and Tomcat you've done before. I'm following with interest.
26 September 2017, 04:35
Thanks Konrad for the very kind words, I hope I can do this majestic bird justice!
Welcome Marko and Dan! Dan, so far this kit is really nice. The plastic looks fantastic, and the cockpit is REALLY nicely detailed and no issues with it so far. The big issue with this kit is the nozzles, they do not provide the option to display them drooped at rest like they are when not powered up. But I have aftermarket to fix that issue. The other issue is there are some differences with the tail stinger between the prototypes and active service Su-35s, and the one in the kit represents the prototype configuration.
I did build the KH Fitter recently, my first KH kit, and really enjoyed the build and it turned out very nice, despite the known issues with the kit.
26 September 2017, 04:55
So, i´m gonna make it comfortable here. Michael where is the beer?😢
Uhh nice nozzles!
26 September 2017, 09:36
I'm not into Flankers that much but what the hell! Seeing those first pictures got me hooked!
26 September 2017, 15:14
Thx Micheal! ...hope we're talking about BEER and not Coors Light or Bud Light or some such?! 😉
Nice idea for a new toppic: What are you guys drinking while modelling?
26 September 2017, 17:02
Almost anything with alcohol in it as long as it doesn't reach 70%, that's what I use to thin my paint with...
26 September 2017, 17:04
drinking and eating may not be the best idea if you do not want to end up eating some of the nasty products we use while modelling.... besides, i can not since I try to use a mask as much as I can while modelling, so i do not breath that stuff either! and that includes dust, specially the one coming from resin....
26 September 2017, 17:27
Good one Spanjaard! That stuff is really nasty! Just too bad there isn't another material capturing tiny shapes as good as polyurethane resin.
26 September 2017, 18:00
Well... I drink tea or beer or wine when i´m modeling. And i like to have a smoke. Just Relaxing with nothing on my mind instead of modeling, history and glueing my t-shirt to the bench.
27 September 2017, 07:26
Well sure, during painting or cutting resin especially I wear a raspirator = so no drinks. But every now and than while I "watch the paint dry" a freezing cold beer or a neat little rum. But generally during buildung I go with NO BOOZE WHILE OPERATING HEAVY MACHINERY 😉
27 September 2017, 09:23
Haha, I see the party has started! Enjoy your stay and please drive home safely! 🙂
Thank you Sebastian, James, Augie, and Clifford! Welcome to the show.
Patrick, yep, huge fan of PPP here. Awesome stuff, it is my go-to. Wanna know the cool part? I have only had to use it for a very small area on both sides of the stinger tail so far, and that is because I got a bit overzealous removing the sprue gate attachment points there. The fit on this has been THAT good so far. I am particularly impressed with the fuselage halves fit. It is also really cool how they handle the rear fuselage fit and the tails... I have not yet attached the vertical tails,but they come down and cover the rear fuselage join, which is normally a bad fit area on Flanker kits.
The nose also fits very well, however there is no way, that I can see, to know which way is up or down when you fit the nose. So lots of trial and error there, and ultimately I went with the way that fit better, however the other way fit decent as well. It looks right to me.
So far the most difficult thing has been the canopy and windscreen. There is a mold seam going down the center of both. The canopy was easy to take care of, however the windscreen was another thing altogether. The integrated IRST made getting the seam line down near the front of the windscreen very difficult to sand down and polish clear. Not only that, the seam line seemed to become more prominent in that area. But in the end, I was able to get it taken care of... mostly. It had a future bath and I will see tomorrow if the future took care of the mild cloudiness in that area that I was just not able to polish fully.
28 September 2017, 05:10
Michael, where do you get your perfect Plastic Putty from. I would like to give it a try.
28 September 2017, 21:21
There's a shop in Norman OK having it on stock but i ordered mine through Amazon.
28 September 2017, 22:55
Hello there! I have this kit as well. It looked very good when I looked it over. Glad to see I was not wrong. 🙂 I may have to get the nozzles as well.
I too am a huge fan of PPP. The fact you can remove it with water or even spit before it sets is awesome. You dont have to worry glopping it in panel lines and the like. And it sands well once it is set.
29 September 2017, 02:57
Clifford, I get mine from eBay. It's usually under $10 shipped that way.
So I got my first big need for the PPP tonight with the wing install. There are some gaps that need attention here. I took some pics of how I do it. I will see if I need further work there once I put some primer down. It's so fast and easy with this stuff!
29 September 2017, 04:09
PPP is my go to as well. Love that stuff. Depending on where you have to do filling, it can be shaped with a moist cotton swab. No sanding required!
29 September 2017, 11:46
is it like Vallejo putty? or better. i was quite disappointed with Vallejo putty..... i am still using Tamiya Putty
29 September 2017, 17:05
I have both. I much prefer the performance of the PPP, but prefer the tube/dispenser of the Vallejo. I actually tried to use the Vallejo previously because it's applicator is better, but I always go back to PPP. Good news though, PPP has a new container/tube/applicator:
[img1]

29 September 2017, 17:20
Yep! That's the one I got! But I use it strait out of the tube and apply it with a 'rubber' brush used for 'sculpting' oil paints on canvas. It has a flexible soft tip where I can easily wipe the putty off.
29 September 2017, 18:18
i have seen brushes those in an artist shop... i knew they could have some interesting use..... ok, that is the excuse i needed 🙂
29 September 2017, 18:29
I like the look of that new tube!
I don't use the masking tape method with this stuff because it is so easy to remove before it sets.
29 September 2017, 19:11
Patrick, can you take a pic of your application brush? I really need a better applicator. I'm using a metal sculpt tool that works only ok. What you have sounds perfect!
Donald, I use tape because I hate spending time getting it out of panel lines and rivets. And there are a TON in that area.
29 September 2017, 19:19
I'll take some pictures after work to show you all what I mean.
29 September 2017, 19:20
Awesome, thanks mate!
And thanks Clifford for the kind words! Hope to get alot done this weekend.
30 September 2017, 00:26
I'm using these for application, cheap, flexible, different shapes and sizes.
luckymodel.com/scale.aspx?item_no=TP09922
30 September 2017, 06:08
Count me in for this one...I'm also a fan of PPP I have started experimenting with a syringe to apply it...if the needle is large enough I can lay down a very tight line of putty exactly where I want it....downside that I use a bit more as some stays behind in the syringe (I use 1 ML syringes so the waste is not excessive)
1 October 2017, 09:23
Thanks for the link Marko, those look pretty useful.
Welcome Adam, Wim, and Alistair!
Well, made some progress this weekend. Got most of the Flanker assembled, so I should be able to prime soon. I am gonna change up my usual priming method and use gray primer. The reason for this is due to the dark eggplant color. I feel it will be too dark to spray over black. Since aircraft in this color scheme tend to be very clean, I am not going to pre-shade either. Will do very minimal post shading though, to give it a little life.
Some random notes:
The refueling probe is designed to only be in the extended position. It is going to require some work to model it in the stowed position.
The intakes fit pretty well, some minor putty will be necessary but not too bad.
2 October 2017, 03:40
Thanks Gerald, James, and Sebastian!
Well, made some significant progress over the last few days. Got 'er primed and painted! Not perfectly happy with the MRP Eggplant Gray. I feel it is too dark. I think tomorrow I will go over it with a mist coat of a lighter gray to lighten it up a little and give it some depth and tonal variation. It is so dark that you can hardly see the black anti-glare paint in front of the windscreen.
6 October 2017, 06:11
Looks great! I do have to agree the purple is a bit dark from the pics I have seen. Lighten the color up with a touch of white and mist that perhaps.
and please sir, the paint brands and color names/numbers? I need to get them. LOL
6 October 2017, 22:59
Thanks Donald and Clifford!
Donald, so far I have used Gunze Mr Surfacer 1200 Gray Primer, Gunze H305 FS36118 Gunship Gray, Mr Paint MRP-196 Light Blue, Mr Paint MRP-205 Eggplant Dark Gray, Mr Paint MRP-189 Traffic Gray (for toning down the Eggplant color), and Tamiya X-1 Black.
I will be using Mr Paint MRP-032 Russian Wheel Green, Akan Red for interior gear bay doors, and various Alclads for the metal work. I will also be using Tamiya XF-85 Rubber Black, Tamiya XF-2 White.
7 October 2017, 05:22
Well, was able to tone down the Eggplant some, and I painted the anti-glare area Tamiya gloss black for better contrast, I previously used Rubber Black, which I use for black usually as it is more realistic in my opinion.
I went a little too far on my mist coat of light gray, so I went back in with more eggplant gray, and while doing that I tried to give the paint some tonal variance to show some wear and fading. I may go back in with some more eggplant to tone it down further.
I also finished painting all the gray panels and whatnot. I will add the gloss coat in preparation of decals tomorrow, and work on the missiles and landing gear.
7 October 2017, 05:26
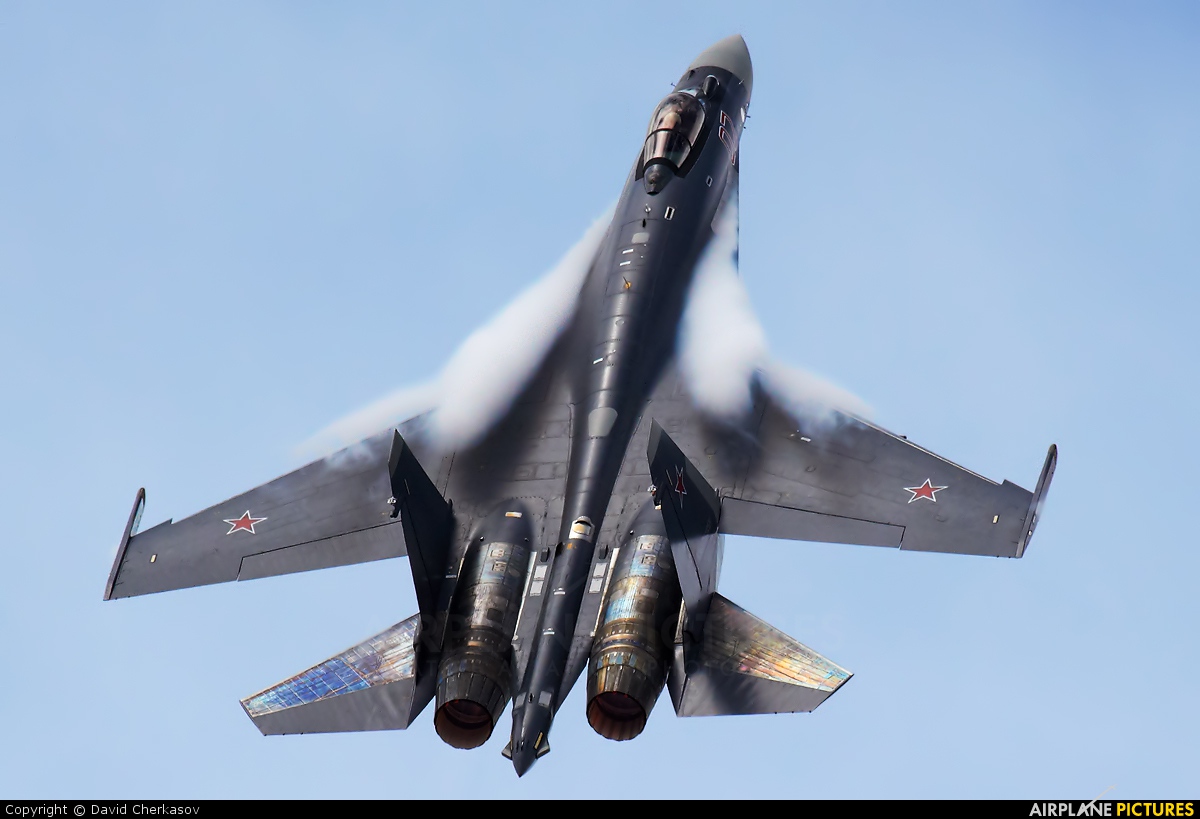
That paintjob really nails the one in the cover picture! As the black is concerned, I understand your doubt between the Rubber Black and true black but the contrast is nice and the cover picture shows the anti glare panel to be really nice and dark without noticable fading.
7 October 2017, 15:09
Thank you kindly for the color breakdown sir. The second go around with the colors certainly made it even better. Looks great!
7 October 2017, 15:31
Great to see more jets getting painted with the current Russian scheme.
7 October 2017, 15:46
Thanks Bart, Stephan, Taarna, Sören, Patrick, Donald, David, Sven, Sarunas, and Clifford!
Got the main decals on tonight. Had some issues with the two dotted line "box" decals that go on the upper fuselage, so I rage quit for the night. I hope to come back to it fresh minded tomorrow. I hope to have the stencils all done within the next couple nights, then I will start the metalwork. Still lots to do!
9 October 2017, 03:33
Looks good sir. Rage quitting is a part of the hobby I think. LOL
9 October 2017, 15:19
Very nice so far! Does anyone know, if another Company brings out the Su-35 1:48? Maybe Hobbyboss/Trumpeter?
9 October 2017, 15:49
Thanks Christian, Donald, and Chris!
Donald, yeah, I don't get so frustrated easily, but this one really got to me. Oh well, I am already eager to get back at it tonight. I am good as long a rage quit for a day doesn't turn into a rage quit of a project. LOL
Chris, actually, GWH is coming out with an Su-35 in 1/48. This promises to be a fantastic kit, so I will be getting one for sure to do a blue camo Syrian Campaign jet.
scalemates.com/kits/1096233-..hobby-l4820-su-35s-flanker-e
9 October 2017, 16:10
adorable design, gotta give it to the russian designers as of late, when compared to their contemporary rivals russian jets got everything on the looks dept. and su35 is a pinnacle at that, especially given that i drool for their 2 seaters, this fella is looking even better in single seat.
as for the kits; kh, kinetic and academy are on my blacklist for good so the gwh would be a most welcome to build this babe in 48 properly and relatively hassle free.
9 October 2017, 17:33
This GWH kit looks pretty interesting. From the poster, it looks like that the exhaust cans could be displayed in different positions - straight for in-flight or powered off.
9 October 2017, 17:35
Murad, I too hope that they make a good representation of this plane. There are many Flanker variants and operators, but probably there isn't a representation of it without quite noticeable shortcomings. Like the older Hasegawa 72nd with too wide rear end or the Trumpeter offerings with those angled wheel wells. And we don't have to mention the Academy's kits 😄
9 October 2017, 17:43
Progress has been slow of late, a mix of less time to work and some tedious small stuff being done such as missile assembly and painting, landing gear, and other little bits. I started the metalwork this weekend, and got the masking done and the base airframe aluminum down. Hopefully tomorrow I will be able to get the heat stressing and other metal weathering done. The Su-35 has some very cool looking metal coloring, so hopefully I can replicate that. I have some really good pics for inspiration and reference, so we shall see!
15 October 2017, 06:42
Another Russian 'fast mover' on the way 🙂
Looking good as usual Michael, you build at an impressive building pace. 👍
15 October 2017, 07:12
That metalwork already looks impressive, can't wait to see it finished.
15 October 2017, 15:59
Good job on the metal sir. Should look great once you do the weathering. Good base.
15 October 2017, 18:55
Thanks Kees, Patrick, Donald, and Clifford!
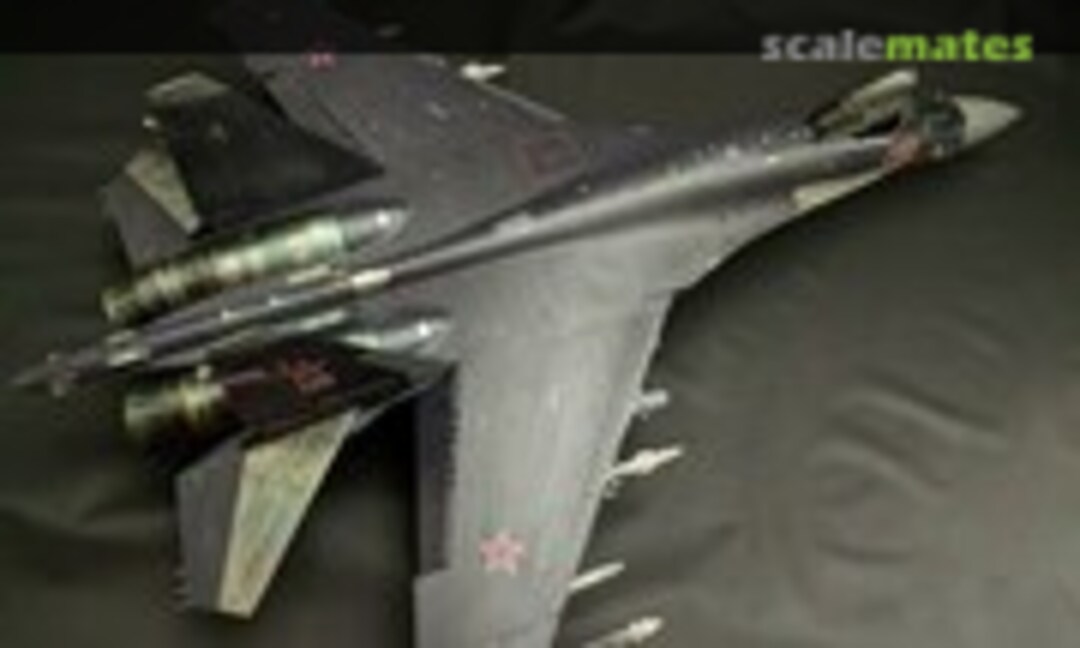
Well, the metalwork is MOSTLY done, there are still a couple metal areas to do and I might mess with the current metal a bit, maybe tone down the blue, yellow, and violet hues a little. What do you guys think?
Still got a ways to go, but I hope to have this wrapped up by the end of next weekend!
16 October 2017, 04:13
Great Job Michael. I still don't get how you produce builds so quickly.
16 October 2017, 10:34
Thanks Bernd, Konrad, Bart, Spanjaard, Dale, and Murad!
Dale, as you can see in the pics, my work area looks like a tornado ran through it. I think part of the reason I build so fast is I just put stuff anywhere while I work. LOL The downside is bench re-set after a project is complete takes awhile... OH, and sometimes it hard to find things I am looking for ("Now, where did I put those damn sprue cutters?"😢 LOL
Murad, I now pronounce you Man and... um... jet? LOL
16 October 2017, 13:07
Man, I can't always seem to find my tools, more so my bright yellow sprue cutters... !!!
Splendid results on the metal areas. Can't wait to see her finished!
16 October 2017, 16:10
I hesitate to say this, because they look freaking awesome, but yes, I would tone down the blue a bit. That is in no way to say I think you did anything wrong. As a matter of fact, I was told by a former Wild Weasel pilot (yes, we have one in one of the clubs I belong to. Makes it hell to bring in a Spook or Viper LOL) that I should blue the exhausts on my F-4 a bit, and I have yet to do so because I have never done that. So you are way ahead of me there anyways.
17 October 2017, 02:27
Thanks Maciej, Erik, Spanjaard, James, Kees, and Donald!
Donald, I am still on the fence about toning it down. Every time I think about doing so I look at this pic and think maybe I should just leave it alone... LOL
[img1]

17 October 2017, 13:48
just to confuse, I think it needs more blue 😛
kidding, I actually think it looks really good as it is. But as Maciej said you are in charge. just remember, if you do it (or you do not), it will hunt you down each time that you look at it in the years to come.... so do not listen to us, and listen to yourself 🙂
besides other considerations, you are the only one who can actually see the real thing, pictures can be deceiving....
17 October 2017, 14:04
Outstanding Michael. Your skill just blows me away. Wish my stuff turned out half as good.
18 October 2017, 00:07
OK, now that I see those pics, ignore what I said. I was clearly smoking crack that night.
18 October 2017, 00:51
Thanks Clifford, I really appreciate the kind words. Man, Clifford, you do great work as well my friend!!!
LOL Donald, you crack me up. Well, after thinking it through I have decided to leave it as is. I have enough left to do otherwise anyway. LOL
Thanks guys for helping me decide my course of action here...
18 October 2017, 13:28
Hey Michael, whazz up? Still not finished? Do you suffer a desease? In this time Periode you normally end up with two finished birds... Do i have to worry?😢😢
19 October 2017, 11:07
Thanks Duri and Sarunas!
Sarunas, I used the following on the metal areas:
1. Gunze Mr Color GX2 Ueno Black (for gloss black base)
2. Alclad Airframe Aluminum
3. Alclad Gold Titanium
4. Tamiya Clear Yellow
5. Tamiya Clear Blue
6. Alclad Hot Metal Violet
7. Tamiya Smoke
8. Alclad Jet Exhaust (heavily thinned)
That is the exact order of use as well.
19 October 2017, 12:38
Holger, LOL!
I have been plugging away at this, just have not had as much time as usual this week. I usually get 1-2 hours a night to work, but this week it has been 0-1. I have mostly been doing touch up and small detail work this week. Finished the decals and stencils, painted gear bay doors and landing gear, stuff like that.
So no disease, unless you consider work a disease. Maybe it is. LOL
19 October 2017, 12:40
I agree with you Michael on the time. This is high school football and marching band season. I drive the band 18 wheeler in my spare time so if I get 15 minutes on the bench I feel relieved. I do sometimes take a kit with me to work on when traveling. Helps to pass the time.
19 October 2017, 15:01
Well, got her on 'er feet now. Wash and flat coat done. Now it is time to work on the missile decaling and detail painting. Still lots to do, but the end is in sight!
22 October 2017, 07:54
Thanks David, Rhys, and Sarunas! Yep, getting close! But the missile painting and decaling is going to take most of my time today lol.
Sarunas, the nosecone fits excellent. This kit fits really nice pretty much everywhere actually, with the wings the notable exception, but that was an easy fix.
22 October 2017, 16:13
Thanks Donald, Oleg, and Konrad! About to hit the bench now and see what I can get done today. Looks like I will have at least 4-6 hours to play with! 🙂
22 October 2017, 19:28
Eager to see the end result! I like that new russian eggplant paint and i think you nailed it pretty good!
22 October 2017, 21:53
Thanks James, Alexander, and Clifford!
This build is becoming my favorite one of all so far. I am really pleased with the results so far and I gotta say that this kit is really nice... I am really getting excited to finish it!
23 October 2017, 12:25
Looking forward to the completed project. Paint work is amazing. The heat distressing on the metal areas and nozzles looks great.
23 October 2017, 15:37
Wow, you are setting the bar high man. Im gonna have to wait a good while before I do mine so people forget about this.😉
23 October 2017, 22:22
Thanks Bernhard, Alberto, Bryn, Stephan, Spanjaard, Donald, and Patrick!
Donald, you made me LOL big time with your comment. Thanks man, I think you will need a week after I finish and everyone will have forgotten this. 🙂
24 October 2017, 13:18
Got the missiles all done... Man, that was quite an undertaking! Won't be long now, should have the final reveal this weekend!
27 October 2017, 02:44
Wowzers! The missiles came out great! Looks like they were major projects on their own.
I take it all the stencils are in the kit? I havent gone through it that closely yet.
27 October 2017, 02:59
Thanks Donald, I am very pleased with how they turned out. Especially the Kryptons. The missiles and bombs are all in the kit, and they are really well done. This kit is almost worth the price for the missiles and bombs alone. Pretty much any kind of Russian ordinance can be found in this kit.
As for the stencils, the kit does include some, but I used the Begemot Su-35 sheet weapons stencils. The are much more comprehensive. For example, each one of the KAB-1500kr bombs had like 20 stencils. Definitely worth getting that sheet!
27 October 2017, 03:23
Wow! A great and very impressive build in the making! The weaponry looks..... lethal
27 October 2017, 07:54
I know the Su-27 family planes have a sh*tload of pylons but that arsenal won't fit all at once will it? 😄 nice work!
27 October 2017, 10:00
Looks good. I had a sheet of Begemot decals for Su-27 1/72. By the time I got to the kit, the sheet already yellowed 😄
27 October 2017, 10:14
Thanks James, Spanjaard, Holger, David, Roland, Alexander, Sarunas, and Bart!
James, that many decals is indeed daunting and tedious. But I would tackle them bit by bit. My method to keep myself sane was to do the two weapons types at a time, and then would take lengthy breaks in between each weapon, coming back refreshed each time and ready to tackle the next set.
Haha, yes Alexander, they all go on at the same time! Crazy thing is there are two more centerline pylons I'm not even using!
That's crazy Sarunas! Your post made me go back and look at all my older Begemot Decals to check their condition. Luckily for me all mine are still good so far. I will have to keep an eye on them in the future!
27 October 2017, 17:52
So, next question. Do you have a source that gives actual load outs?
And now to search for that sheet...
28 October 2017, 04:20
Thanks Clifford and Ice, your compliments put a smile on my face!
Donald, the instructions have a nice diagram and I also used this:
su-27flanker.com/201..nal-storage-loadout/
The Begemot sheet has decals for any Su-35 scheme, including ones from the Syrian campaign, as well as all stencils for the aircraft and missiles and pylons.
My loadout is all stuff an Su-35 can carry, but unlikely to all at once. But hey, it looks damn cool! Lol
28 October 2017, 06:08
I'm aaaaaaalllllllmmmmmooooost done now. Just gotta paint and install the seat and the canopy. Here's a little teaser pic of the hot end of this machine....
28 October 2017, 06:10
Great work Michael, I wish I had your skills on the exhausts as well! Bravo!
28 October 2017, 07:30
man, you should definitely do a tutorial on how to paint those nozzles, they look fantastic!
28 October 2017, 09:37
I agree with Alexander G, we need a tutorial for those engines. Cant wait to see it finally finished.
Keep up the good work!
Thanks
28 October 2017, 10:25
Russian fast jets are simply a beautiful subject. Vectoring nozzles done to perfection. I'll agree with the comments above, please teach us how!!
28 October 2017, 10:42
Thanks Christian, Adam, Alexander, Rhys, Peter, Spanjaard, Patrick, Konrad, and Clifford! So many great compliments all from modellers I respect so very much. It really means a lot to me.
Truth be told, I feel this is my finest work to date, and the model I am most proud of so far. Pretty much everything has turned out as I had hoped or better. So thank you all for the kind words!
28 October 2017, 18:26
Excellent work for sure, Michael. My goodness! I think you win the internet today.
28 October 2017, 18:37
So you guys have asked for a tutorial, so I will do the best to describe the process and paints I used on my metalwork. There are some pics of my process in this album, but unfortunately I got so into my work I neglected to take pics of some of the steps. So here goes!
First, I masked of the already painted area of the aircraft (duh!). The underside has two distinctly different areas of metal, one that is rather dull and one that is quite brilliant with much color from the heat stressing. To replicate this, I first primed the area to be dull metal with regular Mr Surfacer 1500 Black, which has a satin finish. Then, I masked off the areas I just painted with the Mr Surfacer Black and painted the rest (top and bottom, as well as the nozzle pieces) with Gunze Mr Color GX2 Gloss Black. I used this instead of my normal Alclad Gloss Black Primer because I wanted something that would dry faster. The Alclad Primer takes forever to dry, and I had heard great reviews about using the GX2 for a metallic base. I am now hooked, the GX2 dries very quickly and is very glossy. Perfect base for metallics!
After the Gloss Black dried I removed all of the masking from the Mr Surfacer painted area. Next I sprayed the entire area with Alclad Airframe Aluminum, including the nozzles. The area that was primed with the Mr Surfacer had a dull finish and the GX2 area was brilliant silver, much as I had hoped. Now it is time to start trying to replicate the heat stressing!
First, I used Alclad Gold Titanium. This I used mostly along all of the panel lines. It is rather subtle, which is good because I used it rather generously along those panel lines. On the nozzles, the gold areas are all painted with this.
Next up was Tamiya Clear Yellow. This was to give the yellow heat stressing areas a little more "pop". I used this much more conservatively because a little goes a long way. This was used much more randomly than the than the Gold Titanium. I went over some panel lines, but not all. And then painted some areas with random patches of yellow.
Next, I used Tamiya Clear Blue. This I had to be careful with, as it can get to be overpowering quickly. I sprayed this randomly on the metal areas on the fuselage, and more deliberately on the nozzles, as pictures show distinct panels of blue, violet, gold, and burnt metal. I originally thought I had gone too far, but after consulting you all and more pictures of real Su-35s I was happy, and actually considered going back in and adding MORE blue. LOL
After the Blue it was time to spray some Alclad Hot Metal Violet. I did not use much of this, as it too can become overpowering and I just wanted to use it to blend in some blue to the yellow to remove any green areas I had (don't really see any green in pics, just blue and gold being dominant along with some violet). This really started to bring it all together!
The next step was the one that really brought it to life... Alclad Jet Exhaust. This was used to simulate teh burnt metal areas and tone down the colors I had painted already. I didn't want to completely overpower the colors or the brilliant silver areas, just to tone down the transition areas as well as allow some areas to show through.
And that is it! If anyone has any questions I will be glad to answer them.
28 October 2017, 19:01
Thank you Michael for the detailed description. Fantastic result as a whole. Well done mate. Probably your best work so far.
28 October 2017, 20:54
Thanks Mick! I will order the paints today. Never heard of Alclad so there will be some surfing involved finding a supplier in Oz. Thanks again Mate, you just achieved LEGEND status with me!!!!
28 October 2017, 21:51
Dude, a year minimum I will have to wait. This one is abso freaking lutely top notch! That could easily make the cover of every mag out there.
29 October 2017, 03:32
Thanks Maciej, Alistair, Peter, and Donald! You guys have helped push me to do the best I can on this build, so thank you all for following along!
Maciej, I definitely agree. It is most certainly my favorite model I have built so far.
Peter, those are some very kind words! You should check out BNA Modelworld in Australia, I see that they have them. A bit pricey down there I see!
LOL @ Donald. This will be way down the feed and forgotten within a week or two. But thank you for the wonderful compliment man!
29 October 2017, 04:05
I have posted the album of the completed build here:
Kitty Hawk Su-35S Flanker-E - Completed! | Album by Fighting 84 (1:48)
Check it out to see it all done! Thanks again everyone for following along with this project!
29 October 2017, 04:06
Thank you Wim, Sören, Christian, and Cuajete!
This has really been a fun project. Now it's time for something a little less complicated...
29 October 2017, 16:22
I wonder what 'less complicated' means in the Michael Phillips dictionary...
29 October 2017, 20:19
congratz, also a big thanks for the how too... splendid result...
30 October 2017, 12:25