Revell Tornado IDS - WIP


Comments
1 14 May 2017, 06:38
Probably the best Tornado kit in any scale and it will be a beauty. Will you use the decals for the boxart?
14 May 2017, 07:12
Thank Maciej! Nah, I'm going to use Wingman Decals for this, just a regular in-service German Tornado. I plan on entering this in my IPMS chapter's quarterly theme contest "Anything German" in early July. 🙂
14 May 2017, 07:16
Cool theme! I believe that even when you would put in a 1/48 scale pretzle you would turn heads at that contest. 😉
14 May 2017, 08:41
Thanks Patrick and Stephan!
Yeah, they have a different theme every quarter, and they are fun. So far, since I joined the club, we have done "Anything USMC" - which I entered a Monogram AV-8B, "From the '50s" - entered a Hobby Boss F3H Demon, "From Mediterranean Countries" - entered an AMK Kfir C7, and the one last month, "Adversaries" - the premise on that one was cool, pick something you have already built, then build it's enemy or adversary. So I took my Italeri Iranian F-14 and built an ICM Iraqi MiG-25RBT for the contest as it's adversary from the 1980s Iran-Iraq War.
Some of the upcoming contests are "Anything German", which is what the Revell Tornado is for, "Shades of Gray", which I will build a Russian Great Wall MiG-29SMT for, "Anything US Army", which I will build a Hasegawa AH-64D for, and finally "Czech Mate", which celebrates the high number of Czech model companies... and build a kit by a Czech manufacturer, so I will build an Eduard MiG-21. They always have a years worth of contests planned ahead. It is pretty fun!
15 May 2017, 22:03
Whow!!! That really sounds cool! Cool creative themes. Those can get someone out of his comfort zone en get building instead of getting bogged down on a idea that has it's problems. One has to build just for building, I like that!
15 May 2017, 22:17
Yeah, and they always make the themes so that you can build a variety of subjects; armor, aircraft, cars, even figures, and often from any era. So you can get out of your comfort zone, but also can do something familiar, which is what I tend to do lol.
15 May 2017, 22:20
Some more progress... Man, I have a lot of seam work to do around the intakes and wings. This is unbelievably complicated engineering. Sigh...
17 May 2017, 03:52
Still plugging away on this project... Some notes so far:
1. The instructions in this kit are rather poor. It can be hard to decipher the options, and the assembly procedure and visual depictions (especially those complicated wings!) are very ambiguous.
2. The part numbering system is so unorganized! The sprues have letters, but no mention of them in the instructions. And the numbering is in no particular order, so you have sprues with numbers all over the place, maybe some in the teens and some in the hundreds, all on the same sprue. So it is always a hunt and find situation looking for a part. Very frustrating!
3. The complex engineering is unrelenting. Nothing is easy on this kit! LOL
4. I am pretty sure my kit was missing the nosecone. I don't ever remember taking it off the sprue, and it sure has hell is not on there now. LOL So I ordered a replacement part, but that won't arrive for 6-8 weeks. So I just decided to buy a GR4 kit and use that now, and put the replacement nose in that kit for the future. The new kit should be here Tuesday.
Overall the kit has some really nice details. I have no doubt it will look great when completed, but getting there has been a challenge. Rivals the Hasegawa Tomcat in difficulty, and definitely more challenging than the complex ICM MiG-25 I built recently.
28 May 2017, 15:57
Thanks Spanjaard! Got the primer on this weekend, hopefully tomorrow I will get the pre-shading done.
30 May 2017, 04:26
Michael I have two of the GR4's to build from Revell, any tips for extra detail or build issues? Looks great by the way.
30 May 2017, 12:35
It's been my experience with Revell kits that you can get a nicely made kit , great detail with shit instructions, or a fair detailed model with good instructions. just had a Ah-64 apache kit with them showing a landing shock to be attached going outward horizontally!
30 May 2017, 13:11
Wow!!! One blink of an eye and the little birdy is already primed!!! Your building pace keeps amazing me!
30 May 2017, 15:17
I have this kit in my stash. I plan on doing the kit decals. I have put it off because of the things you noted. High parts count. It is in the category of over engineered IMO. BUT, the detail on it looks fantastic. And the instructions on the 1/32 Tiger Meet Tonka from them I did were crappy, so I figured they would be on this one as well.
My IPMS chapter does monthly build themes as well. It really does push you to do different things. Or pull a kit out of your stash that has been hiding for a while.
31 May 2017, 04:41
Thanks Dale, Timothy, George, Patrick, Michael, Donald, and Adam!
Dale, the only thing I can say is to take your time and test fit, sand, test fit, sand, test fit. LOL
So I got the pre-shading done last night. I am finding myself spending less and less time at this stage with each passing build. I used to get super intricate and deliberate with my pre-shading doodles, but now I just kinda spray some dots or figure 8s and move on. I think it only took me an hour to pre-shade every part.
31 May 2017, 13:26
What's the reason beneath this madness? Leave the panellines dark, just like shadowy/dirty spots?
31 May 2017, 14:27
so that the paint doesn't look like it's enamel painted kitchenware, all solid looking lump of an object.
31 May 2017, 15:50
@murad. Thank you for ansewering. What I actually meant: What are you painting where
31 May 2017, 17:56
Thanks Markus!
Murad is exactly right, it is just to break up the uniformity of the basecoat. But I have been leaning more heavily on post-shading lately than pre-.
Martin, can you be a bit more specific in your question, I am not quite sure what you are asking?
1 June 2017, 04:09
Hi Mike,
I always understood the why, I'm just curious about the how and where. Everybody not named Michael Phillips paints their model in a light primer, then preshades the panellines. You do something different. I'm wondering where you're painting the lighter colour. Do you leave the panellines untouched? Do you spray your dots on panels as a highlight?
Or perhaps this is the best way to put it: what do you leave untouched with the lighter colour?
Cheers,
Martin
1 June 2017, 13:02
Ah, ok... I got it now Martin!
I do mostly try to keep the dots, doodles, and figure 8s within the panel lines, but if they go over or into the lines its no big deal. The point is to be as random as possible. By pre-shading like this as opposed to light primer with black panel line shading, I can get a much more organic random look. The lines are not so staight, the uneven white areas show through the base coat giving more depth and richness.
There is no right or wrong way to pre-shade. I just like doing it this way for two reasons: 1. More control over the effects and 2. a more organic paint effect.
I hope this answers your question sufficiently. If not, please feel free to follow up with any further questions.
🙂
1 June 2017, 17:30
Hi Mike,
I understand it now. So there is reason in here 😉
Thanks for your expansive answer. I'll try this sometime soon.
Greetz,
Martin
1 June 2017, 18:36
I very often prime in black and simply allow the black to show through to some extent in random places. There are many different ways to use a black base to provide variation in color.
1 June 2017, 22:03
i like the b&w technique very much in terms of the end result. problem for me so far is with the decal heavy airframes, the contrast between a natural looking paintjob and factory pristine stencils etc. in the form of decals usually ruins it for me. i tend to lean for post shading these days for this reason since i am unable to solve the problem otherwise.
1 June 2017, 23:20
Thanks James! I hope to get at least the lightest gray down tonight. Best case scenario, I get all three down. 🙂
I hear ya Murad. That is why I do both. Pre-shading for overall paint appearance, and post shading for weathering effects and staining (including of the decals). Together they give some nice effects, and for me it's not a tremendous effort on either end.
2 June 2017, 00:12
Thanks Clifford!
I got two of the three main camo colors done. Will finish the dark gray tomorrow, future coat Saturday night, and decal on Sunday hopefully. I leave for a work trip to the UK next weekend, so I really want to finish before I leave!
2 June 2017, 04:15
Murad, when it comes to the really fancy ones, the Tiger Meet and anniversary markings, those planes have usually been repainted just about top to bottom. In those cases the paint is just as pristine. For the other planes, a bit of weathering usually brings that under control.
2 June 2017, 22:34
Thanks Peter!
Got all the main colors finished tonight. Movin' right along now!
3 June 2017, 04:39
Looking awesome Michael, if you don't mind, what colors of grey did you use.
4 June 2017, 22:03
Looking good Michael. Tiger meet decals would look great or at least special markings.
4 June 2017, 23:35
Thanks James, Clifford, and Dale!
Cifford, I used the Norm 95 V2 colors, FS36375, FS35237, and FS36320, all in Gunze Aqueous paints. For the dark gray fin flashes, it is supposed to be Basalt Gray, but I didn't have any. So I just used Gunze Extra Dark SeaGray. I will tone that back a bit when I weather it.
Dale, I am not a huge fan of Tiger Meet schemes, just a personal preference. I like doing in-service schemes, and that is what this one will be. It served in Afghanistan in 2009.
Over the weekend I got many details painted, and all of the main decals on. One side of stencils is mostly done. The Wingman Models sheet for this has an unbelievable amount of stenciling included, which is nice, but I am going to be stenciling for a few days most likely lol.
5 June 2017, 04:16
Thanks Michael. I have this kit also and do not want to do the aircraft on the box.
5 June 2017, 22:06
Looking good!
Clifford, I am totally doing the box plane once I dive into it.
6 June 2017, 03:40
Thanks Kees, Patrick, Christian, Donald and Clifford!
Clifford, if you want to do a German IDS or ECR, I highly recommend the Wingman Models sheet. Very extensive markings choices and stencils for everything, including pods and pylons. They perform very well as well!
So I have all the stencils on both sides and about half of the topside done. Gotta finish the topside, underside, and pods and pylons still, as well as the weapons. Probably another night or two. I was hoping to have this done before my UK trip next week, but I am not sure that is going to happen. Still way too much left to do!
6 June 2017, 04:32
Michael, thanks. Where can I get the Wingman decal sheet? @ Donald. I like the scheme on the box, but do not think my airbrush skills are that good yet.
6 June 2017, 21:25
Thank you Martin. Maybe I will give it a try. Can always re-paint it if I mess up. LOL.
7 June 2017, 21:19
Thanks Holger and Augie!
Clifford, I think I got mine on eBay, you can try there. The sheet is a bit more expensive than most, I think mine was like $25. But with everything you get, it's worth it!
10 June 2017, 07:51
Got a wash on most of the parts tonight, really starting to come alive! But, alas, this will be the last update for a week since I will be off to England tomorrow.
10 June 2017, 07:52
Very nice work so far Michael 👍 Looking forward to the final steps🙂
10 June 2017, 18:37
Thanks Michael, Maciej, Christian, and Clifford!
I am back from the UK as of last night, so I hope to get back to this tonight and finish up sometime this week. Stay tuned!
19 June 2017, 16:53
Weapons and pylons mostly done now, just need to add a flat coat now.
20 June 2017, 03:38
Thanks Holger, Donald, and James! I hope to be finished this weekend!
Got the exhaust painted and installed. Will add a bit more weathering and heat staining to them, but mostly they are done.
21 June 2017, 03:40
Thanks Greg, Dale, Maciej, Clifford, and Markus!
I am almost done now. In fact, I am hoping to finish tomorrow. 🙂
24 June 2017, 07:01
Thanks Arash, Holger, and Christian!
Holger, yes, the canopy will be opened!
Christian, interestingly enough, this one is not the longest build for me. I spent a week and two weekends overseas, so that has actually caused this to take longer than normal for me. Plus, this is not an easy kit to build by any stretch of the imagination. LOL
24 June 2017, 18:41
Thanks Erik and Clifford! Add all the little clear bits and probes, now just have to finish the seats, rear upper IP, and canopy... Then it will be done!
I added a couple new pics of my progress and in better light. 🙂
24 June 2017, 22:05
Michael. Beautifully done mate. 🙂 I am wondering. Are the 'reverse thrust' petals available in the kits parts. ?
24 June 2017, 23:00
Thanks so much for the very kind words James and Kerry!
Kerry, The reverse thrust petals can be displayed in either the stowed or deployed position. I obviously chose the stowed position. 🙂
24 June 2017, 23:51
Michael. I was unaware of the petals being available, and that makes me want to get the kit now, as I had the Hobby Boss kit in 1/48 that had the RTP's but they were not all that well portrayed. Thank mate. 🙂 👍
25 June 2017, 00:11
Michael, have you painted the exhaust stains from the thrust reverse on the vertical stab or is are this pigments?
25 June 2017, 07:18
Maybe it was mentioned before but in the Flugwerft Oberschleißheim there is a Tornado exposed directly out of combat in Afghanistan showing all the wear and tear of the fuselage:
b-domke.de/AviationI..es_Museum/37113.html
airport-data.com/aircraft/photo/000724541.html
airport-data.com/aircraft/photo/000724539.html
25 June 2017, 07:28
It's looking really good. I like the weathering. I did the GR4. This livery would be a nice compliment to the RAF version.
25 June 2017, 08:50
Very nice so far 👍 lookin forward for the final result of that JABO 31 plane
25 June 2017, 10:34
Thanks Gerald, Alistair, and Stephan!
Kerry, the Revell kit is very nice for details, but it is a bear to build. So be prepared for that! LOL
Holger, that is all paint. Tamiya Rubber Black to be exact. I love that stuff. I use it all the time. I actually don't use pigments, but I might try some day.
Thanks for the pic Sven! That is one worn bird. Compared to that, it looks like I may have actually under-weathered mine. LOL
Alistair, I will be the opposite. I just recently got the GR4 boxing, and looking to a RAF compliment to this build one of these days... But it won't be any time soon. 🙂
25 June 2017, 17:04
Michael. 👍
Thanks for the 'heads up' on the bear situation. 🙂
If I can wrestle the Airfix builds to the ground with some success, I do expect the Revell will be a little more forgiving. hehehehe🙂
But what you have produced here is gold mate and I am most impressed with your finished product. 👍
I am now inspired. 👍
Salute. ! 🙂
25 June 2017, 19:25
Michael, it looks flipping awesome dude! Great work. The weathering is fantastic.
Kerry, I think I mentioned earlier I have this kit as well. My plans are to build the nice clean special markings version from the kit. I have sat down at least three times intending to start this kit and put it back in the stash after having pulled the trees out and gotten intimidated. LOL I did their 1/32 Tonka, and I swear it had less parts.
26 June 2017, 00:49
I must look for a review of the kit now. I am hoping there will be one out there somewhere. :-/
26 June 2017, 01:16
Thanks Donald! While this kit is a bit rough, it is not awful. I would not be too afraid to tackle it, just have to take your time with the build process and break out the sanding sticks and putty a few places. The BIGGEST issue with this kit is the awful instructions and nonsensical sprue numbering system and placement.
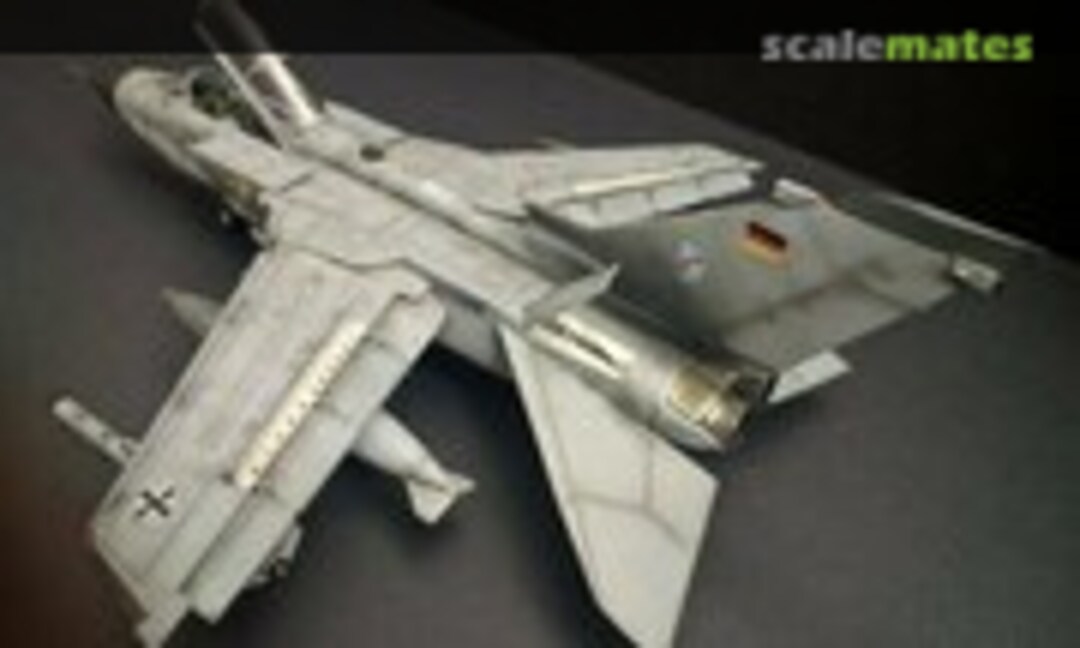
Anyway, I finished her up tonight! New album posted, however I need to retake some pics as they did not turn out as I had hoped. Glad to be done and ready to move back to the KH Fitter!
26 June 2017, 04:38
I found the slats and flaps a real fiddle. I also would not bother trying to build it with movable wings next time. Once you select the wings out seals you can't fold them anyway. The tyres are useless. There is something writing with the nose cone panel line demarcation compared to the real aircraft. So I agree it was a bear, but I'll build another. F3 is due soon
26 June 2017, 07:05
It looks great Michael, excellent job. I have this kit also, so thank you,and Alistair for the building info. I will replace the tires with resin. I agree instructions stink The GR-4 instructions are the new style and are much better.
26 June 2017, 19:30
I also bought the master pitot. I added resin seats and added some missing stores, tiald and paveway bombs under fuselage.
27 June 2017, 12:57
Yeah ....I saw this Birds flying over our House years ago.
Top work,Mate.👍
27 June 2017, 17:21
Thanks again everyone! The final completed pics can be seen here: Revell Tornado IDS - Completed! | Album by Fighting 84 (1:48)
Thanks!
27 June 2017, 17:47