Kitty Hawk Su-22M4 Fitter-K - WIP


Comments
5 April 2017, 03:51
Off and running on this now... The cockpit is quite nice, lots of detail.
5 April 2017, 03:53
Good luck with it.
Heard some not so nice things about this kit - especially the design of the fuselage.
5 April 2017, 11:42
Welcome to my build guys!
Sören, I too have heard some poor feedback on this. But, it seems to be one person in particular with a very prominent voice that has been the catalyst for all the negative things I have seen. And he has railed against KH previously, so I am not sure this kit stood a chance of being acceptable to him. However, what he is saying may indeed be true, but I will reserve judgement until I have built this myself. So far I am impressed, but then again, I am not very far along with this build.
5 April 2017, 12:52
But this person is sadly not so wrong about current KH kits.
He also said that there AH-1Z is an awesome kit.
And don't get me wrong, but why the hell did KH made the fuselage out of 6 pieces?
Thats something I don't get... 🙁
5 April 2017, 14:06
Yeah, that is an odd engineering choice indeed, the six piece fuselage. Just have to deal with it I suppose. But that in itself is not enough for me to forsake this kit. But I will find out all the issues as I go along. So buckle up! LOL
5 April 2017, 15:23
I'm in and excited to hear your opinion about this kit. Best wishes!
5 April 2017, 16:44
For better fitting It is recommended to glue at First left parts and Right parts of fuselage so we get in outcome two normal halves. Glueing fuselage from sections like instruction says is much more difficult to fit.
5 April 2017, 22:29
Suspect the 6 part fueslage gives them options for different versions without requiring totally new molds.
5 April 2017, 22:52
Thanks Adam for the heads up, I had also read that. I also will need to be careful with the shock cone area, there is an alignment tab pair I will need to remove and I will have to figure out a way to scratch a splitter above and below the cone center.
You are right Augie, that is my suspicion too.
6 April 2017, 01:18
My thoughts on tonight's session...
The cockpit detail really is fantastic. I was going to use a Neomega seat, but after assembling the kit seat (there are a ton of parts just for the seat!) I've decided to use the kit seat. The detail is really just as good as the Neomega, and I still have PE belts to attach (kit includes the PE belts). You can see the comparison in the photos I took of both. This is probably the nicest oob seat I've encountered yet.
As far as negatives, I must say KH realllllllly does love sprue gates. Every piece seems to have at least three of them, even tiny ones. And they are not always in the most optimum spots. So in this regard, the criticism of engineering fauxpas is real. But all in all the good outweighs the bad for me... So far...
6 April 2017, 03:56
Great to see you kick this on off so quickly after your previous build. Let's see what your opinion is compared to Doog's negative review. I cancelled my order for it based on his review.
6 April 2017, 06:24
Hello, interesting subject !
Just in case, HAD releases a replacement part for the cone, very badly made by KH
hadmodels.com/
6 April 2017, 07:11

the most prolific member of this community attacks again 🙂 another one to be enjoyed. i am in 🙂 cockpit looking good!
7 April 2017, 18:56
Welcome Spanjaard and Taarna! I hope you find something of value in my experience with this.
Rv, thanks so much for the link! I went ahead and pre-ordered it. Now, I have learned that this is about 3 weeks or so from release, so this project is now on hold until I receive the part. So stay tuned, but for now I am going to start up a new project...
8 April 2017, 20:53
I'm in. I have been wanting this kit, so will watch with interest.
9 April 2017, 00:21
I see Hobby Boss are releasing su17, will be interesting to see a comparisson when it becomes available
10 April 2017, 20:54
Back to the KH Fitter! Got some more work on the cockpit and fuselage halves done. So far so good (even though I really don't enjoy doing cockpits, and not all that great at it lol)!
29 June 2017, 16:48
for being the kit's pit, detail looks as good as some aftermarket.... and you have painted really nicely.
29 June 2017, 20:07
Thanks Marko and Spanjaard!
OK, I need your help here mates... I am trying to decide the colors to use for the new Polish Su-22 scheme, and I have a bit of a quandary. I am using ModelMaker decals for this, and the instructions call out:
FS30219
FS34079
But... I was thinking the colors looked the same as the Polish F-16s, and I was under the belief those colors were:
FS36270
FS36375
Can anyone help shed some light on this for me?
Thanks!
30 June 2017, 00:14
Well nevermind! LOL When I posted that and the colors showed up, I realized that the instructions are in error as those are green and tan for the other Polish scheme. So I just answered my own question. hahaha
30 June 2017, 00:17
Yeah, they look right and my research seems to indicate that is correct. I am 99% sure those are the colors on the Polish F-16s, but I have not seen it written anywhere that they are for sure correct for the new Su-22 gray scheme. So unless any of my mates here know contrary information that they would be willing to share with me, those are the colors I will be going with! 🙂
30 June 2017, 12:28
^^^^This. LOL well said. It looks right to me therefore it is. (to me) hahaha
30 June 2017, 13:15
Tis the way i do it . Lets face it if you try an exact match we'd need thousands of pots paint.... Takes to much room that could be used for plastic lol
30 June 2017, 16:35
i fully agree! have fun and do not get crazy. anyway, each foto depends on light conditions, in your monitor calibration and how much you drank that day, and the colors of the plane depends on long ago was painted, the weather, and how much the guys who painted it drank that day, so have a drink and paint it anyway you like 😛
sometimes i miss the old days when i did not have the slightest remorse in "creating" some color schemes 😛
it can always be a What if or a what the f..... 😛
30 June 2017, 16:56
LOL Augie and Spanjaard, so true.
Spanjaard, I see a commonality in your post, and I like it. I think I need to drink more when I model. I wonder what kind of interesting things I might accomplish if I did so. LOL
30 June 2017, 17:04
Lol maybe that could be the next group build? The "Oppps I was a little drunk" group build
30 June 2017, 19:15
ha ha ha, too many sharp object, chemicals and highly flammable materials....
30 June 2017, 19:26
Nice project, I don't know how I missed this one. I have seen reviews where they say the KH kit beats the HB one in detail. You did the fuselage halves like I will do, make them one piece L/R, instead of six pieces and try to join nose, center section and tail seperatley.
30 June 2017, 20:53
I will follow this with great interest, the SU-22 is one jet I always wanted to build...
1 July 2017, 07:29
Welcome Clifford, Christian, and Stephan! Got a little more work done in preparation of putting the fuselage halves together. 🙂
1 July 2017, 23:25
Test fitted the shock cone in the fuselage halves. Gonna fit nice... But there will be a very visible seam to deal with that is going to be very tricky...
1 July 2017, 23:29
yep the seam doesn't look too inspiring on the nosecone with all the rivets and details nearby.
1 July 2017, 23:47
I'm thinking of maybe using some water based putty there, smooth it out, then hand painting the demarcation line gray again. It should not be a very large area so I shouldn't need to maintain va straight line for very far...
1 July 2017, 23:54
I use Vallejo's acrylic plastic putty for small things like that Michael. It works great and is easy to apply, and cleans up with water.
2 July 2017, 01:22
Thanks Clifford. I have some of that, so I will either try that or the Perfect Plastic Putty I have as well.
4 July 2017, 19:53
Got some more construction done. Starting to look like a Fitter now!
Just got some minor seam work and a little puttying to do. So far this kit has not been all that bad. The wings in particular are extremely well done, almost Tamiya-like fit and engineering there. Compared to the Revell Tornado I just built, this thing is a cakewalk!
4 July 2017, 19:55
starting to look really good already, looking forward to the painting stage!
4 July 2017, 19:59
Looks good, to think I cancelled my back order of this model from Hannants on the basis of the you tube video. Review from Doog.
4 July 2017, 21:07
Thanks Wim, Alistair, and Markus!
Alistair, I am thinking you might want to look into getting another one! I am seeing them for sale here in the $50 range, so not terrible pricing. The biggest issue with this kit are:
1. The intake. There are locator pins near the front which would be visible and the shock cone itself is attached by the sides, there is no vertical air splitter. An aftermarket shock cone is a must.
2. The lower fuselage has a "banana" shape to it. I feel this is minor and won't even be visible once the fuel tanks and armament are added. CWS is working on a fix for this, but I do not feel it is necessary for my taste.
3. The fuselage is made up of six pieces. The best approach to this is to put the three pieces on each side together first then assemble the two halves.
4. Sprue gates galore! Lots of them, and many in inopportune places. A bit more clean-up work then normal.
But really, that is it. Everything else is pretty nice! Detail is just fantastic, and fitment for the most part is quite good. I recommend it as of right now.
I have just a few more construction tasks to do and it is my belief I will be ready to prime on Friday evening most likely.
6 July 2017, 12:45
Thanks Holger, Arash, and Clifford!
She is all ready for primer now, the plan is to do that tomorrow and see if there are any spots that need more attention. If all is well I will preshade Saturday and paint the camo on Sunday!
7 July 2017, 04:31
As an added note, I have noticed in pics that Polish birds are kept very clean, so I will be keeping weathering to a minimum on this one. I nice change of pace from the three dirty birds I've built in a row! 🙂
7 July 2017, 04:33
Thanks Stephan and Taarna!
Got the primer on tonight. Actually not in bad shape here. I have a couple minor seams that are visible, but they should be easy to fix. Other than that I am ready for pre-shade doodling!
8 July 2017, 06:13
Great job there Michael. I would keep the preshade rather light. The two-seater I saw up close looked pretty fresh to me. I'll upload a couple of photos this evening.
8 July 2017, 07:03
Here are some photos from a two seater at last year's Athens Flying Week:
Su-22UM Polish Air Force | Album by m2000-5
(still uploading...)
8 July 2017, 19:24
Thanks for sharing Maciej! I am lucky with this project, there are tons of great hi-res photos of Polish Fitters in this scheme. I really need to be restrained in my weathering, I think a wash will be all I do, and I will not let much pre-shading come through... But at the same time I don't want to be too uniform in my paint or else it could look toy-like.
8 July 2017, 20:16
Oh, also I noticed a couple things building this kit compared to the photos. First, the antenna behind the cockpit is quite a bit larger than what is in the kit. So I found an unused large antenna from the Hasegawa Tomcat kit I built and used that instead. Also, there are two "winglets" on the vertical tail near the front of the tail, about halfway down. These are not in the instructions to install, however they are in the kit. It appears these are only on Polish Fitters.
8 July 2017, 20:22
Pre-shading done! I think I might actually be able to get the light gray down tonight. 🙂
8 July 2017, 22:42
Thanks James, Glenn, and Clifford!
Glenn, I had to look that up because I had never heard of that before... And guess what? Lol it does look like that!!! Lol
10 July 2017, 02:47
Got the base light gray coat on now. Tomorrow I will spray the darker gray pattern on. 🙂
10 July 2017, 02:48
Cheers Michael 🙂 Yes there a rather yummy sponge cake covered in chocolate and coconut and usally have a jam filling! And there NOT FRIED!!!! 🙂 Maybe more like a Twinky bar???? I'm not sure? Any way the build is shaping up great! Looking forward to seeing it in it's proper camo!
10 July 2017, 02:53
Thanks Glenn! That sounds delicious!!!
Got the darker gray camo on tonight. My original plan of using FS36270 didn't work out, it was too light. I ended up going with Gunze Dark SeaGray and I think it looks just right to my eye, if maybe slightly dark. The flat coat should help that out some.
11 July 2017, 03:57
She looks wonderful with paint on her! But when i recmember correctly, the demarkation between the camo coloures must be hard edged? But dont mind, she looks gorgeous!🙂
11 July 2017, 07:19
Thanks Markus and Holger!
Holger, it appears that some have harder lines than others, and some even have both on the same aircraft. Here you can see it looks pretty soft:
google.com/url?sa=i&..ust=1499865322822724
I am pretty happy regardless.
11 July 2017, 13:16
Yeah, you are right! Do you know why the gun openings are painted black?
11 July 2017, 13:39
That is a good question, I really don't know why they did that. But I think it looks pretty cool though!
11 July 2017, 15:20
Thank Maciej, James, and Michael!
Short night at the bench tonight, but I did get the black areas painted. Hopefully tomorrow I will put down the future coat and decals will begin on Thursday night.
12 July 2017, 03:19
Gun openings are painted black as that way the leftover of the smoke stains after firing the gun isn't visible 🙂
12 July 2017, 21:13
looks good so far... was looking for a nice camo for mine... think I'll include this one, next to a libian and a peruvian one...
13 July 2017, 10:22
Thanks Sören, Günther, Markus, Bart, and Dale!
Bart, yeah, as soon as I saw pics of this scheme I knew this is the one I had to do. Check out this link for lots of REALLY sweet pics of this scheme:
hesja.pl/teksciwo,367,aviaphoto-paradise.html
13 July 2017, 14:08
Well, got the main decals on... All 8 of them. Lol.
The fun part is the stencils. There are no stencils available for this scheme, as they are blue, black, and red. So I bought the Techmod Polish MiG-29 sheet which includes red and blue stencils, so I am just gonna use ones that look similar to the pictures. I know it won't be correct, but it will look good from a distance and I can't speak Polish, so why not? Lol I won't tell if you won't.. 🙂
Also, there is a black arrow stencil by the nose intake on each side in black that can be seen in the pics. Probably says danger or intake in Polish, but I cannot find a stencil like that ANYWHERE. SO I used part of an F-15E rescue stencil (cut the arrow part out) and used that. Lol I know it says rescue, but at least it looks right from a distance. Might mask the inside off and spray over "rescue" if it ends up bothering me. Oh, and one side the word rescue is upside down. Lol.
14 July 2017, 07:35
Thanks Sören and Roland!
Sören, at this point I can fully recommend this kit. I actually am ENJOYING building this one. It is my first Kitty Hawk kit, so I have no preconceived notions other than other reviews. Are there issues? Yes. They are well documented and all true. The Mach Cone must be replaced by aftermarket and some cleanup is needed in the intake area. The six piece fuselage is problematic, but by assembling each half of three pieces you can mitigate fit issues very well. Also there are lots of sprue gates, so more clean-up then usual. Lastly, the fuselage underside has a bit of an exaggerated "banana" shape to it. But it is not so noticeable to me at all.
But with all that said, the kit has many positives. The detail (especially the cockpit) is just fantastic. The wing engineering and fit is nearly Tamiya-like. Fit overall is quite good.
14 July 2017, 16:28
I was generally sceptical when Polish Army presented this new gray camo for our Fitters. I definately prefer older NATO green-brown-black one. But your model turns out very nice and I'm wondering now if should I order a set of decals for myself 🙂
14 July 2017, 20:26
Thanks Stephan, Adam, Aris, and Patrick!
Adam, I actually have an extra sheet with these markings (in 1/48 though), if you are interested...
Well, got the metalwork mostly done. Looking at the pics, I do think I need to go back in and tone down a few things. But overall happy how it turned out.
15 July 2017, 07:30
For a minute there I thought the insignia on the right wing was wrong. Strange, Michael is careful with details, so I checked the photos and I discovered I was wrong. The insignia is placed as in the real thing. It seems stange though, because if you take a look at the F-16 and the MiG-29 the insignia have the same allignment. Great job Michael!
15 July 2017, 11:09
Thanks Kamal, Maciej, James, and Clifford!
Maciej, I thought that was odd too, but I didn't even notice that the MiG and F-16 were oriented the same, but different from the Fitter. Wonder why they did that? I looked at pictures of other Fitters in this scheme, thinking maybe this one was a mistake, but they are just like this.
So I spent a lot of time today putting on stencils, and painted some details as well. The stencils are mostly totally wrong, but I since I didn't have any correct ones for this scheme I just made them look close to the same shape as I see in the pics. I have put all the stencils that I will put on it, next I have to put stencils on the pylons and weapons, then it will be time to put on a wash. I hope to get much of this done tomorrow!
16 July 2017, 07:06
Thanks Alistair!
Well, got the wash on tonight. Tried to keep it as restrained as possible, since these birds are very clean. It may be slightly dirtier than pics, but that is ok with me. There will be no further weathering or post-shading.
17 July 2017, 05:04
Thanks Glenn! On the home stretch now. Goal for tonight is to finish putting a wash on the smaller parts and get a flat coat on everything. I would like to finish this before the weekend. We shall see!
17 July 2017, 17:17
Got the flat coat on tonight, looking at the pics I see a couple spots I missed, so I will hit those tomorrow. Got some gunk on the left side of the windscreen I need to scrape off. For some reason that happens to me relatively often when i remove the masking.
Anyway, she is really starting to come alive now!
19 July 2017, 04:44
Michael is the medium grey wash bottle next to the kit was what you'd used overall?
19 July 2017, 09:40
Thanks Markus, Harry, Roland, Sebastijan, Holger, Marko, and Andrew!
Holger, yeah, I was surprised while building this how big of a bird the Fitter actually is. Occasionally I run into that, the last time was with the F3H Demon, which is a much larger aircraft than it looks in pictures.
Murad, I used the Medium Gray wash on the black areas, the rest of the aircraft is washed in Deep Gray, also by MIG Ammo. A note of sadness, I just noticed that my favorite wash, MIG Deep Gray, has been discontinued!!!! I was lucky to find an ebay seller that had 4 left, so I snatched those up. So I should be good for a couple of years, but then I will have to find a new go-to wash.
19 July 2017, 12:44
Just make your own with oilpaint and thinner... Endless possibilities for a dime....
19 July 2017, 13:05
Yeah she is not a small one, I realised that last year at the static display at AFW 2016.
The mystery with the insigniahas been solved. While most of the photos show the insignia misaligned that is due to the wings being fully forward. When the wings are swept back, as when flying at speed or parked for saving space, the insignia are correctly aligned. Most photoshoots happen at low speed. 😉
19 July 2017, 14:09
That is interesting Maciej! I am going to have to test that out when I get home from work and see how the insignia lines up. I would've never have thought!
19 July 2017, 20:11
Looking great! Can I ask which Matt varnish you use and do u thin it.
Thanks
19 July 2017, 20:40
Thanks Forest! I actually make my own matte. I use future and Tamiya flat base (X-21). The matte base is really powerful stuff, so I use a ratio of about 6 parts future to one part X-21. This gives it a nice matte finish with just a slight hint of satin. You can always adjust this ration if you want more flat or more gloss. But I would not go much below 4 or 5 parts of future to x-21 or you will see some frosting show up. I know this from experience and experimentation.
19 July 2017, 20:54
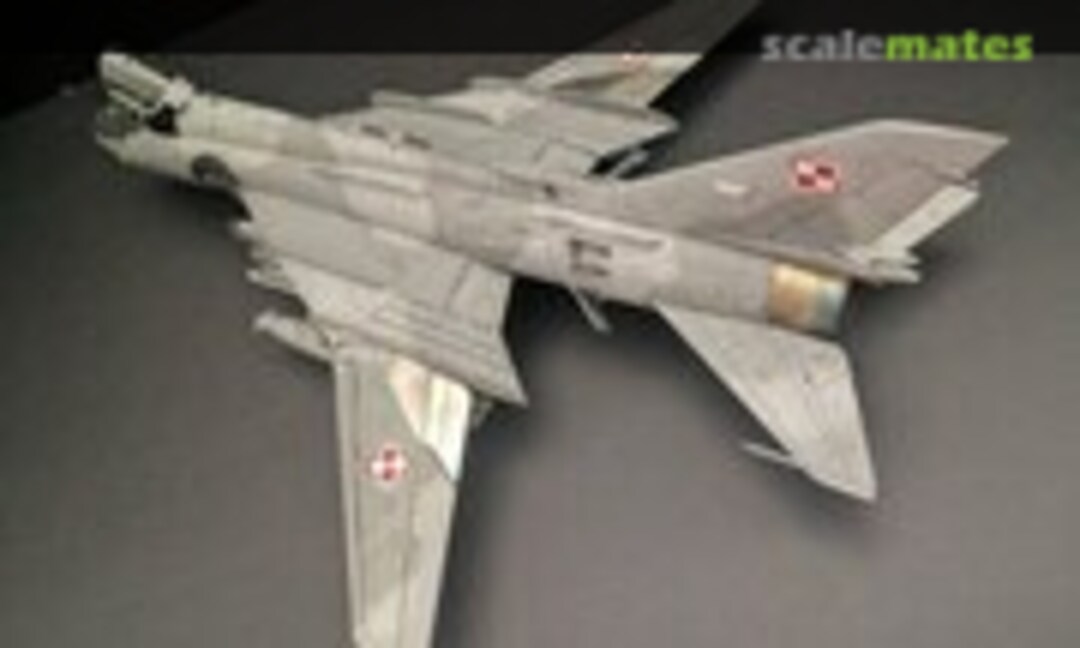
Got her on her feet tonight and added a few dangly bits. Gotta few more things to do, but should finish up by the weekend. This will be my last pics before final reveal!
20 July 2017, 04:34
Looks good Michael, the painting of the exhaust is particular beautiful!
20 July 2017, 08:30
Looking great, coming together well. Looking forward to the final result.
20 July 2017, 10:52
Thanks Greg and Alistair!
I will be eager to see your results with this formul Forest. It really works great for me, sprays really nice too, just make sure to thin it with levelling thinner a bit and stir the mixture in the cup occasionally, as it will settle over time.
20 July 2017, 17:34
i am using something similar as well but it's neither future nor any equivalent is available here. but as Michael sayz flat base is extremely powerful when mixed with these floor polishes and the result is exactly to my taste; it's smooth to touch (unlike any other proper flat varnishes with coarse finish) yet it's perfectly matte looking.
downside is it requires higher than regular model paint pressures as a result needing a wide nozzle (no problem) still it can clog the ab occasionally even with a large nozzle & needle.
anyway it's great to see the beast finally on it's feet, awaiting the end eagerly.
20 July 2017, 17:57
Excellent work and finish. The nozzle, photo no. 47 is absolutely lifelike 👍
20 July 2017, 18:44
She really is coming up looking good, can't wait to see the end result.👍
21 July 2017, 02:59
Thanks Murad, Christian, James, Clifford, and Michael! Your kind words are always appreciated.
Didn't get to work on it last night due to going to a friend's birthday party, but I do hope to finish it up tonight. Next up after this is a Hasegawa Tomcat Top Gun Adversary 😉
21 July 2017, 13:31
A Topgun Cat, woohoo. As for the polish lady, waiting for the final result.
21 July 2017, 21:13
I'm up for that one, maybe it will inspire me to tackle one of my Hasegawa Tomcats.
21 July 2017, 23:44
Thanks Maciej and Clifford! This will be my second Hasegawa Tomcat, so I hope to avoid some of the pitfalls I encountered in my previous one. So stay tuned!!!
22 July 2017, 01:24
AWESOME!!!! A CAT... And in Adversary Markings to boot. I hope I don't get side tracked watching yours and being easily inspired to do more work on my VF-74 Bedevilers camouflaged F-14A+.
22 July 2017, 04:54
What a great Fitter! I like this bird a lot, the Polish markings and camo scheme are very interesting
22 July 2017, 18:58
It appears it is not the dog every one was saying it was. Yours looks great.
23 July 2017, 01:42
Thanks Michael, Wim, Clifford, and Gerald. The kit is now done, will post pics today. 🙂
Michael, I think you should! Hehe. I love that camo VF-74 scheme!
Clifford, I enjoyed building this. Now, it is not perfect, there are some errors and questionable engineering, but overall I would recommend this kit.
23 July 2017, 14:37
Thanks, it is on my list, I was trying to decide between the Kitty Hawk or Hobby Boss kit. I think detail wise the KH kit wins hands down. It also cost less.
23 July 2017, 21:19
Perfect work ! I love Su-22 especially with polish airforce .
I have a question , which gunze colors you used for camo ?
11 February 2018, 19:18
Thanks Alireza! When I saw the new Polish Su-22 scheme I knew that was the one I had to build. Anyway, I used H308 Light Ghost Gray and H75 Dark Sea Gray for the camo scheme. They looked very close to what I saw in pictures, so I just went with those.
12 February 2018, 01:17
What a beauty. Were the colours straight from the bottle?, I'm starting an Iskra soon and want to use these colours.
12 February 2018, 19:19
Thanks Bryn, Przemek, Mathew, Nikolaos, Vinny, David, and Jan!
Vinny, these colors are indeed straight from the bottle, thinned of course with MCLT.
Here is the link to the completed model, if anyone is interested:
Kitty Hawk Su-22M4 Fitter-K - Completed! | Album by Fighting 84 (1:48)
13 February 2018, 03:22
Thank you Michael for your feedback about camo colors . For metalic areas like exhaust which colors you used ?
And Decals too . Which brand you used ?
27 February 2018, 20:51