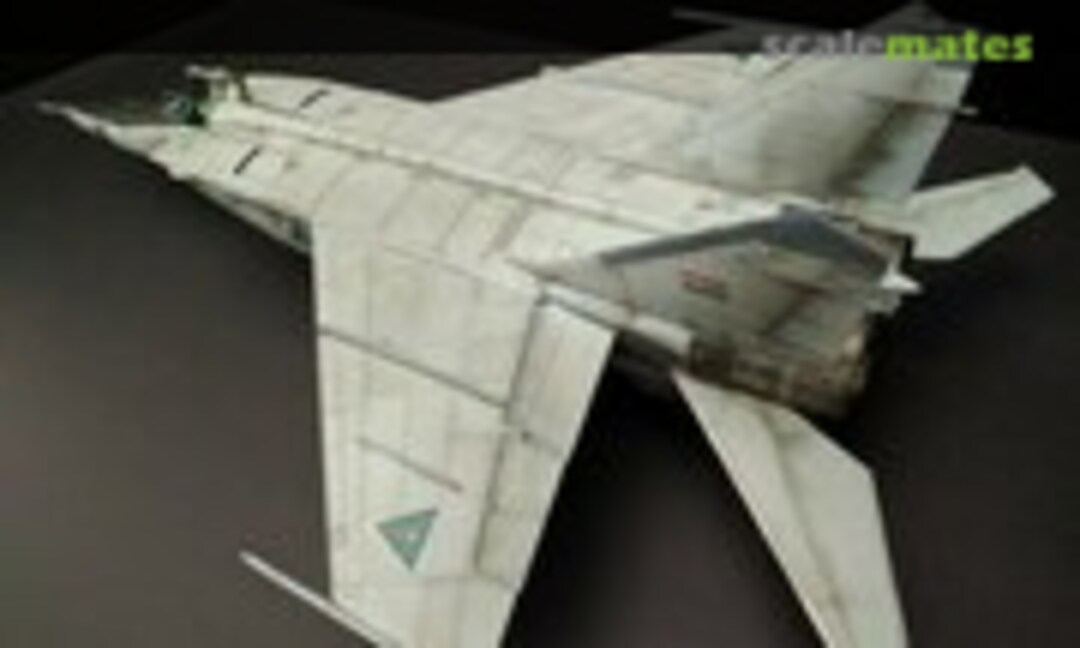
ICM MiG-25RBT Foxbat-B - Completed!


Comments
45 3 April 2017, 16:13
Love it. Looks great. I have also done the pink sealer as freehand as its like that in real. Would love to go up in one at that Russian place. But could not justify that expense to Mrs G.
3 April 2017, 18:22
excellent build, it was a pleasure to follow the progress, and it is even better to see the final results. simply fantastic. my respect Michael, it is a work of art.
3 April 2017, 19:48
Thank you Augie, Christian, Murad, Kurt, Ingo, Marko, Stefan, Alistair, Gordon, Erik, Spanjaard, Aris, and James! You all make me feel very honored to have garnered the wonderful kind words of you all. I am truly grateful for all of your kind words and support. I am glad my work log and final pics gave others enjoyment and I hope that my work can inspire and help someone else to build this kit.
3 April 2017, 20:20
Damn, what a model! Your detail work and weathering are spot on Michael. I think you've perfectly captured the brutish nature of the beast. 👍 🙂
3 April 2017, 21:22
Thanks Gary for that most kind compliment! It was my goal to make this beast look mean and dirty. I happy to hear you think I succeeded in that regard.
4 April 2017, 02:59
Thanks Bill, Martin, and Adam for the kind words! I really appreciate that.
4 April 2017, 14:07
Wow Michael, thats a stunner! Ugly bird but great work from you! Looks splendid, i´m deeply impressed! 👍
4 April 2017, 14:09
Michael, your the only bloke I know that has any chance of building his stash in one life time.😢
6 April 2017, 00:13
Thanks Holger, Rom, and Michael!
LOL Michael, I have done the math, at my current build pace (and hopefully significantly slowing my purchase rate) I will build my stash in about 8-10 years. So as long as I live to my 50s I should be able to do just that!
6 April 2017, 01:13
What a beauty!!!
May I ask for your opinion on the overall quality of this kit? How good/bad is the fit? Are there any parts that would require replacement?
Thanks!
10 June 2017, 16:48
Love it mate! The kit is on my watch list to buy and build later on. Was there any particular pit-falls or did it go together as it should?
11 June 2017, 10:38
Thanks Christian, Gary, soheil, Sören, Urban, and Christian!
Christian and Urban, overall this is a really good kit. The nose is not quite correct for an RBT, but the new Revell boxing of the RBT is this kit with a reworked nose. But the nose is still not quite correct, so the Cold War Studios (which I used) or the Fairy Hobby corrected nose would be a good purchase. The Fairy Hobby nose, which just came out, is a better choice due to how it is made.
Fitment of the kit is mostly very good, but be very careful when putting together the intake area and inside supports. If this is not done exactly right (like I did with mine), you will see a chain reaction of fit issues throughout the rear fuselage area. But detail on this kit is fantastic, so I definitely recommend it.
19 June 2017, 16:52
That´s a really nice work Michael! Congratulations!
I have the Revell kit on my stash. Do you have a link or shop where I can order the corrected nose?
19 June 2017, 17:27
Thanks Klaus!
Here is the CWS nose:
coldwarstudio.com/Mi..se%2048%20scale.html
And the Fairy Hobby Nose can only be bought on ebay, but they go almost as quickly as they are put up for sale:
Ebay.com Item - Fairy Hobby 48007 1 48 MiG 25RBT Foxbat correction resin nose part for ICM kit
19 June 2017, 17:33
What a magnificent paint. I like so much the jet's exhausts. Congratulation. Which paint did you use ?
19 June 2017, 20:11
I think I saw the original airframe outside of Baghdad in 2004, it did not look pretty at all, they had removed the cameras and radar and the whole aircraft sat on its rear wheels, sad really
19 June 2017, 20:15
Thanks Potez, Dave, Norbert, and nikolaos!
potez, I used various shades of alclad, as well as tamiya smoke, tamiya rubber black, and tamiya clear red and blue to create the exhausts. I can go into more detail if you wish...
Yeah, I used pics of that exact aircraft for some of my weathering inspiration. I think it is in Dayton, which is not so far from me. 🙂
24 June 2017, 18:43
You nailed this one perfectly, those Iraqi AF MiG-25s were some of the dirtiest Foxbats I had ever seen photographed! Wonderful work, one day I hope to reproduce this effect in 1/72! ^_^
25 June 2017, 00:55
Michael, if you don't mind sharing more information on the exhaust painting I'd sure be interested.
25 June 2017, 07:47
Good question Cristian, I too would like to know how to paint such convincing tailpipes!
25 June 2017, 09:07
Thanks C Marques, Edward, Gerald, Wim, and Markus! Your very kind words brighten my day!
Edward and Christian, my paint process for both metalwork and regular paint goes like this:
1. Black primer base (Gunze Mr Surfacer 1500 Black)
2. White marble/doodle coat for "black-base" pre-shade using Tamiya White Liquid primer. I use this product mostly because I have a TON of it and no longer use it as a primer, so just trying to use it up. You can use any white, or even a light gray if you wish. I prefer white because it is easier to control how much I let though the basecoat. If I use gray it can quickly be covered completely, losing it's effect. I have gone from being quite deliberate with this stage and taking a long time to doing quick doodles and figure eights as well as heavy and light patches. This now takes me half the time it used to because I just go and dont think about it. This actually helps me to be more random, which is the goal. It is easy to be a little to uniform, which is the opposite of the nature or real weathering.
3. Base Coat. I build up color slowly, allowing some of the pre-shading to come through. More so in some areas, less so in others. I like to use Mr Paint, Gunze Aqueous, and Tamiya paints as much as possible.
4. Clear Coat for decals. I BRUSH paint straight Future on the entire model. Depending on the glossiness of the paint, I will apply one or two coats. Then apply decals. I use future as my decal setting solution as well.
5. After decals have been applied, I wait one day and apply the wash. I really like using the MIG Ammo washes. I prefer Deep Gray for most gray aircraft and Deep Brown for other colors, such as tans, browns, and greens. I apply this rather haphazardly and liberally along all panel lines and rivets. I don't try to get cute with precision pin washes or try to be neat. Once again randomness is your friend here. I let this dry for about 30 mins to an hour. I like it to be juuust a little wet still so that I can get nice streaking and staining effects. The Deep Gray is great for gray aircraft because it has a little brown cast to it, giving it a nice dirty look when applied. If my clear coat was just right it will mostly come up with just a lint free rag or Q-tips without the need to add Odorless Turpentine or any other solvent. I wipe from front to rear of the plane, to give it the effect of motion and streaks from airflow.
6. Next up I use Tamiya Smoke. I like to randomly fill panels, out line some panels, outline some panel lines, create shadows and other stains, and then randomly spray darker areas. I can effectively control how dark these areas are by how many coats or how heavy I apply the Smoke.
7. Next I use Tamiya Rubber Black (heavily thinned), to give even more depth, dirt, and grime in random areas and to give more "pop" to areas that would be grimier than others. This also has a different dark hue than both the smoke and the washes, giving a nice contrast not only in color depth, but also in color hue.
8. Finally, I apply the flat coat. I make my flat coat using future and Tamiya Flat Base X-21. Ratio of about 6 parts Future to 1 part X-21. Don't go too much more X-21 than that as it will "frost" if you are not careful. I spray this one, and can control how flat I want the finished coat is by how much I apply. That's it!
For the metalwork (other than the nozzles on this, which was a different process), my workflow usually goes like this:
1. Alclad Gloss Black Primer is applied after masking off the other areas. I usually do my metalwork after the rest is already painted. Just a personal preference.
2. Next I spray Alclad Airframe Aluminum. I really like this stuff. I can control how shiny it is by how much I apply. It is also easy to modulate the paint with this to get tonal variation to create wear areas. It also sprays much nicer than the other Alclads because the metallic pigments are much smaller than the others. That is why it can get such a high shine.
3. Next I spray Gold Titanium or Pale Burnt Metal along the panel lines to simulate heat stress. This will only slightly show through later, but gives a really nice effect.
4. Next up I sprayed Burnt Iron on the darker panels of the exhaust section, based on what I saw in pictures.
5. On this build, I next sprayed my Flat Coat mix over the entire metal area. I usually do not do this, but pictures I have seen seem to show these areas a really flat. This really made the shiny areas that I had left shiny towards the forward fuselage look faded and worn, which was a great result I had not expected. Happy Accident, I say!
For the nozzles, I also used Alclad Gloss Black primer, then Airframe Aluminum. Then I sprayed Gold Titanium over the entire nozzle area. I then took some more Airframe Aluminum and started spraying random "spots" of varying size and shape. I then took some clear blue, and sprayed over these "spots" with varying intensity. I then took clear red and sprayed over these "spots" again, also with varying intensity. I then went back in with airframe aluminum and sprayed over that lightly on some of the "spots", but leaving others alone.
On the inside, the inner panels were painted with Alclad Gloss Black Primer, then Airframe Aluminum, then I sprayed MRP Russian Wheel Green over it, giving it a metallic green appearance. I then gave it a wash of black, then dry brushed some light tan in there. Then I went in with Tamiya Rubber Black to give it a bit of a sooty black look around the ends of the petals and outer edges.
Anyway, I sure have rambled on, but I hope this helps.
If you have any specific questions, please feel free to ask!
25 June 2017, 17:22
You sir, are a true artist. This sounds like some sort of medieval alchemy formula intended to summon something dark and horrible from the netherworld! I have "copied" this recipe and am stowing it away for my next jet build to give this a shot of my own though I'd better experiment some on parts of retired models or part donor models first though. Thank you very much for teaching we mere ignorant peasants in the arcane alchemistic arts of creating burnt steel from mere paint!😉
25 June 2017, 17:30
Haha, that's awesome Edward! The arcane black art of model weathering. I'm gonna have to remember that one! 😉
For me, my favorite part of any build is the painting and weathering process, especially for metalwork. I love to let my artistic and creative mind just go. I like to experiment as well. But I am not a huge fan of the construction part of a build, and my skills in that area are pretty substandard. Sanding and filling are a bore chore for me, so I am very apt to say "good enough" and move on. But I guess that is why I am also able to build so much.
If you ever have any specific questions before you try something, please feel free to send me a PM.
25 June 2017, 17:46
Michael, I am not particularly skilled with the weathering aspect of modeling thus tips like this are invaluable to me.
I've never been a part of a modeling club, my grandfather built as-new, out of the box, models and my father was an out of box builder who would paint erroneous and fictional paint schemes rather than make any attempt at accuracy; Let alone worrying about weathering! A memory from childhood; All of his Japanese aircraft were painted Testors Beret Green over Testors Gray. All of his German aircraft were painted Testors OD Green, which is a far lighter green than true olive drab, over Testors Gray. His USAAF bombers were painted like a propaganda poster, overall Testors Olive Green, which is quite close to true Olive Drab. His USAAF fighters were either painted overall Testors Gloss Silver or Testors Olive Green over Testors White.
My area of expertise is scratch building details and coming up with novel ways of creating more accurate representations of aircraft parts in my chosen scale. I also cannot stand to leave the inner parts of models to be cavernous or spuriously detailed. I once added nearly 400 parts to the interior of a Heller 1/72 Breguet 693 to reproduce details seen in photos of the type's interior, about half that number to the interior of a Revell or Airfix Kingfisher; I can't recall which. Evergreen card stock, wire of various gauges, foil, masking tape, needles and hypodermic needles are some of my best friends in these endeavors. If I could master weathering I'd grade my builds far higher!
25 June 2017, 19:51
Thank you, Michael for the great step-by-step tutorial! I wish there would be a place on this site to pin such descriptions.
26 June 2017, 09:20
Thanks Massimo, Spanjaard, and Cristian!
Edward, I only wish I had scratchbuilding skills. I am severely lacking there, heck, I really don't even try. Sounds like we have a lot we can learn from each other...
26 June 2017, 14:23
Michael, if you're handy with a very sharp scalpel, a pin vice, a scribe tool and even carefully using hypodermic needles of different gauges, specifically to create recessed circular details both on the interior and exterior - such as rivets, gauge faces and so on its reasonably elementary with some measurements. Very thin plastic card is just as good as photo etched parts in most instances if not better as its flexible enough to fold it into position into complex convex shapes - this is especially true for fuselage and wheel well frame works. I assume it would work well for wing flap detail though I've never dropped the flaps on a single one of my builds. Thicker plastic card works well for bulkheads, cockpit tubs and so on.
I've taken to studying PE frets as of late to get a better idea of what these manufacturers think is "good enough" and occasionally use them as a basis for my own scratchbuilding details while adding details I observe in photos which they omit, such as oxygen tanks which can be replaced with sprue or even slightly stretched sprue, cutting it to size and sanding the edges to the desired curvature. Bands around them can be thin plastic card but in my experience plastic based masking tape, such as what Tamiya offers, works better when cut into thin strips.
Ammunition boxes are easy to replicate with thick plastic card cut to shape, layering if you must, for larger scales, with a solid bond of CA glue, sanded smooth and scribed with appropriate detail using the pin vice. (Ammo boxes for some other weapons, which I can't help but think remind me of old camera film rolls, are best replicated with polystyrene rod or sprue cut to size and conjoined by plastic card.) Thin strips of copper foil scored with the pin vice/needle work well as ammunition belts.
Wiring is easy to replicate with various gauges of stretched sprue, nylon thread, fishing line, copper or even stainless steel wire. If you need something a little more sturdy than plastic card for very fine minute details, that's where copper foil comes into play again which I cut using a needle in a pin vice by repeatedly scoring the surface until some delicate work with the scalpel can break it free from its carrier. Get some good reading glasses or a desktop magnifying lense or you'll go blind doing this kind of fine work!
I cannot downplay the value of a good spares bin, donor kits and so on either. Even chunky old kits can find parts of their thick plastic repurposed into fine block or details such as radio boxes, consoles and so on.
In my preferred scale, 1:72, a bead of glue works fine for the knobs on throttle controls and the like but I am sure with some creativity something equally effective could be found for the larger scales. I've only recently made the decision to get the post-WW2 giants out of my collection and wish list in favor of going half size with 1:144 scale and have yet to make my first acquisition in this area. Thus I cannot comment intelligently on how to super-detail such small kits. I imagine it will be much the same just with a bit less detail on parts added and a further headache to create finer fuselage interior components.
I do have an Achilles heel in my detail work in that I've yet to manage to convincingly replicate the fine details of 1:72 weapons or radial engines. Aeroclub used to be my saving grace in this department. I see that some companies have risen to the occasion to fill the void that their business shuttering-up left for the modeling world. However I preferred their sturdy white metal of their accessories versus the now commonplace resin aftermarket offerings. Polystyrene gun barrels are easy enough to knock loose - resin is brittle though so the slightest snag I would imagine to be catastrophic.
My father used to manufacture lead fishing sinkers for his cottage industry fishing tackle company and I still have his electric smelting pot and a fair amount of lead laying about. I've considered, on more than one occasion, exploring the option of using a white metal or even a fine quality kit part as a basis for a female mold to manufacture lead parts to fill this void - for my own personal use. However its toxicity is further reason to pause in this consideration.
26 June 2017, 16:38
Wow. Now THAT is a treatise oh how to scratch build and the tools and products necessary to do so. As Cristian said, I wish there was a pin for posts like this. Thank you for that amazing description. I am, unfortunately, not adept with a pin nor blade yet. In fact, I cannot even re-scribe effectively at all. I avoid it at all costs. LOL But one can only learn by experience, so I will try to get out of my comfort zone a little and put some of your advice to work. Stay tuned.
Anyway, you mention after my tutorial that I am a true artist, but after yours I must say, you sir, are a true craftsman.
26 June 2017, 17:09
Wow, thanks so much for the compliment! I never thought of myself that way I just thought of myself as a modeler too cheap to go out and buy all the Eduard goodies everyone else does! lol
For rescribing panel lines, might I recommend metal foil tape? Use it just like masking tape but it serves as an excellent flexible surface to go over complex shapes while offering further resistance to your' scribing tool wandering off of its path. Also don't try to scribe the full depth your' first time across, make multiple passes over the same line and this will eventually get you to the desired depth and effect. Furthermore your' preliminary scribe lines will again serve to help keep your' scribing tool on target without wandering. After you have your' scribed panel lines take some very fine grit sandpaper and trace those lines to carefully smooth the edges out a bit.
As for cutting plastic card, find yourself a metal ruler/straight edge and a couple of good strong C-clamps to affix the ruler/straight edge to the edge of your' work bench over top of the plastic card. This will assist you in cutting straight lines. Again, do not try to cut through it in one swift slice of the scalpel.
For fuselage stringers/frames you will want to study photos carefully to estimate the actual size and then decide upon a measurement that will suffice for some measure of uniformity - unless there are multiple width stringers/frames, then change it up. I would measure the width on both sides of a sheet of thin card stock, apply the metal foil tape, clamp it down and score-cut it out.
For more complex interior shapes such as bulkheads and some formers, there are several creative ways to make these. One, I've never tried this one but its been floating around in the back of my mind, is to pick up some air drying modeling clay, roll it to the approximate shape of the fuselage and join the fuselage halves together around it, allowing the modeling clay to fill the void. Remove it carefully from your' fuselage and let it dry. Use a hobby saw to cut away any excess product from the top/bottom of your' modeled fuselage core. Put it back into one fuselage half and mark the areas with charcoal pencil allowing for the amount of clay that will be lost through sawing, where your' bulkhead/former will be. Once it's cut, you can turn it on it's end and trace it directly onto the plastic card to be score cut to shape and sanded for fit. The great idea behind this technique is that you can get all your' bulkheads/formers from this one piece of modeling clay - provided it doesn't crumble/break up when you're sawing it.
The way I've always done it is to draw the projected estimated shape on paper card with pencil first after taking measurements and careful examination, I'll cut out the shape and fit it to see where it may need to be adjusted. Oftentimes you have to be extra creative to get the finished shape and more often than not you will go through several prototypes. Thankfully you've got all the paper card you need in your' model collection; Those cartons are good for more than just decoration and holding unbuilt kits! I've used everything from coins, bottle/pen caps, washers, emery boards, credit card corners, etc. to get just a section of curve I wanted. (If you're lucky you'll find some scale drawings that will give the estimated size/shape of the bulkhead/former you can use as a basis however the thickness of the kit part will make it oversized.) Once your' paper card prototype is ready, clamp it into place on your' plastic card and outline it onto the plastic card. Remove the clamp, flip your' paper prototype over to line up with your' drawing on the plastic card and trace it again. Use the same clamp, score cutting, etc. After that, dry fit, sand the part, rinse and repeat until you have the part exactly as you want. IMPORTANT! To make certain the part is not too wide or too narrow, secure it inside one fuselage half with tape in the front and back so it stands perpendicular from the fuselage length and bring the other fuselage halves together.
Anyway, hope this might have helped and not scared you away! lol
26 June 2017, 22:03
Thanx Nathan for blowing the dust from this thread. Indeed an impressive build.
7 March 2022, 01:22
Very nice result. I really like the weathering. You made the scheme very interesting.
7 March 2022, 18:17
Incredible result. Thanks for the weathering tutorial too. It will come in handy!
13 January 2023, 12:36
I love the weathering! IMHO, that's what really makes the MIG-25 kit "pop". Now I'm too scared to build the kit I have until I gain sufficient skills in the weathering process.
31 July 2023, 15:34