

JGSDF Type 10


Comments
1 22 April 2018, 18:30
Here we go. My new projetct and my first Japanese JGSDF vehicle. An Type 10 tank. The build so far was very fast and without any problems. The most time consuming are the workable tracks from Orochi. Very nice and fast building tracks as you do not need any glue but really are pain in the a** to clean up.
The part that is connecting the single links in the middle is very small and got two big attachment points to the sprue. Really hard to clean up.
By the way, you need 79 links per side as there is no information about it in the instruction.
Right now i am in the middle of the turret build and half way trough the build groups like commander and driver sight. I am not going to attach them yet as i have to add all the PE parts.
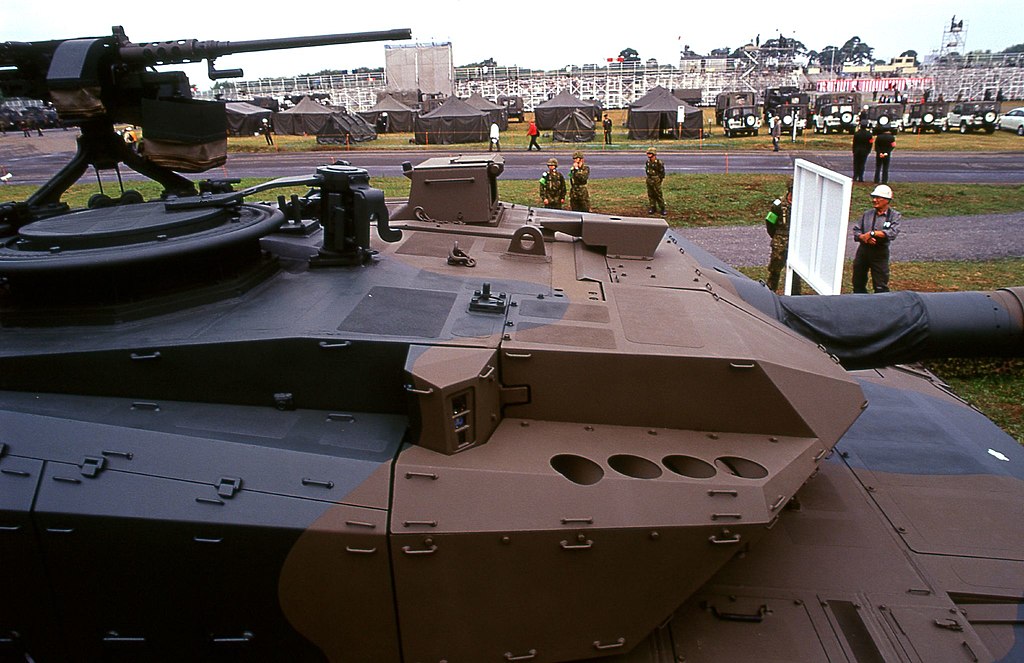
The handles are molded solid so i have to remove them and add the PE parts instead.
The big problem are this small parts that are also molded solid and looks like"grab handles" on the real tank. I assume those are attachment points for the camo net.
There are 232 in total and this are very tiny PE parts...... this will be fun. 😄
22 April 2018, 18:52
That was really fast Ingo. Interesting and quite rare subject, I didn't see one of these built before 🙂 count me in.
The way these tracks go together reminds me of the workable Trumpeter track on my Leopard build. Took me 3 sittings to clean all those bits and pieces 😄
232!? Are you kidding?
Normally I'd say replace them with thin copper wire rather than with PE, for the round look... But that many? Yep. PE. 👍 You do get very good results with it here already!
Watch out for the carpet monster though...
22 April 2018, 20:33
Thank you Rene and welcome. 🙂
Nope not kidding. There also about bigger 10-15 handles. Gluing so many PE parts is not that kind of a big deal but i have to make two small holes for each with the knife tip. For a better adhere.
When i am building the models i always have the cover of the box on my knees. Prevent the feeding of the carpet monster. 😄
Using that many PE parts is a good training for my future HMMWV project. 🙂
22 April 2018, 20:45
I counted the small handles and there are only 108 on the turret. Better then 232 but still too many. 😄
23 April 2018, 18:21
I glued 17 of them and it took me about an hour. It was the first try. I think the next one will be faster. 🙂
23 April 2018, 18:40
Nice idea with the box. Not very comfortable, but more comfortable than crouching on the ground looking for a piece of brass in all those plastic shavings😉
An hour for 17 of those? Not bad! Took me about 40 minutes to replace the few grab handles on my Leo with wire. May I ask why you use a knife for the holes?
24 April 2018, 18:16
For most people it would be not very comfortable to have the box on the knees but as i am sitting cross-legged about 99% of all time its ok for me. 😄
I dont know the name of it but i have an tool that looks like an hobby knife with a needle at the end instead of a blade. First i was trying to use it or an knife tip to make the holes. Unfortunately sometimes the space between the holes was too narrow or too wide.
I found some old school pair compasses with needles on both sides. Put them on the same wide as the PE grab handles, got an piece of plastic in between so they would stay in the same position and fastened them with tape.
I started to remove the molded on parts and make holes with the pair compasses so i wont forget the position of the grab handles. After i removed all the pieces i used a needle to make the holes bigger.
Thats all. 😄
Tomorrow i will post some pictures of the current progress and the modified pair compasses. 🙂
24 April 2018, 20:39
Nice start! I have to say you are a very patient man, I would have given up a long time ago on those handles 😄
Are the Orochi tracks available in some European shop? I couldn't find them anywhere ...
24 April 2018, 20:48
That's quite handy 👍 might keep my eyes peeled for one of those as well. For 'normal' jobs of this sort I use 0.1mm or 0.25mm drill bits, but with >10 handles this might get bothersome... Plus the alignment problems you mentioned.
Don't these things usually have a spring-loaded screw for adjustment? The one I used during school did...😄
24 April 2018, 20:50
Thank you Dan. 🙂 Believe me there was a moment when i was thinking of dropping the idea to replace the handles but then i started to remove the plastic parts and coud not go back anymore. 😄
I dont know if the Orochi tracks are available in Europe, i got mine from Hobby Link.
@Rene: Mine are older then me. They are from the 70's and were used by my mother in school. 😄
24 April 2018, 21:02
Sort of retro then😉
Just cross the point of no return quickly.
It's the best way to keep yourself from bailing out!
And it will pay, the PE will be a big improvement over the moulded-on bars.😎
25 April 2018, 04:39
Added a few pictures of the current progress. The other side is almost finished. Only 20 pieces left.
Used the tip of the knife to test how solid the PE parts are glued. One or two fell off and were attached back into place. 🙂
25 April 2018, 19:12
Veeeery nice. That's a lot of fiddly bits 🙂
What did you watch while attaching them?😉
26 April 2018, 16:55
Thanks Rene. Nah wasnt watching anything. Just listening to old music from late 90s/early 2000s. 😄
26 April 2018, 17:16
There was some really nice music back then. Especially the trancey stuff imho.🙂
26 April 2018, 17:33
Oh yeah there was some very good trance/techno stuff back then. 😄
Little update on this one. All the grab handles are now glued. Found some that were hidden and i nearly missed them. 🙂
Will take some pictures tomorrow.
26 April 2018, 19:17
Here a batch of new pictures. The model is almost finished. Will post the final pictures tomorrow.
28 April 2018, 20:04
Very nice, that must have been a few nice hours of fiddling😉
What's with the white stuff around some of the pe parts? Is that filler?
28 April 2018, 20:46
Thanks Rene.
The white stuff is PE glue. Don't know but its allways like that if i got a little more glue around the PE parts. Only happens if i use the extra pe glue from Modellbau-König. 🙂
28 April 2018, 20:55
Ingo, I am not sure what to comment on here but I will try to get my thoughts across. I have been watching from afar, can't get much further away than I am! Accepting the challenge to build anything with this much detail is intimidating for me but I am gaining confidence that lateral thinking (your self made tools) and preparation (thinking through the build before starting) is essential to get another step along the long and steep path to expertise. The sheer volume of additions and subtractions from what looks to be a terrific kit adds so much to the outcome. Thanks for showing what you have done and how you have done it. Brilliant mate, just brilliant. Look forward to the paint!
28 April 2018, 21:31
Completed the build this morning. The tank already received an coat of black primer.
29 April 2018, 12:44
Tidy job Ingo. Tanks primed black look quite awesome imho 🙂
120mm l/44... Is the Type 10 armed with the Rheinmetall 120mm gun from the Leopard 2 or a derivative of it? 🤔
29 April 2018, 17:38
No, only Type 90 uses the Rheinmetall gun, while Type 10 uses a Japan Steel Works 120mm. Which is compatible not only with JGSDF but also NATO ammo.
29 April 2018, 18:16
Thank you guys. 🙂
I think i made a small mistake with the figures. I primed the body and the head separately. I think it will look ugly if i glue the head after the painting. Need to check it tomorrow after the primer is dry.
Think that i have to redo the figures and use some green stuff to cover the space between the head and body.
Btw the handles looks really good after a layer of primer. 😄
29 April 2018, 19:01
Interesting Dan, thanks! Got to read some about that... Compability with NATO cartridges is peculiar considering Japan not being a member of the NATO. 🤔
29 April 2018, 19:06
Not really surprising Rene. Almost all of the western allies use the same ammo as NATO.
29 April 2018, 20:58
Nice to know. Never looked at the armament of Type 90 until now. Basicaly i can use the Leo 2 barrel for the Type 90 build. 😄
29 April 2018, 21:10
Japan wasn't really on my radar Peter. But you learn something every day 🙂
Although I don't have any japanese armour in my stash.
Yet.
The type 10 looks to be a worthwhile build😉
29 April 2018, 21:55
Oh it is Rene. Even without the PE grab handles it is a fantastic kit. 😄
I will go through all JGSDF tanks in the future. Got Type 74 and 90 in my stash.
But now i will go back to my favorite tank: T-72. Already started the build of T-72B2 Rogatka from Trumpeter.
29 April 2018, 22:05
Hhhnnnnggg my stash is growing too fast already 🙂
I don't have the space for a 40' container 😄
30 April 2018, 08:43
Hah, same here. I have to make space for new kit. 🙂 From today on i am on vacation for two weeks. Wondering how many models i can build in this two weeks. 😄 Tending for 3+ models. 🙂
30 April 2018, 09:59
Good luck with that! I bet "she" has a list you don't know about yet!
30 April 2018, 10:12
I am single so there is no hidden list. 😄 I did'n plan anything for this two weeks. No appointments, no doctor visits. Will help the familily if needed but this two weeks are only for myself. 😄
30 April 2018, 10:24
Nice! I've got 2 weeks off now too. But 3 kits... jeeez I'm happy if I get the Me262 done. 🙂
But I'm not single... that poses a problem and slows building considerably! 😄
30 April 2018, 11:06
amazing detail... looking excellent already, and there is not even a drop of paint on it yet.... 🙂
30 April 2018, 11:13
Martin and Peter i hope your wifes do not read the posts here or you mates are in great trouble. 😄
30 April 2018, 13:08
ha ha ha ha! Ingo, who do you think will pay better, Mrs Hardy to read, or Mr Hardy to keep it quiet? 😄 😄
30 April 2018, 13:12
Don't go there Ingo! Mrs Hardy is small, feisty and a woman to be reckoned with. I am 192 tall and weigh in at 130 kegs, but I shake in fear when I hear my name called!
30 April 2018, 21:02
Oh man, things really are the same all over the world, aren't they.
30 April 2018, 21:18
Dont want to read something like that tomorrow: Yesterday evening the police was called to a dispute into a peaceful neighbourhood. Arriving on the scene the police officers encountered a dramatical situation. A man was chased by his wife who was throwing plastic tanks on him ......... 😄
30 April 2018, 21:47
better plastic tanks than hobby knives, dremels, chemical products..... 😄 😄
30 April 2018, 22:09
Talk about being beaten with your own weapons 😄
Martin it sure seems this way. When even a giant in the australian bush isn't safe, who is?😉
30 April 2018, 23:04
Sounds like a tough neighborhood Ingo!
Martin, I would rather spend a night camping with an Inland Taipan for company than displease my wife and suffer the consequences! en.wikipedia.org/wiki/Inland_taipan
1 May 2018, 02:37
Paintjob is done. Completed the detail painting today. Had to repaint two wheels as i mixed them up. The idler wheel looks the same as the normal wheel but is narrow.
Was lucky that i only knocked down two of the pe grab handles. Found and glued them back. 😄
1 May 2018, 20:34
Looking very good! And the carpet monster can die a horrible death as far as I'm concerned 🙂
1 May 2018, 21:01
Thank you guys. My carpet monster is long dead as i havent lost any parts in ages. 😄
1 May 2018, 21:03
Oh yeah. With his next build he'll have this one make-or-brake piece that flies into another dimension 😉
1 May 2018, 21:12
Hah already regreat that. 😄
Thank you James. Yes that are Tamiya acrylics XF-72 Brown (JGSDF) and XF-72 Dark Green (JGSDF).
2 May 2018, 00:03
Nicely done shading Ingo. Looks interesting, especially because it's just a 2-tone camo👍
2 May 2018, 13:16
Thank you Rene. 🙂
This one will be an clean tank. Will only add an filter. A little bit of chipping near the hatches, streaks down the sides of the turret and skirts and little bit of pigments to the lower hull and tracks. Nothing more. As far i have seen, the japanese tanks are very well maintained. 🙂
2 May 2018, 13:21
You wouldn't want to hide all these small details underneath heavy weathering😉
And yep, japanese armour seems very well cared for. 🙂
2 May 2018, 13:50
Here we go. My first time painting a face on a figure. I think it turned out good for the first time. Not gona win the figure painter of the year medal (yet 😄) but with a little practise it should work out well in the future.
As for the tank itself i gave the model an coat of brown filter and it darkened the color a little bit and broke the uniform surface. Not sure if i should add some washes or going with the streaking grime on the sides.
@James: What did you use on your Type 90?
5 May 2018, 19:40
Thank you James.
I tested the NATO filter out but it was a little bit too brown for me. I think i will test it out tomorrow deluted with s little bit of white spirit as a wash on some areas but not over the whoole tank.
The NATO filter give the model some kind of dusty appearance if you use it on Bundeswehr vehicles.
5 May 2018, 20:07
If that is a first go I'm giving up painting figures! I've been painting them for three years and am nowhere that good! Actually just to be spiteful I'll tell you they look European not Japanese. No that's unfair. I got nothing Ingo! Too bloody good.
6 May 2018, 00:11
Thank you Peter. I know they look European not Japanese. With a little bit imagination you could say that the let one looks a Japanese. 😄
6 May 2018, 07:23
And the right one is a participant in an international tank crew exchange programme😉
Taking a look at a 35th scale figure now... And wondering how you managed that 🤔
6 May 2018, 07:43
Hehe Rene. I just picked the figures and start painting. I have an old Vallejo Game Color Miniature & Paint set in my stash that i bought years ago. There is a quick guide how to paint faces on the back of the box. I just followed it.
I bet when i will paint the Bundeswehr ISAF crew for my upcoming Panzerhaubitze 2000 build, they will all turn out Japanese. 😄
6 May 2018, 08:58
Don't face the figures towards the sun. Found that out at my wedding. My wife and family are Thai as was the wedding photographer. She had us facing the sun and then asked us not to squint. My mates daughter who is also Thai yelled out "hey! We're Asian, what do you expect"? We all broke out laughing as did the photographer!
9 May 2018, 20:56
A little update on this one. The weathering is done. Working on the figures right now. Will add better pictures after the crew ist ready and attached to the tank. 😄
12 May 2018, 20:26
Slow progress on this one. A little update on the figures. Base painting is done. Next will be a wash and drybrushing.
27 May 2018, 18:03
Thank you James. Now i need to find a suitable wash and dry brush paint for the figure. Thinking of using brown wash for green and grey for drybrushing.
27 May 2018, 18:10
That uniform looks better than many of my plane builds 👍
Okay, gonna drown myself in beer now ……
27 May 2018, 18:34
Great uniform camo! You can be really proud of how your figure came up! Now you don't have any excuse not to paint other figures 😛
27 May 2018, 20:22
Thank you Dan. 🙂
Nah, i do not need any excuses. I am really happy that i got over this "fear for figure painting." 😄
27 May 2018, 20:34
Need help with that Marty?
Ingo, please stop doing stuff this good without embarrassing yourself like the rest of us do. The camo is effing good, just the European face. Actually, he looks a lot like me. Tall, fit, dark hair, extremely good looking with nothing in his pockets! We all expect builds with groups of figures now! Well done compadre!
27 May 2018, 21:08
Haha Peter. 😄
Don't worry mate, you will see much more figures in the future. Got tons of ideas for dioramas, vignette and so on. 🙂
27 May 2018, 21:12
You didn't serve in the jgsdf by chance didn't you Peter? 😄
They turned out really great Ingo. Nice work, makes me want to grab a fine brush and try some myself. They might end up looking like Homer Simpson though 😄
28 May 2018, 02:43
@Rene go ahead, grab a high quality fine point 0 brush and 3 panzer aces flesh colors from vallejo and start off. it might not be as hard as you imagine!
@Ingo, nice samurai, HEEEAAH!
28 May 2018, 07:00
Finished this one. Very nice kit and easy to build. Unless you go for the PE grab handles. 😄
Painting figures for the first time was fun and not that hard as i thought. 🙂
10 June 2018, 10:24
excellent job Ingo. i am sure we will see lots off figures in your next projects😉
10 June 2018, 11:30
This one will need to go in the front of the display cabinet Ingo! Well done. If I had a gold medal it would be yours!!
11 June 2018, 02:32


