

Churchill Bridgelayer


Comments
22 24 May 2015, 18:57
Hour D has started. I'll build the Churchill SBG Bridgelayer with as much detail as possible. This weekend I started with the Friul tracks.
24 May 2015, 19:05
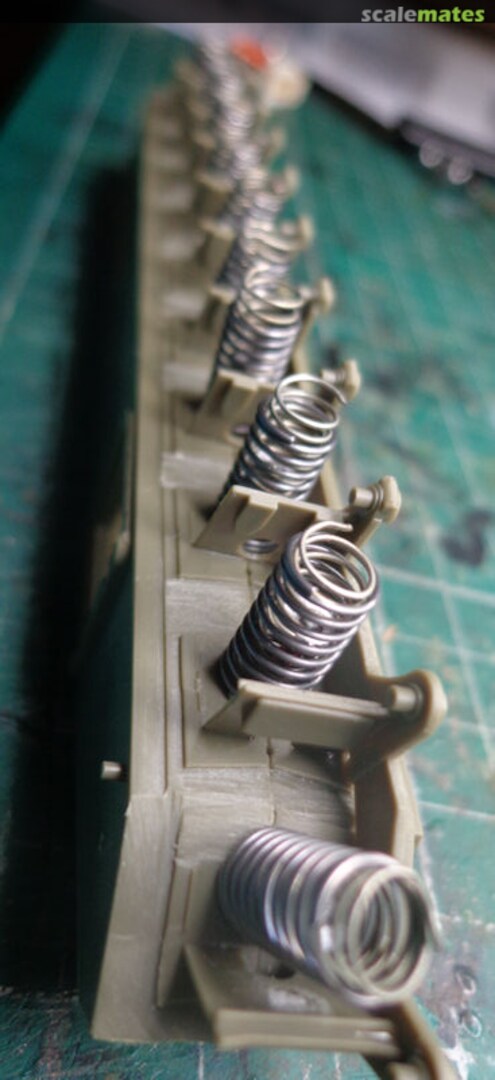
The suspension was already complicated to begin with, but I had to go and make it worse. I'm incorporating the usual 4 springs per 1 bogie, even if I have to make most of the springs myself.
31 May 2015, 20:32
Suspension is taking form. I don't follow the order of the AFV instructions, this can lead to fitting problems because the subassembly is connected as a whole from about 15 parts before it is aligned with the hull.
1 June 2015, 20:50
The tracks can be attached on the wheels, now supported by the authentical spring system.
4 June 2015, 21:11
Thanks for your interest! I did a small modification to the Voyager track supports scavenging on some old Griffon PE. It contained also some fine inner sprocket bolts.
8 June 2015, 23:05
Yes, thank you, it's all glued on with PVA on a piece of wood twelve by eight meter, I made it last week.
10 June 2015, 04:47
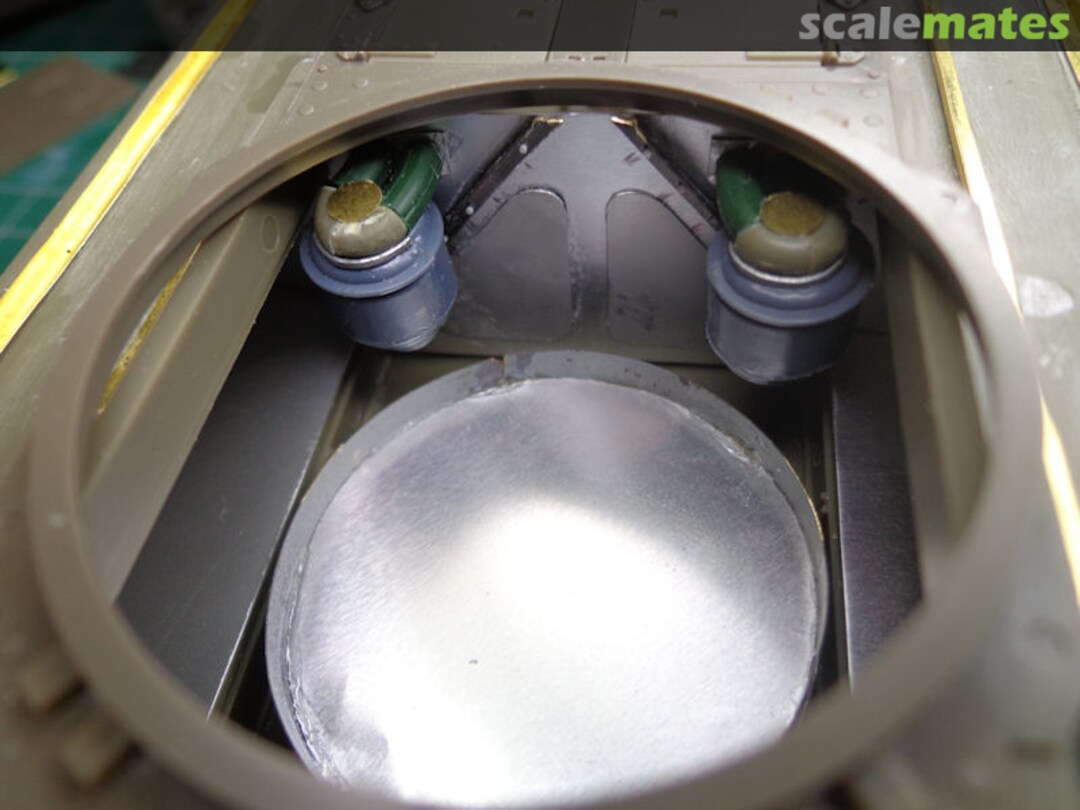
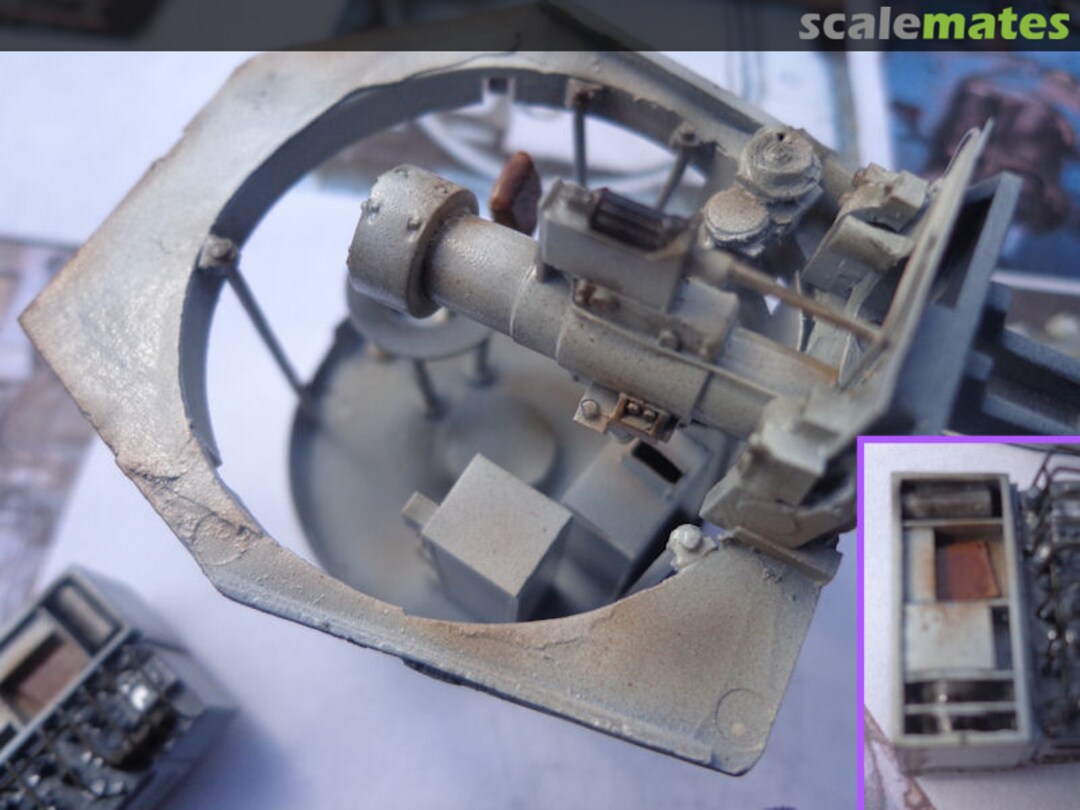
Thanks, Jeffrey. I started to make a scratch interior. The turret is dryfitted onto the upper hull plate.
14 June 2015, 23:23
You can train the ability to see useful material where others see only junk. And to keep on fumbling with it when another would give up and glue that thing shut.
23 June 2015, 05:14
Thanks, Yaman. I just added the auxiliary generator from scratch. I also gave the poor crewmembers some legs to stand on.
24 June 2015, 22:09
The lower interior is primed in grey. It will be post-shaded in white. Most of the petard mortar will not be constructed from the resin kit, because AFV seems to have a more recent, correct design. I'll use the resin part on a second Churchill turret starring in the diorama.
27 June 2015, 21:49
Nope lol it was my bad spelling lol,I meant great lol. This build is faaaaaar from dreary lol
27 June 2015, 23:29
With me, you don't get the time to be bored, I already have a new update about the interior being finished to close the hull. I used Vallejo Air white and a few drops of US grey and light blue to shadow it. Then some mudwash after a layer of clear. Now it looks more like the tank actually participated to the training programme preceding D-day. I'll still add some chips and other details.
28 June 2015, 21:56
Lol very true!!! The wash looks great !!! Can't wait to see the chipping !!!
28 June 2015, 23:53
Thanks, Hunter! I detailed the air filters with some sparebox decals and I finally received the Aviation Shoppe blueprints.
30 June 2015, 17:39
Are those real blue prints??? I would love to have a copy as I have a Churchill aswell
30 June 2015, 19:10
They're for sale on www.aviationshoppe.com. Actually they originate from real blueprints. I think that's your best option, because they wont pass under a normal copier...
30 June 2015, 20:40
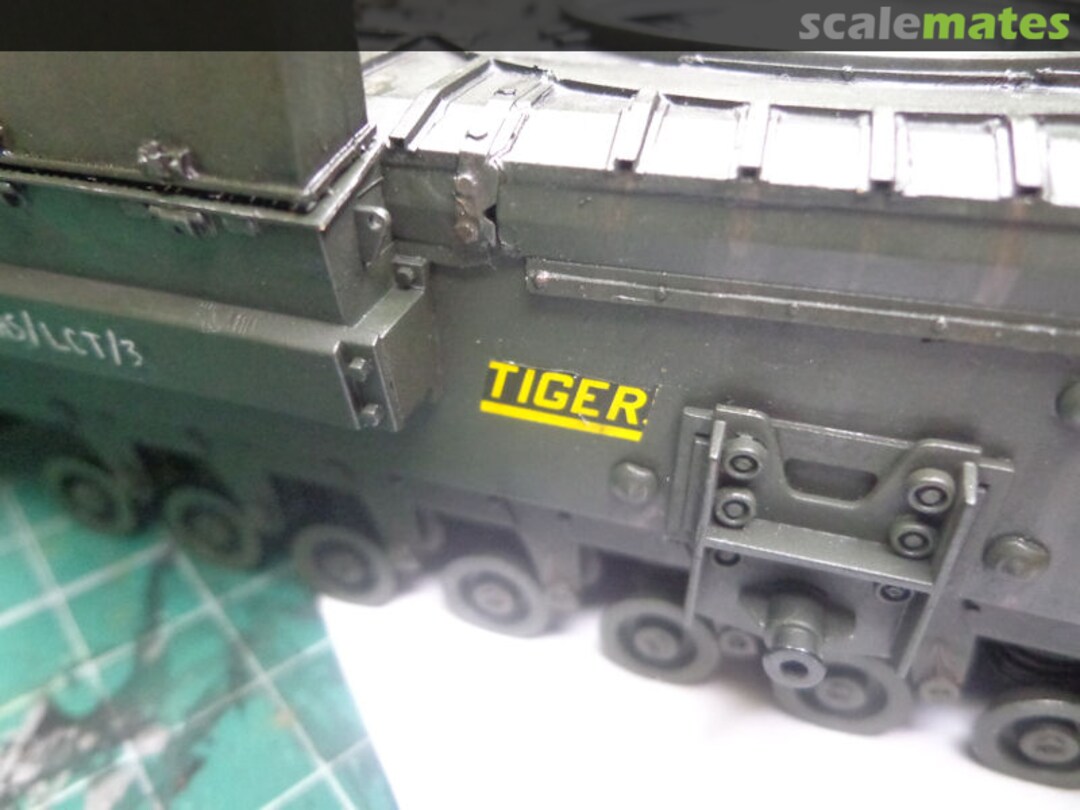
The wading gear will have to wait because of its frailty, but the clearance holes I just made had to be undone. It meant that I could engorge myself on the Voyager fender set. Amazing how easyly this comes together.
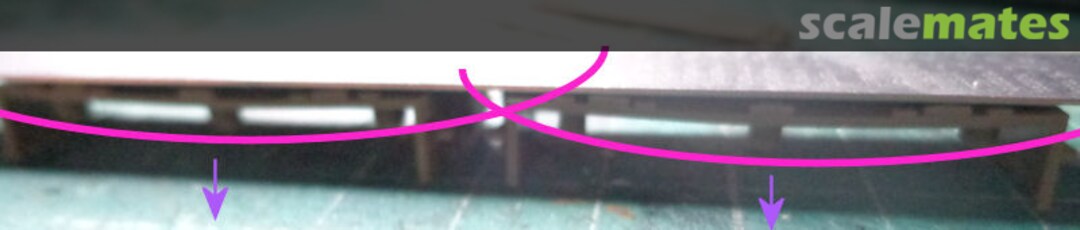
3 July 2015, 20:48
I just compared to Primeportal pictures and it really pays off I'd say. [img1]
3 July 2015, 21:42
The large parts were pretty easy, but the ribs are a pain to ply. Still more than 25 to go.
4 July 2015, 22:50
And all done. The fenders must now be connected with bolted strips.
5 July 2015, 21:51
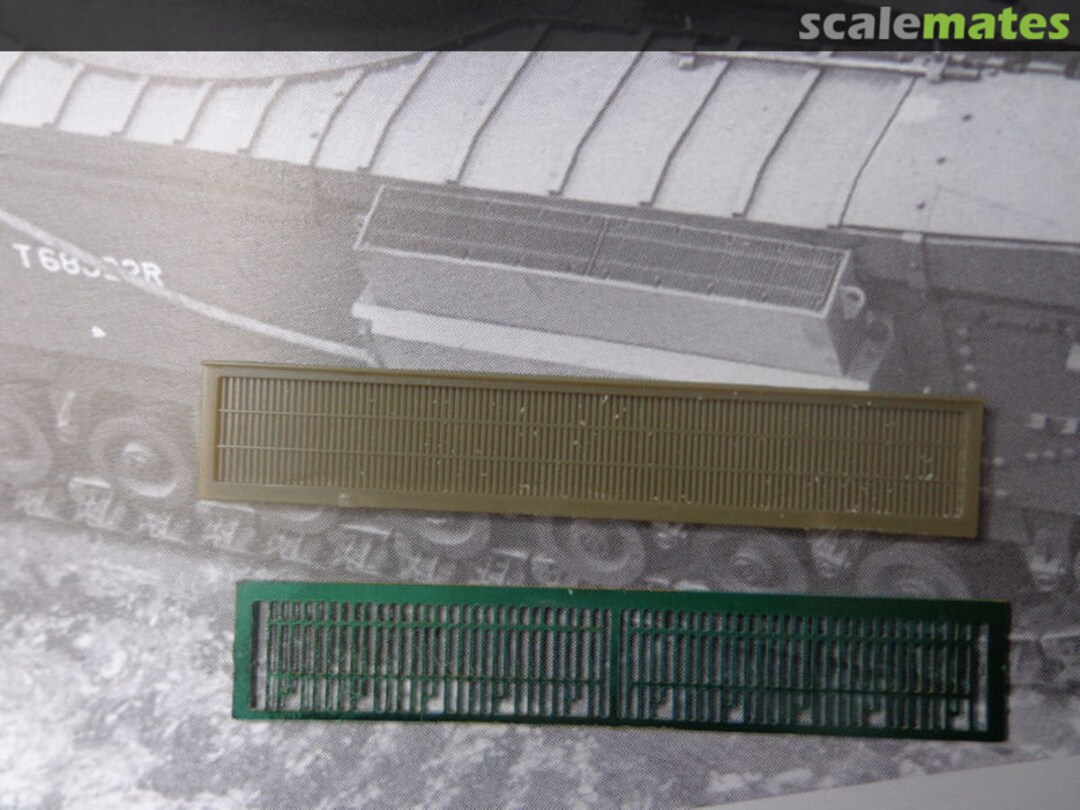
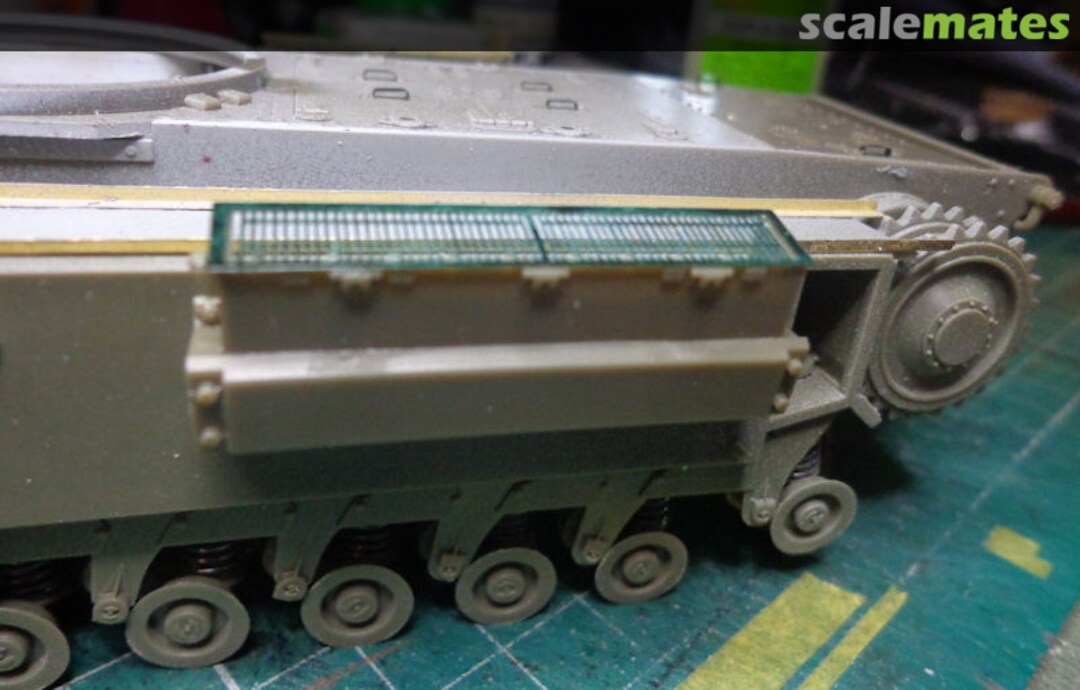
Yes, but it's strange now it's done. Where to begin now? I looked at the aft section and replaced a poorly made grille.
6 July 2015, 22:08
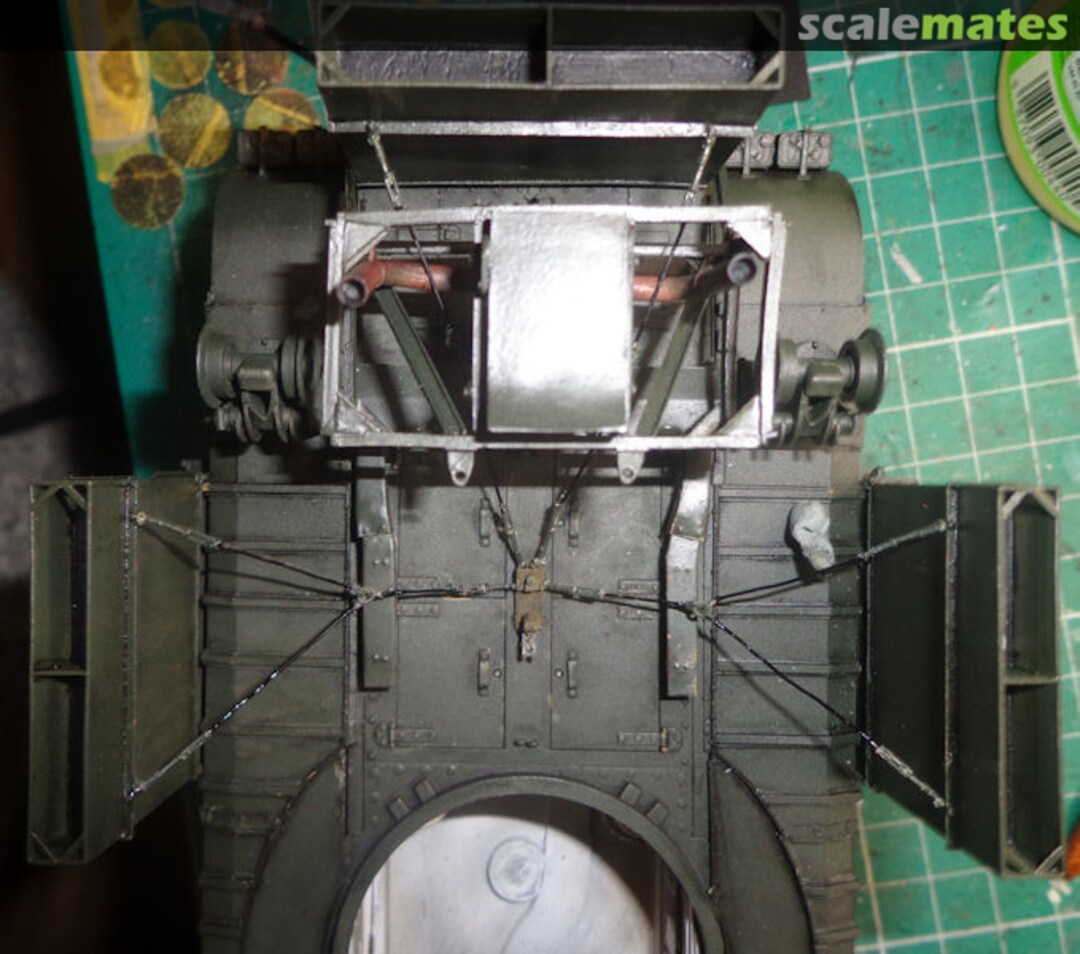
Here I found some stuff to improve. I had to discard the Airwaves upgrade kit, it appeared overscale. So I had to scratch the 6 door handles to the engine compartiment. I also had to counter some warping of the exhaust system. The smoke grenade launchers were fine though.
7 July 2015, 21:32
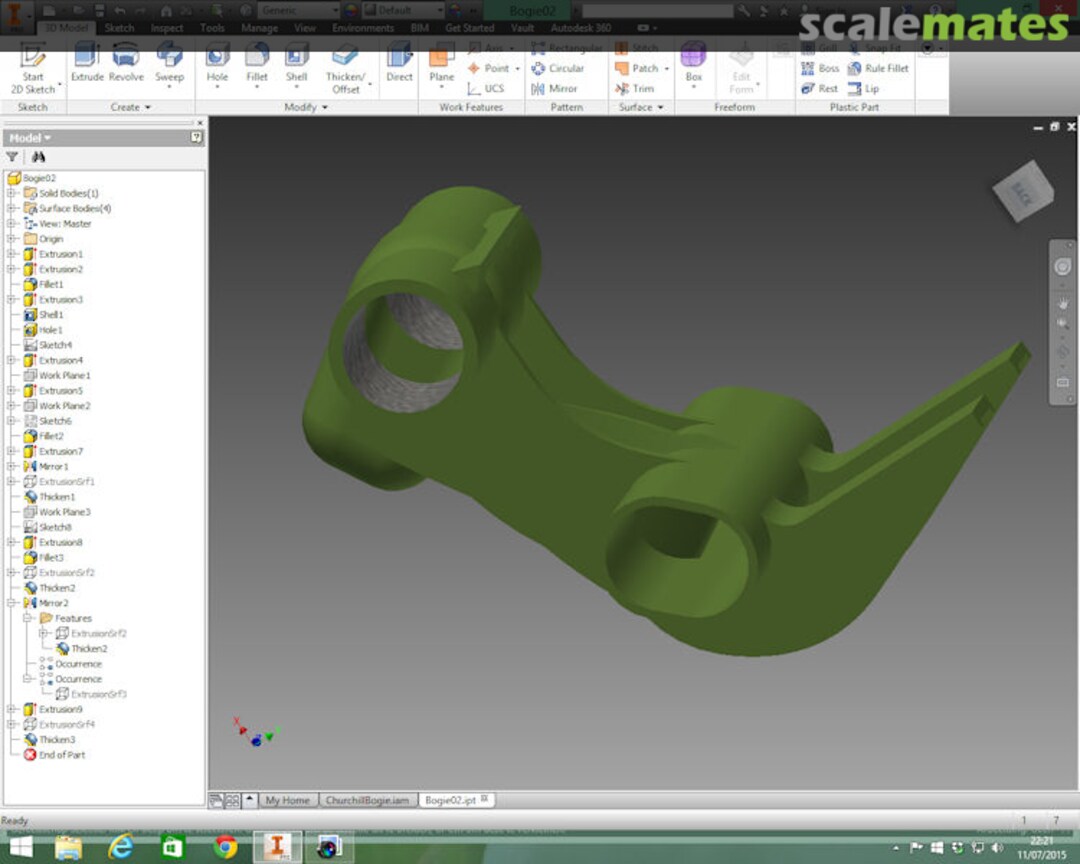
I used a piece of Airwaves PE for the exhaust system. I'm also converting plans and drawings to 3D-parts in Inventor, so there will once be a Churchill + SBG in 3D. When it's timed well, it can be used as a template to assemble the bridge parts.
8 July 2015, 21:59
Turret interior has been partially assembled now. CAD drawings show the suspension system.
11 July 2015, 23:09
Turret interior improved, but apparently some Mk.VII treats have sneaked into it. It probably won't be visible at all.
13 July 2015, 20:56
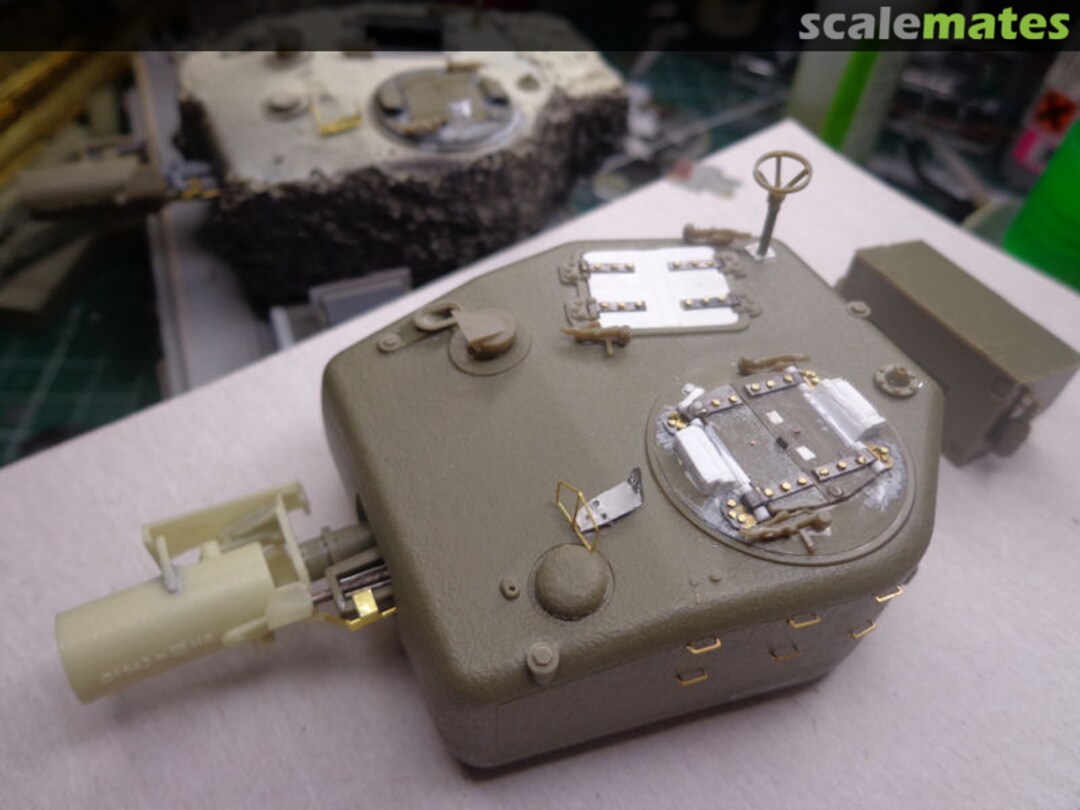
Today I repaired a faulty resin turret hatch by undercutting the ring and resetting it.
15 July 2015, 19:47
I found some diorama material and I changed the mortar elevation system.
17 July 2015, 19:04
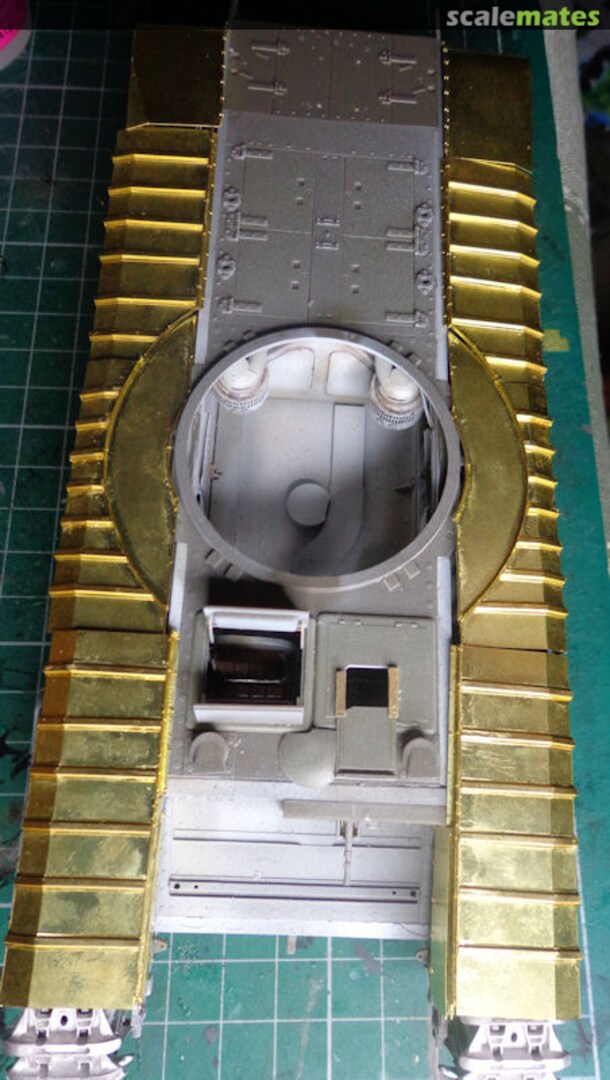
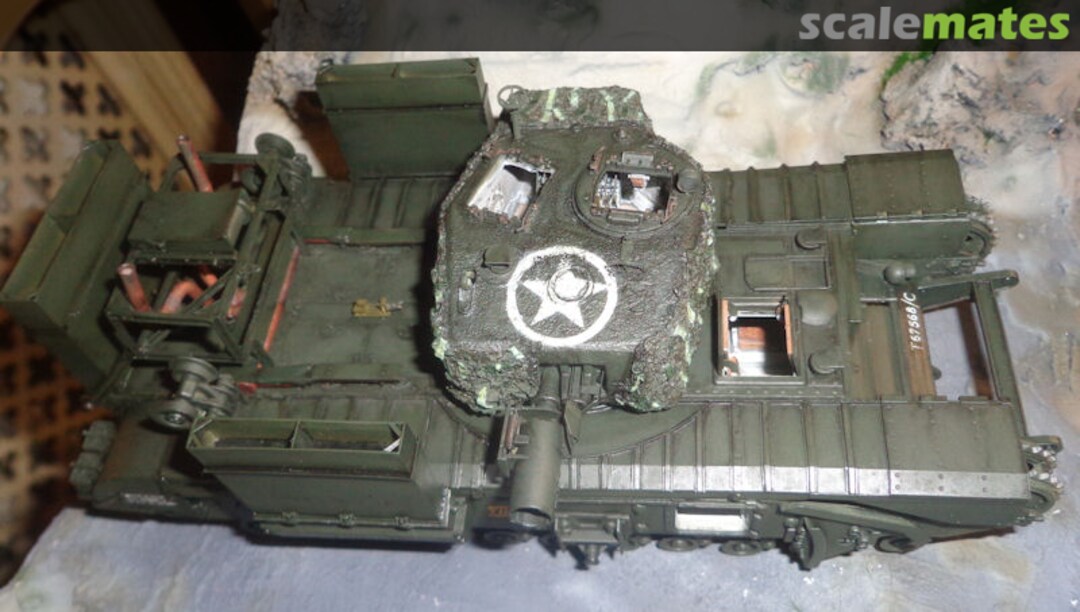
Soon the Churchill can be closed down to start working on the exterior. The inside of the urret is painted in Gunze Off-white.
18 July 2015, 15:04
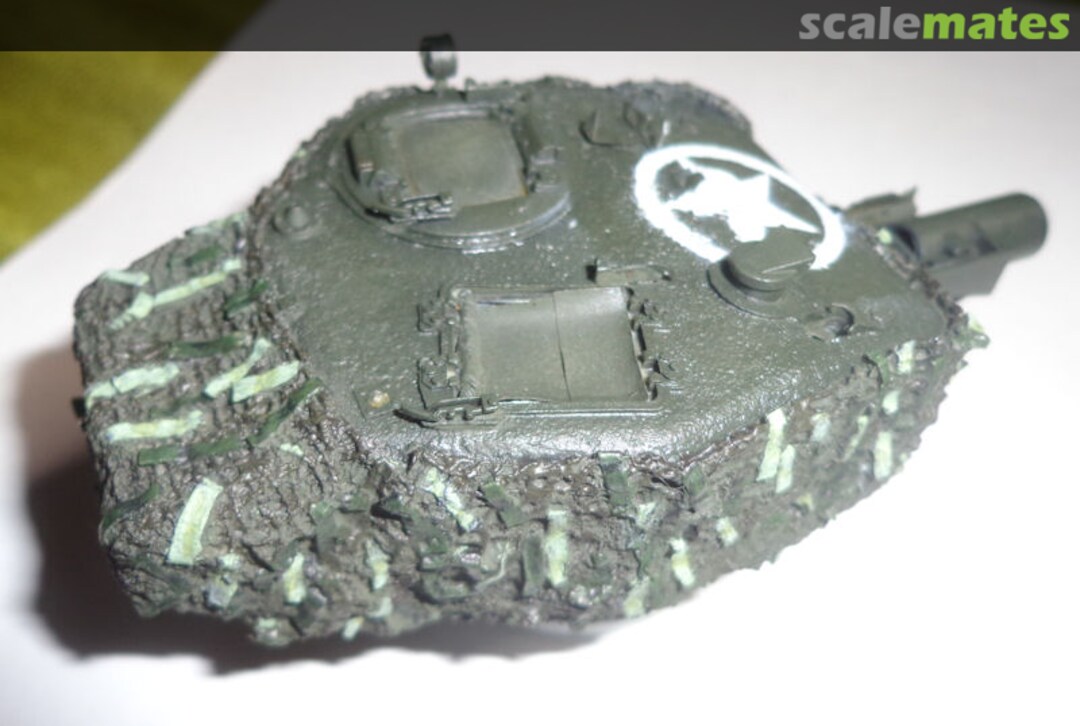
Thank you, Kevin. Today the turret was glued shut after a chipping session.
19 July 2015, 08:59
I built the petard mortar and the Resicast toolclamps. I also drew a tracklink and made an assembly with the sprocket to test it.
23 July 2015, 00:40
For the second Churchill in the diorama, that will represent the Graye-sur-Mer event, I assembled the unused kit turret and started to backdate the second, post-war commander hatch periscope ring to Mk Iv conditions. The spare bogies are for the first model.
24 July 2015, 21:05
Steven, How about putting some text with your images, as it's hard to guess what you doing in the images you post.
Cheers mate 🙂
24 July 2015, 21:08
I know it's possible. Scalemates is the third site in a row I update every day, but the principle doesn't fit the format of the first two sites that are in phpBB and have the pictures and text in one field. I tend to generalize the info in these comments.
24 July 2015, 21:48
Now the complete turret is duplicated, minus the Hessian armor. I might add the styrene fenders under the water surface, but I have no extra idlers so the water will have to be quite opaque.
27 July 2015, 19:28
Now first some black primer, so I can mount the brass fenders before I start building the fording equipment. Tomorrow I'll spray it Dark Green XF-61, which I chose as the base color for the Churchill.
29 July 2015, 21:52
Thanks, Gareth. Things are looking green now. That means I can assemble them before I weather the exterior.
30 July 2015, 14:47
Thanks, Christian, yes, it's getting underway now. In this update you can see the fenders assembled. This Tamiya paint doesn't stay on very well when manipulated. That should be adressed with some p+.
30 July 2015, 21:44
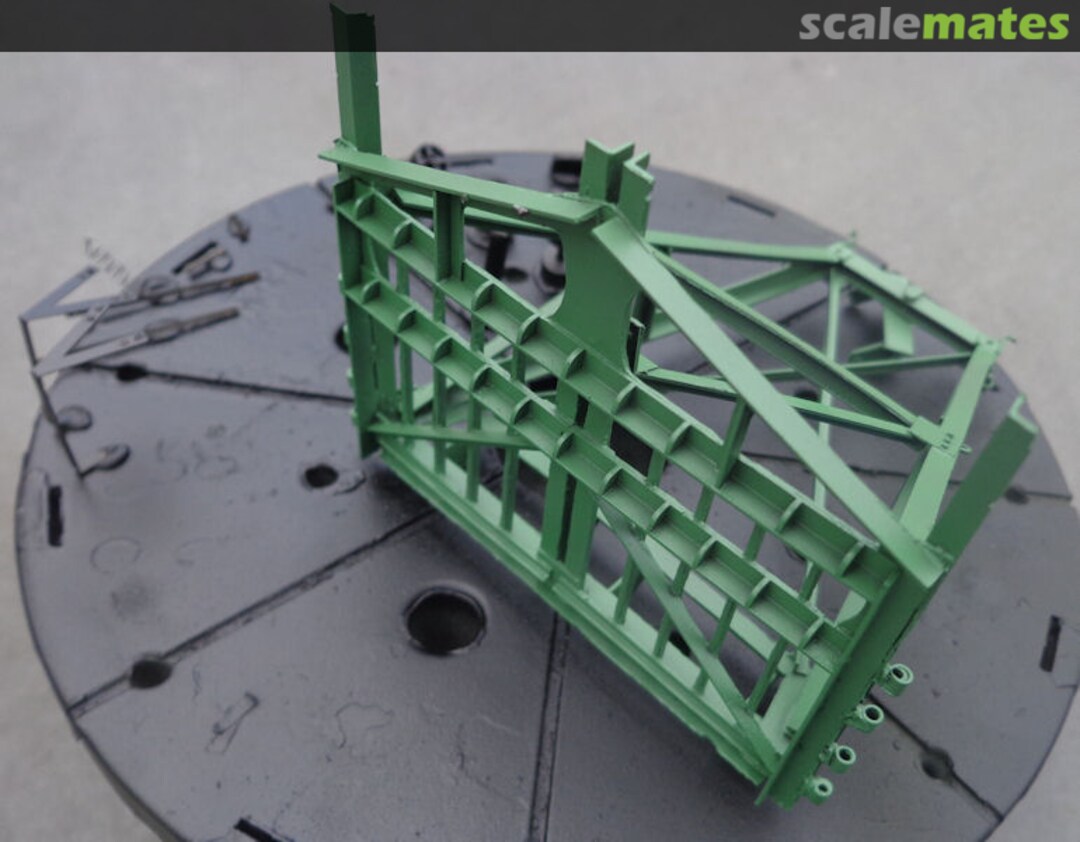
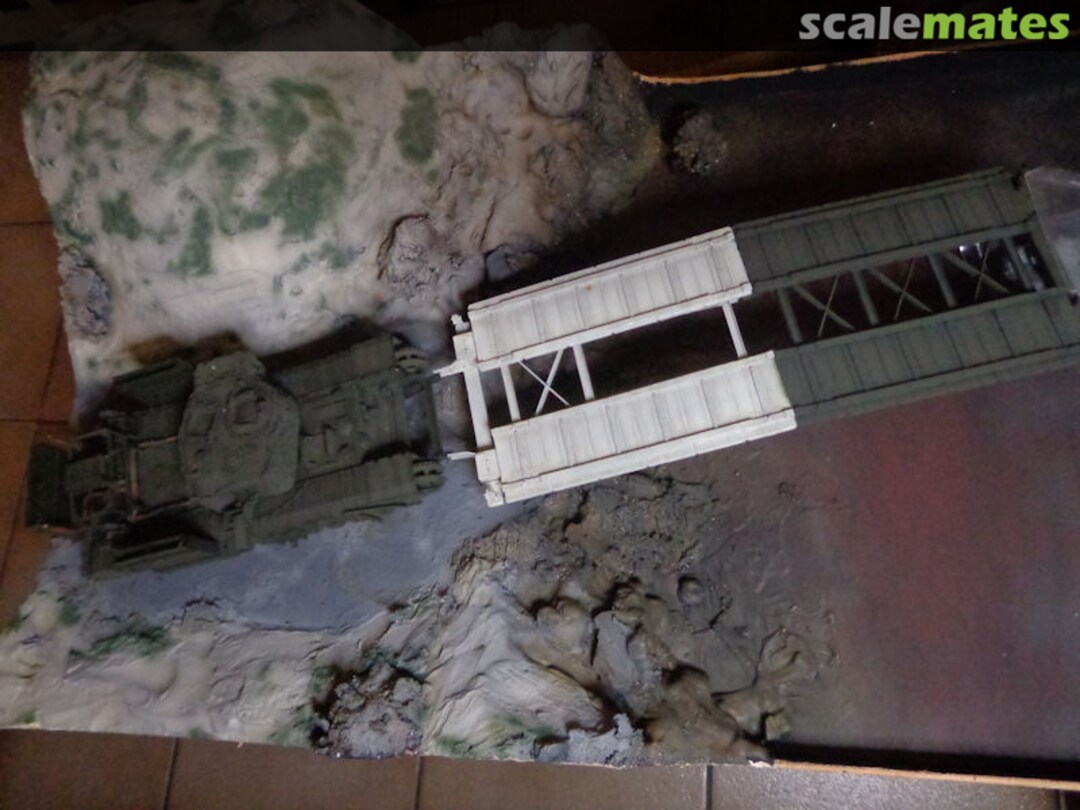
The bridge is taking its form. I had to use a different kind of styrene girders, I got L-irons and British Pathé shows T.
3 August 2015, 20:44
The bridge had a symmetry problem, so I sanded down a particle to solve it. The winch is also ready. I bought a CRP resinkit of a Cointet-obstacle to put on the diorama, but it needed a lot of de-flashing.
4 August 2015, 22:53
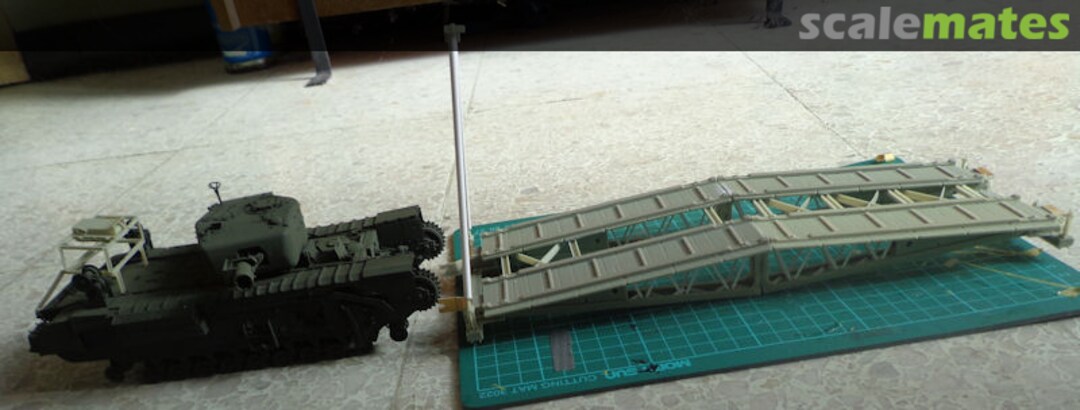
I made a setup of the tank with the bridge. Tomorrow the bridge will be primered black.
6 August 2015, 23:10
I assembled the Belgian Gate and also painted one bridge element white.
7 August 2015, 20:46
The Belgian Gate is painted according to the instructions. The bridge is now completely painted and the tank is also faded and go the deep wading gear and the exhaust system.
9 August 2015, 22:17
Goed bezig Steven. Volg je ook al op MB. En je laat me versteld staan.. GreetZZ
13 August 2015, 03:57
Wow! Great job going on there, Steven!! 👍 👍
And yeah, like Wim said, how could I have missed this project 😮 British armour! I love it!
13 August 2015, 07:55
Jullie kunnen nog aanschuiven, er komt nog wat moois aan...
Figures have been painted Vallejo Dark Earth.
14 August 2015, 22:35
Holy cow! That's a lot of figures! 😄 can't wait to see how they turn out 👍
Time for a bag'o'popcorn 😄
15 August 2015, 07:40
It's a nice thing to have some followers. Today I painted the figure's faces and hands in skin tones, on a red primer.
15 August 2015, 23:11
I am following with great interest! 🙂 👍
Since my figure painting is quite bad, it will be very interesting and helpful to see how you paint your figures 👍 Thanks for posting the first intermediate steps!
16 August 2015, 07:58
Quite a project you have going, Steven. Impressive so far and I'm following with great interest! Turnhout 33°C, mooie zomer!😎
16 August 2015, 08:20
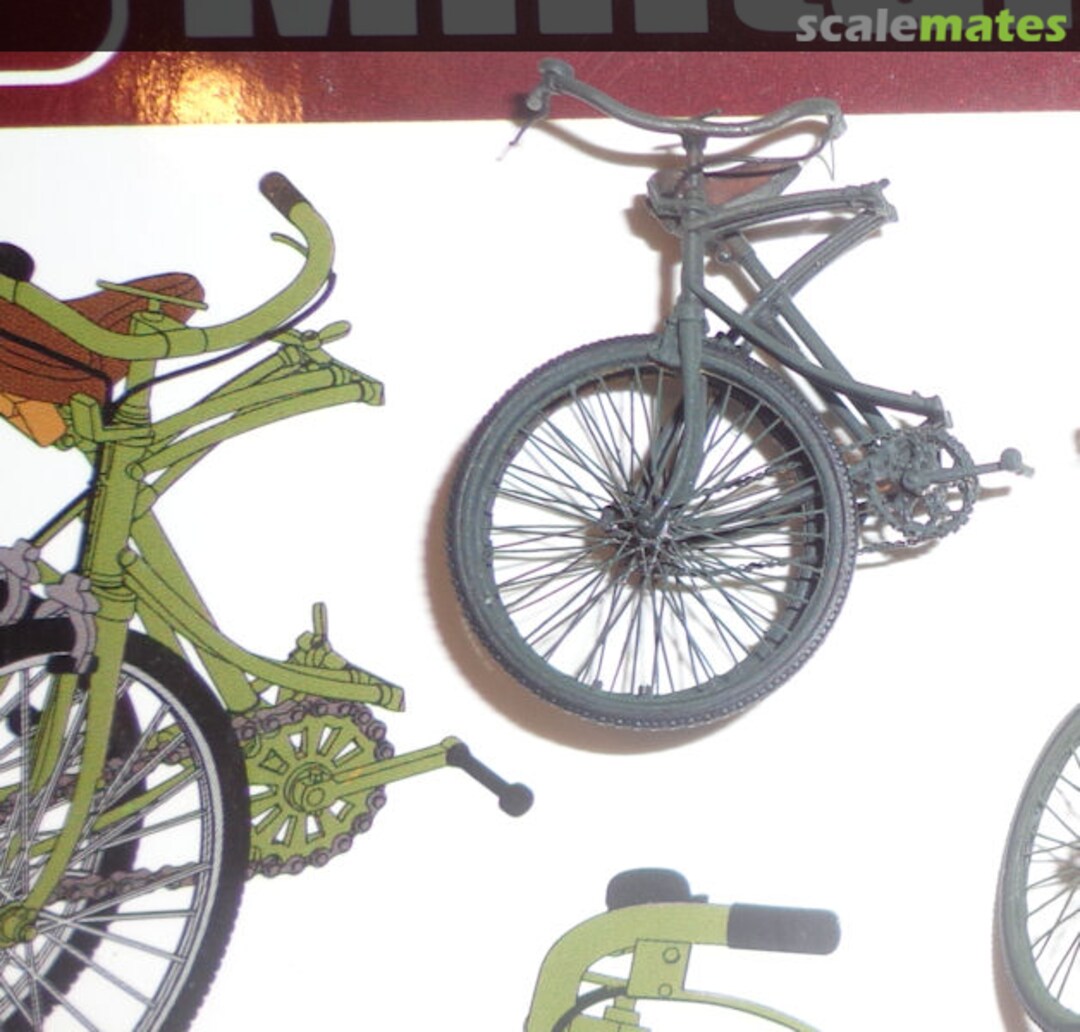
Thanks, John and Frank. For the moment, temperatures have been dropping... I've started the Diopark bicycles. The base plate is showing a large crater now. It also features a hull stabilising system. Two cables will be wound around this axle and connected to the hull. A hole in the base plate's bottom will allow the tensioning of these cables. It will prevent the model from toppling over and even imitate the strain on the first bogies.
17 August 2015, 20:56
Time for som landscaping. I was hoping to get more cream from this can, but eventually it will expand some more. Not the promised 7 litres, though. My brother is doing some plasterwork in his apartment, time to nick some of his plaster.
18 August 2015, 20:04
Hehe😉 Yeah, plaster is the foundation of all landscape modeling projects. Friends and family beware!😉
It's great to see all the pieces fall into place through your photos 👍
19 August 2015, 04:59
I admire the skill and patience required to make a model like this. Makes me wonder when doing so much detail is it ever enough to the point you are truly satisfied? Looks amazing Steven!
19 August 2015, 05:37
Thanks for these inspiring words. Often I find things to improve on the model, but it's too late to incorporate it. When I think I made something different, it gives a lot of satisfaction. Today I started scratching the upper hull for the fascine carrier. Thank goodness it was almost unvisible, so I only make the top part.
19 August 2015, 23:17
I got me a bag of plaster and started casting. Soon you could recognize mud and sand in stead of wood and plastic.
20 August 2015, 19:59
So your brother is happy with you 😉 and is now missing a piece of plaster somewhere in the corner of one of his walls because he ran short? 😛
Kidding aside, this is very cool! It's definitely and visibly shaping up. We can see where it is going now. Awesome! 👍
21 August 2015, 04:51
No, John, I didn't infringe on my brother's real estate, because the stuff I needed was already passed to a friend. I had to buy an additional 5kgs of it. Some of that will also serve for the next diorama that is already planned, a piece of Vietnam township that will depict a VC assault on a convoy with an M151 and a V-100. By now the plaster is already painted with Vallejo Air.
22 August 2015, 21:28
One fascine rack scratched. This was the easy part, now for the fascine...
23 August 2015, 22:13
The engine deck scratched, lots of bolts cut from styrene rod. It was impossible to drill this Trumpeter 1/32 Swordfish PE, but it was thick enough for the job.
24 August 2015, 22:32
That looks awesome 👍 I would go crazy trying to work with tiny pieces like that😉
The fascine rack looks great as well 👍
25 August 2015, 06:46
Thanks, John. For that reason, I also make some very large pieces. Today some grass was sowed and the water darkened with Panzer Aces Shadows Flesh. The figurines are masked and painted some lively colors.
25 August 2015, 19:07
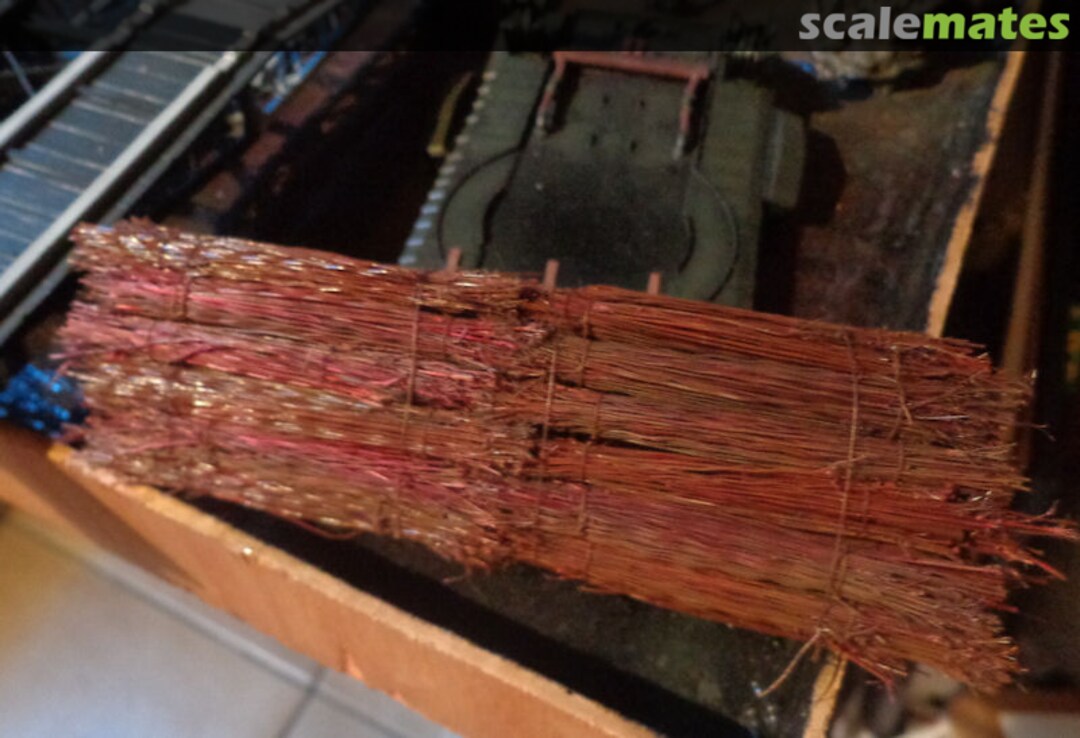
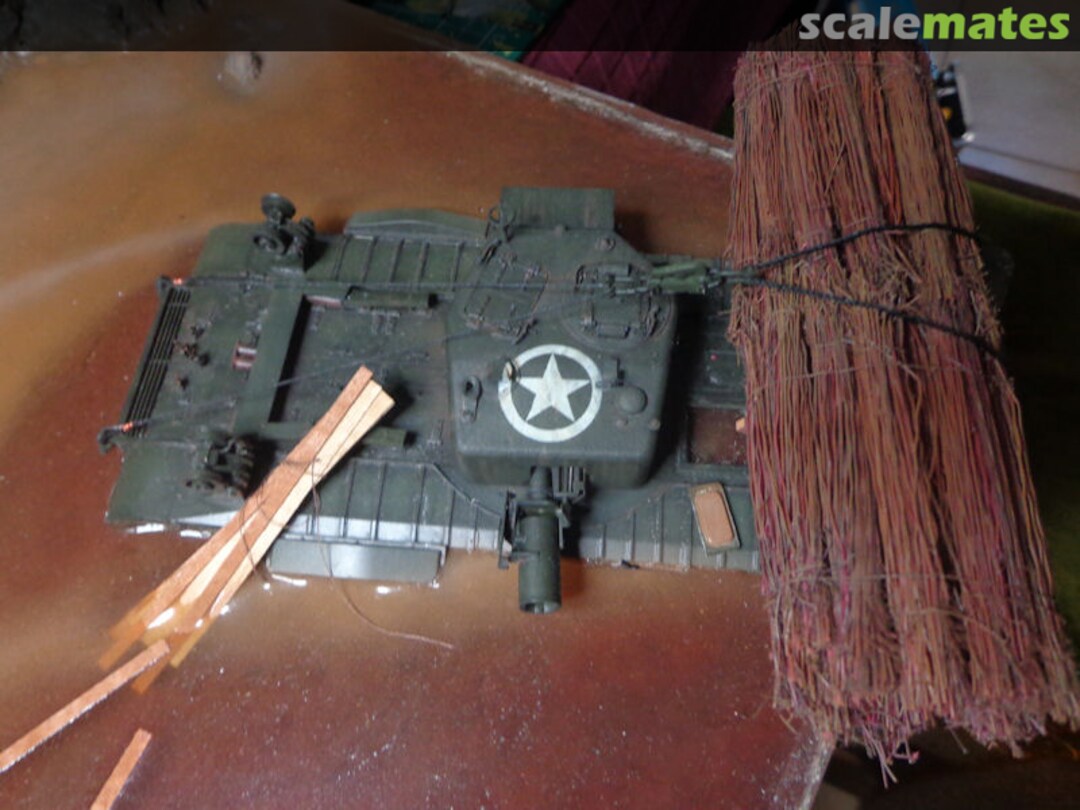
In the process of making the fascine. Just found a worn-out brush coarse enough for the job. Some aluminium tube is used for the second tank's exhaust system.
27 August 2015, 20:05
The brush is transformed in four dozen of fascine bundles. It's not sufficient but it will have to do. The tank got it's fenders and rear deck ready, but for the tools and the spare bogies.
30 August 2015, 20:50
Scratching some spare bogies for the fascine tank. Now I only need the suspension springs.
4 September 2015, 23:00
Steven, the amount of attention you are giving to your work is amazing. So much detail! 👍 great work on the bogies and the fascine bushes 👍
Maybe you can use the spring of ballpoint pens for the suspension?
5 September 2015, 06:48
Thanks, John. For the production of these springs I use templates like 5mm drills, parts of the plastic suspension and pieces of sprue. Some of them turn the other direction according to regular springs. All of these bogies had 4 concentric springs and I found this an important detail to reproduce. Especially when the spare bogies are turned upside down.
5 September 2015, 13:47
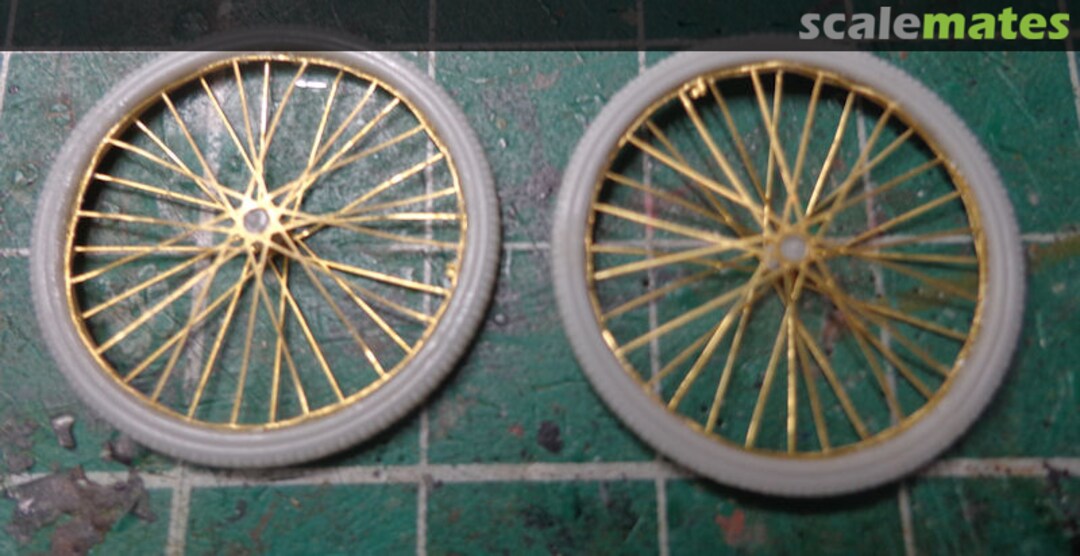
The second tank is primered now. Soon it can be painted green like the other one. The weels are reproduced nicely and the fascine rack has been shortened to fit on the dio.
6 September 2015, 22:05
The second hull is painted green and the tracks have received a grey overcast to show wear.
9 September 2015, 20:02
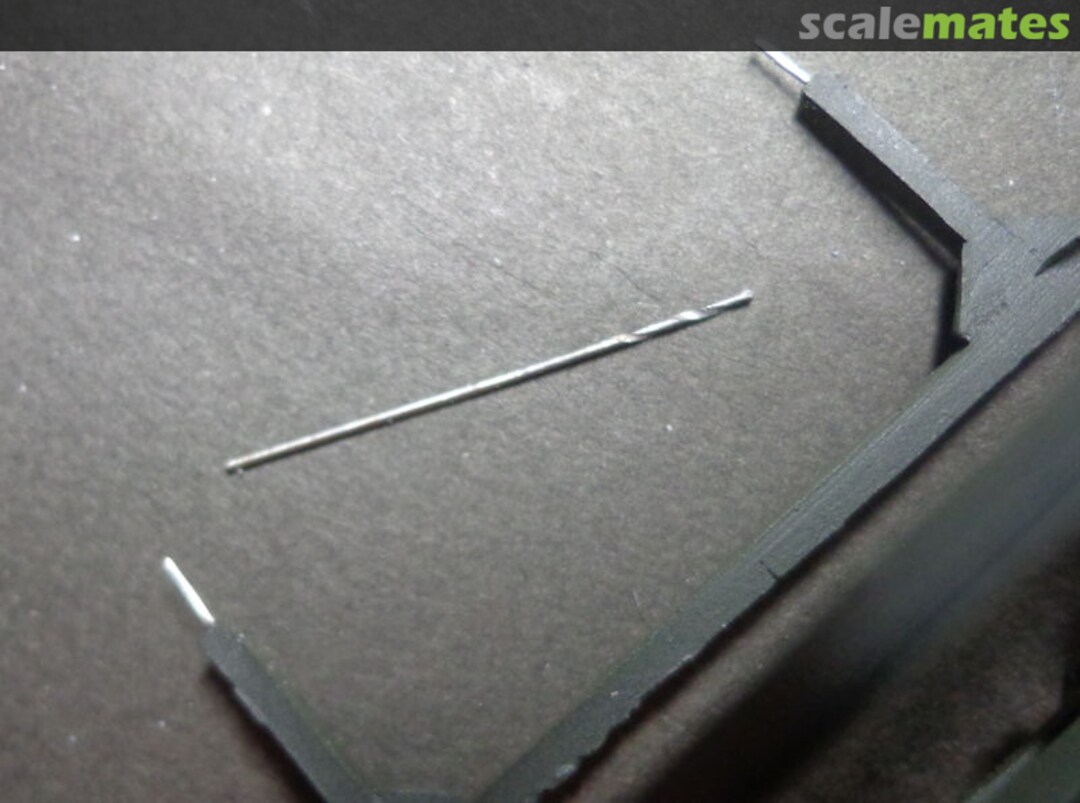
The bridge hauling system needs proper reinforcement to stay put on the hull once the pulleys are being installed. Some wire is inserted in the resin. There was a confict with the exhaust stacks so these are removed for adaptation. The tubes for the fascine are made very rusty.
10 September 2015, 20:46
What an impressive build! Looking forward to the next update
10 September 2015, 20:55
Thanks, Wim. Today I made a lot of progress on the painting. The bridge got the necessary white marking, the pipes for the fascine got rustier and a lot of stuff is painted in the base color. The fascine tank has been shaded now.
27 September 2015, 19:43
Could it be correct I saw your progress in Gorinchem this weekend? If not you have a copycat 🙂
28 September 2015, 05:23
You saw that correctly, Jan. I hope it satisfied your expectations! But the last progress with the white markings happened yesterday, after the show.
28 September 2015, 16:27
The tanks are now covered in a shiny Parket Plus coat to put some decals and weathering on. For the sunken tank I needed to reproduce the decal with a masking.
4 October 2015, 19:28
Hi Steven, can you show what "shiny Parket Plus" are you using in that coat? Thx
5 October 2015, 11:47
It's just what you probably call Future. It's a water-based gloss coat actually designed for treating wood. It's a bit yellow if applied too thick, so don't use it on white surfaces. I hope it will protect my base coat against some aggressive chemicals that will be used, like filters and epoxy resin casting products.
5 October 2015, 15:39
Thx Steven, but we don't have future in Portugal, that's why I was asking for more details?
5 October 2015, 15:46
I know that it is called Sols Plus in Belgium and Parket Plus in Holland. It's being replaced by other products because the formula has changed, so it's probably hard to get at the moment. I heared some people use a brand called HG, nr.51.
5 October 2015, 16:44
Here is the MSDS sheet from Johnson wax. It only has 4 major ingredients. Must be something similar in Portugal.
5 October 2015, 17:21
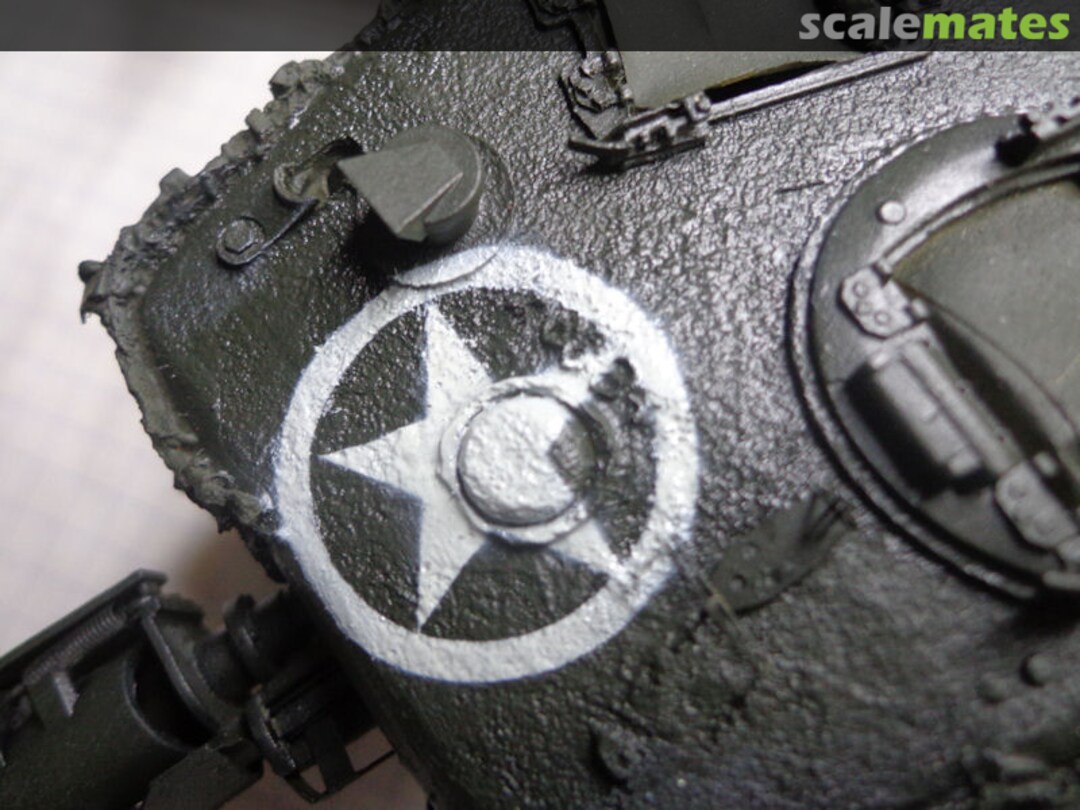
The Czech Hedgehogs are treated a dose of hairspray because they have been sitting in the marshes for months. The insignias are sprayed on in stead of the AFV decal, I mistrusted it on the bumpy surface of the resin turret.
10 October 2015, 20:48
Still watching this amazing project! 🙂 Great progress, Steven! 👍
3 November 2015, 19:54
It definitely does 🙂 and it is really interesting to watch it all come together! 👍 👍
4 November 2015, 05:43
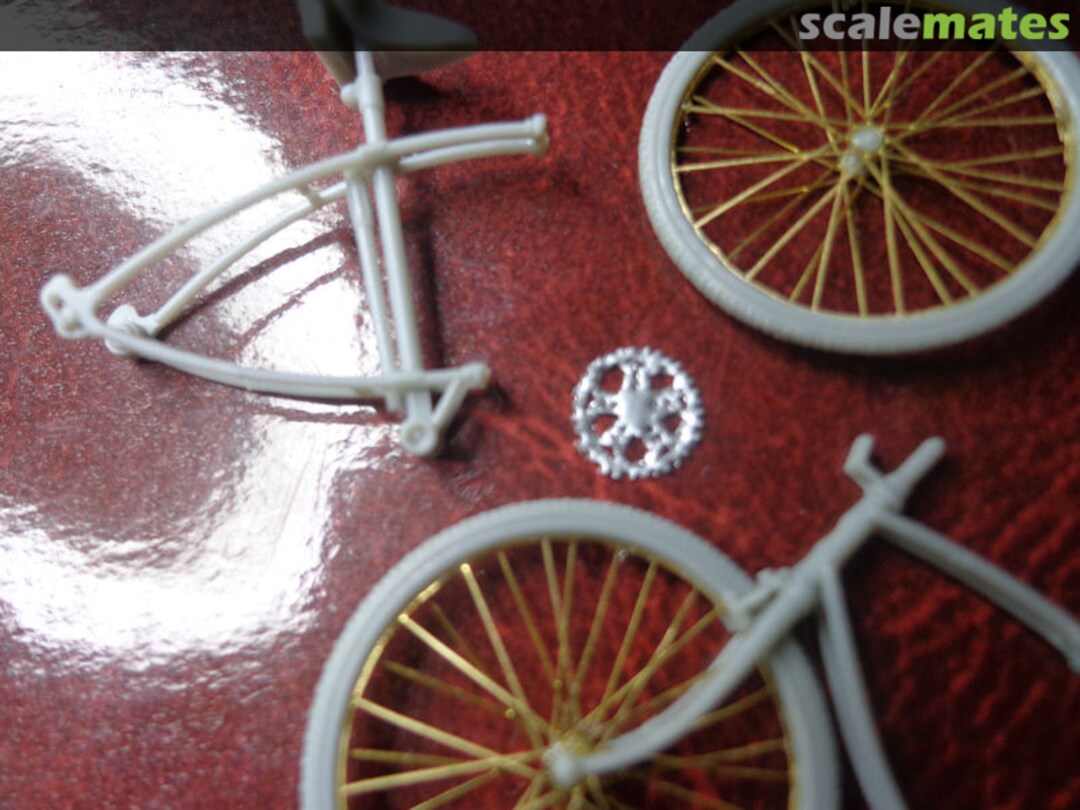
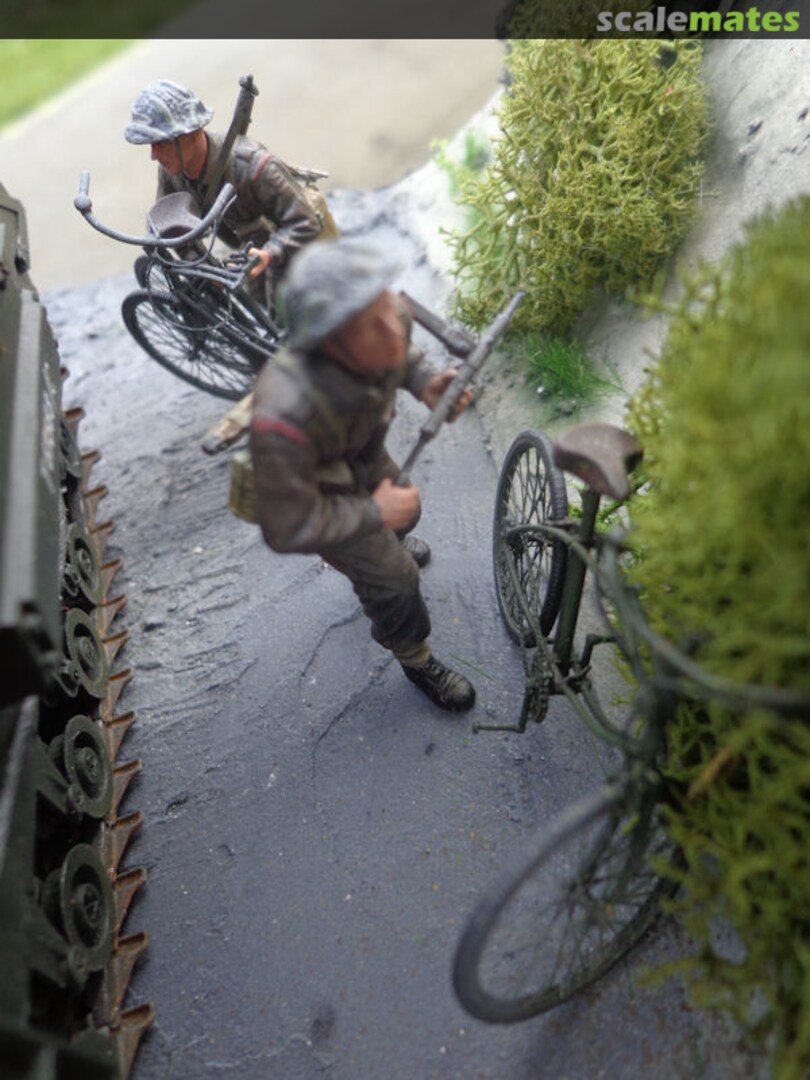
One of the bike is standing upright. Painting will not be straightforward, I think.
5 November 2015, 23:31
They look really great though! 👍 But yeah, painting them will be kind of a challenge I think😉
6 November 2015, 05:50
Dragon's Welbike joins the show. It's unassembled to facilitate the painting. Not all the photo etch parts return in the manual, though the droptube container is fully opened.
8 November 2015, 23:18
The tank and bridge are fully washed with Mig Nato Wash. The tracks got a touch of enamel rust. I'm a bit drunk on benzine now.
19 November 2015, 00:27
The Bowden quick release system for the wading kit is ready. It cost me hours to connect everything to the stacks correctly. Wouldn't recommend this job to sane people.
3 December 2015, 22:37
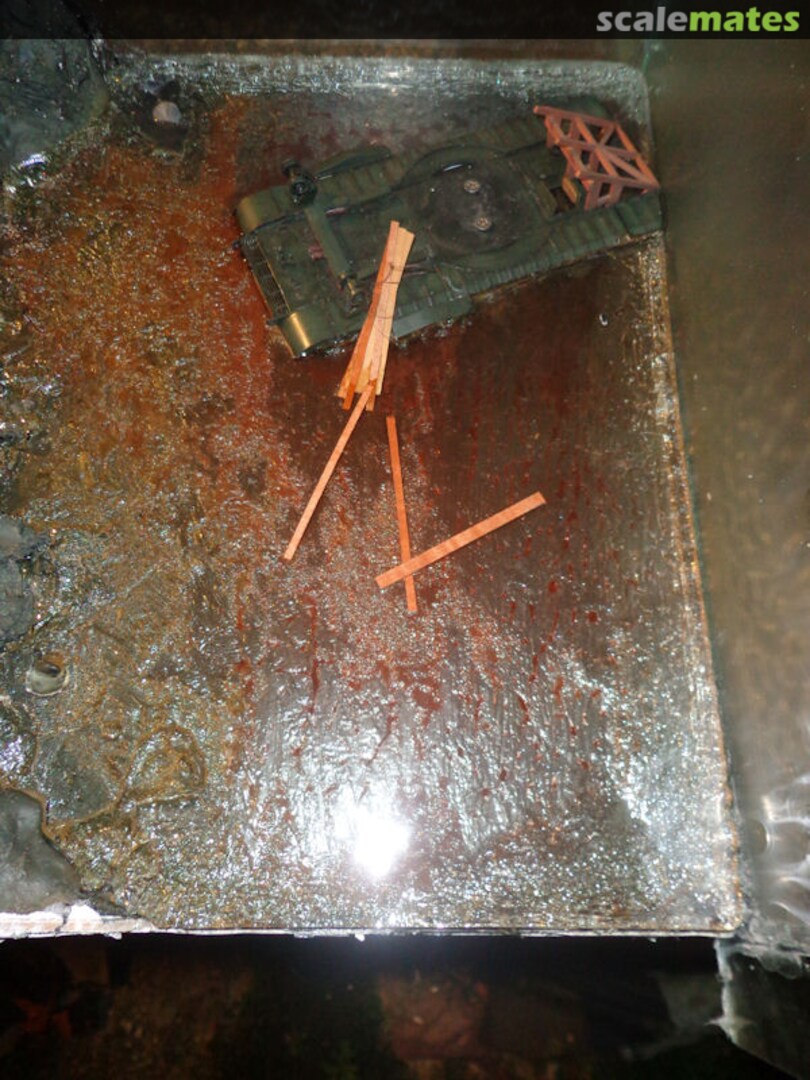
Some time has gone by and another year has arrived, but I haven't been partying all the time. The diorama water has been cast with one kilo and a half of Vosschemie GTS clear epoxy resin. That was a first for me. I cast it in three layers with half an hour between, with glass panes sprayed with a loosening agent as a mould. At first it seemed well done. I had chopped some planks to throw in the water, as part of the stowage the Churchill had with it. After three hours I went looking for the result. It appeared to be a miserable failure. The resin had been cast into a painted reservoir that was covered with a layer of silicon to be able to do some testing with water before I would risk pouring the costly resin in. That had paid off in making me realise half a kilo wouldn't suffice to immerse as little as half a centimeter of tank. But this silicon had prevented the resin to attach itself on the right half of the diorama. On the left, it had a better grasp because of the tank attached to the bottom. The resin had curved itself away from the silicon and even the plaster earthwork. That left a crevice of almost half a centimeter under the right half of the cast, dispersing into a large number of shiny bubbles and drops of painted goo. The only merit of my work seemed the surface of the resin, that was impeccable. It didn'n touch the landside because of a continuous crack. For days I pondered how to solve these unexpectd problems, it wasn't announced that the product would shrink this much or had to be cast in any layers. The solution was quite rigorous: I had to reach the unattached parts of the cast. For that, I had to sever the thick multiplex plank under the diorama on exactly the line where the cast had to be painted to look like quicksand. This was mentioned in the D-day report about the Graye event. I sawed through the bottom of the diorama and eventually after hours succeeded in liberating the bottom part of the cast. It was a little sticky but perfectly clear. After removing the pink goo that remained on the surface, I was able to spray the bottom of the cast in successive layers of red brown and sea blue to create depth in the water. All turned out quite well. Finally it seems that the base for this diorama is tuning the right way... I'll have to make sure the lost piece of wood is replaced with something firm to protect the cast towering over the floor. I also have to fill up the cracks with Vallejo Still Water to be able to level the cast for applying the quicksand. Only then can the other constituents of the diorama be positioned...
9 January 2016, 00:03
Come again, Donald? Maybe you misplaced a reaction from a different topic? In the meantime, I painted the dio water so it would look muddy.
12 January 2016, 17:22
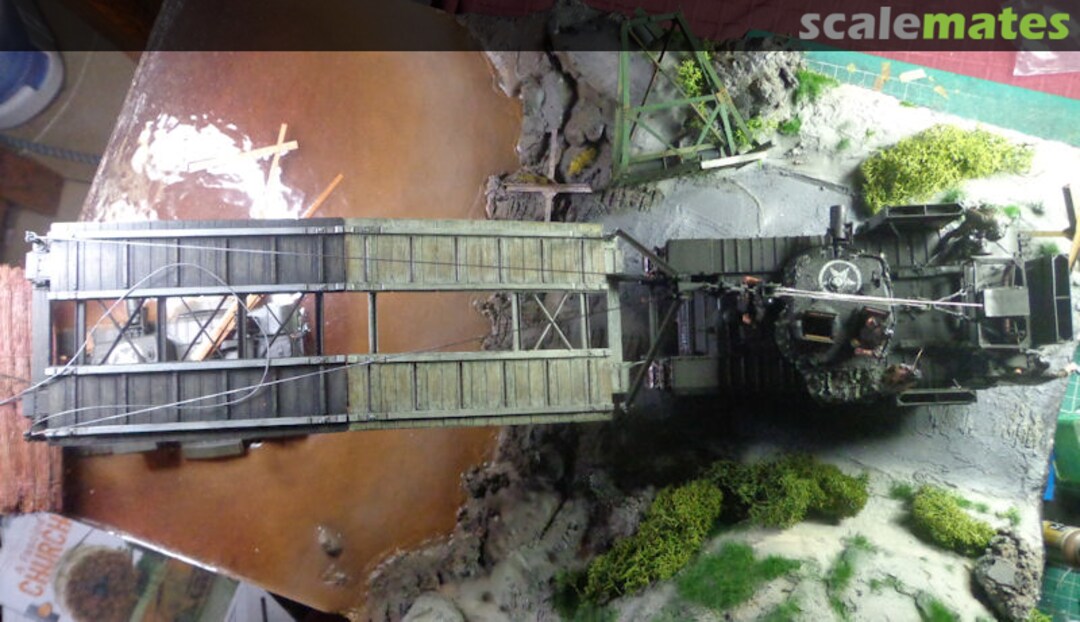
The bridge is hanging by a thread. After some meddling with the resin parts for the ends of the steel cables, I decided to get rid of these and use only real thread. The fascine tank is ready but for some little parts. The crew is only a dry-fit. I like the way this is looking...
21 January 2016, 01:10
What an unbelieveable intense project, Steven! 😄 How could i miss it? You put so much work and sweat and elbow grease in it, astonishing!!!
The face-painting and scratch building, the small details in and on the tanks - top notch! Let alone the bikes look awesome! Great dio but i have to watch it many times to catch all the details...
Bravo!👍
27 January 2016, 13:33
Thanks for joining, Holger. I just finished the stencil for spraying the dio name on the sidewall.
27 January 2016, 23:11
The last update. Some details were added, tomorrow I'm planning to photograph the diorama outside.
3 February 2016, 20:20
I´m looking forward these pix! Hopefully you have some better weather than we have here...
4 February 2016, 07:16
Holger, you don't need to wait no longer. And Denis, thanks for the superlatives!
4 February 2016, 15:09
The new pix are wonderful, Steven. I love the cool dude who´s hanging off the tank site with his big grin!😄
4 February 2016, 15:32
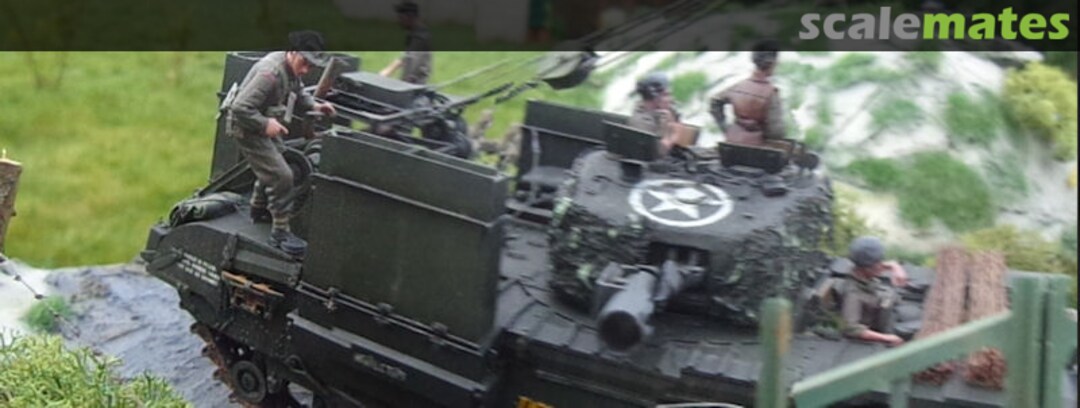
Yeah, that guy brought me some trouble. A number of times he kept coming loose, to the point he was standing on crusts of CA-glue... Some of those are hidden under that rope.
4 February 2016, 15:56
Just had a peek again, well done! I cant see anything under the rope👍
4 February 2016, 17:10
What a fantastic project this has turned to be! I haven't posted much but I'm enjoying every update you are making!
4 February 2016, 18:25
Thanks, guys. I've come to appreciate the Churchill now. Another funny came to my attention now, in a while I will build a Sherman crab too.
4 February 2016, 18:48
Steven ! What an enthrallingly awesome piece of work, the photos in natural light really bring it to life !!
fantastic work !! love it 🙂
4 February 2016, 18:51
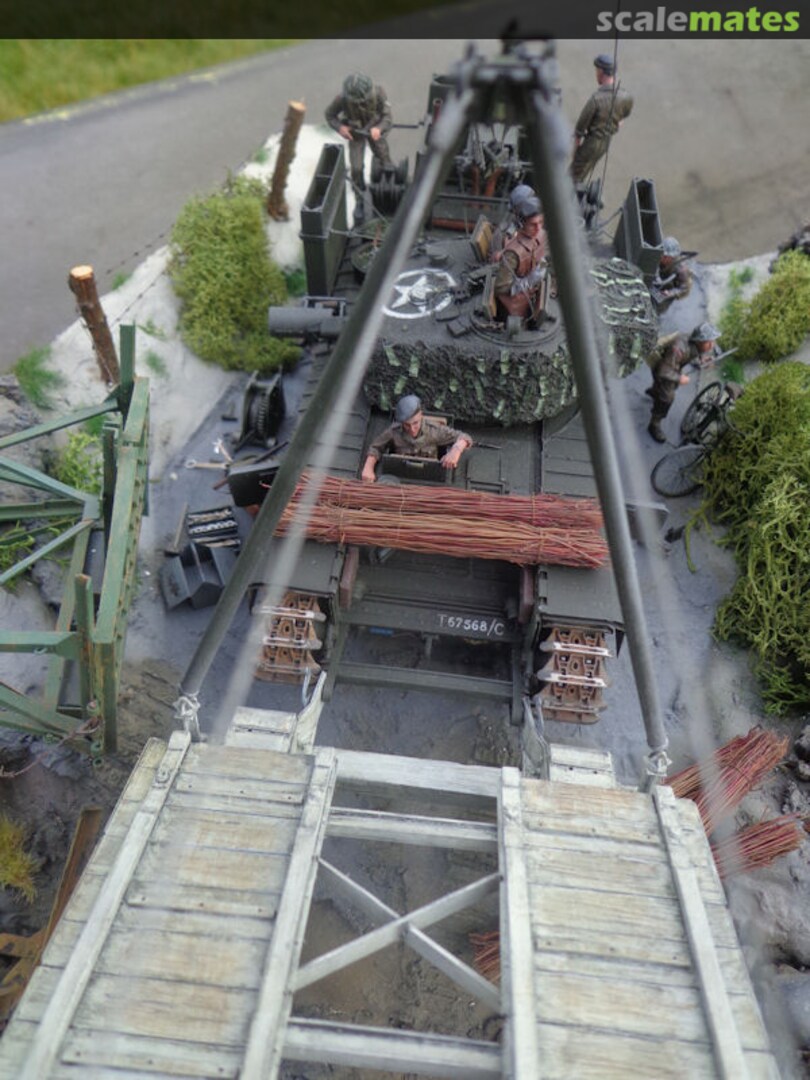
Thanks for the nice comment, Choppa! Saturday the diorama has participated to the IPMS Antwerp contest and it won a bronze medal and the Sturmtiger Trophy for the best military diorama of the show. I'm very pleased with the results.
1 March 2016, 00:14
Thanks, guys. Maybe an update in a few weeks, MCW Event will also have a contest.
1 March 2016, 09:55
What a crazy project this was... Congratulations! And also for the well deserved prize!
27 November 2023, 14:06
Great dio. Lots of lovely detail, especially the tools. The figure painting is great and the Churchill is wonderful. Great work on the track and camo netting.
27 November 2023, 18:52
Thanks for the renewed attention. The dio is still in my showcase after 7 years and the water is still shiny. Even this weekend I still bought some PE for the old Tamiya MK VII in my collection. I think that one will not get all the springs in the bogies.
28 November 2023, 06:35
Album info
This album will show the build of my AFV Churchill Mk.IV with SBG Bridge.


