

PZL.37Abis (seria I) Łoś (finished)


Comments
25 18 July 2016, 17:05
No idea what's gonna happen but I will follow this with interest!
18 July 2016, 22:17
Never seen such a detailed investigation regarding the Łoś 🙂
What's the source of the pics and infos?
21 July 2016, 07:10
Cześć Łukaszu. Dzięki za miłe słowa. Pudła z Łosiami leżą w piwnicy tak długo ze aż zapomniałem, że były w nich już blaszki Parta. Kupiłem rok temu drugi zestaw blach no i powiedziałem: teraz albo nigdy. Z "teraz" zrobił się ponad rok, podczas którego szukałem w internecie zdjeć i faktów. A jest tego nadzwyczaj dużo. Mam książkę "Samoloty września" oraz czasopismo z dobrą monografią Łosia. Niedawno natknąłem się w dwóch polskich forach na 2 bardzo ciekawe wątki budowy Łosi: PWM, Kuba Galicki oraz oraz na stronie Modelarstwo z pasją na której modelarz pod pseudonimem Jambus zaczął fenomenalnie budować model ale niestety wątek urywa się na wnętrzu kadłuba. Czy wiesz może, czy pan Jambus swój model skończył? Jak tak to czy jest gdzieś reszta zdjeć z budowy? Pozdrawiam
21 July 2016, 15:17
Hi Bernhard, thanks a lot for writing in Polish, but I'll stick to English as the messages may be not easy to understand for others (I hope you don't mind, I have the same with German messages 🙂 ). I did a quick research and unfortunately the topic by Jambus is not continued anywhere, but the guy is still active on the forum (last entry yesterday). So either I ping him via PM (yes, I have the login on PWM) or you register there - let me know what suits you best. MfG
PS. I found another unfinished build here: modelwork.com.pl/vie..4fc501f&start=45
21 July 2016, 19:17
OK, it seems to be a great project Bernhard, as always. Good to see Yours tips and tricks! Many thanks!
22 July 2016, 17:39
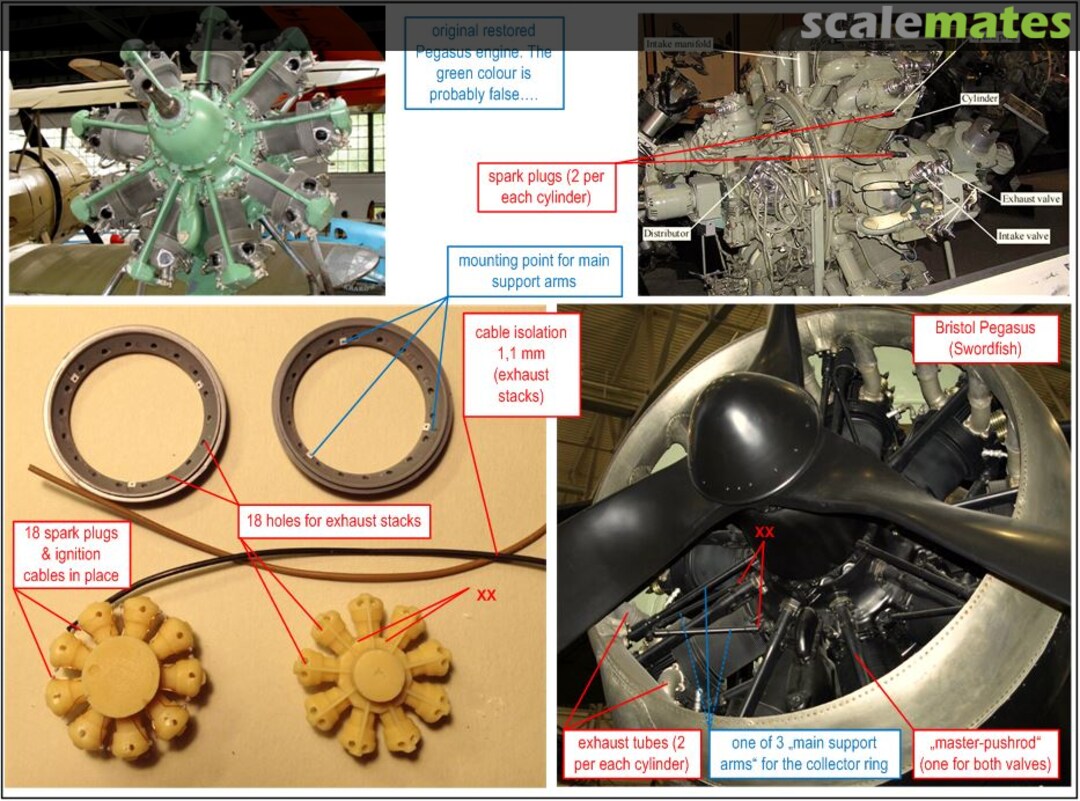
Meanwhile both engines, cowlings and propellers are completed.
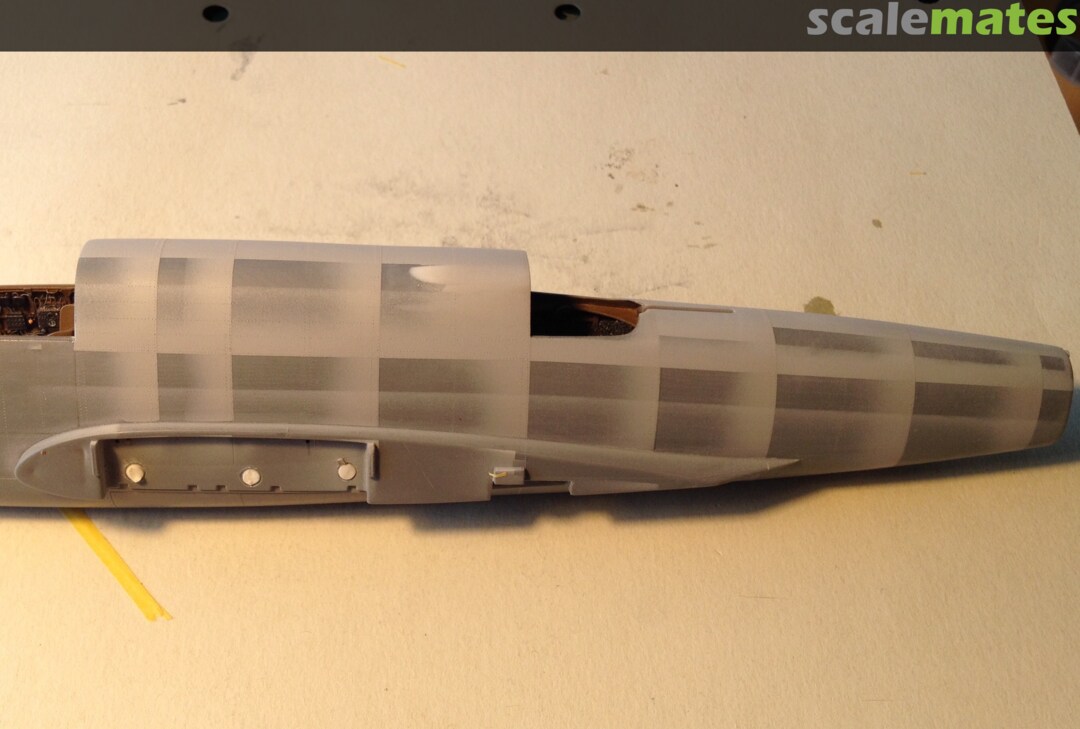
Rear part of the cowling (see picture 7): yesterday I checked three times all my original pictures and drawings and I don't know still how this area was divided in panels. I only found out that on the upper side was a round acces panel and on the outer side was an opening (drain?). Does anyone know more? Each information and help will be appreciated.
26 July 2016, 07:08
No oob anymore? Slightly detailed this time? 🙂 Looking fwd to Your next masterpiece 🙂
29 July 2016, 08:43
A little bit progress. Today I reworked the vertical parts, divided them and mounted to the "rest of the tail.
30 July 2016, 11:23
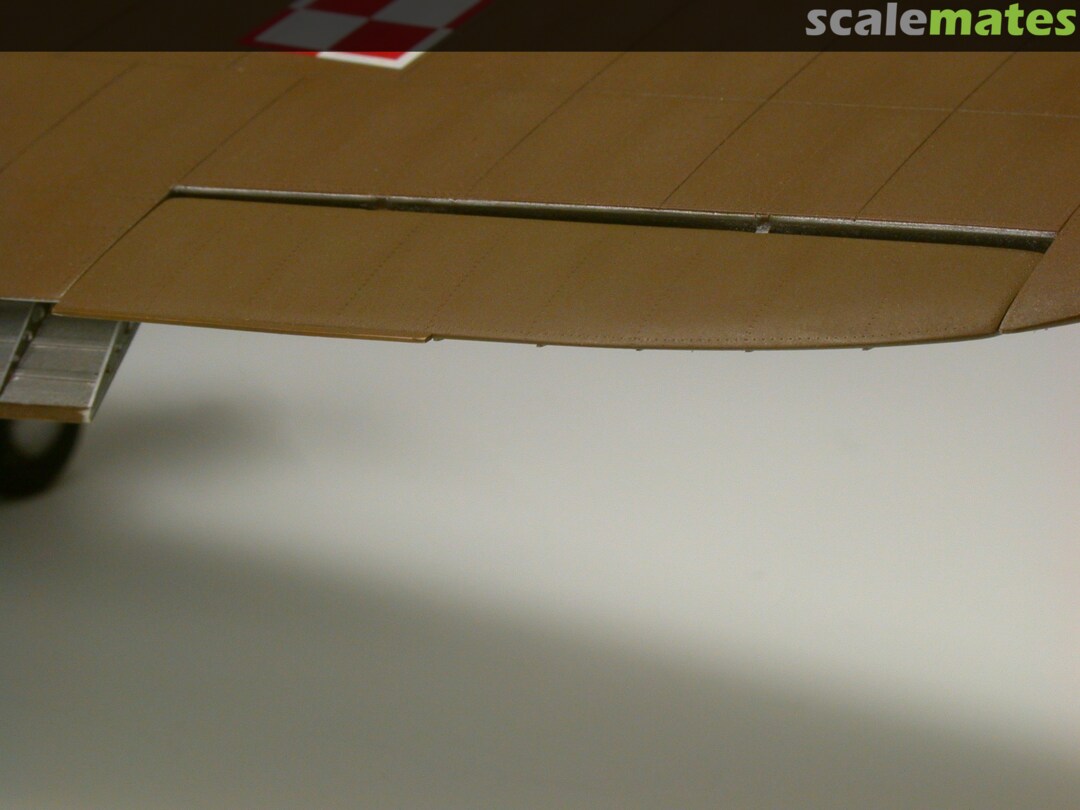
Today I researched a bit about wings and nacelles. I found out that the shape of the nacelles on upper and lower side is wrong!!!!! I do not wont you do think that I'm counting rivets but these mistakes are a bit to much. I can not understand this mess because this such an important polish plane kit made by a polish company so wrong and the are enough plans. The was a 1:72 kit 40 years ago that was correct in this section. Knowing myself I will either give up the project or invest many many hours correcting and reworking the nacelles.....(see pictures 21-27: right upper corrected).
30 July 2016, 13:39
your approach to models leave us with no excuse to build whatever we dream. Love them
30 July 2016, 14:04
Thank you mates. This was only the first half of the hard "match". I must still play the second half🙂
Left lower side: corrected.
31 July 2016, 15:08
Hi Bernhard, I had a brief look for the pics of the nacelles in my "Septe Bombers of 1939" book, but there's nothing more than a plan you've got. I hope you'll manage to get them correctly shaped, fingers crossed! MfG
31 July 2016, 20:05
Łukasz: thank you, I'm doing my best🙂
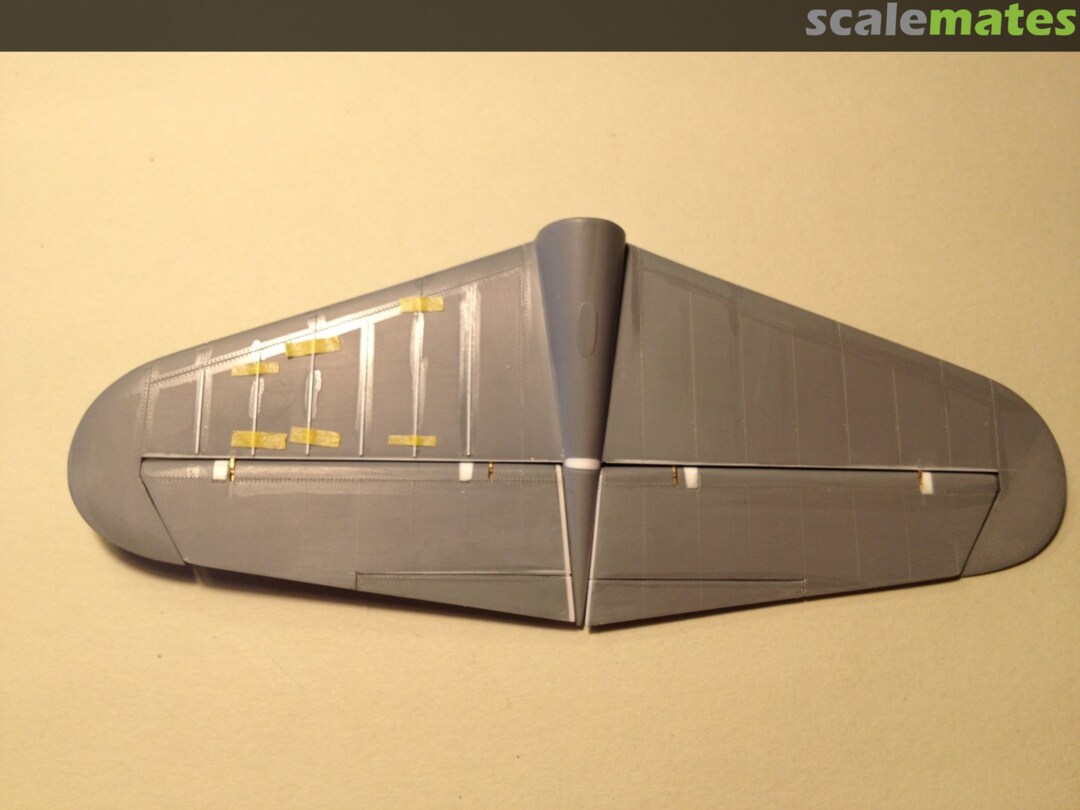
After researching the flaps - configuration I had to decide if the very nice etched parts by Part were durable enough. Experience shows that flaps this size completely made of etched parts tend to warp easily. For practical reasons and because they do not really fit the kit I decided to make the base from plastic. Additionally it's possible to shape rivets on the outside (picture 43).
6 August 2016, 21:27
This time you're diggin' deeper than ever before ! Absolutely exemplary and impressive.
👍
7 August 2016, 11:57
About two weeks ago I discovered with the help of a plan how the trim tabs on the elevators work (picture 39). Since I finished it I have bin wondering why the mechanics on the upper right side is not visible on any of the original photos... Until I finally realized a few days ago that I misread the plan🙁 Result; today I reworked the already reworked parts🙂
17 August 2016, 20:20
Result of an good modeling-vacation day: landing gear and bays completed, legs minus brake lines completed.
20 August 2016, 08:29
You have the most amazing eye for detail, Bernhard! Outstanding craftsmanship. 👍 👍 👍
21 August 2016, 13:24
Yesterday I wanted to do anything different than sanding, reshaping and correcting. I decide to use the smaller but to the original closer wheels from S-Model. After painting the wheels dark grey, earth and aluminum now the landing gear is ready for fly.
30 August 2016, 04:06
Oil coolers under the wings in the kit look like made of chewing gum. Fortunately Part designed parts for the 4 coolers in the "Interior set". The small ones should be completed of one base and 16 separate ribs, for the bigger one you must glue 25 ribs to the base inline! Despite great patience I had not managed to glue them together in line. So I tried so sand them in line. It worked well and so I wondered about the strength of the construction. In comparison with the pictures the shape of the ribs is not 100% correct... A little bit of sanding will help.
1 September 2016, 12:57
Thx Adam. I suppose you know this "excellent" kit...🙂
Next task completed: flaps.
Middle and outer flap: based on experiences with the inner flaps I made the first and last rib from thin plastic. It became clear that the strength of the connection of the first and last etched rib is not very big. Plastic on plastic is more durable.
3 September 2016, 11:39
Cutting and fitting all these stringers must have been quite some work, superaccurate looking flaps ! 👍
3 September 2016, 18:26
In this kit nothing seems right. So why should the rear fuselage cross section and shape be correct?🙂. The cross section in the area of the rear gunner is too oval (in the original approx. trapezoid) and very aft too low.
I decided on an unusual solution. I glued the fuselage halves temporarily together, placed a temporary bulkhead with the correct cross section and bolstered the fuselage with plastic strips and CA glue.
4 September 2016, 16:40
Unfortunately the inner structure is not done well. The different thickness of the ribs is not existing and the stringers have the same thickness as the ribs. Moreover the pattern is wrong. So the easiest thing is to build the structure completely new. The picture 73 show the result of approx. 1,5 hour of work.
6 September 2016, 19:52
Whow Bernhard große Klasse! I just stumbled into our build and I´m delighted by your skills man! Are you an aircraft engineer? I did finished a PZL-24G kit from MIRAGE last month and can feel your pain. I swore to myself "never any MIRAGE kit again" 😉.
11 September 2016, 11:42
Yippie yeah!!!! The most time consuming but very important for all later work part (cockpit bottom) is ready!! Time for a break and glas of Chardonnay🙂
11 September 2016, 17:01
This is really cool. Impressed with the plastic ribs. How do you get them to bend to be so perfect in contour??
11 September 2016, 17:25
Thank you Clifford, Hanno, Thomas and Scott.
@Scott:
The stripes are "cold bended" over an edge before gluing. Further I used for positioning the stripes normally plastic glue and for finally gluing ethyl acetate. Thanks to this technique I can still repositioned slightly the glued stripes.
11 September 2016, 19:54
Thanks for responding. It really is superb, I am very impressed with your skills
11 September 2016, 21:03
i wish I had a little bit of your skills... but it is nice work you show here...
12 September 2016, 07:23
Hi Bernhard, es ist immer wieder schön, dem Baufortschritt zu folgen. Viele Grüsse Stefan
12 September 2016, 10:47
Looks like you could actually fly the finished model from that cockpit.
15 September 2016, 19:53
Thx🙂
I got to the point where I don't care how long it takes to finish. Nose section is completed.
16 September 2016, 19:38
Today I finished the cockpit interior (minus main instrument panel and MG's and ammudrums: coming later). Now is time for painting🙂
By the way: thank you Mates for supporting me via positive comments.
21 September 2016, 18:40
By the way: any days ago I discovered a thread on pfmrc (polish RC forum) about a 3D model of the Łoś. Agnieszka alias Kropka is in my opinion a CAD genius. You MUST have a look at lthis!
pfmrc.eu/index.php?/topic/58589-pzl-37-w-3d/
sketchfab.com/models..467b8bd38f508a223662
21 September 2016, 19:04
During several decades it became a law that the interior of the Łoś should be painted grey. In the last years new insights have been found that the interior was painted polish khaki (exterior colour) except the rear part of the fuselage that was unpainted (natural colour of aluminum).
I followed several discussions on polish modeling forums with great interest and after own research I decided to join this opinion.
Now the interior is completed minus instrument panel and several parts in the glasnose🙂
26 September 2016, 15:31
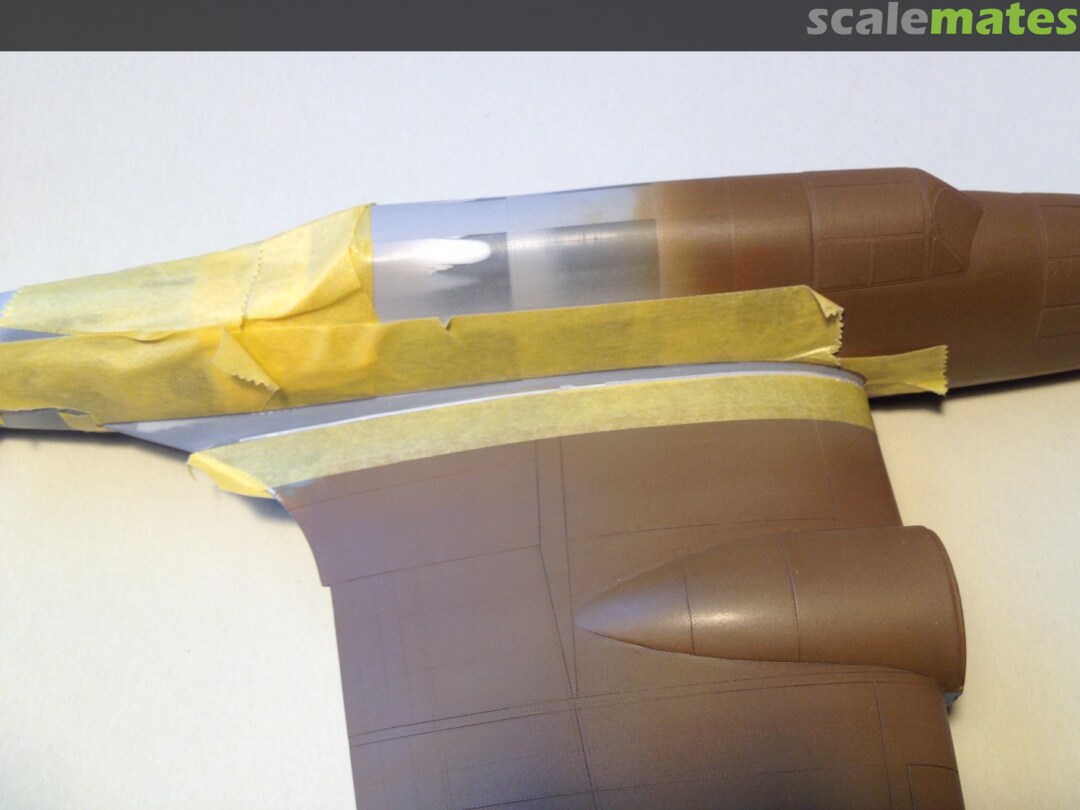
In the typical manner of this time Łoś has OVERLAPPING skin panels on the fuselage. This means that the surface should be have no recessed panel lines. Because of the thickness of the used duralumin in sheet (2-3 mm) each material for the model such plastic is too thick. So I decided to try this effect with Surfaced 500 from Mr Color.
For the 2 first steps see pictures 103-105.
2 October 2016, 20:30
nice work with the paint. in shipmodelling they tend to scrape away the material just under the line, and the file away the corresponding bulge till it is smooth: HMS NELSON | Album by elmarriachi (1:200)
Too bad you need to re-apply the rivetting, but it will give a nice result...
3 October 2016, 07:48
Hi Adam. Thx for your opinion. I'm very honored to hear such a opinion from a polish modeler. I suppose you have an account on the PWM and know the Łoś - thread by "Jambus" from 2012/2013? I discovered this build in the research phase of my Łoś and I was absolutely stunned about his work. Unfortunately 2013 there was a stop of the build. Such a pity!!
Best wishes Bernhard
Notabene: miałem wielkie szczęście że z moim Łosiem tak długo czekałem bo doczekałem się najlepszej dokumentacji która mogę sobie wyobrazic: model 3D, Agnieszki Cyrankiewicz, na PFMRC. Zajrzyj tam: bardzo się opłaca!!!
3 October 2016, 08:09
the handles in the inside of the glass part, are they simply inserted there, or did you also add some glue? which glue did you use, if i may ask? thanks
9 October 2016, 10:31
ThX Erik, Spanjaard and Victor Hugo.
@Spanjaard: first I deyermined the correct placement (temporary framing from Tamiya tape) and drilled from outside 0,24 mm holes. Then inserted the grips (0,2 mm black wire, flattened in the middle) from inside and secured on the inside with a very little drop of CA (applied with a 0,1mm wire). After polishing with polished paste and after painting nothing more will be visible.
9 October 2016, 12:49
Instrument panel.
In the typical manner of the polish aircraft the Łoś has very colorful instruments: orange-brown, red and blue. I'm not yet quite satisfied with the result.
Windshield and pilots hatch.
Very interesting: both upper windows of the pilots hatch were tinted blue. Obviously a lot of modelers do not know this (me too). In this area I was confronted with a complicated task. Similar to the nose the struts of pilots hatch was wrong. Sanding of the very heavy molded struts resulted in making the final result too small (grrr). Astonishingly and fortunately the vacuum formed part of the S-Model turned out to be fitting well after a little reworking. Especially the eye-shaped windshield windows were correct in shape (in contrast to Mirages part) and distortion free.
9 October 2016, 19:30
Excellent work, still following. I'm happy to see how Masters of modellig works...
9 October 2016, 20:30
excellent work. what type of glue do you use to glue things into the glass parts?
10 October 2016, 07:36
THX Bart. CA-glue (Tamiya). Very tiny drops at once. So I'm able to prevent fogging.
10 October 2016, 12:31
Hurra, fits perfect ! Very curious on the new CA glueing- technique .
11 October 2016, 08:41
Fantastic work as usual mate! It's a joy to follow your attention to detail and reworks as you stumble upon new data along the way.
11 October 2016, 10:33
Yesterday I managed the probably most complicated task of the entire project: mounting of the vacuformed pilot canopy on the fuselage. Astonishingly this worked good and I suppose the new gluing technique helped to prevent fogging.
First I used CA to fix the part in the correct position (about 1/3 of the edges were fixed with CA). As second step I filled the remaining area with Future (sealing of the gaps to prevent of fogging). After drying of Future I used CA again to fill the remaining gaps. After two rounds of CA I was ready and veeeeery satisfied.
12 October 2016, 05:41
Aren't You worried of fitting between painted wings and fuselage? The glass looks impressive!
21 October 2016, 08:53
Bart: On lower side I used decals of the S-Model kit (Techmod too but with durable carrier film printed on TOP of the decals). I removed the carrier film on the "squares" and as well as possible on the black numbers (some was left on the inside of "6" and "8"😢.
Adam: Thank you. By the way: I used a new technique for painting. First I airbrushed a mix of Mr. Color Surfacer, Mr. Color Copper metal and humbrol green (this mix was very close to polish khaki). And then only a very thin coat of the polish khaki was necessary. So I prevented the rims of the windows from fraying. You are right: the fitting between the wings and fuselage is practically non-existent. Meanwhile the right wing is "flusely" ("na brudno"😢 fitted. Pictures comming tommorow.
21 October 2016, 20:16
Now, when You said it, I can see grain of metallic in paint, but it's not very much. Intresting idea and good efect 🙂
23 October 2016, 06:11
Hello Mates,
The last days I researched about the history of the plane with the radio-cal-number 864N (72.41) and discovered in the net very different informations. Some sources says that the serial-number 72.91 is correct but this number was not existent and is a interpretations-mistake of the serial-number 72.41. The airplane was a PZL.37Abis and not a PZL.37B (the only difference between Abis and B was the engine). All B's has serial numbers greater than 72.100.
PZL.37Abis Łoś, 72.41
radio-call number (under the wings) 864N
12 Eskadra Bombowa „Wróbel"
X Dywizjon bombowy
Crew: Balinski, Jensen, Wasylewski, Zielinski
The airplane was damaged (engine-problems) and was destroyed by a bombing incident on 04.09.1939 in Kuciny.
Does have anyone other/furher information? Each help will be appreciated.
25 October 2016, 11:30
Wish I had and could help, but you already know much more than I do 🙂
25 October 2016, 15:25
For a few days I have been doing what I like most: airbrushing🙂. Yesterday I airbrushed light blue on the fuselage & middle section of the wings. After washing I was surprised about the result/effect of the bomb bay doors made of black foil.
28 October 2016, 20:08
Thx Clifford.
After this weekend the Łoś-project is very close to the last finish. I managed to join the tail and fuselage without problems and without damage of already completed components. After restoring rivets and pane lines and panels (Surfacer 500) I airbrushed light blue: I'm very satisfied. Rear clear part and Khaki for the upper surface today evening.
31 October 2016, 09:02
Bart: these grey "elements" are overlapping panels not preshading. By the way: as usual I use postshading.
2 November 2016, 16:21
Clifford: I'm glad that you like it🙂
Today only a mini task: landing gear and doors in place. As you can see the doors don't have actuators. There was nothing in any picture. So I did not include it because I had no idea how it works...
4 November 2016, 20:49
Stunnig. Unpatiently awaiting final result. This is not only great build Bernhard, this is also famous modellers course, high school at least...
5 November 2016, 18:42
Thank you for support on the last 100 meters! Very appreciated:
yesterday evening I noticed that the inner flaps are too short for the cutouts!! Obviously I calculated the length WITHOUT the gaps between fuselage and wings🙁 Sh.....! Today morning I knew that after all already finished corrections, refinements, corrections, refinements and corrections of the kit I had to correct this mistake too...
6 November 2016, 05:43
One of the most time-consuming projects I ever managed is finally finished. As usual a glass of wine🙂🙂🙂 first and just a few quick shots. The "real" pictures tomorrow.
6 November 2016, 20:32
Fantastic result! The research, the bits and pieces added, the paintjob. All is fantastic. Congrats mate.
6 November 2016, 20:37
It's great that Polish famous airplane finds it place in hands of international modellers. Awesome work!
6 November 2016, 20:50
beyond words, beyond professional and beyond award winning. congratulations. and inspiration for us all.
6 November 2016, 21:04
Wow. Great job! I wanna prepare the same model, but it's difficult to make (Łoś of Mirage Hobby isn't easy to build)
7 November 2016, 07:36
Vraiment un superbe travail, un montage passionnant à lire. Bravo!
7 November 2016, 09:10
Hallo Bernhard, Glückwunsch, es ist immer wieder eine Freude Dir bei Deinen Projekten zuzusehen. Viele Grüße Stefan
7 November 2016, 10:54
Tank you very much for this lot of comments!! As "promised" I shoot today morning any pictures with my Coolpix...
7 November 2016, 11:49
congratulations on the completion of another super work .your patience and diligence to be envied it is a pity that a large part inside the again, will remain invisible
7 November 2016, 18:55
I was following whole work with greatest pleasure. Very well done! Congratulations! Best Łoś in any scale I've ever seen!
10 November 2016, 10:35
Unique aeroplane and a sharp and clean work as usual Bernhard 👍
13 November 2016, 18:18
This is amazing Top-Master Class work Bernhard, no more words. Just my hat down many times. 👍 👍 👍 👍 👍 And another thumb up for detailed build description 👍 ! It's enough for a book!
3 December 2016, 14:18
Wonderful job! Great research and finish - it's a pleasure to look at it! (as with all your models!).
3 December 2016, 19:10
Such quality work! A great deal of patience is required with this kit but the patience and execution elevated this model to the next level.
27 September 2020, 15:54
WOW, this is Amazing! Do you have a YouTube channel? If not then make one this would be Awesome to watch! WOW, you are an absolute Artist!
30 December 2023, 00:32
Well done, Rick, for dusting off this fantastic build! What Bernhard has done here is, in my opinion, the absolute pinnacle of modelling. I've looked through the whole gallery again and I'm once again in mute amazement at the beauty. Bravo Bernhard! 👏👏👏👏👏👏👏
30 December 2023, 07:01
Album info
PZL.37Abis Łoś, serial number 72.41, with radio-call number (under the wings) 864N. Flown by 12th Eskadra Bombowa „Wróbel" of X Dywizjon bombowy
Crew: Balinski, Jensen, Wasylewski, Zielinski.
The airplane was damaged (engine-problems) and was destroyed by a bombing incident on 04.09.1939 in Kuciny.


