

Berijew Be-12 "Czaika" - completed.


Comments
2 31 January 2016, 18:46
Where is button "subscribe"? I would like to watch too. How can I do this?
1 February 2016, 14:18
So many watchers... It seems that I have to rent more chairs and supply a lot of popcorn🙂
If you see this props, you think first: this is never 1:72!!! They are huge like the entire plane! If you believe on not Chaika is nearly so large than Shinmeiwa!!
1 February 2016, 19:55
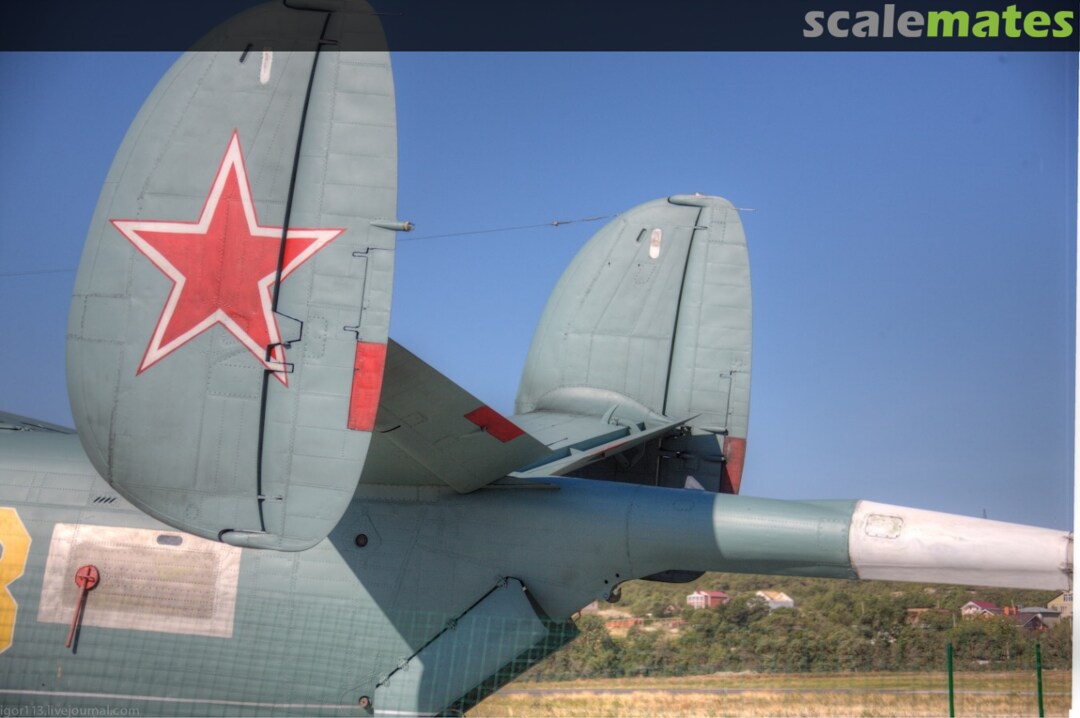
In the internet portal Seawings about flying boats there are 9!!! different walkarounds about the Be-12 containing several hundred pictures!!!! There is no way to pretend you didn't know what it looked like🙂 So I thought today evening that the vertical surfaces of the tail were ready. But I looked on another walk around and discovered on the inner side of the rudders more details.
6 February 2016, 21:01
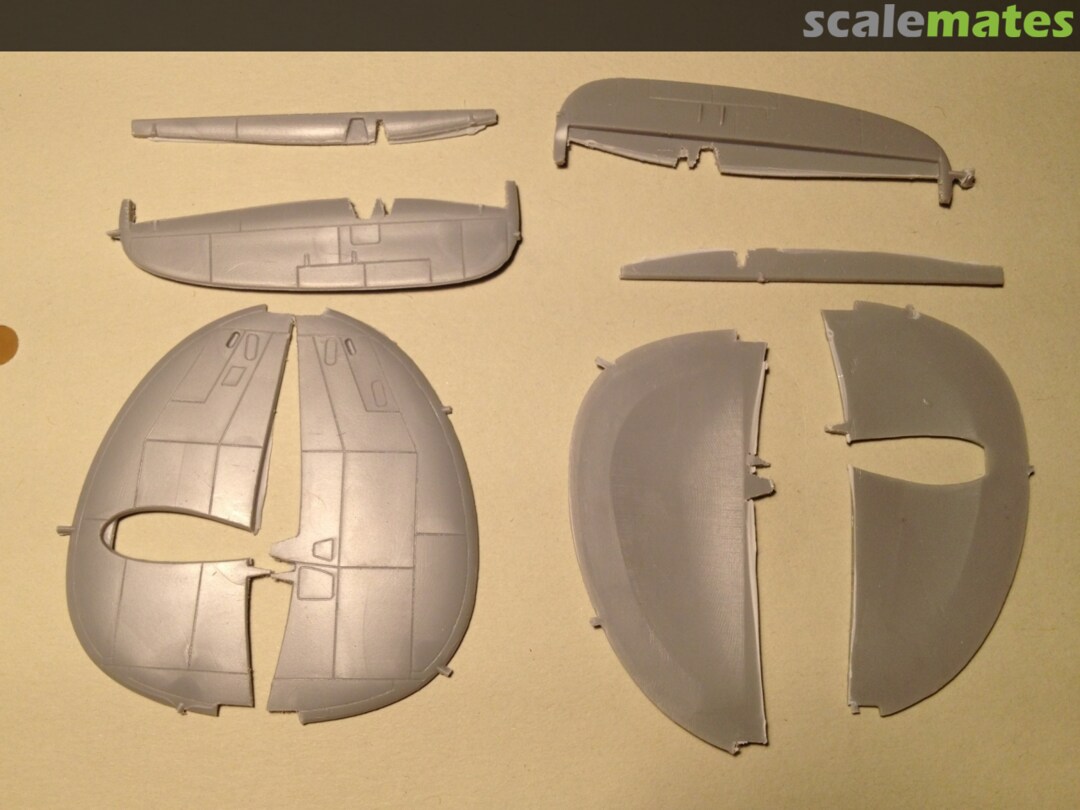
The first large task is completed: the tail. Actually I should have made the trailing edges thinner (much too big) but I was too lazy. I thought "on such a large airplane this is OK"
By the way: ethyl acetate is a perfect tool to smooth the "rough edges" ("sehr gut zum entgraten geeignet": sorry I don't know how to translate this in English)
8 February 2016, 20:13
stunning work. on the aluminium colored pieces for the screws, how did you get the relief/structure in it?
9 February 2016, 08:48
I'm very glad about you comments: THX.
Bart: first I marked with my self made riveting tool (pitch 0,5 mm) the points. Then I used a sharp scalpel and produced raised lines via "rolling" (not cutting).
9 February 2016, 20:34
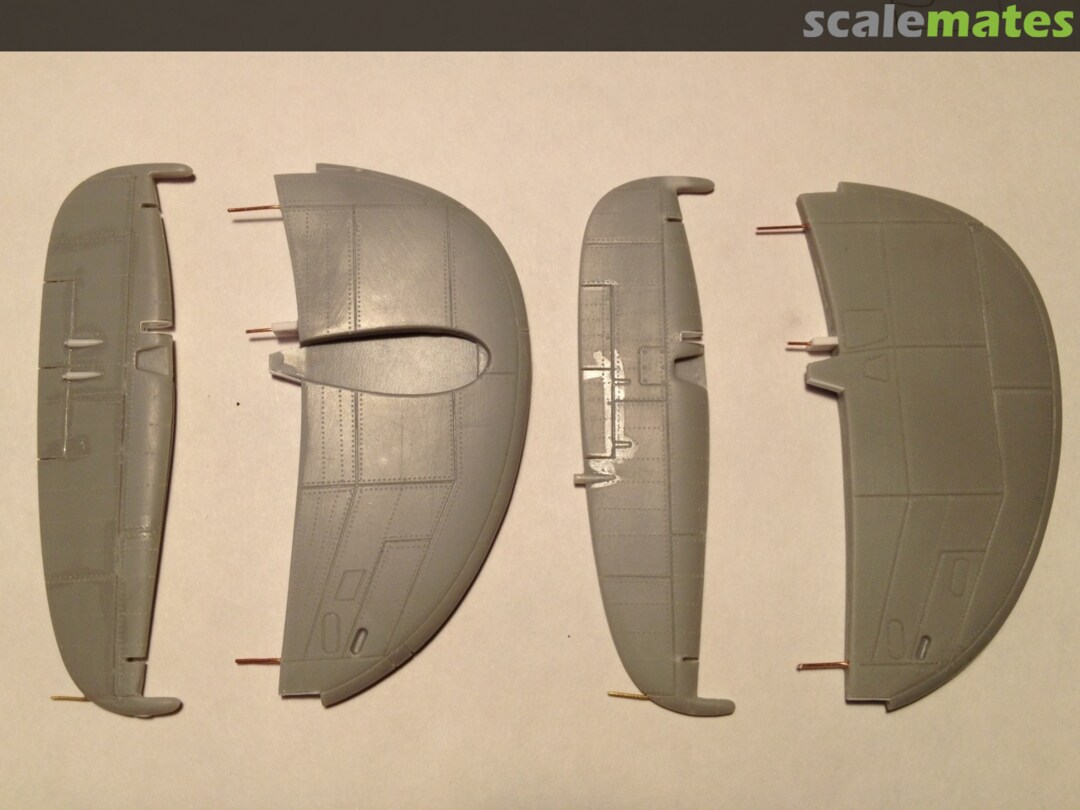
Wednesday I started next task; the wings. Obviously Model Svit used the drawings from Awjacija i Wremja and this is unfortunately not 100% correct. Each aileron has 4 hinges (not 3), the position of the aerodynamic - counterbalance (3 "noses on the ailerons" ) and the inner searchlight is wrong. The inner trimtab is slightly larger as the outer trimtab. The cover for the actuator is in right position (in the drawing not present).
13 February 2016, 06:55
I fancy flying boats and I am sure this will become another masterpiece.
13 February 2016, 08:12
During the last three days I had to do what I do not like at all: fitting, applying CA, sanding, applying CA, sanding, restoring of lost panel lines and restoring of "wrong" (partially raised) panel lines , sanding, polishing and finally producing of several thousand of rivets... Phew. Thats it for today Feierabend.
16 February 2016, 20:43
Next large task is half completed:
Pictures 27, 28 and 29: cleaning, sanding and restoring of details completed (about 1,5 hours).
Pictures 30, 31 and 32: for comparison "start situation" on the other side. After about 30 minutes of dry fitting the nacelle is glued completely with CA. Small pieces of 0,13 mm plastic for holding the CA glue in place are well visible. Only on the rear side the fit is really poor but it's no problem for this technique.
18 February 2016, 21:33
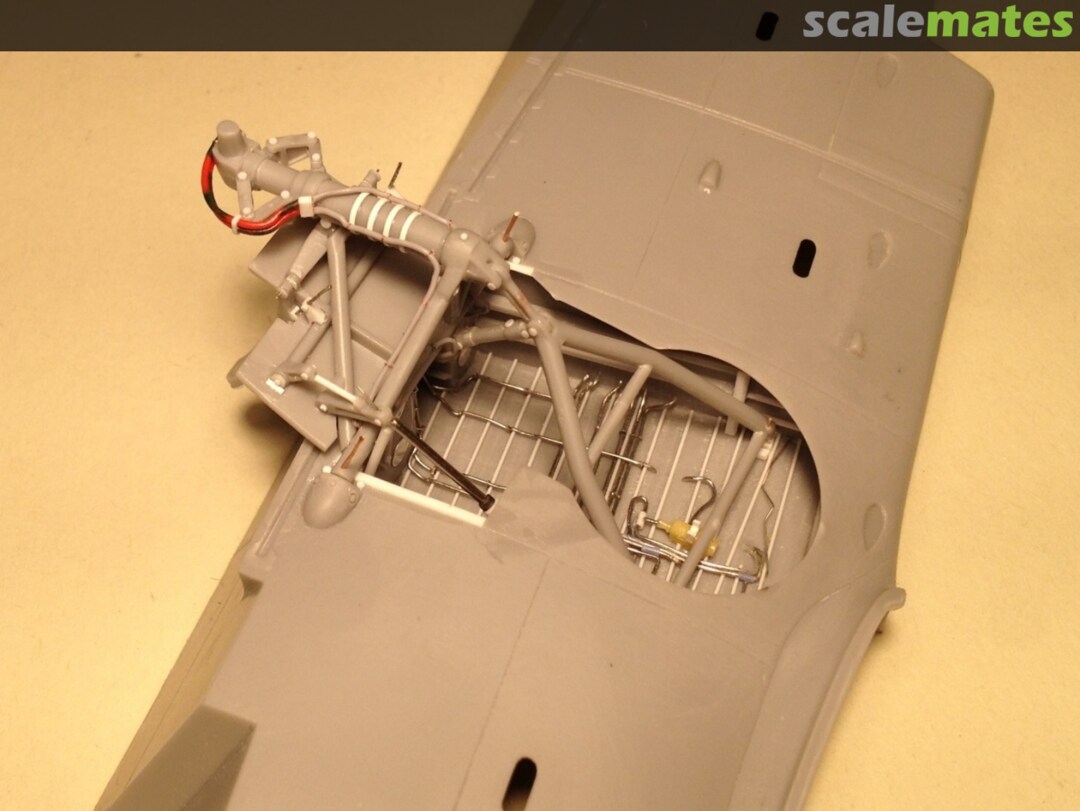
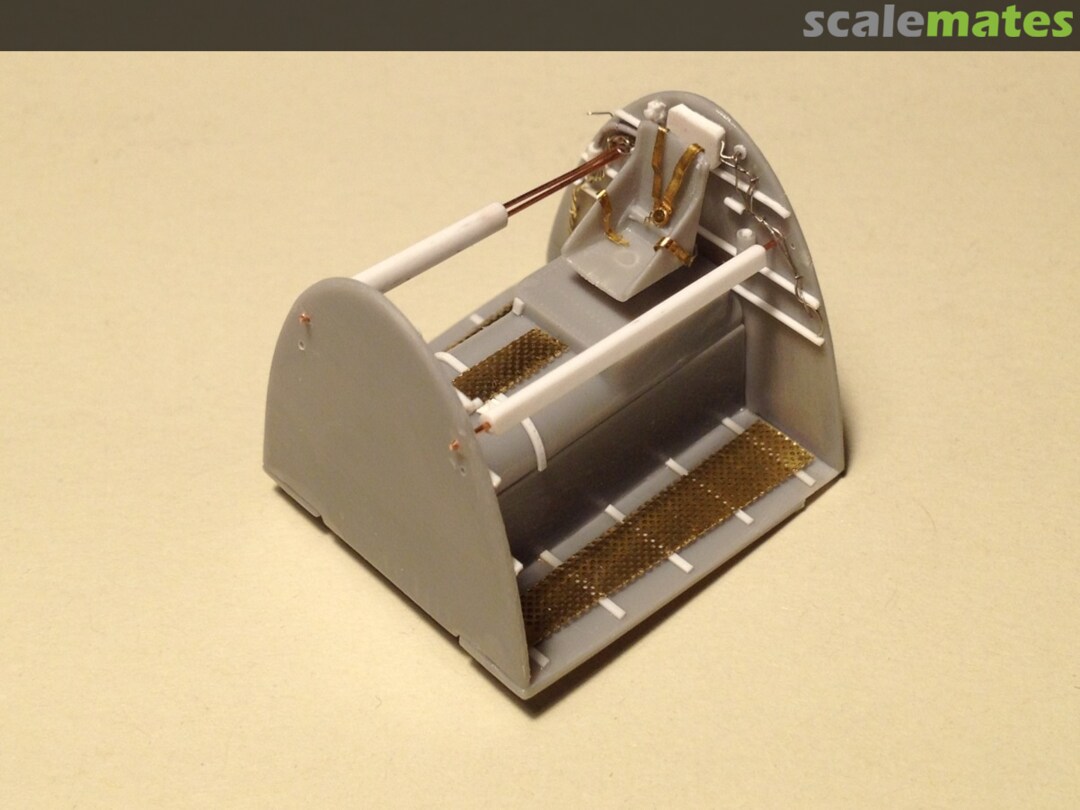
nice rebuild of the landing gear bay... How do you keep these ribs straight while glueing?
22 February 2016, 15:28
Thank you Bart:
first I determined the distance between the ribs via counting of the "rivets". Every 5 rivets one rib. Then I fixed the strips with plastic glue only at one side at the tip, waited, aligned and glued with ethyl acetate (plastic welder).
22 February 2016, 20:29
Landing gear. As usual first I consulted the original pictures of the really complex construction of the landing gear. I compared the original with the kit parts and tried to understand how this and that works and witch function it has. Now the result of the first task of today.
29 February 2016, 19:49
Left landing gear: finally completed. It took an eternity and I thought I would never get done. Surprisingly everything fits. The right side will be easier because now I know how I should look. Time for a glass of red wine🙂
4 March 2016, 20:01
looks wonderfully detailed, what great scratch building, love the little brackets etc.
4 March 2016, 20:17
Holy moly, this is so painstakingly accurate and detailed that it's hard to believe it is really 1/72.
Wiring and the hydraulic cylinders look fantastic. I still have a loooong way to go........ 🙂
Truly inspiring work Bernhard !
10 March 2016, 20:53
Lovely, Bernhard! Our very own Bernhard (Pethe) just finished his Be-12. Impressive kit!
11 March 2016, 06:54
it's painstakingly accurate... wish I had a lot of time at my hands to try to achieve something similar... at the moment a bit forced to stick to basic detailing...
11 March 2016, 07:59
Thank you for watching Mates.
Cockpit: first step completed. Looking for the second step (painting and applying really good cockpit decals) and 3rd step (attaching of additional parts such as switches and knobs) on the "decaled" panels.
13 March 2016, 20:27
I'm not completely happy with the instrument panel. The question is how much of it is visible later?.....
16 March 2016, 17:52
have you hand painted the instrument panel or is it pre painted PE ?
either way, looks great
16 March 2016, 17:55
Thx Choppa. It is a decal over grey painted plastic part. I think, I should have
painted it darker...
16 March 2016, 18:24
perhaps you could paint the surrounding area lighter to help it "pop" as you had hoped for 🙂
16 March 2016, 19:10
I understand what you mean with the instrument panel, but in the end, will it be visible at all?
@Bernhard Pethe: no pics visible when nog logged in unfortunately
17 March 2016, 08:08
Yesterday evening I add the 3rd dimension and a bit paint (similar to Choppas suggestion) and now I'm satisfied.
17 March 2016, 09:02
Hallo Bernhard, mit Interesse verfolge ich nun hier den Bau Deiner "Möwe". Schon deshalb, weil ich mich auch schon damit beschäftigt habe. Since the first link did not work , here a new . As is my seagull . ffmc.de/modelle/flugi/bp_be12/bp_be12.html
17 March 2016, 10:36
Very interesting and informative, ah and by the way - excellent modelmaking Bernhard 😄
19 March 2016, 12:26
The landing gear is completed without trouble. The wheels are painted with an extra thick coat of green paint as protection because the tyres are from rubber/soft plastic.
25 March 2016, 12:30
Outstanding work/detail Bernhard. How did you replicate those tiny red control knobs in the cockpit?
25 March 2016, 13:58
Hello Mike. Thank you for the nice comment and interests🙂
As usual I make the switches and knobs from round or square rods and the switches from silver colored wire. See picture 72: two round rods 0,5 and 0,8 mm in diameter and 0,8 x 0,7 mm as base and the finished knobs, one of them hold with a tip of a scalpel. Fortunately I have a steady hands and can place the parts aprox. +-0,2 mm exactly.
Picture 73 for example: right side of the fuselage, station of the observer/bombardier. I attached the knobs and switches from 0,25 and 0,2 mm wire with CA-glue to the decaled panels. For the switches I drilled holes.
25 March 2016, 20:12
Yesterday I thought that the front cockpits are completed... But today morning I noticed that the rear side of the instrument panel is visible from the observer compartment. A little bit of paint and two dozens of wires and then the cockpit is really completed.
26 March 2016, 18:05
just astonishing how much detail you can put in this bird. If I may ask: how do you make the cable-attachments?
30 March 2016, 07:24
Bart: the language of an engineer is a drawing🙂. See picture 78 for my technique to fix the cables on the surface.
Yesterday I spent nearly two hours on mounting the windows. For flush fit with the fuselage I had to remove the rim on all the windows. In the most cases I applied two times CA glue from outside. After sanding and polishing I applied Future on the inner side. Time for two rounds Kniffel🙂
30 March 2016, 19:54
thanks for the drawing (I'm an engineer too 😉 ) Windows look nice. When attaching with CA, don't you have problems with fogging?
31 March 2016, 06:49
Bart: there are several ways to protect the fogging of clear parts.
1. The most simple way is when you use only very little CA glue at once.
2. Coating of windows on the inside with Future helps.
3. If you have any chance put pressure into closed fuselage to blow away the salty fumes of CA. If the fumes do not get a chance to settle then there is no fogging. The best example of this solution is my Martin Mars (see the gallery on Modellversium, last picture)
modellversium.de/gal..aircraft-models.html
Through the bull eye under the cockpit I put via needle and compressor about 2 bar into the fuselage and was able to prevent fogging on the inner side of the canopy (completely glued with CA).
If nothing worked you can always polish the fog away or overcoat them with a another coat of future.
31 March 2016, 19:42
Prima, Rumpf zu, Kiel gerundet. Hast Du schon Den Staubsauger eingesetzt ? 🙂
25 April 2016, 17:13
Yesterday I had chance in Lübeck to talk with Bernhard Pethe and saw live his "Chaika"
modellversium.de/gal..be-12-tschaika-.html
Today I could use any of his hints. Bernhard: it was nice to meet you and thx for the helpful hints.
Riveting job on fuselage: 15% completed.
Hanno; noch nicht aber der Miele ist schon im Planelab. 🙂
25 April 2016, 17:56
Großartiger Fortschritt Bernhard. Hätte mich gerne länger mit Dir am Sonntag ausgetauscht, nur meine weibliche Begleitungen hatten andere Prioritäten🙂
25 April 2016, 18:50
Danke Bernhard. war nett, Dich und Hanno in Lübeck zu treffen und ein wenig über die "Chaika" zu sprechen. 🙂
25 April 2016, 19:01
Riveting job: ribs 100% completed. Stringers 20% completed. Again you can see that it is better to do a little well then doing a lot badly. More rivet lines tomorrow.
26 April 2016, 19:18
Saturday I finished the riveting job (🙂 🙂 🙂 🙂 🙂 ) and could do yesterday (after producing one million rivets in the last week) anything different.
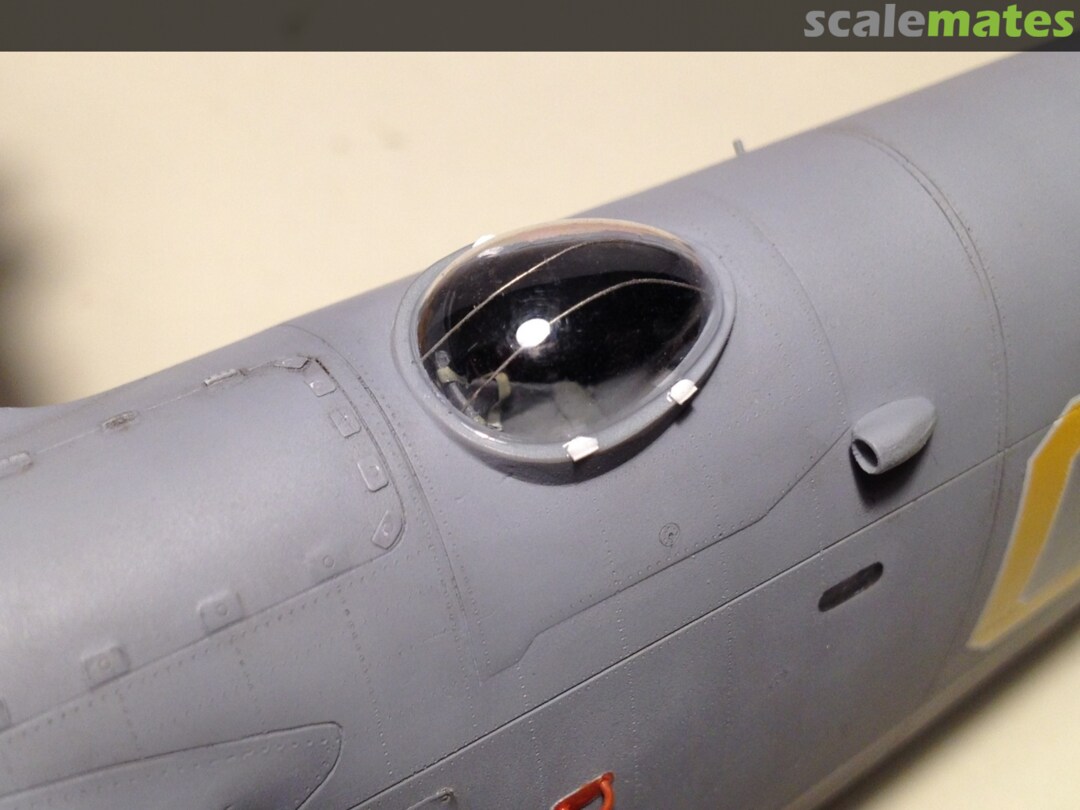
Cone: the kit provides for this area 4 clear, 2 grey and one PE part and is in my opinion an invitation for scratching the interior. Fortunately I know after the PMCL - Show that most of the interior is from outside not visible (thx Bernhard🙂.
Unfortunately I noticed that the fuselage is approx. 1 mm wider than the cone🙁
2 May 2016, 07:43
Nose: also here turned out that das scratchbuilding (making) of the inferior is only half of the solution. The connection of the parts on the inner side lasted almost as long as "making" of the parts....
Bart: I think a mix of both. I solved the problem more than half via removing a bit in the seam area (lower and upper sine of the fuselage). More tomorrow.
2 May 2016, 19:18
Great job of documenting yourself before... and amazing detailing skills. beautiful build indeed.
2 May 2016, 19:35
Every time you manage to surprise me again with your scratch building skills.
5 May 2016, 06:58
Thank you mates for you feedback.
Two weeks ago I had the opportunity to see Be-12 of Bernhard Pethe live.
Bernhard, you have pinned up the "measuring bar" with the installation of the windscreens (3 parts) very high!!! Today I have spent a total of nearly 4 hours to be satisfied with the result🙂
5 May 2016, 20:27
i have a question... in the sides and centre of the upper compartment you are using some perforated metal plate. i just purchased some on the internet, but i think that the holes are too small for what i want. where did you got the plate that you have used if i may ask?
6 May 2016, 17:55
Hi Spanjaard, fortunately I found a rest of this etched plate with the producer logo: Airwaves. But I'm not sure that type of plate is still available. The polish company Aber have a large selection of different types of etched mesh-plates (see last picture).
6 May 2016, 19:26
Basic colour: H128, a bit lighter: 80% H128 + 20%H130, a bit darker for panel-lines: H126, mottling: H129. Two months ago when I was painting the first batch of parts (control surfaces, floats and propellers) I wrote it down to not forget. Today I "finished" the tail und I'm asking myself: I'm getting old, I'm seeing it wrong or not always is the same color in the H128 can?
12 May 2016, 20:00
It was the correct decision to paint the sub assemblies separately. Today I spent about one hour for holding the fuselage (left hand) and pressing the airbrush action button (right hand) and afterwards I could not feel my fingers🙂. Now I time for Star Wars VI and chips🙂.
19 May 2016, 19:23
looks good... too bad not that much is visible of the interior... but we've all enjoyed the pictures...
23 May 2016, 10:15
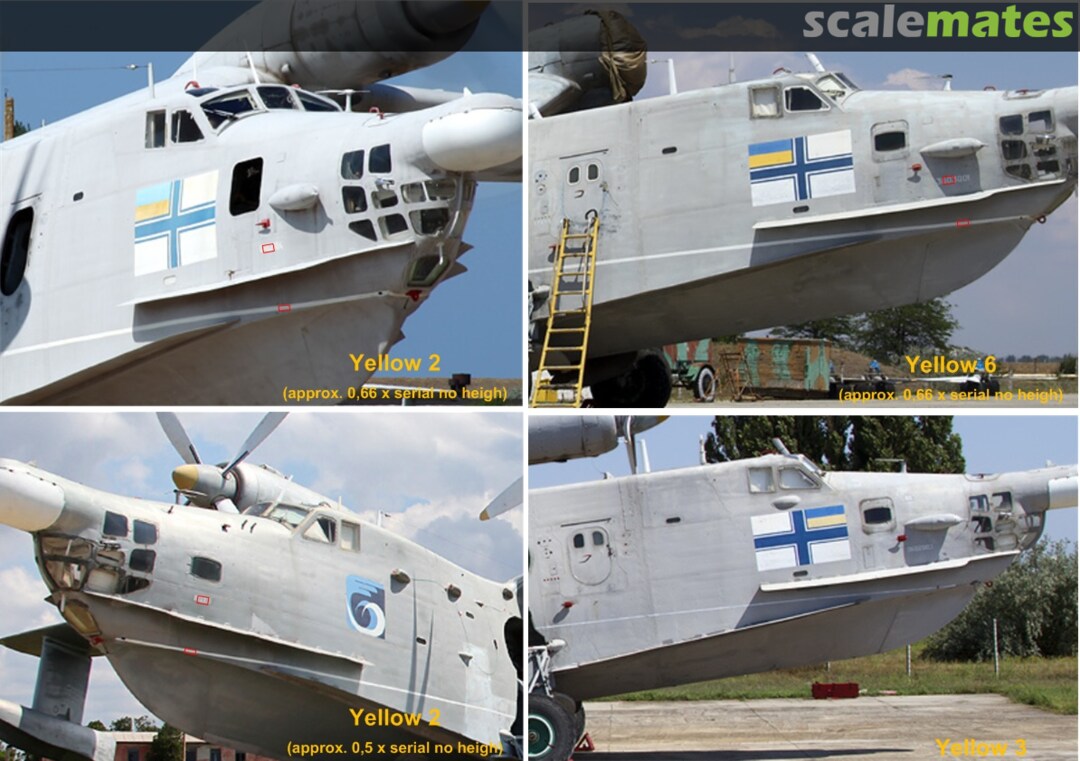
Thx Mates. Yesterday I had a lot of trouble with the decals especially with the large numbers for the aft fuselage. But I could save the fragments and could place them in the right position. Pictures coming soon (today evening after washing).
23 May 2016, 13:18
Instruction says: #02 on the left side should be positioned that the window is IN the yellow area of the 2. I thought why would anyone do this? I put the 2 "about" the window. 10 minutes later I found an original picture. Of course the instruction were right and of course It was too late to move it🙁
23 May 2016, 19:41
the pilots of this plane used to joke about which end was the nose and tail 🙂
23 May 2016, 19:47
Yea, the second plane in the backround has exactly the same markings as yours..... 😉 looks great anyway !
23 May 2016, 19:49
Bernhard, Bernhard, ich glaube das ist das Alter.😢 Solche "mini Fehler" passieren jedem irgendwann einmal.(mir schon öfter)Das tut dem Modell aber in keiner Weise Abbruch. Das Gesamtbild zählt und da hast Du die bis dato beste Be-12 auf dem Tisch.
23 May 2016, 20:34
Wie gingen Deine Decals?
Ich lache mich tot, ich habe das Fenster bei mir gesucht. Bei mir ist das Fenster noch unter der "2" und ich habe es vergessen auszuschneiden. 😮
23 May 2016, 20:50
Bernhard Pethe told me that the applying of the long white stripes for the water pass was very tricky (thank you for this advice Bernhard🙂. So I decided to airbrush them instead of working on them for hours. The masking take about on hour. I think the airbrushing is going to take in 30 minutes or so.
26 May 2016, 19:20
Looks like the white stripes on the photo are more narrow than what you have taped?
27 May 2016, 06:51
Moin Moin Burkhard, danke für "Controlling". Im ersten Moment dachte ich, dass ich es in der Tat übertrieben habe. Eben ein wenig recherchiert und es scheint mir, dass die Breite bei der 02 stimmt. Vielleicht ein "little bit" zu viel. Schau dir mal das letzte Bild an: was meinst du dazu?LG Bernhard
27 May 2016, 07:33
this seems slightly back to front to me, sorry 🙂
but my temptation would be spray the white and use a thin line of masking tape and then spray the grey etc. afterwards.
although you are doing this to a painted and decaled model I would still do it that way by just masking off the decals and windows etc. 🙂
I just think it would be easier to control the line thickness that way 🙂
anyhow, just a thought, hope it helps, though I am confident you will do an expert job which ever way you go, as always😉 😄
27 May 2016, 08:06
Auf dem Foto schaut die Linie dünner aus als die Fensterstreben der Bugverglasung. Gut schaut es in jedem Fall aus. 🙂
27 May 2016, 18:23
Hallo Bernhard, es macht mal wieder richtig Spass dem Baufortschritt zu folgen. Viele Grüße Stefan
27 May 2016, 20:33
Today I began with the end assembly. For mounting the floats I drilled two auxiliary holes for applying CA glue. Result: clean seam without problems.
29 May 2016, 16:47
Excellent work to make wing and fuselage fit perfect 👍 Do you use Balsa wood to spread the wings?
30 May 2016, 19:14
Since yesterday the Czaika can stand alone (undercarriage is in place).
99,5% completed🙂🙂 The rest will follow tomorrow🙂
2 June 2016, 19:32
And after finishing, the first testflight? Really love how everything comes together!
3 June 2016, 06:52
Yesterday I planned to finish the Czaika, but noticed that the etched plate is gone (and the windshield wiper too). Not a big problem: today morning after the second cup of coffee I scratched them out of some pieces of plastic.
Now it's time for a test flight! Lex, you can sit on the nose or under the cupola: you have the choice🙂
4 June 2016, 11:19
Whatever place I choose, it will be an thrilling experience! All your efforts have finnaly paid of. It's a beauty .
4 June 2016, 11:36
"you can sit on the nose or under the cupola" .... haha 🙂
front row seats are the best 😄
Looks great Bernhard, it's a strange plane though as it has a paradoxical ugly but elegant presence 🙂
4 June 2016, 11:46
what a beauty, Beriev flying boats have their own charm, and such a model you see is pure enjoyment, really impressive 👍 👍 👍
4 June 2016, 12:54
Breathtaking and awesome- as ever! In my opinion, this "Chaika" is one of your best!
4 June 2016, 17:19
Superaccurate and convincing result Bernhard ! All these delicate details in the wheel wells and on the fuselage live up to your reference pics perfectly.
5 June 2016, 14:38
Today instead of modeling I sweated in the kitchen witch needed new paint. When I read your comments I realized that my "sweating" over the model at least had been worth it🙂🙂🙂
5 June 2016, 18:53
Painting models is bad enough.... Painting house just sucks... 🙂 By the way did you paint the kitchen light grey by any chance! 🙂
6 June 2016, 00:03
stunning... I was a pleasure to follow the build of this model... and a fantastic result...
6 June 2016, 07:25
Hallo Bernhard, ich bin schwer beeindruckt, was doch noch von einem Könner, wie Dir aus dem Modell herausgeholt wurde.👍 Es zeigt mir, wo meine Reserven noch stecken.😉
6 June 2016, 17:54
Absolutely famous built, Bernhard! Just gazing on pics with my hat down... 👍 👍👍
10 June 2016, 12:52
Thank you very very much of second wave of comments. Talking about "waves": the next project is a flying boat too🙂
10 June 2016, 18:30
I built the entire Monogram "Century series fighters. I relly want to find Monogram's F-89 Scoropin.
19 September 2016, 20:36
A wonderful combination of the beauty and the beast. And beautiful executed. What material you used for the antenna wires.
20 September 2016, 05:56
@Lex:
I'm sorry that I overlooked your question.
I used fine polyamid – thread (dark grey, looks similar steel). In the most cases I use for antenna wires in 1:72 nylon thread from a old stockings (thinner than thinnest thread). In this case I though that nylon is a bit thinn for such large plane.
30 November 2016, 10:00

