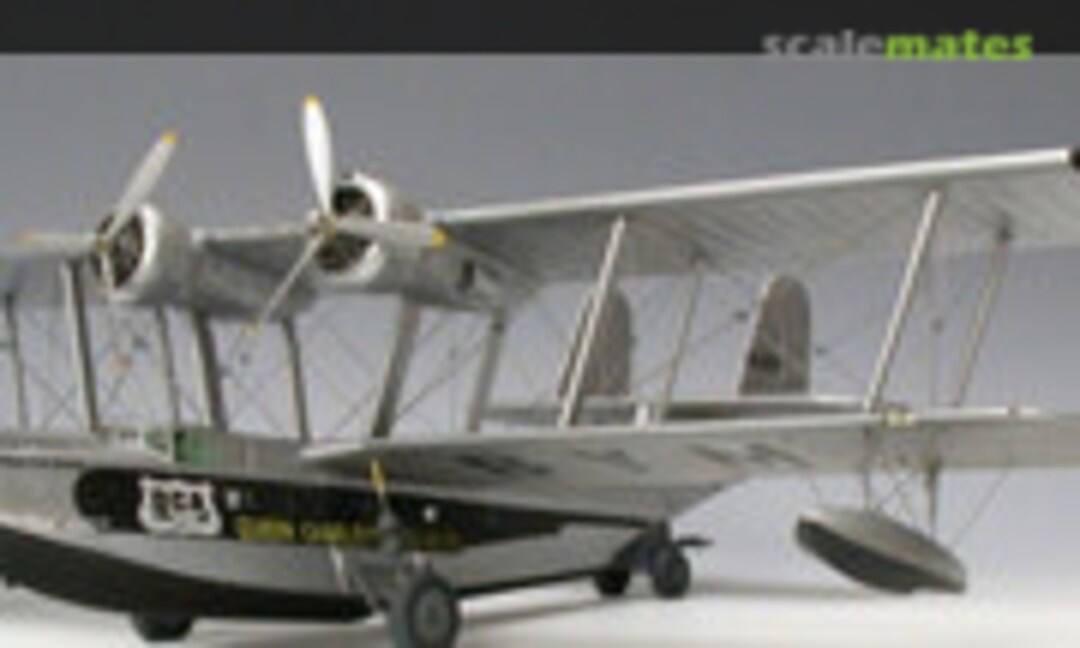
Supermarine "Super-Stranraer", Queen Charlotte Airlines, CF-BYM (completed: picture 158)


Comments
6 8 March 2015, 19:18
Moin Bernhard!
Man kann jetzt schon sehen das das wieder etwas Außergewöhnliches wird. Tolles Vorbild und dann noch ein Matchbox kit... Aber Du machst ja eh aus Sch.... Gold 🙂
8 March 2015, 19:28
Immer wieder frage ich mich, warum ich so lange mit dem Anmelden gewartet habe? So viel Freude und so viel Lachen über die so originellen und witzigen Kommentare🙂
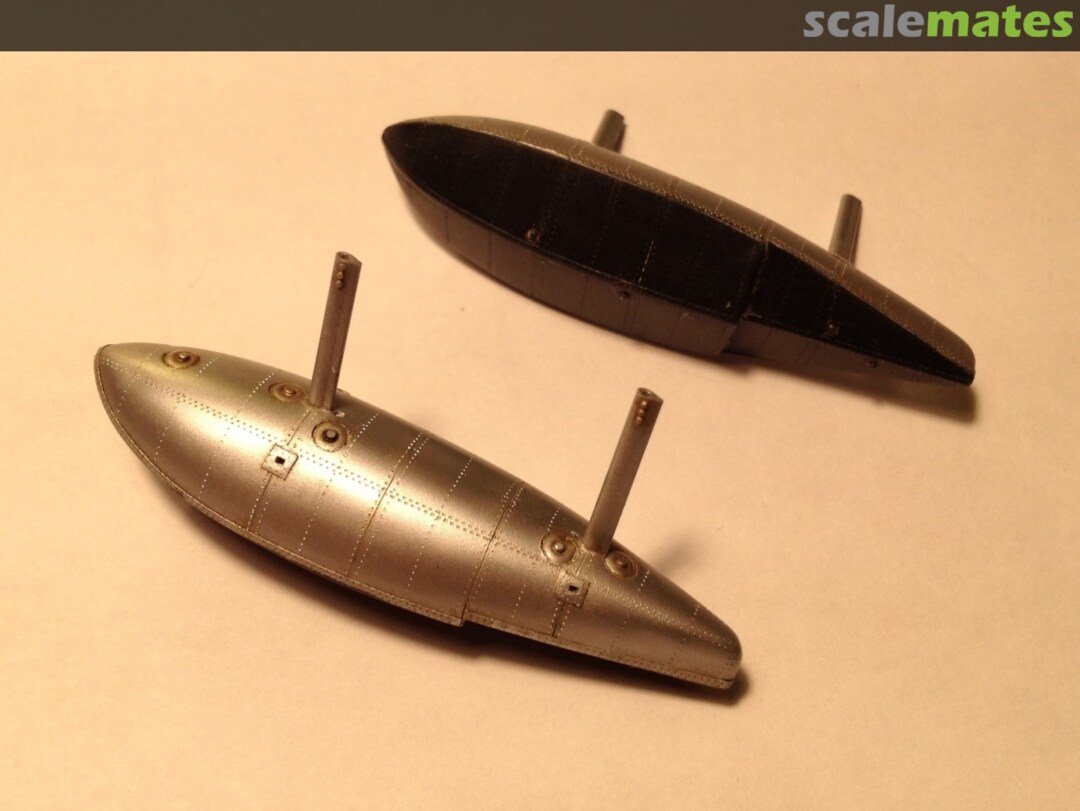
As usual with flying boats I begin with the floats. A little sketch "what to do" helps. On the 1st picture the caps punched from this alu-sheet are well visible. As usual for biplanes of this time the Stranraer has flat-metal profiles (no cables) for wiring. I solved this problem about 10 years ago, creating with Thomas Gatermann a small photo etched plate with flat wiring for biplanes from "new silver" (German Neusilber, a silver colored kind of messing). No painting of the wiring is necessary. On the 3rd picture the self made tool for the producing of rectangular holes for the mounting flat wiring is well visible.
8 March 2015, 20:00
Also, Hauptsache ist das Du hier bist. Ich glaube es gibt hier Niemanden der von Dir nicht lernen könnte.
8 March 2015, 20:39
O.M.G. he's at it again! Bernhard, GREAT WORK MATE everything you do should end up displayed in a museum! FANTASTIC STUFF!
9 March 2015, 14:57
Moin Bernhard, oh you love to suffer, hu?😢 Carry on, i´ll take a seat here!🙂
9 March 2015, 15:04
Ohhhhh! A new tutorial on how to create a masterpiece out of a limited kit base. Consider me subbed!
9 March 2015, 18:16
Bernard, I just had a look at Google Images of the build you are doing and it should be something very special indeed.
Good times. 🙂
10 March 2015, 12:40
Ooh, etwas aus meinen Heimat! Always fun to see something from my corner of the world, being built by someone on the other side of it!
And for the record, if I'm not wrong, "Neusilber" is nickel silver in English.
10 March 2015, 13:06
Ohje, jetzt getraue ich mich nie mehr, die Stranraer zu bauen. Sieht schon einmal sehr gut aus!
10 March 2015, 13:18
Everyone is welcome: lot of empty seats. I will try to make the pictures well - lighted🙂.
Alex: der Bausatz ist gar nicht schlecht und hat zumindest nicht die berüchtigten Gräben.
Xenia: danke für das nickel silver. I learned something again🙂
10 March 2015, 20:28
Natürlich bin ich auch wieder dabei, wenn ein weiteres Meisterstück entsteht.
10 March 2015, 23:07
One of four is completed: wing & aileron. The shape of the parts is ok but gluing OOB produces trailing edges with a thickness of approx 1 mm (72 mm in the original!!!). In picture 9 the difference of thickness compared with OOB is well visible. In picture 6 shows a self made tool to create a "seam structure under the fabric".
11 March 2015, 20:31
Have you ever asked yourself how to separate rudders with bent edges from the fins? This is a way (picture 10) how you could do it.
12 March 2015, 20:08
Ok Bernhard! Great idea! How do you smooth the surface after drilling? I always use a razor saw for this kind of operation and fill the gab with sheet. Like this: Me-108 Heller | Album by worldinscale (1:72)
12 March 2015, 20:21
I have made from balsa wood and 240 grid sandingpaper several sanding blocks (Schleifklötze, sind inzwischen meine besten Werkzeugfreunde🙂 approx. 5x1x2 cm. In approx. 2 minutes the edges were smooth incl. finishing with an sanding stick.
12 March 2015, 21:04
Bernhard, please forgive my ignorance. But how old is this kit and/or is it still readily available mate ?
The PE you have there for the rigging reminds me of the Tamiya Swordfish build and the flat thin brass for it's rigging.
You have a delicate touch there too. 🙂 🙂
12 March 2015, 22:02
Opps, I goofed.
I just googled the Supermarine Stranraer in their Image factory and I see it is a 1/72 Revell kit. 🙂
12 March 2015, 22:09
Bernhard - are you using a microdrill to get these small holes? I use a razor saw to seperate the flying surfaces. For sanding, I glue different grades of sandpaper (Wet n' Dry 320 and 600) to popsicle sticks.
13 March 2015, 14:32
Hallo Bernhard. Tolle Details bis jetzt, aber warum hast du diese übertriebene Rippenstruktur nicht reduziert?
13 March 2015, 15:13
Gordon: yes I used a electric micro drill and 0,4 mm drill bits.
Dieter: nun habe ich wohl keinen Ausweg und muss an dieser Stelle etwas tun🙁 War einfach zu faul, denn m. E. ist es mit dem Abschwächen nicht getan. Ich müsste alles glatt schleifen und die Struktur komplett neu aufbauen um das Original in etwa zu treffen. Die Pics aus Hendon von der QN 920 sind leider sehr scharf und "merciless".
13 March 2015, 16:22
Don't panic! Ich freue mich trotzdem, dir über die Schulter schauen zu dürfen. Womöglich fange ich dann auch an, eine Stranraer zu bauen.
13 March 2015, 18:29
Ist es so besser? Den zusätzlichen Aufwand stelle ich Dir in Rechnung Dieter! Es nach je einen Kaffee für links und rechts! Mit Milch, und zwar viel🙂
13 March 2015, 19:14
Eigentlich lieber nicht🙂 Welche hast du denn? Je mehr desto besser!
Ich stütze mich zurzeit auf die Pics and Plans aus "Seawings".
14 March 2015, 20:12
What great results your achieving here Bernard, I am most impressed with the clarity of your work and the neat crisp rigging on the floats. 🙂
15 March 2015, 01:23
Möchtest du noch mehr Kaffee in dieses Modell investieren Dieter?🙂. Klar her mit den Fotos.
Kerry: Thank you for this "crisp" feedback🙂
Today I mounted the elevator to the tail via self-made hinges from 0,8 mm wire. In my opinion it is not (or very hard) possible to fit these two parts using the hinges of the kit. The fixed surface has already the fabric structure, the structure of the elevator coming soon.
15 March 2015, 13:38
Moin Burkhard, danke auch für die andere Info🙂. Ist diesmal zeitlich etwas zu dicht an EME 2015...
16 March 2015, 05:25
Moin Dieter, hab eben beim 1.Kaffee die Pics gefunden. Die sind ja der Hammer, Deine Eigenen? Genau aus den Blickwinkeln, die im Nebel standen, besonders von unten. Werde viel Zeit für Recherche sparen🙂 Grünes Licht für Dich in Zukunft für uneingeschränktes "Copyright"🙂 🙂 🙂
16 March 2015, 05:32
I just love these bi-plane builds, as it takes a special kind of touch to get it right and by the looks, Bernard has it ! 🙂
17 March 2015, 00:06
Today I made a "beginners mistake": I relied on a drawing although I had excellent photos. The drawing shows the nacelle struts on the outside of middle axis but in the original they are on the inside of the middle axis🙁 not really bad but regrettable.
20 March 2015, 20:17
I'd considered doing this one once. I have seen one completed in a contest. As you might guess it did very well.
31 March 2015, 20:44
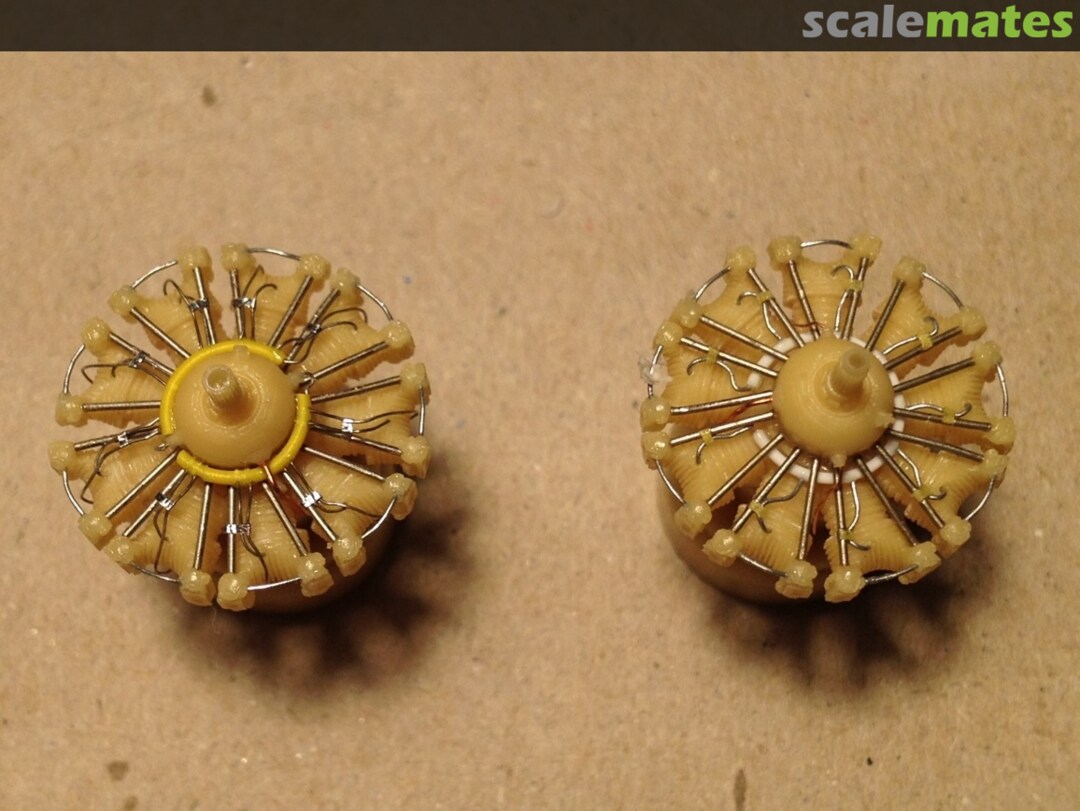
The Super Stranraer was reengined with more powerful Wright R-1820 engines. F.m.o. Aires is the best choice for the Wright radials.
8 April 2015, 10:12
Great choice! I intend to build a stranraer too, but after the Matchbox Walrus I need more time 🙂 Very inspiring what You do nevertheless 🙂 Great job!
8 April 2015, 11:13
I am enthralled Bernhard, all those little 'caps' make such a huge difference. I love it. 🙂
8 April 2015, 11:21
In Germany we have a saying "wer es nicht im Kopf hat, hat es in den Beinen" (if you don't use your Head you have to use your legs"😢. I did not look at the pictures closely and overlooked that the R-1820 has the ignition ring (divided into 2 halves) in FRONT of the valve pushrods.
9 April 2015, 19:53
Thank you mates🙂
Today I completed the engines and the mounting on the nacelles.
10 April 2015, 12:25
Nice build so far, and i have to agree with the others, interesting build to follow... The PE flat cables, were they etched on commission?
10 April 2015, 12:32
THX Antonio & Bart.
Bart: this was an joint venture with an another modeler: I created the artwork, Thomas Gatermann does the etching part.
10 April 2015, 12:49
I was stunned: it was impossible to mix the correct lemon yellow (matching the dacal) from white and yellow. It was necessary to use lime green too. Approx. 1/4 lime green, 1/4 trainer yellow and 1/2 white produced the correct color.
11 April 2015, 09:35
Oh, Du sitzt gerade am Basteltisch? Revell hat so ein Limonengelb, aber frag mich gerade nicht wie die das nennen.
11 April 2015, 09:42
Hej Holger, danke für den Tipp. Kenne ich. Bei der Beguine (Rennmustang) müsste ich das Gelb der Decals ausbessern und war schon am verzweifeln.... Kein Gelb von Humbrol passte und Revell hat mir aus der Patsche geholfen.
11 April 2015, 10:26
Obviously I used to much ethyl acetate when glueing the wing trailing edges of the upper wing... This problem was visible first after airbrushing🙁 grrrrrrrrrr
12 April 2015, 17:02
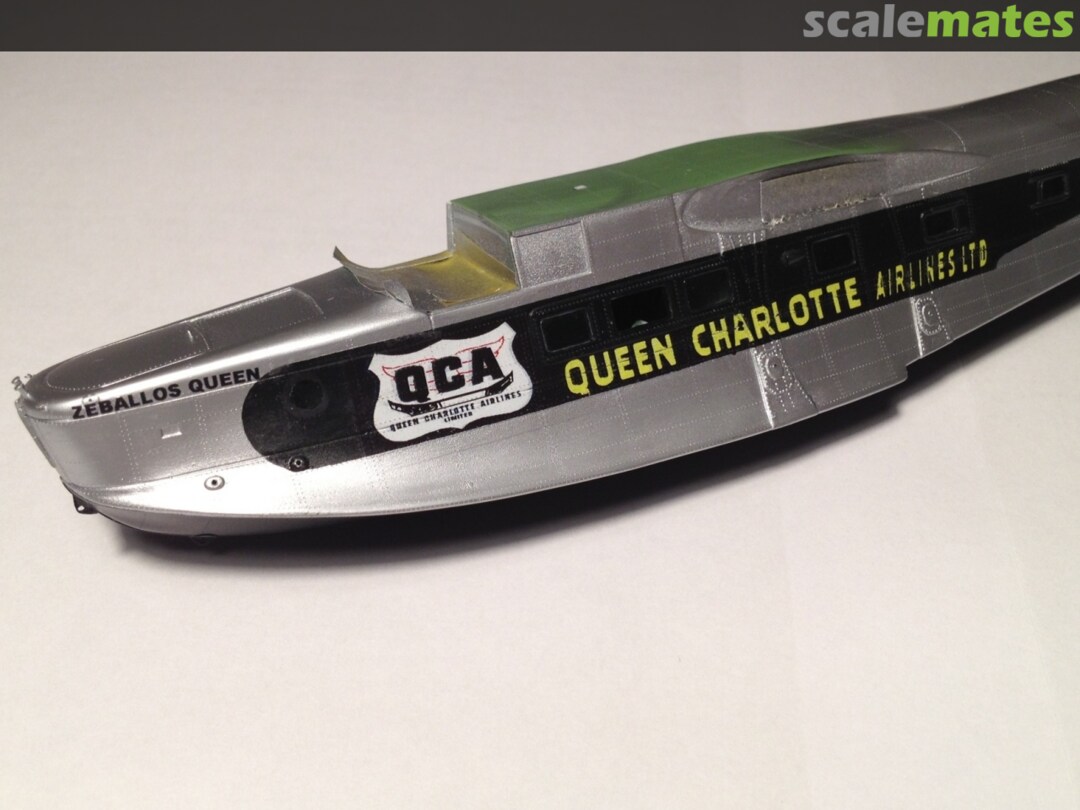
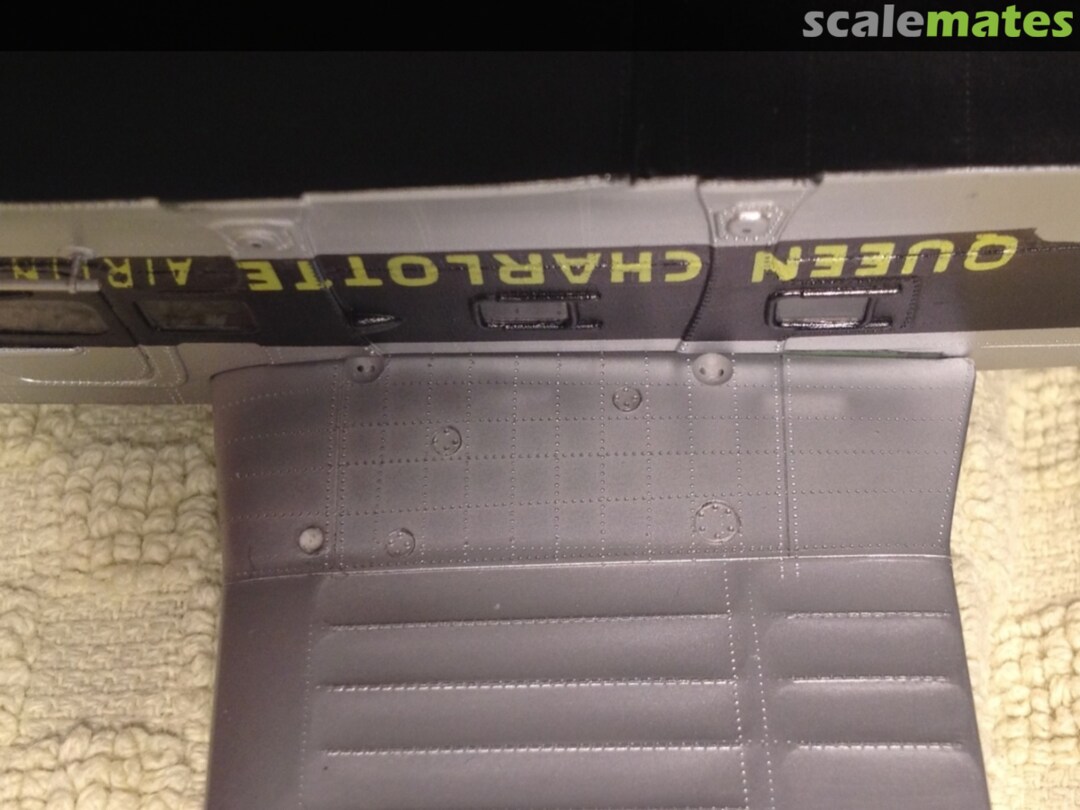
Good news: the decals from Whiskey are very well (minus white letters CF BXO🙁😢 made and durable. After sealing with a thin coat of Micro Scale decal film and cutting out the letters (the sheet is completely coated with carrier) I could place everything without problems.
Because the white coats for the large letters are out of register I changed from CF-BXO to CF-BYM.
By the way: thank you for the motivating feedback🙂
14 April 2015, 20:00
Hi Bernhard, one question..is not C and F too close together than B, Y and M? It looks quite asymmetrical...any foto for this?
15 April 2015, 17:56
You have good eyes Jan. Probably I did not pay enough attention🙁 By the way: I do not know any picture from above.
15 April 2015, 18:03
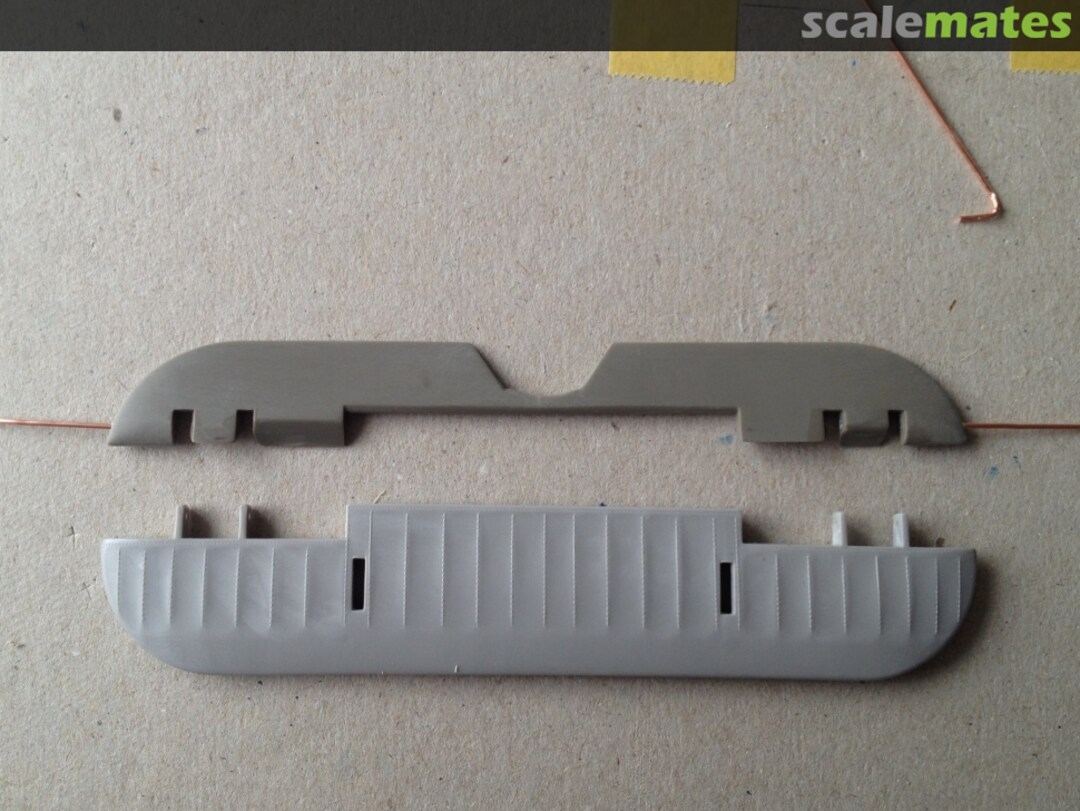
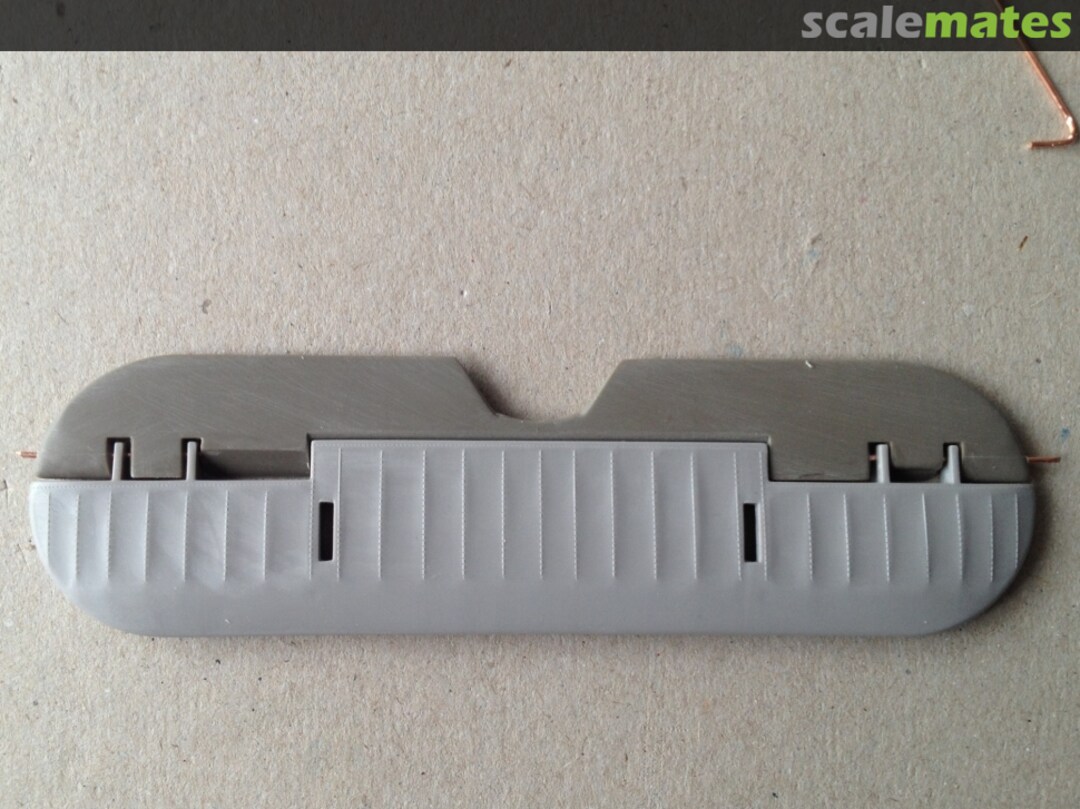
After a week of "hard" work now the lower wings are completed. I never thought that producing of two dozen of rectangular holes for the wiring takes so long....
19 April 2015, 17:10
Hi Edgars, a little bit patience please. After a long project like the Guardian I need a easy and fast one for example Xorox🙂. Yesterday I sawed and and fit the tail on the fuselage of the La-7 and I was surprised how fast this went. After completing the racer, I promise to reactivate the Stanraer.
7 July 2015, 15:54
Your attention to detail is truly inspiring and motivating Bernhard, as always.
I would have loved to have seen the 'collector' ring for the exhaust you made, as I had to make some for my B-17........no easy task. !!!
Congrats mate.🙂 👍 👍 👍
7 July 2015, 21:22
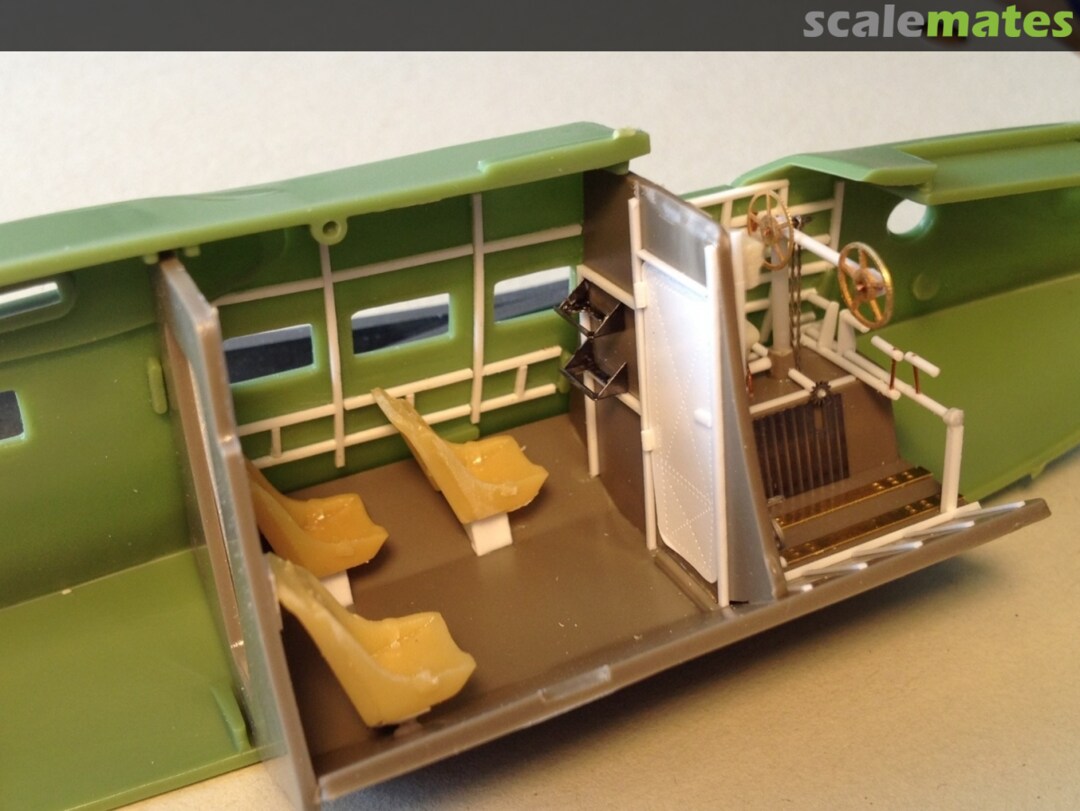
Decals for Xorox take some time (about two weeks) and so I reactivated this modeling project. The cockpit pictures are very rare and so drawings (and parts from old watches) was my main source for detailing the cockpit.
17 July 2015, 15:09
I'm simply unable to figure out how you always achieve this superb level of accuracy in 72 nd. It looks so much bigger than it actually can be.
I still have a lot to learn.... Exemplary !
17 July 2015, 19:53
Bernhard, The chain on the steering column got me. :-O
As Hanno said, your skills are something else mate, just astounding. !! 🙂
The plastic rod and the copper inserts I add to my comments.
Your an other modeller I would like to sit beside and just watch what you do. 🙂 👍.
17 July 2015, 21:04
How did I miss this? Just because I was going through chemotherapy, that's no excuse for missing Bernhard building one of my favourite flying boats! Great work! 👍 👍 👍
17 July 2015, 21:29
I echo what everyone else said. Your skills are very impressive! Amazing...
18 July 2015, 04:09
From today I will only do cockpits with a lot of plastic and even more watch parts. This way I will get a lot of comments🙂
18 July 2015, 08:57
Ticktack🙂 What is about the wholes below the pilot seat? Guess they'll be filled?!
Bernhard, you should start a ship one day😉
18 July 2015, 09:29
Bernhard, you will receive great comments even if you sneezed mate LOL. 🙂
18 July 2015, 10:12
Marco: vor vielen vielen Jahren hatte während der Luftwaffe WWII Phase unter anderem eine He-219 in 1:72 (Dragon??) zusammen gebaut. Der Sitz und die Funkgeräte dürften die Reste des Sets für diesen Vogel sein. Wohl seit 20 Jahren liehen sie dort... Firma:?
Christian: Belüftung für den Piloten🙂 Nee, erster Versuch für die Sitzstreben, ging daneben. Mache ich noch zu.
18 July 2015, 10:46
Sorry I missed the entire build, I will watch the finish, or did I miss that as well?
18 July 2015, 18:12
Guido: THX.
Dave: not too late, you're are welcome to watch the finish🙂
Unfortunately the clear part especially the windows are completely unusable🙁 What to do? In my opinion the fast and simplest way is producing each window from thin transparent PVC. Fortunately the Stranraer has only 11 windows and it wasn't too bad: despite different size after approx. 1 hour all 11 windows was completed-🙂 (picture 57 &58). Now is cinema time.
18 July 2015, 19:06
How much of the cabin interior is visible through the windows? Because of the size fortunately not so much🙂 if the windows had blinds you would see even less. I think the Super Stranraer in QCA - service certainly had blinds🙂
20 July 2015, 17:56
This keeps getting better and better! And thank you for not making 1:72 passenger cabin window blinds - or are you going to do that too? 🙂 🙂 👍 👍
20 July 2015, 18:34
The main problem is, that I don't know which interior the Stran had until service with QCA. The three seats in the first compartment are probably fictional. So if I put blinds I can't do anything wrong. But no fears, I will only put blinds in the aft compartment and only partially🙂
20 July 2015, 19:03
Indeed the watches are a astonishing source for very complicated looking parts. By the way: I have always wondered how these parts were made 135 years ago (the first pocket watches Were built since 1880 for the German marine).
A little progress on the Stranraer: paint for the watch parts🙂
23 July 2015, 19:55
It was worth to leave this project for several months: 3rd match, I'm motivated again and I think this time the model will be finished.
The decal sheet provides wide black stripes with yellow letters and suggests applying them over the windows too. Because of the very pronounced structure I did not even try. After trimming of the decals I applied only very narrow stripes on black underground (picture 66). This time I was "brave" and I tried a new semi gloss vanish from Model Master (2016) with a surprisingly good result (picture 67).
25 November 2015, 20:30
The next enthralling episodes of a masterful build Bernhard, and I am pleased to see your back. 🙂 👍.
25 November 2015, 20:36
Well Bernhard... As far as I know You wanted to build something simple out of the box after finishing the black widow 🙂 But now You are struggeling again with an old matchbox kit. I can`t wait anymore to see this one finished, because it`s a flying boat. Bernhard please do it again! 🙂
25 November 2015, 20:41
Result of a mini task: rectangular windows in place without trouble. Floats painted and ready for mounting.
27 November 2015, 20:31
The whole modeling time of this weekend consisted nearly of CA-gluing and producing of clouds of sanding dust🙂.
29 November 2015, 19:57
A highly under estimated filler of gaps that CA glue.👍
It has saved me on many an occasion.
29 November 2015, 20:02
stupid question, bernhard... but how do you manage all this... factor: time.. do you have wife and kids?
30 November 2015, 15:16
It's unbelievable how many details consists a hull of a flying boat. Mission impossible to represent all of them and so I scratched only very few of them.
30 November 2015, 19:54
The "very few" details you do scratchbuild add up to a very impressive looking model Bernhard!
2 December 2015, 10:23
You comments, especially the one from Bill, have made me thoughtful in the last days. I done the paint job via airbrush and brush (yes: brush!! then on any places it was impossible to manage the task with the airbrush). I tried as hard as I could and it did not work as I wanted🙁 The combination of raised windows frames, painting scheme and the kind of decals (printed with a sublimation printer) was very unfavorably. Well, you can't always have everything🙂
3 December 2015, 20:26
I think you've done a fantastic job, especially when I recall that this is the Matchbox kit. Maybe some things did not work as you wanted, but you have achieved a marvelous result with this old kit. You've gone far beyond anything that Matchbox ever intended, and I praise you for that - I'm looking forward to seeing the completed project! 🙂 🙂 🙂
3 December 2015, 22:07
Today i looked at the reworked canopy and thought "you can't use this armored glass - there is so much work in the whole model". As a first result the roof-rail, upper and right fixed panels and right moveable panel.
4 December 2015, 21:04
Hallo Bernhard, es ist immer wieder schön Deinen Projekten zu folgen. Viele Grüße
Stefan
7 December 2015, 16:22
lovely pic the last one... then we try to sand everything smooth...
8 December 2015, 08:55
Bernard please, for the next time something big, like 1:72 Heller DC6 Skymaster. Please.
8 December 2015, 18:42
Thank you mates.
Jan: you are so right! The Stranraer (1:72 Is small, too small for me) and reeally challenge. I think next time I try anything in 1:48...
Last week I meet Hanno Kleinecke and told him that I don't have the right idea how and in what sequence I should attach the canopy. He told me to simply "make the frame from metal". This was an excellent idea and now I have a very durable (soldered) frame. Thank you Hanno!!!!
Little bit progress: handles for the bow (durable too because completely from metal).
12 December 2015, 16:24
Anytime Bernhard ! I'm glad to have made a small contribution to this great project of yours. You made it look a lot more sophisticated compared to what I was able to imagine ! 🙂
12 December 2015, 19:05
When and where are you planning to test fly it Bernhard.? 🙂 🙂 🙂.
It's a real work of art to be so proud of mate. 👍 👍
12 December 2015, 21:33
immer schön, um dein Arbeit zu sehen. Lust pur soll ich sagen 🙂
12 December 2015, 21:38
Hanno: thx again. The frame I unbelievable durable.
Kerry: I don't know yet about the flight but you have a seat🙂
Martien: the passenger cabin of my Stran has several seats; would you participate in the first take of?
The next obstacle is overcome: the pilots have a roof above there heads🙂
Honestly I was pretty scared of this... But I was lucky: 3 of 9 panels was moveable and so I did not have to glue them in🙂
13 December 2015, 20:14
Troubleshooting a' la Bernhard : How to turn a problem into an advantage. Exceptional, all other words fail....... 🙂
13 December 2015, 22:24
Looking really sweet - this is one kit I'd like to get someday, my grandfather worked on those during the war when he was stationed at Coal Harbour on the north end of Vancouver Island. Well done indeed.
14 December 2015, 00:33
Time for a glass red wine: the roof is painted. Because a mistake by mixing of paints I had to do this job twice. Fortunately I was possible to remove the paint from the canopy without problems. 🙂
14 December 2015, 19:12
Sometimes traffic jams are useful: today evening I found the solution for clean attaching of the wings to the fuselage without messy work.
15 December 2015, 18:58
This is ingenious Bernhard! Probably the best solution for this job. What brand of cyano will You use? It has to be very thin I think.
15 December 2015, 19:50
Moin Moin Christian, thank you🙂
As always I intend to use the thin CA from Tamiya which has a very fine tip like pipettes. I think this will work but today was a long day for me and it's too late for gluing and so I take a break: It's probably smarter.
15 December 2015, 20:32
Very good news: everything worked as planned. 100% success. 0,0 g putty & 0,0 g sanding required. Three small stripes of self adhesive aluminum foil as cover for the gaps was enough. 🙂🙂
17 December 2015, 14:26
Gratulation Bernhard! Das dürfte die wohl weltweit am besten umgesetzte Matchbox Stranraer sein.
18 December 2015, 07:51
Dieter: da bin ich aber platt... Aber auch schachmatt, denn das Modell ist ja noch gar nicht fertig und nun habe ich also keine Wahl und MUSS die Stran zu Ende bauen🙂
18 December 2015, 20:25
Na ja Bernhard, wer die Meßlatte so hoch legt muß wohl auch mit solch positiven Reaktionen rechnen🙂 Und das Teil wird immer besser! Ich habe absolute Hochachtung vor Deinen Fähigkeiten und Deiner Ausdauer! Wirklich beeindruckend! 👍
18 December 2015, 20:34
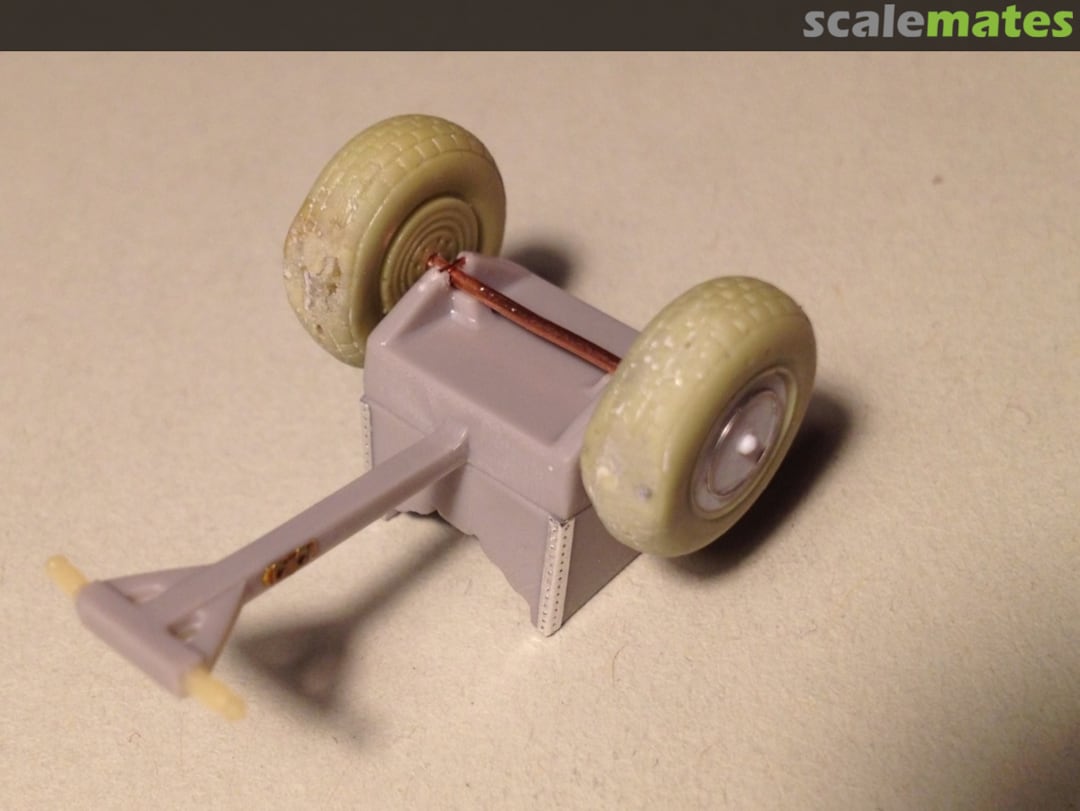
Wheels ? I don't suppose the Stran was amphibious, so they might be for a cart to place her on ? 🙂
20 December 2015, 18:35
Hi Bernhard, i can hardly wait to see the model next year at a scale modeling show 🙂. Cheers Stefan
23 December 2015, 18:57
Hi Hanno, you are "nearly" right: Stranraer was not a true amphibian and needed a beaching gear.
@Stefan: seeing the many Stranraer fans I have no way out but to bring it to the EME 2016🙂
23 December 2015, 19:20
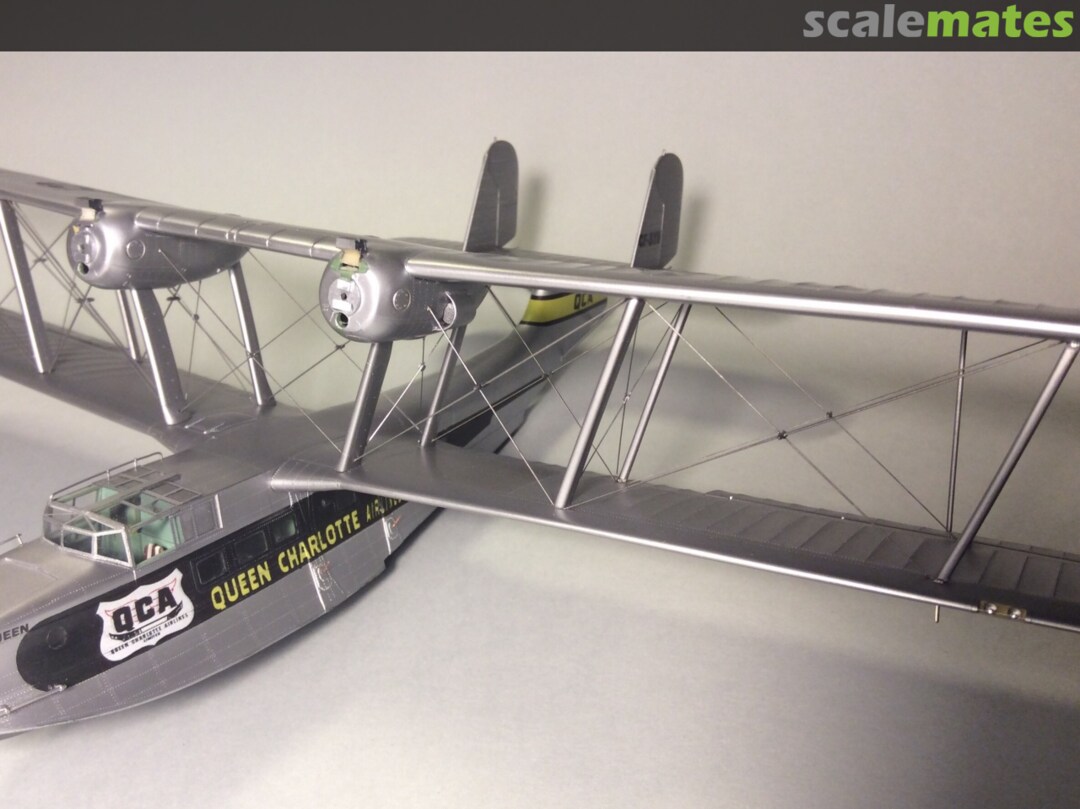
Yesterday I researched the last time before mounting the upper wing. It was worth it because I discovered that the Strans in "my" scheme has 2 additional rails on the right side: on the bow and on roof of the cockpit. After attaching them now I'm ready for mounting (today🙂🙂🙂 ) of the upper wing.
30 December 2015, 07:47
Outstanding in every way Bernhard, and I do like the museum images, as it helps me tell the difference between your work and the real thing.
A BIG salute mate. 👍 👍 👍 🙂
30 December 2015, 14:53
It was worth to invest a lot work and preparing the connecting points for the struts: all struts fit on the lower side without glue.
Mounting of the engine nacelle struts on the lower side.
I used the same technique as for the wings and applied the CA - glue through two auxiliary holes respectively connecting points for the landing legs. For this I had to redrill an already closed hole (landing leg mounting point).
30 December 2015, 16:15
Sieht einfach nur geil aus das Teil, super Arbeit Bernhard (wie immer😉)!
30 December 2015, 16:52
Ich habe den Bausatz hier liegen. Ich glaube die Anzahl Atome, die da noch erhalten sind bei Dir kann man an zwei Händen abzählen ... Chapeau.
30 December 2015, 18:05
Das wird das wohl beste Flugboot aller Zeiten! Allein das verbeulte Blech am Rumpf ist der Hammer! Besser geht es wohl kaum!
30 December 2015, 18:50
Next task is completed successfully: mounting and glueing of the upper wing without blemishes and without trouble. In the front of the nacelle I drilled an auxiliary hole for applying of CA for gluing of the forward strut without a mess.
Many thank to all Mates for all comments.
I wish all Mates all the best and happy new year.
@Christian:
freut mich, dass Dir das Finish gefällt. Korrespondierend mit meiner Philosophie (nicht der absolute Glanz via "Alclad Spiegel chrom" sondern unterschiedlicher Glanz durch nachpolieren ist entscheidend) habe ich auch hier meine bewährte Mischung aus Testors Metalizer, Testors Sealer und MrColor/Gunze MrMetall verwendet. Anschließend mit Micromesh 3200/3600 poliert/geschliffen und zum Schluss mit Q-Tipps über die Blechstösse und Nietenreihen gewischt.
31 December 2015, 10:37
Happy New Year - Same to you and your family🙂
Looking forward to this stunning WIP next year🙂
31 December 2015, 11:00
And all the best from the land "Down Under". see you all in 2016. 🙂 👍
31 December 2015, 11:14
Exquisite! Looking forward to the finish, and to new Yellowwing projects in 2016 - gutes neues jahr!
31 December 2015, 20:52
2016: you and all Mates are welcome🙂
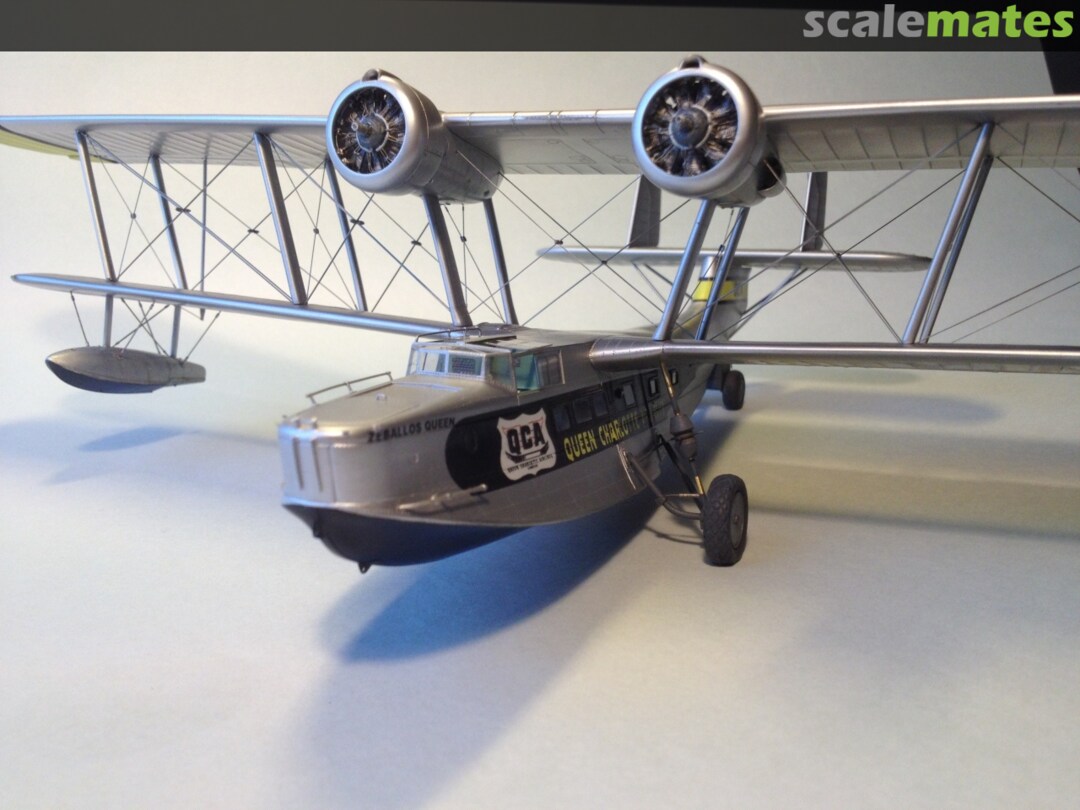
Today was a real "slow" day... After "awakening" (after lunch🙂 I dared to start the wiring. Result: 12 of 36 are in place with very minor collateral damage. When I painted the turnbuckles aluminum I slipped with the brush and soiled the wing. No big dear🙂
1 January 2016, 17:30
Your work is all the more extraordinary to me when you present an item we are all familiar with that helps bring it home to us, what you have produced. 👍
Stunned I am, absolutely gob smacked at your skills, but totally inspired.🙂
Salute. 👍 👍 👍
1 January 2016, 20:29
Wiring, 2nd task: 27 of 36 in place. This time I used photo etched profiles, 0,35-0,40 mm wide. I decided to use the darker set that looks a little oxidized. I'm not really satisfied with the result because the color of the wiring is clearly different from the rest of the airplane. I have to sleep on it for a night.... :I
2 January 2016, 20:37
Today I attached the remaining 9 wires and managed the last hurdle: the spread bars. I cracked my head over this for several days because I had no idea how to do this. In the original the wires passed THROUGH the spread bars where they cross. That means that a piece of rod (in the model) "should" not lie under or over the crossing point. I came up with the following solution. I attached approx. 1,5 mm long and pointed pieces of 0,7 mm rod on both sides and filled the area between the rods with CA glue. In two cases I had to add a thin slice of rod because of to large distance between the wires. I was truly surprised that this was necessary only in two cases. In the end I painted everything with a mix of Mr Color metal primer and Alminute pigment. To my great surprise the spread bars in the model have the same effect as in the original: everything is very durable.
3 January 2016, 20:00
Klasse geworden Bernhard, ich hatte mich schon gefragt, wie Du das gemacht hast. Sieht total überzeugend aus!
4 January 2016, 06:26
Thank you Mates!
The last curve: completed minus props and wire-antennas🙂🙂🙂
4 January 2016, 14:44
Moin Bernhard, whenever I have been following your reports, I find it very difficult the tool back in the hand to take, very informative, absolutely worth seeing and the models at the end simply a class of its own, top notch, Divinely awesome, admirable (Y ) 👍 👍
4 January 2016, 14:53
Die Vorschußlorbeeren waren mehr als berechtigt! Häßliches Flugzeug - Fantastischer Modellbau!😄
4 January 2016, 15:53
It looks great Bernhard. I came across one of these models at our local aviation museum.
South Australian Aviation Museum/Model Expo | Album by Chazwazza
6 January 2016, 01:08
One more time thank you Mates.
@Stefan: Lübeck? Ja am Sonntag, werde mit Hanno Kleinecke gemeinsam ausstellen und freue mich riesig. Aber Du meinst wohl mit Deiner Frage, ob ich den Drahtverhau mitbringe? Mal sehen.....🙂
6 January 2016, 20:38
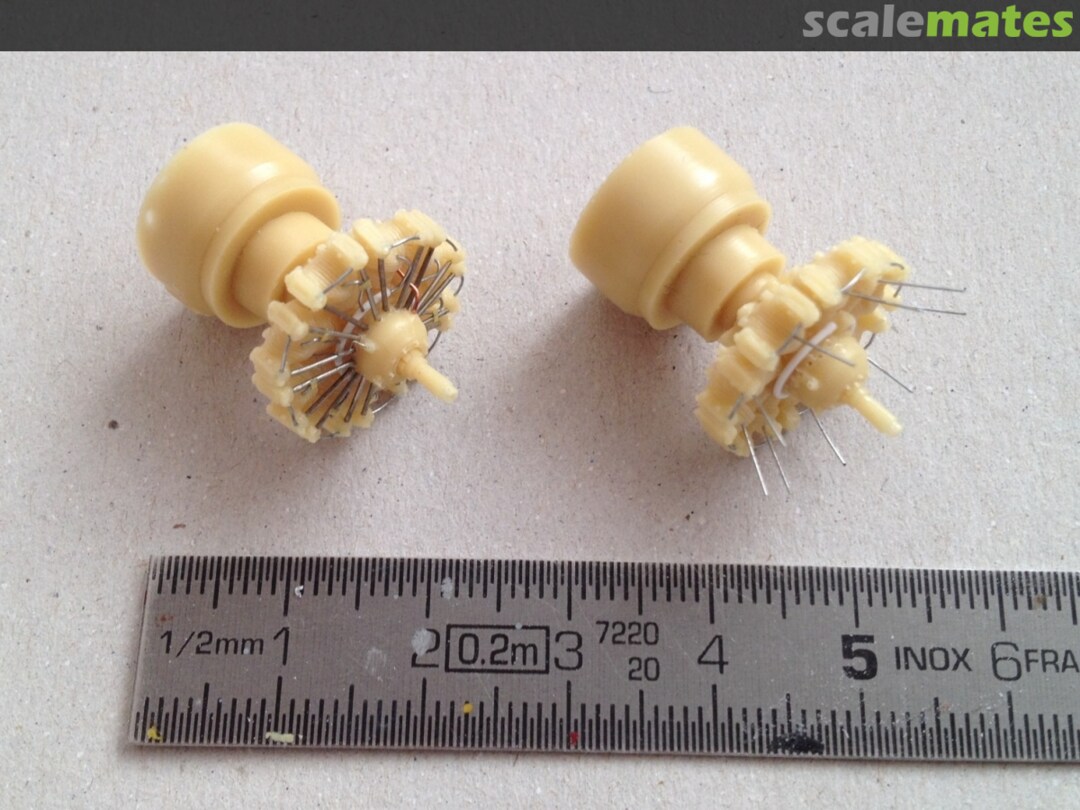
52 parts for two 1/72nd prop hubs...... well worth the effort ! 👍 👍
7 January 2016, 11:34
"Unerschrocken" nahm er sich des Bausatzes an ...
Ich bin entzückt.
7 January 2016, 20:20
I echo all of the above comments Bernhard. absolutely. 🙂 👍
Salute. !!!
7 January 2016, 20:30
We all bow to the master - this is beyond well done, perhaps superlative would be appropriate.
8 January 2016, 01:06
Fantastic Work Bernhard.. Take a 5 minute break and get into your next amazing project!
8 January 2016, 01:26
Very impressive work. It is certainly the best matchbox Stranraer ever built.
8 January 2016, 08:01
I didn't write anything earlier on, but it was a pleasure to watch this build, the amount of scratchbuilt details is amazing
8 January 2016, 12:50
Meinen Respekt vor diesen Modell, toll was du aus dem alten Matchbox Kit gezaubert hast,
8 January 2016, 14:36
Hast Du eigentlich auch schon mal ´ne 109er gebaut, oder so.....!?
8 January 2016, 17:43
I can only repeat what everyone has already said! A masterpiece and outstanding example of modelling skill and craftsmanship - bravo! 🙂
8 January 2016, 18:35
In the past every time when I finished a model I enjoyed this moment. For the last two years I'm enjoyed this moment twice because I get so many positive and friendly comments from you. Actually the enjoyment is three fold because you like my work and you support me when times are rough.
One of you suggested that I should take a only a five minute break🙂 but it is going to be more like 15 minute because the bird needs a nest🙂 I already have an idea for the nest (2 last pictures).
8 January 2016, 20:31
Hi Bernhard, nice idea. Do you want to add a few figures? Cheers Stefan
8 January 2016, 20:55
Hi Stefan. Es ist zuerst eine grobe Idee, welche heute aufm Weg Heim entstand. Figuren: eher nicht da ich nicht wirklich Gesichter malen kann, erst recht nicht in diesem Maßstab🙁
Die Idee sieht so aus, dass die Flächen des Dios gar keine Struktur bekommen sollen, sondern nur Farbe (um nicht vom Modell abzulenken). Das Wasser an der Kante der Rampe will ich in der Art und Weise gestalten, wie damals bei dem Dio mit der Supermarine S6 (sind es wirklich 23 Jahre her.....?) Grüße zurück, Bernhard.
Übrigens nimmt die EME 2016 Gestalt an: Jens hat uns heute angemeldet.
8 January 2016, 21:15
Hi Bernhard, egal wie strukturiert Du die Grundplatte baust, sie wird definitiv nicht vom Modell ablenken sondern nur die Gesamtwirkung unterstreichen 🙂. Figuren sind auch mein Schwachpunkt, aber solangsam lerne ich es. Viele Grüße Stefan
8 January 2016, 21:28
There is nothing to say....just WOW!
And as i wrote before, your are candidate for "Kit-master of the Year"
8 January 2016, 22:34
A truly delight for the heart and soul, a very welcome warm sight for this cold winter days. Thank you for sharing your art and talent! 😄
9 January 2016, 10:01
Based on my fingers, it doesn't seem possible that human hands could do this. Great work!
9 January 2016, 16:26
Thank you for the second bunch of feedback! In view of all the comments I took great care with the base🙂 Just now coated the water with a layer of future and now I'm satisfied. Pictures coming soon.
11 January 2016, 17:09
You really should make the plaque longer and add the same text in English as well as in German. I love what you've done with the crude and old Matchbox kit! Excellent scratch building.
11 January 2016, 17:46
Somehow I missed it - but it was now on Modellversium. What a great amount of details - very nice model 👍
27 November 2016, 21:49
i missed this work of art/modelling course/absolutely astonishing model from you Bernhard. thanks for showing what true accuracy and attention to detail really mean
27 November 2016, 22:19
Great Model. Especially the metal finish and the bracing. WOW
28 November 2016, 06:06
I've been to Stranraer and it isn't a tenth as beautiful as you model Bernhard. Looking through your photos is like a masterclass in modelling, so thanks I've learned a lot.
28 November 2016, 16:59
Beautiful! Reminds me of Porco Rosso or maybe I'm thinking of The Wind Rises
31 March 2019, 17:51