

Sikorsky NH-3A Seaking "Highspeed-Testbed" - COMPLETED


Comments
13 10 October 2014, 08:17
Burkhard: you are welcome!
Me racer is complete, "holidays are over" and now real work starts🙂 It is going to be a lot of work. Completely different "tailboom" and tail, new streamlined sponsons with jets from Rockwell jetliner and wings.... We're to start? I going to start small as a worm up: horizontal stabilizer.
16 October 2014, 16:13
Mhhhhhmmmm..... Aber auch kompliziert. Schwanke noch zwischen zwei möglichen Varianten für den Hinterrumpf. Balsa, imprägniert mit Sekundenkleber und Primer oder aus Spanten mit Plastikbeschichtung.
18 October 2014, 12:21
Today I thought about the wings. In the "blueprints" (picture 8 ) is the wing divided in 8 sections (have 7 inter spars). From an other picture (picture 7, in flight) I can see the position of the hinges of the ailerons and flaps well. But they do not fit to the positions of the spars (comparison on sketch in pic 9). Question to all you aircraft engineers out there: are the hinges always on the spars or could they be mounted between the spars?
18 October 2014, 18:15
Ailerons are mounted aft of the wing box, which is between the front and rear spar. This looks like a multispar box.
Ailerons have spars, too.
There may have been different versions of stub wings, with and without ailerons. Hard to differentiate all the lines on that sketch. Oneline may the the hinge line, not a spar?
18 October 2014, 19:27
seems to me you're in the mood Bernhard. Definitely you have a run at the moment😉
18 October 2014, 20:02
Moin Burkhard, danke für schnelle Antwort. Hab eben gemerkt, dass ich Rippen und Holme verwechselt habe. Das hat man davon, wenn man im einer Sprache schreibt, die man nicht richtig beherrscht-🙁. Also alles nochmal in German. Die Tragfläche hat gem. Blueprint 8 "Bereiche", die zwischen den 2 äußern und 7 inneren Rippen gebildet werden. Dass hinten und vorne ein Holm dran ist, kann ich nachvollziehen (Flügelkasten). An der Rückseite des hinteren Holms sind die Scharniere befestigt. Nun die Frage: muss am Befestigungspunkt des Scharniers eine Rippe sein (an der andern Seite des Holms). Als Elt- Ing. mit einem Halbwissen in Statik hätte ich das so gemacht...
18 October 2014, 20:13
Ein bisschen masochistisch muss man schon veranlagt sein, wenn man sich so ein Projekt antut, oder? Aber wie ich dich kenne, wird das wieder ein Hammermodell. I'm in.
18 October 2014, 23:47
THX für die nächtliche Beratungstunde🙂.
Stefan: Das nehme ich doch glatt als Kompliment an!
Clifford: each support is very appreciated-)
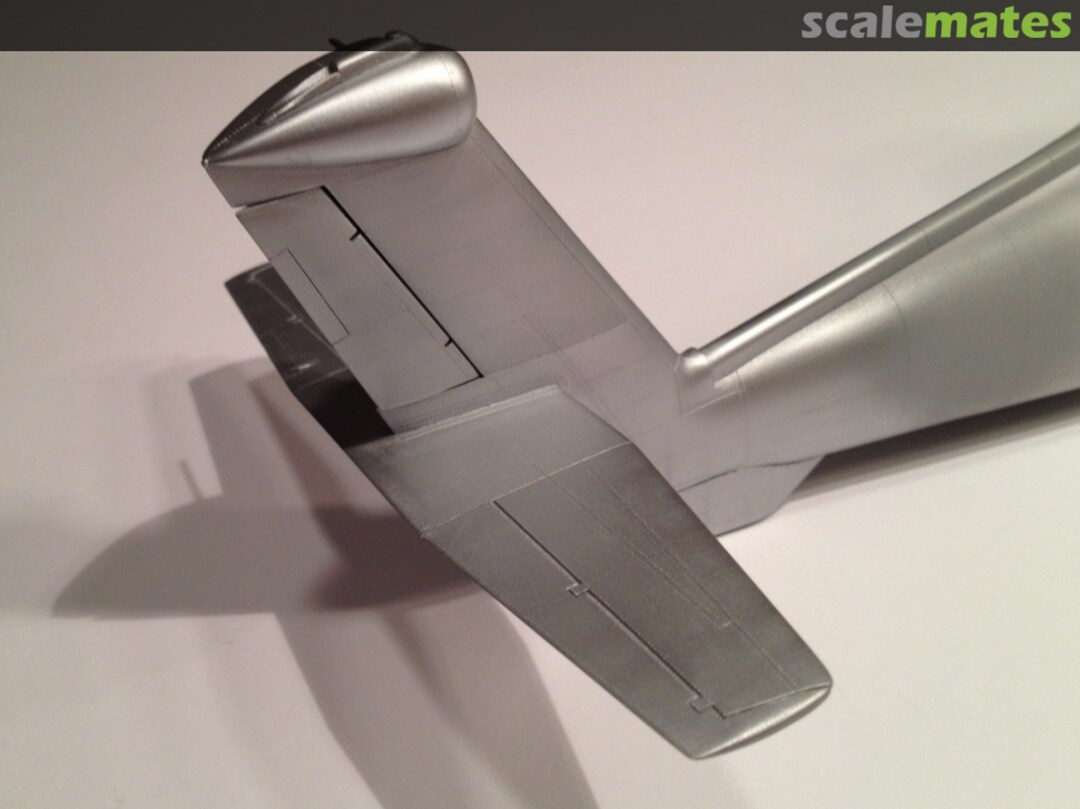
Fortunately I saved the old Monogram Mustang kit. With its raised panel lines it is better for this project than each modern kit with engraved panel lines🙂 ... And has wings with laminar profil!!
1,5 hours later: 8 cuts, a lot of spare plastic and approximate 3-4 cm3 cyanoacrylate. More cutting and producing of sanding dust coming soon🙂.
19 October 2014, 11:57
Hej, es sind noch Plätze in der ersten Reihe, David🙂.
I never thought that balsa wood impregnated with cyanoacrylate would be so hard.
28 October 2014, 20:15
With your skills Bernhard this should come together beautifully, looking forward to seeing it finished.
28 October 2014, 21:46
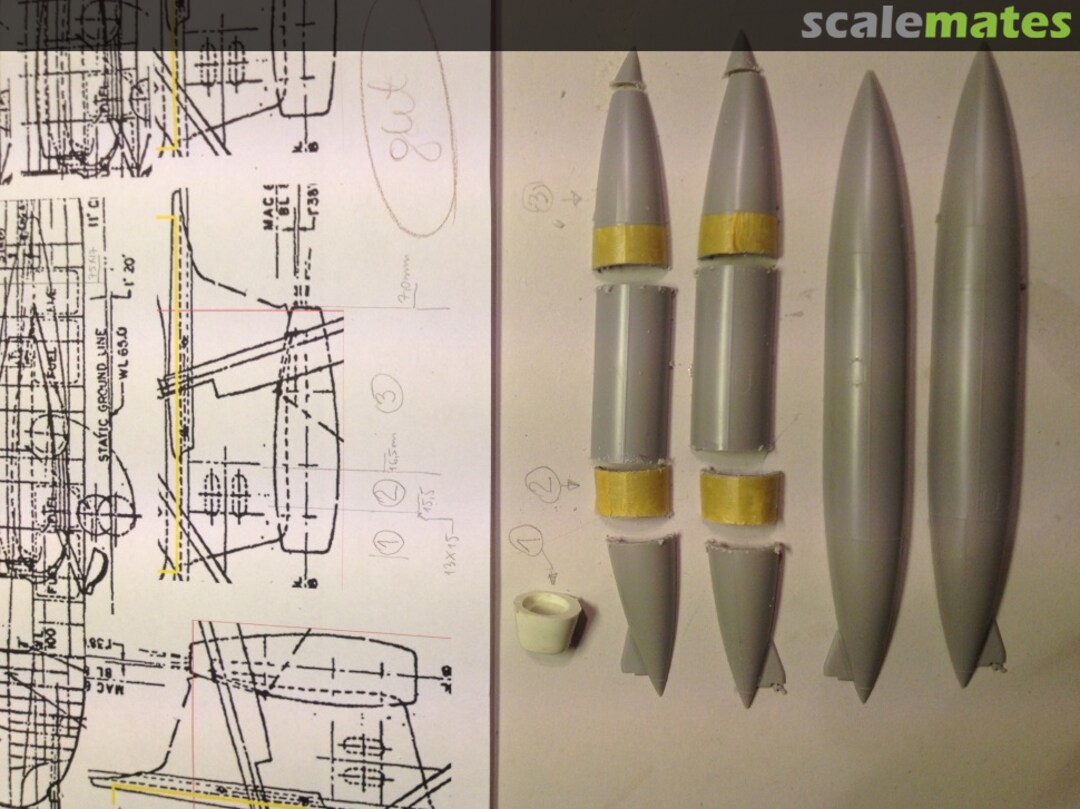
Hallo mates. Today a little progress with the jets. But first: thank you for the last comments. Sometimes things are complicated. Sometimes everything just goes really smooth. Fortunately I have saved the stone age MPC kit of a Learjet for ten years. In connection with the large auxiliary tanks from Revels Strike Eagle I was able to manage the first jet pod in about 1,5 hours including the fan on the front (from Monograms Cessna A-37) and the thrust tube.
30 October 2014, 20:47
Today I had a first success: I managed/carved from ureol (a kind of soft plastic like material)the wing/fuselage fairings. It was worth investing 2 quite hours in precise work: the wings fits perfectly.
1 November 2014, 14:39
Bernhard, meinst Du das ernst? das Ding willst Du halb scratch bauen?Na da bin ich aber mal sowas von dabei!👍
1 November 2014, 17:16
Willkommen Holger und Soeren! Platz in der ersten Reihe neben David reserviert🙂
Die letzte größere Baustelle liegt 10 Jahre zurück (TBM-3E Tanker #3) sodass es mich mal wieder in den Finger gekribbelt hat. Abgesehen davon: als Modell habe ich die Kiste nicht gesehen. Im Prinzip habe ich alle Fragen "wie und aus was" gelöst. Will noch ausprobieren, wie ich flüssiges Plastik herstellen kann, zum Beschichten von Konstruktionen aus gemischten Materialien wie die Stummelflügel. Bin gespannt, ob sich der Ureol- Schleifstaub mit irgendetwas auflösen lässt. Ansonsten werde ich Plastikspäne mit AE auflösen und damit die Teile beschichten.
1 November 2014, 17:29
Hallo Bernhard! Wenn es hier auf Scalemates einen Preis für Innovität geben würde, hättest Du den schon 🙂
Wie immer ein tolles Projekt!
2 November 2014, 19:08
Tank you Clifford and danke Christian.
Diesmal wohl noch nicht ganz🙂. Weder mit Ethylacetat noch mit Aceton lies sich Ureol beeindrucken und etwas stärkeres habe ich nicht-🙁 Die Pampe aus Spänen und Ethylacetat hat prinzipiell funktioniert; haftet wie die Pest aber lässt sich komischerweise sehr schlecht schleifen. Da muss doch der Mr 500 oder Mr 1000 von Gunze ran.
Today I managed to fit one of the ureol wing-fuselage fairings and was stunned that after only 15 minutes I was ready.
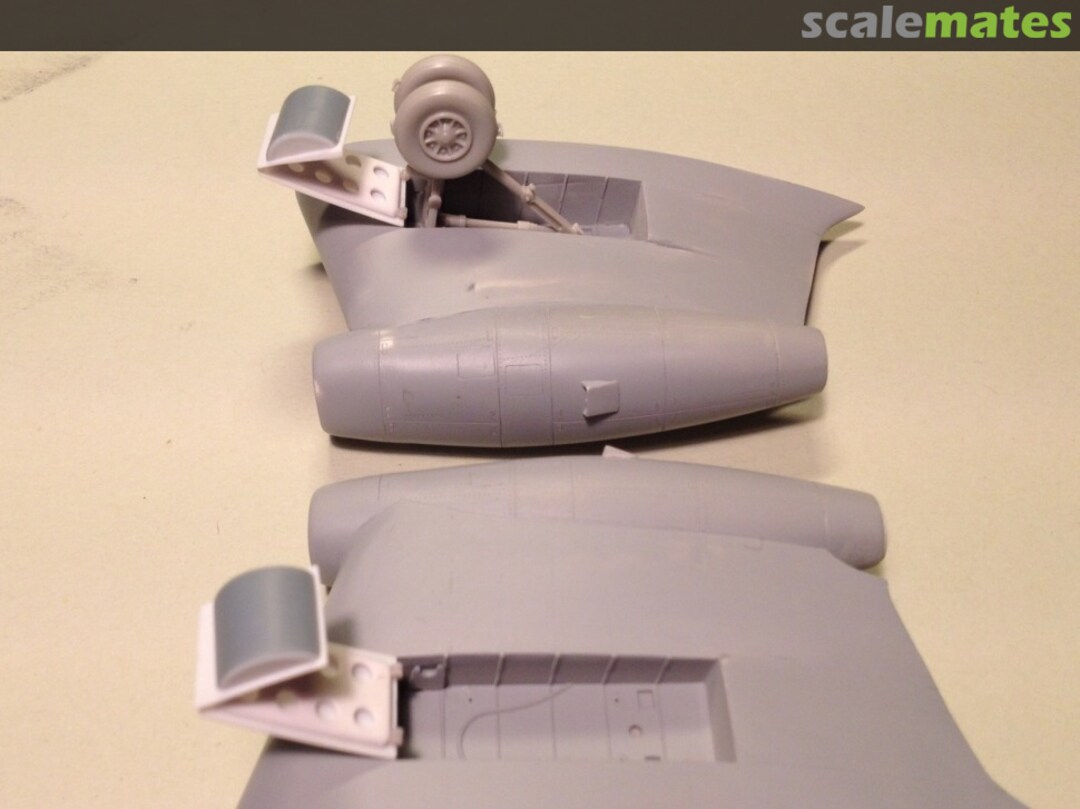
One of the engines is completed including panel lines and two inlets. The other engine and fitting to the lower "wings" are coming soon.
2 November 2014, 19:37
Today I glued the wing fairings to the fuselage and used a simple but very effective technology: cyanoacrylate was applied not from the outside but from the inside via 5 auxiliary holes. Result: 100% clean and no sanding or cleaning.
Another construction site: mounting of the engine pods on the lower wings. I'm afraid that will be not so easy. Putty or coating of the gap with thin plastic... That is the question!
3 November 2014, 19:48
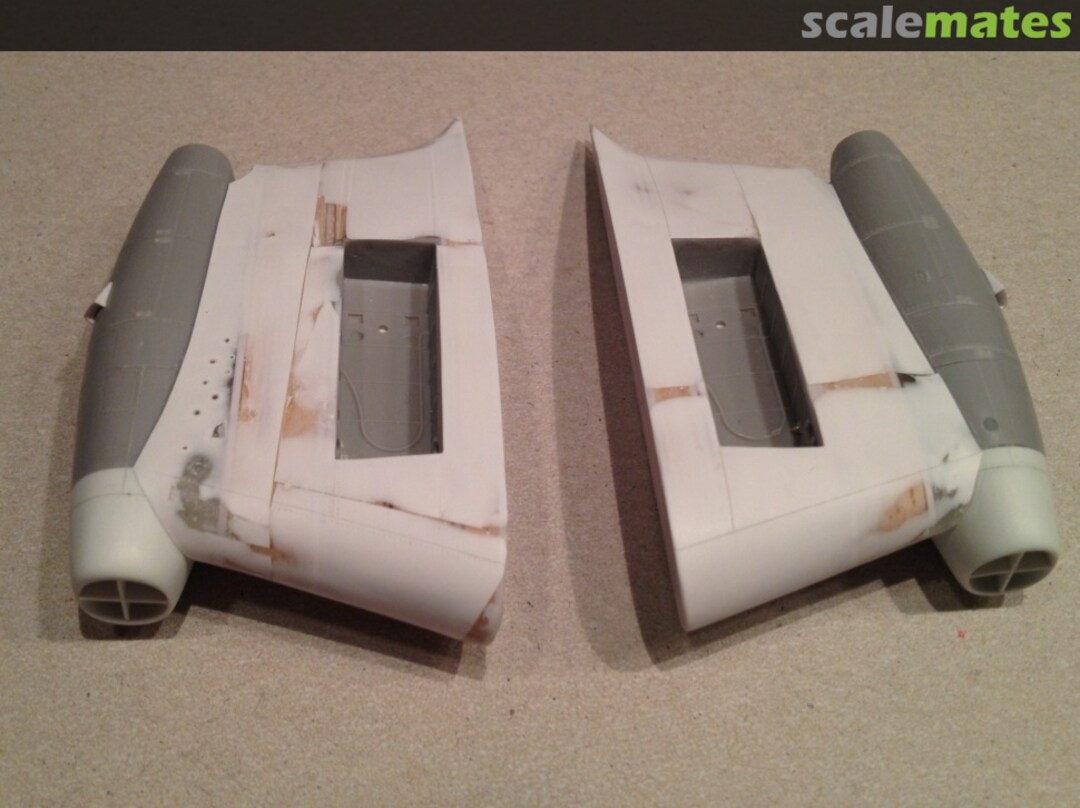
One week ago at last I decided to coat the half-completed new sponsons with thin (0,13 mm) plastic sheet. I think this was no right decision.... A lot of hard work, sanding and a dozens corrections with CA-glue & micro balls for strength was necessary to finish this task.
9 November 2014, 16:50
So bin auch dabei.
Nochmal zur Rippenfrage ... nein nicht unbedingt.
9 November 2014, 22:03
I'd recommend using Magic Sculp instead of CA and microballoons. Easier to sand/scrape into shape and the resulting surface belnds in nicely with styrene.
10 November 2014, 14:33
Moin Marc, musste 4 mal fokussieren, um den Bezug herzustellen. Danke. Da bin ich doppelt beruhigt🙂. Hast du einen Luftfahrt-Background als Beruf?
Moin Mates; never ending story "lower wings/sponsons & jetpods" is done and I'm very happy with the result.
11 November 2014, 06:54
Ich lock mich hier auch mal ein, ist ja der Wahnsinn! Hoffe ich komme selber vor lauter Schnappatmung noch zum basteln!😉 👍
11 November 2014, 07:50
Konstruktion oder "Realisierung"? Kreetslag? Ich war neulich wieder da, im Gebäude 18 neben der Fährenanleger. Ging um Abstimmung zum Thema ZAL (Hab unter meiner Obhut die IuK Technik für das ZAL um die Ecke; sehr imposant).
11 November 2014, 21:16
Tadaaaaaa! A small task & few pieces but great happiness! The landing gear & doors fit very well. Does anyone have an idea how the door will be retracted? I've not solved this question yet....
12 November 2014, 20:31
Thx Es-haq.
Es ist vielleicht verrückt, sich so viele Gedanken zu machen.... Aber es war interessant, die Mechanik zu verstehen und zu " konstruieren". Marc: jou, Stange, hab auch gedacht. Hab zwei Punkte gefunden für die Stange. Aber die kleine klappe muss in die andere Richtung bewegt werden. ohne Hydraulik für die kleine Klappe geht's m.E. nicht oder habt "ihr" in der Luftfahrt einen Trick für ein derartiges Problem?🙂
13 November 2014, 16:00
Muß mit einer extra Stange, ungefähr parallel zur Ebene der Großen Klappe funktionieren, ähnlich einer Youngman-Flap. Stell Dir ein Rechteck mit gelenkigen Ecken vor, bei dem die eine kurze Seite fix ist, eine lange Seite die große Klappe ist und die andere kurze Seite die kleine Klappe.
13 November 2014, 19:47
You are welcome Clifford!
Marc & Burkhard: danke für Support. Gestern hat mich ein schlimmer Husten erwischt und hab heute (war ein langer tag🙁 nicht viel geschafft. Immerhin ist eine "Mimik" fertig: wird's so funktionieren?
14 November 2014, 20:43
A Little bit progress: lower wing-fuselage fairing on the left side. In the same way as the wing fairings I carved this from ureol. About one hour of work incl. gluing to the fuselage.
17 November 2014, 15:10
Thx Gabor and Alberto. Now I have to do the most complicated part of this project: the rear fuselage. A few days ago I decided to construct this one from plastic: spars, ribs and skin.
18 November 2014, 16:07
View your skill to demonstrate, it will be like a walk for you 🙂 👍 I'm sure.
18 November 2014, 16:16
Hallo Bernhard! Ich weiß zwar nicht wie Du das machst, aber was Du machst ist unglaublich. Und vor Allem unglaublich gut. Das würde ich auch gerne können. Besser geht wohl nicht!
18 November 2014, 20:42
Moin moin Edgars: thx.
Würde gerne andere Meinungen hören: nach Auswertung der Originalpics und des Blueprint ist m.E. der untere, hintere Teil der Heckflosse nach rechts geneigt...(siehe letztes Bild). Was meint ihr?
19 November 2014, 06:57
Hi Bernhard,
echt der Wahnsinn, was du hier zeigst!
Ich würde dir mit der Neigung der Seitenflosse zustimmen. Hat den Hintergrund, dass somit ein "Auftrieb" nach links entsteht, um den Heckrotor zu entlasten.
19 November 2014, 07:21
Hej Florian. Danke für den Blitz Feedback. Der kleine dunkle Klecks unten links? Positionslicht? Rot? Oder irgendeine Antenne?
19 November 2014, 08:25
Hi Bernhard, kein Probelm 🙂
Ein Positinonslicht ist es nicht, wenn wäre es das weiße, aber das liegt oben an der Hinterkante von der Seitenflosse. Antenne auch nicht, ich gehe davon aus, dass es sich dabei nur um einen Schatten handelt, denn da ist eigentlich nichts angebracht.
19 November 2014, 09:02
Super Arbeit Bernhard, freue mich schon auf das fertige Modell!
19 November 2014, 11:53
Danke, danke, danke!
Today was time to saw and to construct the base of the rear fuselage. Unfortunately I discovered that no part of the fuselage has a plain surface🙁. So it will be necessary to fill the room between the pastic parts with balsa wood. I'm not going to make the same mistake as with the lower wings (0,13 mm sheet). This time I will use more durable 0,4 mm sheet. I now already how I'm going to bend this.
19 November 2014, 16:16
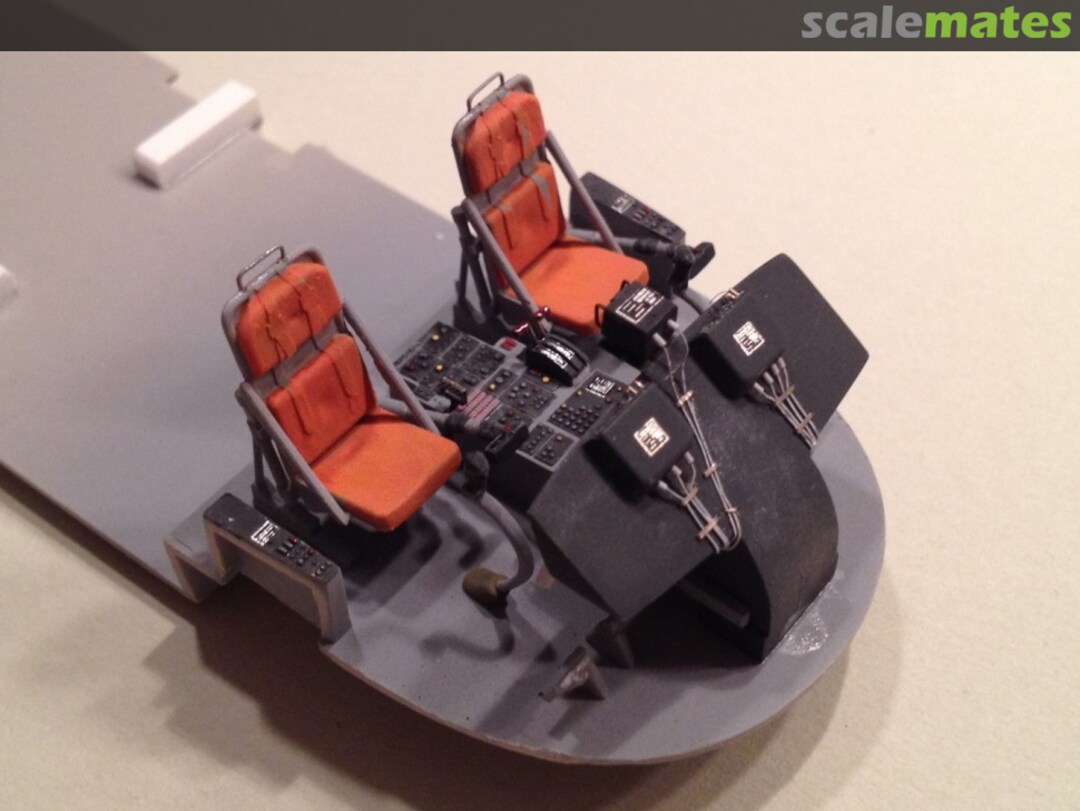
I did not feel like balsa wood dust and opened a few tins of Humbrol and Mr decal softer. Of course what I most "like", the harness, is not finished yet🙂
On the left side are the thrust levers for the additional turbojets well visible. On the middle of the panel roof is the remote unit of the APTr-513a flight data transmitter good visible🙂
20 November 2014, 16:51
Amazing. Ich habe jedes mal die bilden angesehen . Es ist unfassbar, unglaublich
Was Du dar creeert....respekt
20 November 2014, 17:17
I'm glad you like the cockpit. Today a little more...... cockpit. Paint coming soon🙂
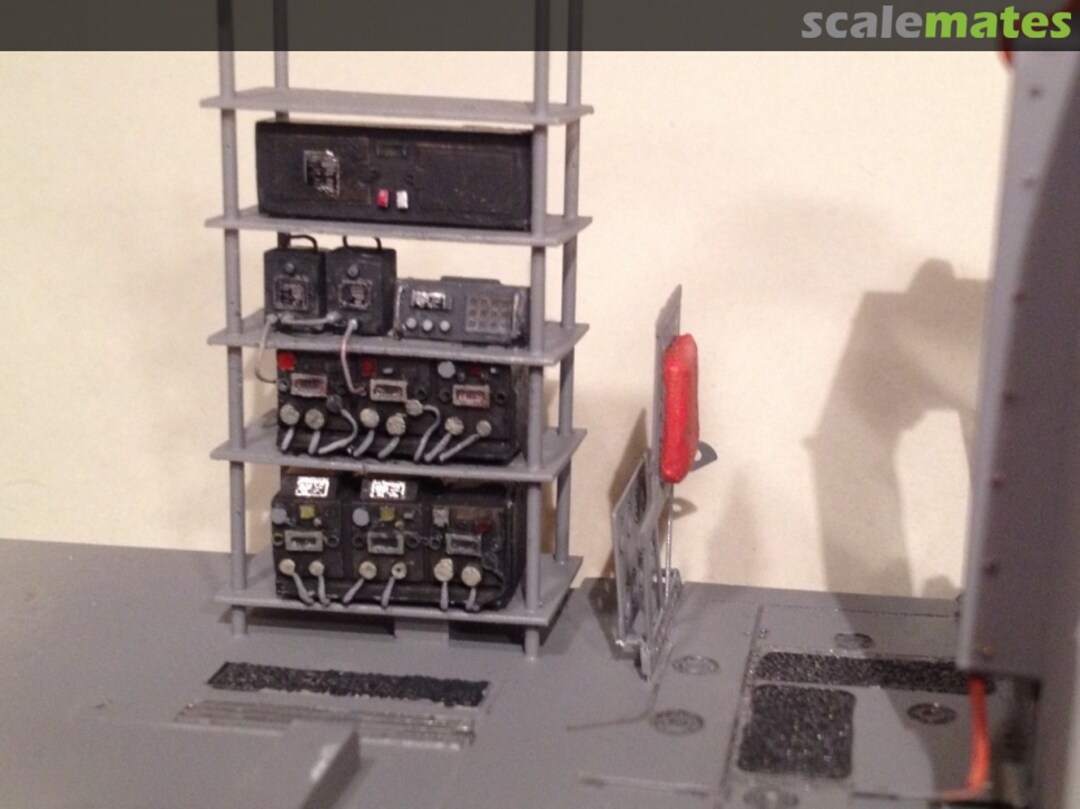
It's stunning of how many etched parts (Flighpath) a door/ladder can consist. What could have been in the cabin of an experimental helicopter? A lot of electronic equipment, in certainly several racks. But I'm only going to equip one. You can't see more thru the one large window and thru the cockpit anyway🙂
21 November 2014, 20:35
Your are welcome Mates. As promised a little bit electronic equipment and paint🙂
22 November 2014, 20:01
What the f***? Bernhard, einfach Wahnsinn was du hier zauberst!
22 November 2014, 21:35
es ist immer wieder ein Vergnügen deinen Berichten zu folgen , und ebenso ernüchternd , wenn man sich an diesen handwerklichen Lösungen versucht 😄 👍 👍 👍
23 November 2014, 06:51
Are you sure you have every fuse in your electronic rack😉 Excellent work so far! Christian
23 November 2014, 08:46
I have been looking forward to this moment for many weeks: the construction is slowly starting to look like a Seaking🙂
By the way: thank you for the nice comments, mates!
By the way 2: Edgars, what is afigek mean in English or German
Christian, wohl nicht, aber hab eine HE im Rack als Reserve gelassen-🙂
23 November 2014, 19:50
Afigeķ is like 'that is way too cool, I'm burning all my models and dropping off from school to go to Mexico'
23 November 2014, 20:07
Thank you very much mates. Finally all the glueing and filling (yesterday and today the underside of the bow and radome) is done: now I starting on the filling of the back fuselage.
29 November 2014, 12:42
Tanks Choppa. Yesterday and today I spent about two hours to glue and sand the balsa inlets.
30 November 2014, 16:30
It was easier that I though: 2 of 3 sheets are in place, 1 of 3 sanded into shape. I decided not to glue the whole part at once but divided them into 3 parts for easier glueing. The fit to the Hasegawa fuselage is 8 of 10. I think it will not be so difficult to combine them.
30 November 2014, 19:51
Massive effort building this one, it has certainly been worth the effort Bernhard, keep up the amazing work.
5 December 2014, 21:01
Fantastic tutorial on advanced scale modeling, infotainment style - from research and planning to execution, demonstrating how to use mixed materials and spare parts. Truly helpful and inspiring. Thanks for sharing!
6 December 2014, 11:44
I'm glad that my pictures are helpful.
Today sculpting of the stabilizer:
For better contrast I used parts of horizontal stabilizer of Hellers F4U-7 (blue). I'm not going to build it anyway🙂. The plastic parts needed to roughly form the shape are clearly visible. Finishing is coming soon after the CA glue hardened.
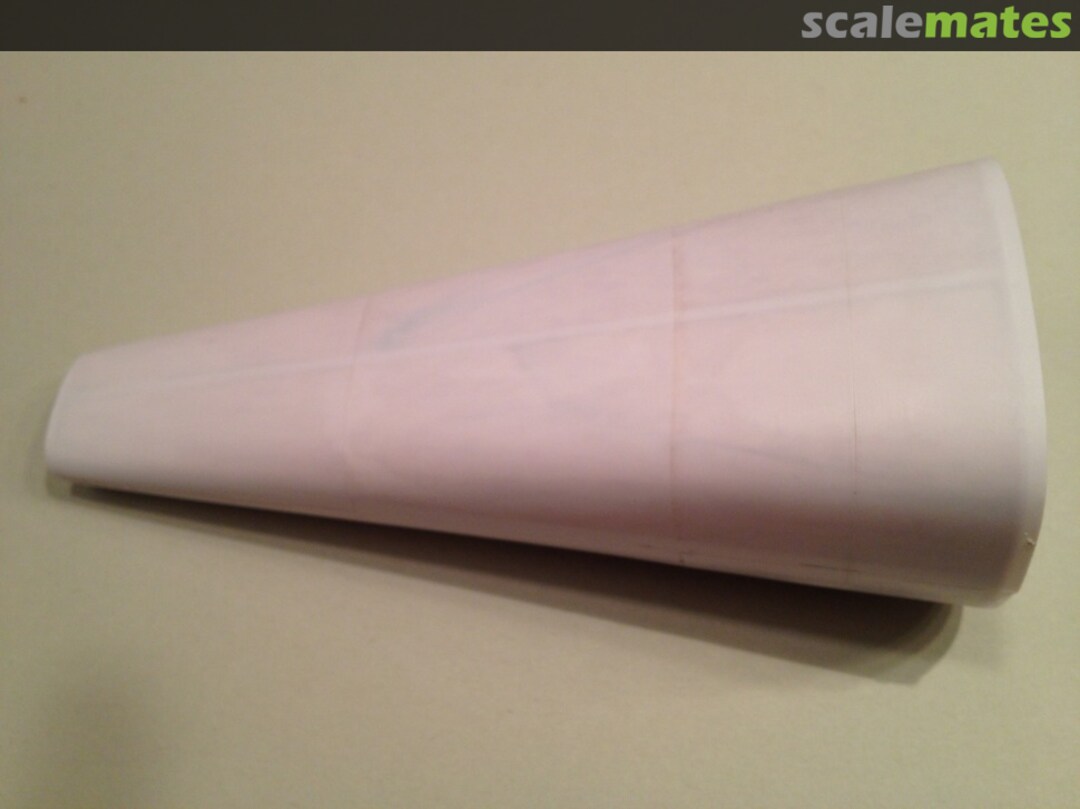
The shape of the first drop-shaped fairing turned out wrong🙁. So I did it again. The olive colored part is the spare spinner from a I-16 Rata.
6 December 2014, 15:25
Moin Edgars & Christian🙂 ich freue mich auch schon. Das Anpassen des Hecks an den Hinterrumpf ging erstaunlich schnell und einfach!
Approximate 2 cubic cm of CA-glue and a lot of plastic: tail & rear fuselage are married🙂
The housing of the drive shaft for the tail rotor in place. I did not yet fix the last 3-4 cm to make it easier later to fit the part to the forward fuselage.
10 December 2014, 21:33
Uffffff I'm very surprised how much work is needed to build a small plastic piece and fit it to the rest..... (Dorsal fin/tail wheel support)
11 December 2014, 20:19
I believe you Bernhard! I do not know how you're not stressed out ... Really a huge work👍
13 December 2014, 16:34
Amazing amount of detail work! Fantastic to watch this come together.
13 December 2014, 19:06
Two coats Mr. Surfacer 500 later: I'm very content with the result🙂 Only the rivets could be more visible...
13 December 2014, 19:53
Dobry wieczór Mates (this is Polish for good evening). I was so tired of glueing, sanding, polishing, filling and sanding again... I feel like a bloody dentist! So I just had to start to do some airbrushing here and there. I think I'm going to airbrush the engine housing red before mounting the wings and sponsons. It will be easier to handle.
20 December 2014, 21:26
Labvakar, Bernard (that's Latvian for good evening) Nice looking progress so far, can't wait to see it painted 🙂
21 December 2014, 12:30
Edgars; especially for you: there are to few models in pink. Here we go🙂
21 December 2014, 17:30
I'm stunned how durable my 15 years old Iwata airbrush is. As usual I used Humbrol enamels. In my experience the best base for red is a mix of light gray and red (1/3 H131,1/3 H129 and 1/3 H174). It covers very well the different colours of different materials and is optimal for sanding of red. If I sand too much on red, I don't get down to white, or grey but to a similar color (pink).
22 December 2014, 11:00
Your approach to painting and decaling is inspiring. Breaking up and mixing the phases of building, painting and decaling is something I'll explore in the future. 🙂
23 December 2014, 10:36
Burkhard: das "hin und her Springen" resultiert meistens aus den Überlegungen heraus, wann ist es am leichtesten etwas zu machen. Die Flügel wären mir jetzt nur im Wege... Deswegen müssen sie warten. Heute habe ich den Hinterrumpf lackiert. Die erste Metalizer-Sealer Schicht diente nur zur Kontrolle beim Verschleifen mit 3600 und 4000 micromesh. Ohne Farbe sah die weiße Oberfläche OK aus, aber die Riefen hättest du wirklich nicht sehen wollen, die sich nach der 1. Schicht zeigten. Hab eine ganze Stunde herumpoliert und war heil froh, dass ich den Rumpf gut halten konnte.
Melde mich für Weihnachten ab und wünsche allen ein erholsames, ruhiges und vor allem trockenes Weihnachtsfest.
I wish you a merry and happy Christmas.
Wesołych, spokojnych oraz zdrowych świat Bożego Narodzenia.
23 December 2014, 21:51
Viel Spaß bei basteln .... Frohe Weihnachten - a merry christmas to you
23 December 2014, 22:03
Today I was very relieved that my worst fear did not come true: merging of the fuselage, the lower wings (via fairings made of ureol). "It all went superbly because I made an experiment: I produced a "colour optimated filler" that I could use for airbrushing from 1/3 Mr Surfacer 500, 1/3 my special alu-mix (based on Testors Metalizer and Sealer) and 1/3 Gunzes Mr Thinner.
28 December 2014, 20:12
Tell us more about this colour optimised filler! It sounds very interesting indeed. And it looks fantastic! 🙂
28 December 2014, 20:16
Hi Mates: thank you.
Bill: off course I could tell you a bit more about this. Basically I enjoy experimenting with different materials and mixing different paints, fluids etc. already many years ago I had an idea to mix the Testors Metalizer (non buffing product) with the Mr Metal from Gunze Sangyo (buffing product) hoping that the mixture would have quality of both basic products. Indeed it turned out, that more buffing means more shine. In the next step I had the idea to add the Sealer from Testors to give the mixture the "filling power". This also worked very good for sanding-scratches. With this project this method did not work because I did not only have scratches but all pores (in ureol). But the pores were closed very well by Mr Surfacer 500 (light grey). Then it came to my mind to mix my special mixture with Mr Surfacer. After airbrushing the surface was grey-metallic but after a little sanding: polishing with Micro mesh 3600 I had a very shiny dark metallic finish. Nearly all pores were gone. I suppose that the very shiny effect is because of the Mr Metal part that tends to be little "smeary". Got it?
29 December 2014, 21:37
Dr. Bernhard the Chemist! Thank you, I now understand exactly what you wanted to achieve. I must now try the same thing, I like experimenting, especially when someone else has worked it all out ahead of time! 🙂
29 December 2014, 21:42
It is always good to see there are more crazy guys out there. Not just me.
30 December 2014, 08:47
The heli now has an name: NH-3A, 148033. In the spare box I have tons of decals but never the correct size or colour. So I made up the "3" from a "B".
What used to be red (for technical reason, spray dust) is now aluminum. But red is correct: arrgghhhh! That what you get if you don't look right.
30 December 2014, 09:50
Happy new year!
An exciting moment on the first day of the new year; how are the windows going to look after I tags off the masking. 8-9 of 10 because the CA glue did not quite do what it should have done (a little bit of fog on the inside of middle window). Despite that I'm happy with the result. It is better to end the day on a note of success so I'm going to glue the wings tomorrow. See ya!
1 January 2015, 20:19
That is more that outstanding! You are one of the 5 Modelling Gods of Scalemates 😄
1 January 2015, 23:30
Mates; you make me speechless!!!🙂 THX
Fuselage is ready and painted, the wings are attached without accident-🙂 I have been waiting for this moment for more than 12 weeks!
2 January 2015, 10:21
This is again an outstanding masterpiece.
I should start looking for a new hobby .... 🙂
2 January 2015, 11:22
Here we have the first Grandmaster of Scalemates 👍👍👍👍👍😎
I'll keep watching and learning.
2 January 2015, 12:44
Unique model and an outstanding work Bernhard! I lift my hat! By the way, photo 149 the side window looks steamed or is this a rest of masking tape?
2 January 2015, 14:34
Thank you!!!
Christian: it is masking tape applied from inside🙂. The small window will be inserted from outside but only after I got rid of the little particles inside the cockpit.
I have just tried something and would like to share it with you. Between the left wing and its fairing remains a little gap. I mixed a little bit of aluminum-pigment from Gunzes Mr Metall (toothpastelike stuff from the bottom of the glass) with Future and filled it into the gap. Very smooth, no leftover substance. Hint: after mixing you have only one minute or so to use it.
2 January 2015, 14:50
Hi Bernhard, ok understand!
A good idea while working on a finished model. I use PVA glue for example to fill small gaps on my ship models.
2 January 2015, 14:56
Wow... excellent project, well executed, lets see your grand finale.
2 January 2015, 17:42
I'm very stunned: in only two hours I managed to make and fit the windows and fit the landing gear and all small parts!
3 January 2015, 18:36
Next step is the main rotor. Fortunately the blades are fixed without folding functionality (not so much work as with the Mk-41 Seaking🙂 ). In the internet I found only one usable walkaround from a Seaking with such a rotor.
primeportal.net/hang..l_lee2/s-61n_hl9287/
But there are not enough pictures for me. Does anyone have more detailed information?
3 January 2015, 21:31
The main rotor of the NH-3 does not seem to have the bifilar vibration absorbers the S-61 in the walkaround is sporting.
3 January 2015, 23:05
It looks like the rotor head was a straight SH-3A head with the folding mech removed.
I think this head is close, you'll have to picture it without bifilar absorbers..
[img1]
Now.. also.. I found some documentation on it that might help..
dropbox.com/s/9kxogpru0ripkpl/726764.pdf?dl=0
3 January 2015, 23:26

Thank you Burkhard, thank you Augie. Every picture helps. Now I have a "plan". The first parts are already in place. I shamelessly copied from a Mk-41 Seaking in 1:72 that I found on Scalemates....🙂
4 January 2015, 21:12
Mmmmhh, that remind me to something I have seen here a short while ago😉
5 January 2015, 17:28
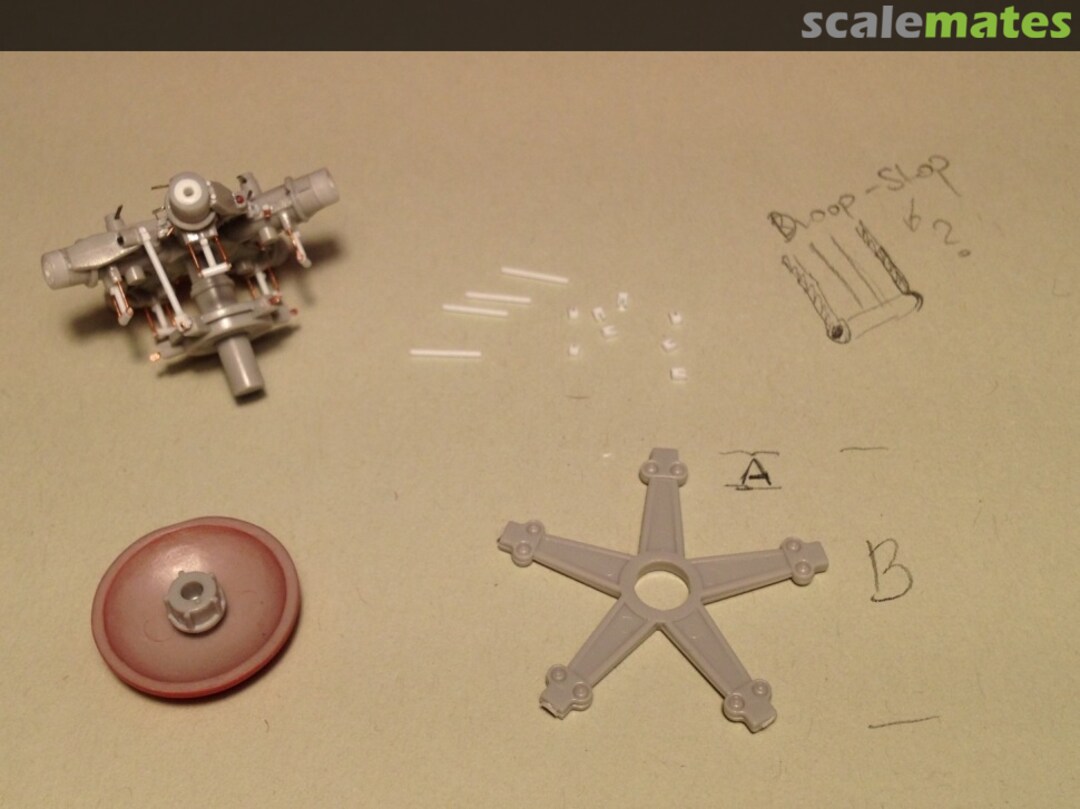
Any parts later again....
Danke für "Bifilar-Dingsda-Support" Burkhard. Dass es Dämpfer sind, ist mir bewusst aber was machen die denn genau? Wieviel von dem sternförmigen Teil muss weg? Alles oder nur der Teil, welchen ich mit A markiert habe? Meinst du mit droop-stops die Teile, die aus Draht und Rundstäben sind? Mein technisches Helicopter-Englisch hinkt auf beiden Beinen🙂 Was machen diese Teile denn genau?
5 January 2015, 20:01
Meines Wissens der ganze Stern. Warte mal, ich schaue mal in den alten JANE's nach...
5 January 2015, 20:07
I just sit here and can't say anything. I simply, freaking, don't know what to say..
5 January 2015, 21:59
Bernhard, have you considered having a sanity check? This is one "crazy" build! I am completely impressed! 👍 🙂
5 January 2015, 22:15
YEP! Bernhard is CRAZY!!! But in a good kind of way. Fantastic work mate! 🙂
6 January 2015, 13:15
We really need to get this a special icon for by his name.. I mean its simply amazing
10 January 2015, 18:16
Great idea, Augie! It could be great to find outstanding (VIP) modelers in search and follow their builds!
Bernhard, you still impressing me a lot 🙂
11 January 2015, 08:54
When ready, you should send some photos to the Sikorsky online archive. They'll love to have them.
11 January 2015, 12:04
Augie, how about a surgeons operating kit, after all that is what Bernhard is, surgeon on plastic.
11 January 2015, 20:33
Isn't 'plastic surgeon' the technical term for a beauty surgeon? Well in place. 🙂
11 January 2015, 21:54
Lol, well Bernhard is certainly a surgeon.. perhaps crossed paint brushes for the experts 😄
11 January 2015, 22:29
Or a bottle of styrene glue and paint brush crossed with an Xacto knife. Modeler's adaptation of a Jolly Roger flag.
12 January 2015, 16:57
Mich haut es aus den Socken! Sehr sehr geil geworden und echte Modellbaukunst! "verbeug" 👍 👍
12 January 2015, 20:33
Was soll man sagen? Ein echtes Unikat welches von der Kreativität des Erbauers zeugt. Ein absolutes Highlight! Ich wünschte das könnte ich auch. 100 von zehn möglichen Punkten!
12 January 2015, 20:53
Bernard, I am wondering if you have built this outstanding model based on fact or your imagination. ?
Either way mate, your skills are to be admired and I do believe that you should do what Burkhard D suggested and send some images to the Sikorsky online archive, as I am sure they would be most impressed, as all of us are. Just fantastic. 🙂
12 January 2015, 21:00
A W E S O M E !!!! 👍👍👍👍👍👍👍👍
After all that surgery such a clean build with that fine surface detail, unbelievable. It is probably totally unique. Photography is top noch as well.
Chapeau!!!
12 January 2015, 21:56
Bernhard, this is your finest work yet. Simply stunning, nothing more can be said. Thank you for sharing the build. 🙂
12 January 2015, 22:15
Wow! Fantastic! Great Job, Bernhard! Was great watching you building this unique model!
13 January 2015, 03:52
Great work mate, it looks outstanding and so much work put into it.
13 January 2015, 07:04
Hallo Bernhard, da ist Dir ja wieder ein Spitzenmodell gelungen. War schön zuzuschauen. Viele Grüße Stefan
13 January 2015, 07:56
Many thanks for letting me watch and learn, BSH! This is one of the most ugliest Helo´s i´ve ever seen, but just for watching you, making rotorheads is worth the bleeding eyes!😢
13 January 2015, 09:13
Followed this one from the sideline and mostly speechless... superb work and congrats with this one...
13 January 2015, 10:28
Kann mir mal jemand helfen, bekomm meinen Mund nicht mehr zu 🙂.... Wahnsinn das Teil, ich würde sowas nicht mal in 1/32 hinbekommen
13 January 2015, 11:48
Bernhard, a really fast build with all the scratch build parts, modifications and – not least excellent quality. I lift my hat of your work!
13 January 2015, 17:15
Wahrscheinlich wurde in den vorangegangenen 188 Kommentaren alles geschrieben, was es zu diesem unglaublichen Projekt zu schreiben gibt. Von mir deshalb nur folgendes: Es hat mir sehr viel Spaß gemacht, den Bau zu verfolgen und gratuliere Dir herzlich zum Endergebnis. Einfach großartig!
13 January 2015, 17:31
Bernhard, you should be so pleased with your efforts, magnificent work
13 January 2015, 20:35
To be honest, I was quite speechless by the number and content of the comments. While I was reading and enjoying them, there were new ones coming in🙂🙂🙂🙂.
I had no idea it is possible to say "I like this" in so many different ways. I am using only one way to say thank you: thank you🙂
I followed your suggestion to contact Sikorsky Archives and they already replied. The archivist even mentioned the possibility to use my pictures in a forthcoming modeling portfolio.
13 January 2015, 21:00
Very few models can be photographed this close up and not reveal flaws, Outstanding! About as close to perfect as you can get.
13 January 2015, 21:06
Simply incredible work Bernhard! This is museum quality, and you photography skills are also excellent. I know that the curator at either the Igor I. Sikorsky Historical Archives (museum) in Stratford, Connecticutt or the American Helicopter Museum in West Chester, Pennsylvania would love to show case this beautiful piece of work and history!
18 January 2015, 16:58
Fantastic job Bernhard, Whats next... I'd like to see a Sikorsky S-72 RSRA or a Hughes XH-17 or a Boeing XCH-62 maybe!!! ??? 🙂
18 January 2015, 23:12
@ Glenn, No a B-58 Hustler, cant wait to see what Bernhard would do to that beauty!
19 January 2015, 02:06
I had the chance to see this masterpiece yesterday live.
What can I say?
Maybe that even the fantastic photos are not really showing the unbelievable level of detail in build and paint.
I can tell you this is an absolute WOOOWWW!
24 January 2015, 11:44
Yes, we had Bernhard as the guest star at our bi-monthly club event. That was fantastic. It turned out that all the detail on his Seaking Mk.41 are MUCH smaller than what the macro photos here on Scalemates suggest. Seeing a rotor head in 1/72 complete with hydraulic lines and and even the tiniest nuts and bolts was stunning. The NH-3 nicely portraits stressed skin effect from differential polishing along the spars and stringers of the wings, something not visible in the photos here.
Thanks again for visiting, Bernhard! 👍👍👍
24 January 2015, 18:20
Absolutely stunning, Bernhard. I would really love to see your models in the flesh again - last time we've met was some 15 years ago in Cologne, if I remember correctly...
20 March 2019, 14:45
I've been wanting to do this in 1/72 - along with a version of the Bell Model 533 - and this is an amazing reference! And such a beautiful model, bravo Bernhard!
4 December 2021, 20:40
Zac unburied it. Thanks for that. Incredible build! Insane detailling. Interesting techniques. Perfect finish.
4 December 2021, 20:55
Das Ding ist immer noch der absolute ober-Hammer, und sieht dabei auch noch unglaublich elegant aus !
These scratchbuilt engine pods are still unbelievably superb !
4 December 2021, 20:56
Excellent job! Wow! Meticulously executed details, absolutely clean execution, just pure beauty!!!
4 December 2021, 21:03
A second wave of comments...🙂. Thank you. I build this heli 6!! years ago?? Unbelievable...
6 December 2021, 06:22
Wieder mal ein tolles Projekt der Vogel, Excelent gemacht! Ein echter Schrock eben.
6 December 2021, 07:56
Album info
The first flight occurred on May 21, 1965.... I was just 10 days old...


