

Junkers G.23 (CH 132)


Comments
1 5 August 2017, 14:21
Mounted the cockpit and the passenger cabin, next step - closing the fuselage
26 August 2017, 21:03
I've got one on the 'to do' list, so keen to see how it's done - cheers
27 August 2017, 02:41
Mounted the mid engine and the stabiliser today. The mid engine cowling fit isn't the best one - there is some filling needed around the cockpit too.
30 August 2017, 19:42
Thx folks. Yes, it reminds me the old cars' bonnet😉
Btw. found the first error in the instruction - parts 20&21 should be exchanged with each other.
31 August 2017, 06:08
looks good so far... cleaning up te cockpit exterior will be a though job...
31 August 2017, 07:14
Welcome Bart. Luckily I'm intending to use the Perfect Putty to fill all the holes close to the cockpit, so I can wash it off using water (I already mentioned it somewhere - the inventors of this putty should get a Nobel Prize! 🙂 )
31 August 2017, 08:15
Wow, that looks good! I like your scratching of the corrugated steel for the inside panels! Looks really good so far!
31 August 2017, 08:33
Thanks, it's not the level of Valiant/Stratojets you know😉
I saw the idea for making corrugated steel out of alu foil on some Polish modelling forums and I find it v.useful and easy (you need only the foil and a toothpick). However the product is very delicate and handling must be done with great care.
31 August 2017, 11:16
Thank you gentlemen 🙂 I had to stabilise the stabiliser as you can see 🙂
Currently working on the wings - I try to thin down the trailing edge, but I have already done some damage during cutting the wings, so I have to fix the corrugated surface later on (that's gonna be a real challenge). Btw. - I'm not gonna fix the shape issues (the wings are bit too wide and the rear fuselage section is too high).
15 September 2017, 15:38
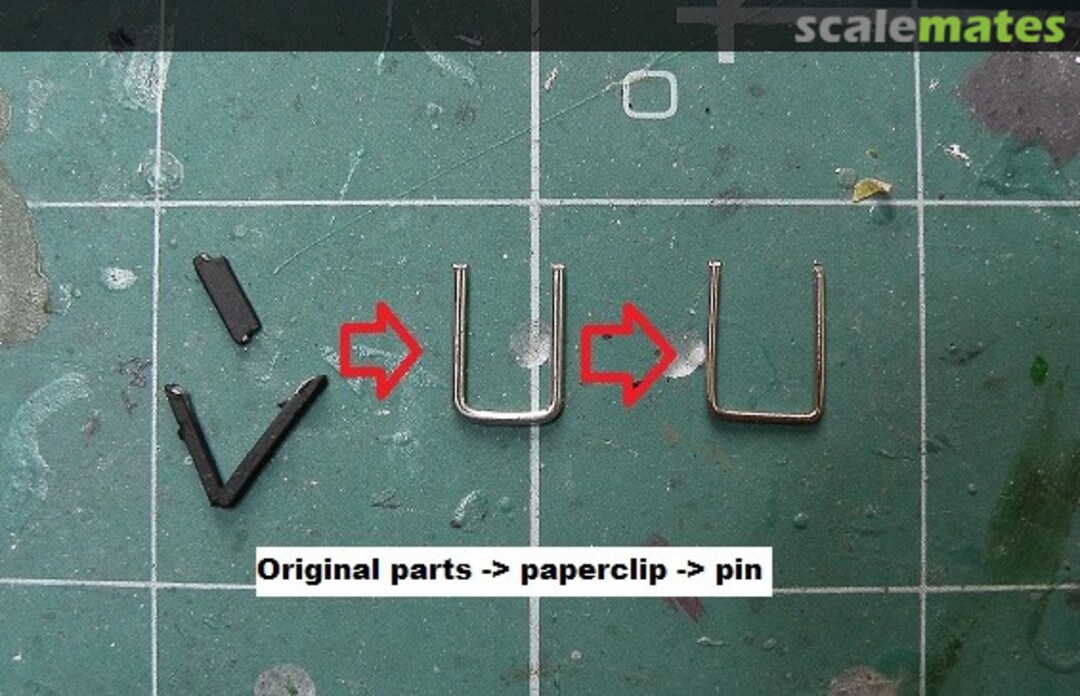
Dryfitted fuselage and wings today (after completing last engines) - few gaps require filling and reverse engineering of the corrugated surface (still didn't decide between alu foil or the thinnest evergreen plate). Also I had to rebuild three hinges on the wings (white dots).
24 September 2017, 19:28
That looks like you had alot of work to do! Looks like it's on a really good way!
24 September 2017, 20:12
Thanks, currently trying to fill the part of the wing damaged during sanding using the alu foil
8 October 2017, 13:41
Been fighting with the wing and the small fuselage details. The alu foil for the wing turned out to be too soft and I simply scribed an evergreen plate instead.
Last pic: the DDR kit doesn't seem to be very symmetrical... 🙁
Next: joining the wings with the fuselage and mounting the undercarriage.
25 October 2017, 17:29
Small update - corrected the stabilisers, attached the wings and undercarriage legs, currently scratchbuilding the cabin steps.
11 November 2017, 11:00
Thanks folks. Maybe I'll disappoint you, but I'm gonna stop detailing at this point.
Slowly thinking how to paint that beast, probably first will be black and then aluminium.
I found the original decals very well designed and the curved border between black and alu (below the cockpit) will come from the original decal set 🙂
Kudos for the East-German decal designer, they are much better that the An-14 ones 👍
11 November 2017, 18:03
Progress looks good, maybe some small Changestraat, but in the end they lift the model up. Curious how you will clean the gap between the Parts before the cockpit
11 November 2017, 20:21
Looks great, Lukasz! Good job on the replacement trailing edge and the new steps will look much better than the kit parts.
12 November 2017, 00:07
Thanks Gordon, but I have to tell you the trailing edge was a pain in the ass to be honest😉
12 November 2017, 08:53
The replaced steps are such an awesome improvement, great work and a very god looking outcome!
12 November 2017, 09:11
Thanks, usually the macro makes the details look worse that in reality, but this time it's exactly the other way around 🙂
12 November 2017, 16:46
Bunch of news: sprayed using black and alu. Started decalling, but there are issues, will try to fix them using leftovers from An-14 kit. If that doesn't help, will overspray the stripes using Revell Feuerrot (seems to beexactly the same). Currently another layer of the decal softener is drying - it will take few evenings to fit the corrugated surface...
27 November 2017, 19:00
Thanks Martin. The Plastikart decals work surprisingly well with the softeners, however decalling of this kit should go the other way around - longer strips from the top, exactly opposite way as instruction suggests. Now it's time to fix it.
27 November 2017, 19:07
Thanks Dave, I love that alu paint too (it's the now-extinct Revell airbrush enamel in the yellow-sticker-jar)
28 November 2017, 07:11
Hm, not almost, the fight has just begun... 🙁
The decals still don't want to fit the corrugated surface everywhere. So I gave up the idea of putting more decals (from An-14 kit). The leading edge is the worst part - even my camera desn't want to focus on it...
Instead I bought Revell 31 enamel and started brushing here and there. In the meantime I prepared the propellers - I came up with an idea to spray them multiple layers of transparent orange & brown to cover the pattern I made using a marker.
3 December 2017, 09:09
the thing I do is putting the decals on the spot with water, then press them down with a semi soft flat brush and press the water out from the middle to the outside. When this is done, I apply some decalsetting (Daco, the nr1 for me) onto the brush (not much) and wet the decal, then I press it slightly around the details with the brush, also from the middle to the outside to avoid air underneath. I've found this is better to guide the decal around the details. This I repeat several times till I'm satisfied...
You can also work with a hairdryer on the lowest setting to heat the decal a bit to make it softer before you begin...
4 December 2017, 08:35
I tried to soften the decals for last 2 weeks - the result can be seen on pic 40 - can't get better result, when I squeeze the decals more, they break and get holes... On the other hand I managed to paint the propellers using black CD marker and the brown furniture marker. I like the result, but was wondering whether it looks convincing for the others too - so please have your say 🙂
PS. The red bands are covered with a thin layer of Revell 31 enamel to make it looks uniform everywhere.
17 December 2017, 09:53
Agreed , the props look great. I think those decals look fine also (the fuselage ones are adhered as well as they can IMHO).
17 December 2017, 13:12
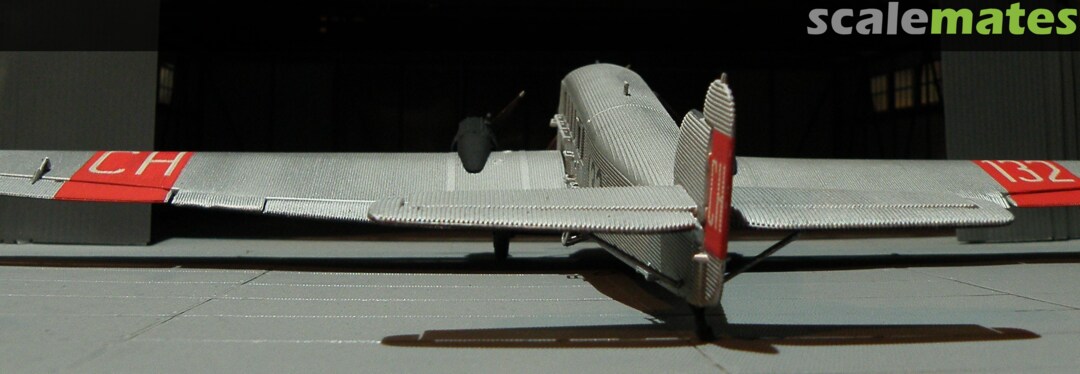
Finished, unfortunately it's so big, that it couldn't squeeze it into the stand while taking pics😉
25 December 2017, 16:54
Wow, wonderful and very impressive! The finished model is great- and it´s such a rarely seen subject.
All the efforts you have done did pay off!
25 December 2017, 17:46
Thanks Roland for your kind comment 🙂
I have to add that I recommend (for the next builders of that kit) to cut out the white digits and numbers out of the red wing stripes and paint the red part - if I'd do that, the result could be much better.
25 December 2017, 18:51
Great! The props look like you made them from very expensive tropical wood. And good job on the decals!
25 December 2017, 18:54
Thanks Dave, it turns out that 2€ furniture marker can do the trick much better than any paint😉
25 December 2017, 18:54
In case you'd like to repeat:
- first step was to draw the thin black lines with a thin CD marker and let it dry
- than I took that 2€ Lidl marker and applied several thin layers, the markers react with each othr, so the black lines blend with the brown layer
- I repeated it few times, then sealed with Citadel satin varnish
- then added another thin brown layer
- and sealed it finally once again
That's all
25 December 2017, 18:58
turned out very nice! I always observe that the little imperfections which haunted me during the build get forgotten in the weeks, months and years to come 🙂 Merry Christmas to you
25 December 2017, 20:44
Thanks a lot. As you can see the hangar is too small sometimes😉
26 December 2017, 09:01

