

Wonga Bonga


Comments
10 December 2017, 11:12
Welcome Rui!
I think the Sopwith Camel is the WnW model with the most cockpit rigging I have. (clearly I don't have the felixstowe 😉 )
Surprising for such a small plane.
Starting on the bent undershield, 9 cables already!
7 January 2018, 11:50
I've 2 in my stash but unfortunately, no Wingnut Wings.
I'm a Panzer and other vehicles guy.
I also like the WWI and some WWII planes (but with almost none experience in these 1/32), so mainly I'm here to learn and enjoy😉
P.s. The rigging, looks to me, as the most difficult part?
7 January 2018, 13:18
Yes, I would probably agree there. Especially this kind of tiny cockpit rigging where you have to plan in detail how to go about it in order to reach and get the right tension in every bit.
I'm using Ezline, which is quite good.
The build and fit part of these kits is the easiest. With the WnW kits, the decalling can be a bit tricky. Not that there's anything wrong with the decals, -on the contrary. The decals are excellent. The challenges lie more in the size of the decals; -Some are extremely tiny and some huge.
7 January 2018, 21:37
Hi Peter definitely following along. I have just taken the plunge with WnW with the 'Le Rhone' Camel which is on order. Happy bunny. I thought the rigging didn't look too bad on the Camels but now you have me worried!! That cockpit looks fab.
7 January 2018, 21:52
Hi Mike,
I look at the interior rigging more like an experience and an excercise. Not much of it will be visible I suspect.
I would not be worried leaving bits of it out.
The tail could get a bit tricky I suspect, but nothing serious as far as I can tell.
Looking forward to following your Le Rhone Camel build!
Should be very little difference, except for the engine?
8 January 2018, 02:04
Rigging can be very tricky. Tom Grigat's got some tips: Youtube Video & Youtube Video
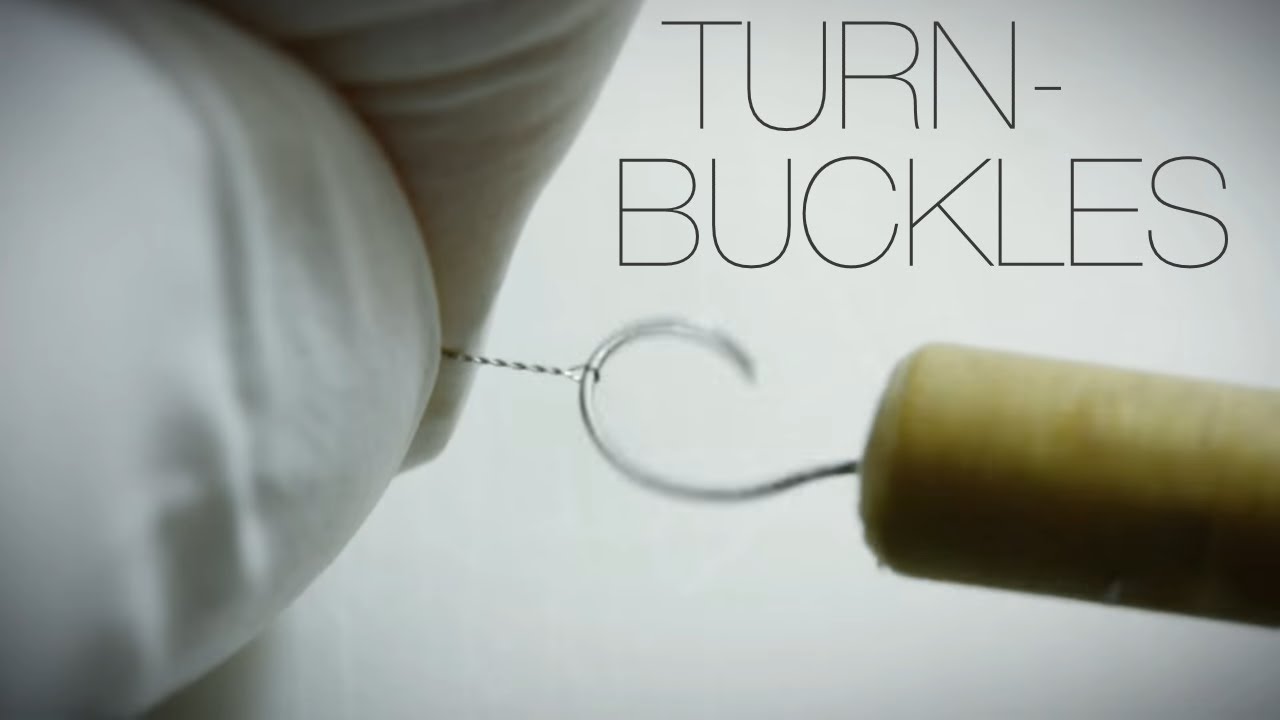
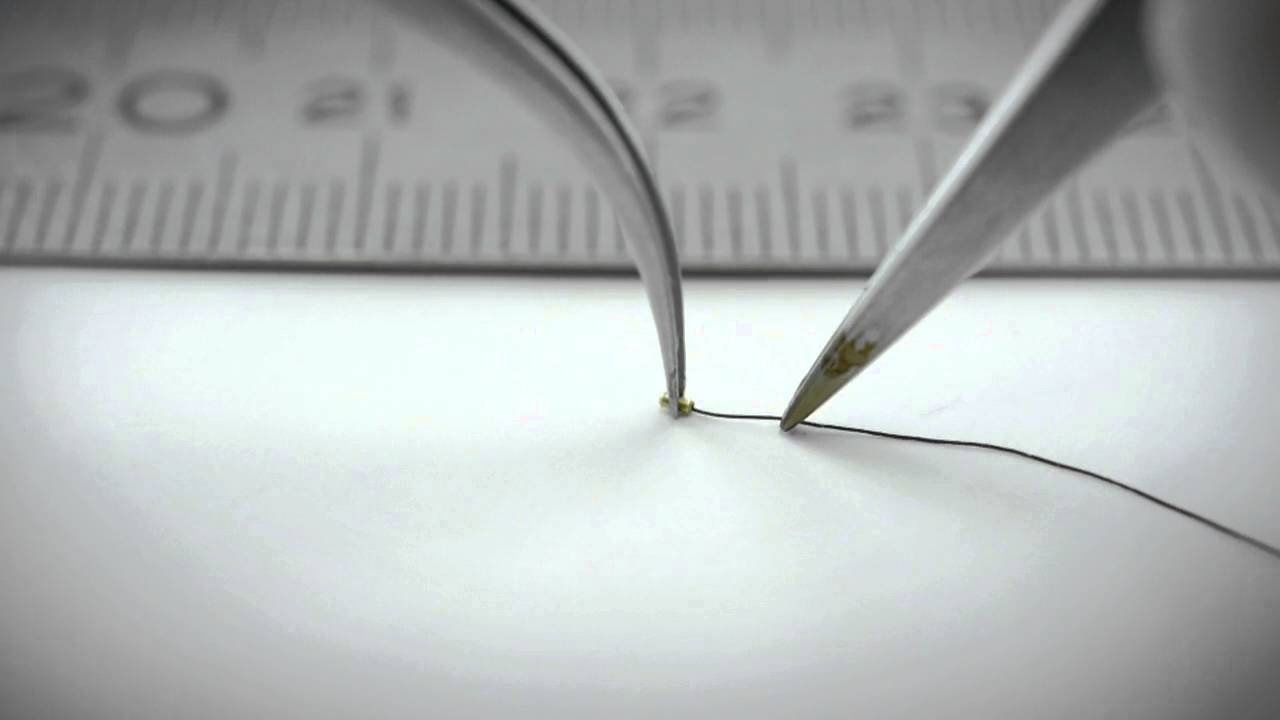
You can glue the EzLine or some other wire with superglue to the turnbuckle.
8 January 2018, 14:52
Are all those 'cables' at the bottom for the flaps/rudder etc ? rather than rigging per se ? Nice video Martin. I have seen Toms work before. Gives a very nice finish.
8 January 2018, 21:03
Hi Martin,
Thanks for the video links.
I have seen some from Uschi van der Rosten before. While you can certainly use turnbuckles on the internal cross bracing for the Camel, you have to be careful.
Firstly, for wing rigging, the Camel does not have turnbuckles.
Secondly, you have to be careful, or they will look out of scale.
Neat and cool looking detail, but out of scale.
I may simulate turnbuckles later on one of the larger German planes, using brass tubing..
8 January 2018, 22:17
Peter, whatever turns you on (intentional joke) 🙂
The video's were merely intended as inspirational, but I guess you knew that. I really like where you're going and I will follow this build as closely as possible. Keep it up 👍
8 January 2018, 22:24
Hi Mike,
The rudder controls contribute most of the cables here.
Each side of the rudder has two cables, plus one extra for steering the tail skid(!)
So 6 in total for the rudder.
The elevator has four cables in this picture.
Reason for this is the elevator cables run through two pulleys attached to the cross beam behind the air intake.
The middle ones will go to the control stick, the outer ones back to the elevator.
The aileron cables you can barely see.
They go from the top of the horn on the joystick axle, and down to the leading edge of the wing (where it later can be seen through an inspection window)
Lastly, the three cables attached to the aluminium is a representation of bracing cables that really should go through.
The middle one is for the landing gear. The ones on the sides are for floor cross bracing.
I have cheated a bit here and drilled through all floor timbers to just zig-zag all the floor cross bracings with two wires...
(so yeah, makes for a total of 15 lose ends on this last picture! That's before installing the joystick. Sadly, you'll see very little of this detail on the completed model)
8 January 2018, 22:52
I'm not on this level. When you think of it, you need many of the same skills as a surgeon to pull this off!!
8 January 2018, 22:58
Nice one Peter. Did you learn all of that from the WnW documentation or from previous experience ? That is amazing attention to detail. I must admit that I would be tempted to only put in those you can actually see. But I can see the attraction of trying to create an as authentic model as possible. Its usually pretty difficult to get your hands on that sort of high detail information ( unless you happen to have a Camel in your garden). Thats 1/32 i suppose. Mine is in the post - gulp!
8 January 2018, 23:53
I installed the fairlead beam so i could pull back on the cables leading aft.
Now I can at least see what I'm doing.
Also temporarily removed the air intakes which I luckily didn't glue.
Now I can use it's attatchment hole to pull at the landing gear bracing.. 🙂
8 January 2018, 23:57
Hi Mike,
The most of it is, as you will see, in the build instructions!
The WnW instruction booklet contains a wealth of information. There is a rigging diagram for the cockpit, as well as photos of a Camel during renovations at Vintage Aviator.
(seep pg 5 of the instructions: wingnutwings.com/ww/..uctid=3157&cat=4 )
There are also additional photos on the website:
wingnutwings.com/ww/..uctid=3157&cat=2
9 January 2018, 01:51
Thanks Peter. Getting good authentic info is so helpful, especially on WW1 aircraft as so few photos exist.
9 January 2018, 09:31
Wicker seat and tank done. Dryfitting in cockpit. Joystick also done. Next: seatbelts, then time to glue this cockpit together..
10 January 2018, 12:30
I can see two sinkholes on top of the framing! Shock horror!
-Better now than after closing the fuselage I guess.. :-/
10 January 2018, 12:33
Nice work so far, I've thought that on the fokker DR.I the airinlet for the engine was also behind the engine, in the 2 holes in the sideplates
10 January 2018, 16:24
Hi Bart,
I think for any rotating engine, the intake has to be at the back of the engine since the carburetor is in the axle.
What I think looks odd on the Camel is that the air intake is a large horizontal pipe running across the cockpit between the instrument panel and the pilot...
I guess you put things where there's room.. 😉
10 January 2018, 23:09
Hmm, wonder what this is?:
wingnutwings.com/ww/product?productid=3180
Given that clues for the next release are often in the background of the boxart of the previous release, perhaps something like this?:
facebook.com/1075528../?type=3&theater
11 January 2018, 05:24
I ordered an FE2b :-o
Rigging sanity challenger! 😉
Sadly it arrived with the box only half full.
7 sprues were missing!
On the positive side they (Weta) sent a replacement. A whole new kit.
I now feel the need to find something to do with the incomplete kit...
It has the fuselage (minus the bottom and the engine)
The wings (minus the struts)
The tail and booms (minus the cross beams and the elevator surfaces)
The clear sprue is missing. Also, the landing gear and the armament is missing..
Crash diorama? -or scratch missing pieces and build two?(!)
Need the struts and the gear, mainly, for a full build. (oh, and elevator control surfaces.)
The engine is available separately, as is the armament..
Hmm... -careful choice of variants..?
22 January 2018, 23:21
Yaaa. I want the WnW Fe2b. Like you say - mental rigging. Already watching.
Love the leather seat in the Camel.
23 January 2018, 00:08
Looks like they may have inadvertently supplied an exercise kit to practice on.. 🙂
The British rigging is a bit special in that it uses flat rigging wire.
Luckily I will get some practise with this on the Camel.. 🙂
23 January 2018, 00:25
a dismantled casco? Nice gesture to provide a new kit altogether...
23 January 2018, 08:25
Very nice of them indeed. This was not technically from WnW, but from Weta. They seem to deal more in much more expensive collectables, where a replacement could easily be in the thousands of dollars.
Though, they did have some additional problems with my order. I ordered a different plane, paid, got shipment confirmation and then, later got an email that they had run out of that kit.
I picked this one as a replacement, which then arrived with the box half full.
So sending a whole new kit i probably compensation for all of this..
With a bit of effort, I can eke out two for the price of one out of this! 🙂
In the end, happy customer! 🙂
I ordered a Beardmore engine, if I build different versions, one clear sprue and one set of armaments can cover the needs of both kits. The fuselage bottom is completely flat, so that's easy to make.
Leaves the landing gear, the wing struts and the elevator control surfaces to scratch..
23 January 2018, 22:57
And, back to the Camel.
Decalling the tail, + some painting experiments.
23 January 2018, 23:08
OMG, this is attention to detail if i have seen one. i did not know how WnW was... amazing job you are doing.
29 January 2018, 06:29
Thanks,
Yes, the seatbelt is a bit crude design.
Really wide, only tied around two cross timbers under the seat.
Still flying Camels don't seem to use these period seatbelts.. 🙂
Probably not a very good design.
29 January 2018, 21:13
That is so realistic.Worth spending the time on all those control lines. Looks great.
29 January 2018, 22:57
-And on another note, Uschi van der Rosten just reported the new Wingnut kit is Junkers D1
31 January 2018, 09:46
Painting the engine. I dryfitted a bit as well to make sure the wings still fit.
I had to scrape some paint off to fit the lower wing.
3 February 2018, 09:57
I think I have done about 75 rigging lines so far and still haven't started on the wings yet... :-o
5 February 2018, 12:23
An attempt at the elusive PC10 colour.
I did some pre-shading. In fact spent an hour masking rib tapes for it. However, it is now barely visible.
7 February 2018, 21:31
I think that colour wise that looks about right Peter, if Dave Johnsons build on the WnW site is a good guide. Are you going to varnish it ? That would help to bring out the highlights and brighten up the texture. Nice prop!
wingnutwings.com/ww/..uctid=3157&cat=5
7 February 2018, 21:48
Thanks Mike,
I'll give it some very light olive accentuations with the airbrush I think, then we'll see after decalling. I don't want to put too many coats on, since the surface detail is so fine. Could easily get hidden by paint/too much clear. I've had some good experience with hand brushing very diluted acrylic clear.
Come to think of it, there are both half a fuselage and a wing section left in the box to experiment on... 🙂
8 February 2018, 02:20
Attaching the wing requires some extra putty and sanding.
Not been ably to put much time into the build recently, mostly slowly advancing with minor things that do not really need new photos.
Anyways, here's a picture of the wheels so far, not even these are actually done. Needs some clear and some more weathering.
27 February 2018, 01:39
Attach cabane strut rigging before attaching top of fuselage. The top of the fuselage blocks access to the strut eyelets.
2 March 2018, 09:12
Remember to decal the wings before attaching the ailerons or rudder horns! :-/
6 March 2018, 13:35
nice work.. weren't rubber wheels in that time more dark grey then black?
6 March 2018, 13:43
Thanks!
The tyres did end up a bit dark. They are supposed to be Nato Black according to the instructions, but I think I might need to lighten them a bit.
I have done some weathering on the wheel covers, but none on the actual tyres. Hopefully it will look lighter when done...
6 March 2018, 21:51
Thanks!
One of the main finishing touches remaining;
Adding the upper wing and rigging it.. :-D
9 March 2018, 10:19
Here we go. Lots of lines!
To be honest, I may be doing a jet next (!)
I was going to do the Gotha or the Taube, but maybe a bit later..
11 March 2018, 01:59
And the wing is on!
Not many details left now.
Windscreens, gunbarrels, a bit of weathering..
11 March 2018, 21:31
Thanks everyone. As some may have suspected, this was actually completed a while back. Sorry for the lack of pictures. I'm afraid I just neglected that part and went straight to opening the next kit box instead... :-/
6 May 2018, 00:56
Can't believe I missed this. What a fantastic build, very well done.
14 September 2018, 00:05
Thanks. It was a fun build. I recommend it! Surprising amount of rigging!
14 September 2018, 01:08
Peter, do you heave a sigh of relief or satisfaction when you finish a build like this? I think, if it were possible for me to build something like this, I would collapse in a pile of nervous relief. All credit to you Mate, Just brilliant!!!!!
14 September 2018, 01:24
Great looking Camel, Peter! Those Wingnut kits looks like they are well engineered.
14 September 2018, 02:48
Thanks guys!
The Wingnut kits are indeed very well engineered.
I keep doing dryfits, not to adjust and make the fit better as with other kits, no, the fit is usually perfect.
I keep making sure that I'm not ruining the fit in any way as I'm going along.
Famously, the Wingnut fit is so exact that even a thin coat of paint on mating surfaces can cause alignment problems.
-Peter; It is very satisfying to put a completed Wingnut model on the shelf, but also, the whole building process of these kits is a great experience. They have definitely put in effort to make it that way. Well researched options, great detail, fantastic instructions filled with plenty of references.
I keep taking the instructions out of the kits in my stash just to read. 🙂
The rigging is of course the tricky part, the sigh of relief is every time I let go of the Ez-line, and the CA holds the load! 🙂
I have been meaning to try different kinds of CA, but have not gotten around to it. Suspect the thin variety I'm using is not ideal...
(Accelerator does not work well for me)
14 September 2018, 23:56
Absolutely agree Peter. The WnW instruction booklets are fab. A lot of very hard to find historical information that is difficult to find elsewhere.
I have been using 'Gorilla' CA. Works well for me. Had a little tube that must have so far done about ten models. It is not runny at all and gives you a few seconds to move things around rather than being an instant bond.
15 September 2018, 00:47
I prefer it to cure fast. I'm using Zap thin CA. However, in drilled holes, it's a bit random how fast it cures. Sometimes it takes a minute or more, sometimes only seconds.
Trouble is, you can't tell until letting go of the line...
I had some issues with bonds cured with accelerator being weak, so I don't really trust it now.
Currently, I have resorted to working with a drop of glue on a piece of plastic that I have left out in the open for 15 minutes first.
Seems to be what works best for me so far...
15 September 2018, 03:33
Album info
An attempt at the elusive PC10 colour.
I did some pre-shading. In fact spent an hour masking rib tapes for it. However, it is now barely visible.

